Have you ever wished there was a quick fix to make updating software go more smoothly because you felt overwhelmed? Picture a system where your code integrates easily, is well-tested, and is deployed without problems. Would you be interested? That’s what happens when the magic of integrating Jenkins with GitHub works flawlessly.
While other technologies can produce results comparable to these, this blog post will reveal the precise procedures for integrating Jenkins with GitHub. Jump right in!
The synergy between Jenkins and GitHub emerges as a crucial dynamic for efficient software development. Jenkins is an open-source automation server that manages the whole code lifecycle, from development and testing to deployment. When combined with GitHub, an online platform that uses Git for version control and encourages collaborative development through pull requests, branching, and issue tracking, this synergy is amplified.
As we walk through the fundamentals of integrating Jenkins with GitHub, regardless of your experience level with this integration, you’ll see how these tools work together to create a solid foundation for Continuous Integration and Continuous Delivery (CI/CD).
Without further ado, let’s get into the blog and explore how the powerful combination of Jenkins with GitHub can transform your development workflow, making it more efficient and reliable!
- Summary of How to integrate Jenkins with GitHub
- What is Jenkins?
- What is GitHub?
- Jenkins with Github Architecture
- Setup Jenkins and other required tools
- Setup Github Sample Application Repository
- How to Integrate Jenkins with GitHub
- FAQs
Summary of How to Integrate Jenkins With GitHub
Now, let’s recap the steps taken to seamlessly integrate Jenkins with GitHub, bringing together these powerful tools for an efficient and automated CI CD pipeline.
- Create an Ubuntu 20.04 EC2 Instance on your AWS Account; if you don’t have an AWS Account, you can create a free tier account.
Or, you can create an Ubuntu 20.04 machine on a cloud platform of your preference. Remember that the software installation and machine access steps may vary in this scenario. - Open ports 22, 80, and 8080 for incoming connections on the designated EC2 Instance or chosen machine.
- Create a mandatory GitHub account.
- Install Jenkins, Java, Node.js, and Git on the specified EC2 Instance or machine.
- Initialize Jenkins with the Initial Password during the setup process.
- Install Docker for containerized sample application deployment.
- Create a GitHub Repository by cloning sample code from a reference repository, and create a Personal Access Token.
- Configure a Jenkins GitHub Webhook within the GitHub Repository for seamless integration with Jenkins.
- Create a Jenkins Pipeline, integrating the GitHub Repository into the pipeline structure.
- Validate the Jenkins Pipeline’s auto-trigger feature by committing changes to the connected GitHub Repository.
What is Jenkins?
Jenkins is an open-source, self-contained automation server that automates crucial software development, testing, and deployment processes. It is well known for being extensible and flexible and for handling a range of project requirements. With hundreds of plugins available, its broad plugin support enables developers to easily integrate with a wide range of tools from the Continuous Integration and Continuous Delivery (CI/CD) toolchain.
This Java-based application provides packages designed for Windows, Linux, macOS, and Unix-like operating systems, providing out-of-the-box readiness. One of its most distinctive features, the plugin architecture, offers developers countless customization options so they may tailor Jenkins to specific project needs.
What are Jenkins’s Basic Concepts?
For a basic grasp of Jenkins’s capabilities and features, let’s now explore some basic concepts that comprise its framework:
Jenkins Pipeline: The Jenkins Pipeline is a method for defining and managing operations such as building, testing, deploying code in different stages, and implementing Continuous Integration and Continuous Deployment (CI/CD) processes.
Stages: Stages in a Jenkins Pipeline are distinct tasks like Build, Test, and Deploy, contributing to the overall build and deployment.
Jenkinsfile: Written in Groovy syntax, a Jenkinsfile contains the whole pipeline configuration as code and enables version-controlled definition and management of build processes, deployments, and integrations by developers.
Plugins: Jenkins plugins are extensions that enhance the functionality of Jenkins by integrating it with different tools and services.
Jenkinsfile
Let’s quickly see the Jenkinsfile that we are going to use in this blog.
The following Jenkinsfile starts with “pipeline.” It contains various stages, such as “Unit Tests,” “Building image,” and “’Deploy’.” Each stage contains the necessary steps.
- The “agent any” line means the pipeline can run on any available agent in Jenkins.
- The “environment” block sets an environment variable IMAGE_TAG to the Jenkins build ID.
- Unit Tests: Installs npm dependencies and runs unit tests for the Node.js application.
- Building image: Builds a Docker image for the Node.js application, tagging it with sample_nodejs_application_image and the Jenkins build ID.
- Deploy: Stops and removes any existing Docker container named jenkins-with-github-nodejs-cicd-container, runs a new container from the built image, mapping port 80 on the host to port 3000 in the container. It also prints a message indicating where the application can be accessed (MachinePublicIP:80).
In summary, this Jenkinsfile automates the process of testing, building, and deploying a Node.js application using Docker. Each build is identified by a unique tag based on the Jenkins build ID. The application is deployed as a Docker container accessible on port 80 of the host machine.
pipeline {

    agent any

    environment {

        IMAGE_TAG="${env.BUILD_ID}"

    }

    stages {

    // Tests

    stage('Unit Tests') {

      steps{

        script {

          sh 'npm install'

  sh 'npm test -- --watchAll=false'

        }

      }

    }

    // Building Docker images

    stage('Building image') {

      steps{

        script {

          sh 'docker build -t sample_nodejs_application_image:${IMAGE_TAG} .'

        }

      }

    }

    stage('Deploy') {

     steps{

        script {

          sh 'docker stop jenkins-with-github-nodejs-cicd-container || true'

          sh 'docker rm jenkins-with-github-nodejs-cicd-container || true'

          sh 'docker run -d -p 80:3000 --name jenkins-with-github-nodejs-cicd-container sample_nodejs_application_image:${IMAGE_TAG}'

          sh 'echo "The Application is available on MachinePublicIP:80"'

        }

        }

      }

    }

}
Read our blog on the ultimate comparison of Gitlab vs Jenkins
What is GitHub?
GitHub transforms the way teams collaborate on code. It is a web-based platform that hosts and manages code repositories using the Git version control system. Pull requests, branching, and issue tracking are just a few of the features that allow developers to work together, manage changes, and make simultaneous contributions.
GitHub’s version control features facilitate coding collaboration. Branching allows for separate development before merging, while pull requests offer a forum for discussing and proposing modifications. The platform’s user-friendly interface and integrative capabilities support diverse development workflows, fostering collaboration in code, documentation, and discussions.
For a foundational understanding of GitHub’s functionalities and attributes, let’s delve into key concepts that form its core:
Github Repository: A GitHub repository, also referred to as a “repo,” is a centralised place where project files, code, and related data are kept.
Branches: Development teams can establish several development paths within a repository using GitHub’s branching feature without interfering with the primary codebase
Webhooks: GitHub Webhooks allow repositories to broadcast changes to outside services. This capability is very helpful for automating workflows like CI/CD in response to pull requests or code pushes.
Personal Access Tokens: GitHub Personal Access Tokens are an essential component of safe authentication and authorization for a range of operations performed within a repository.
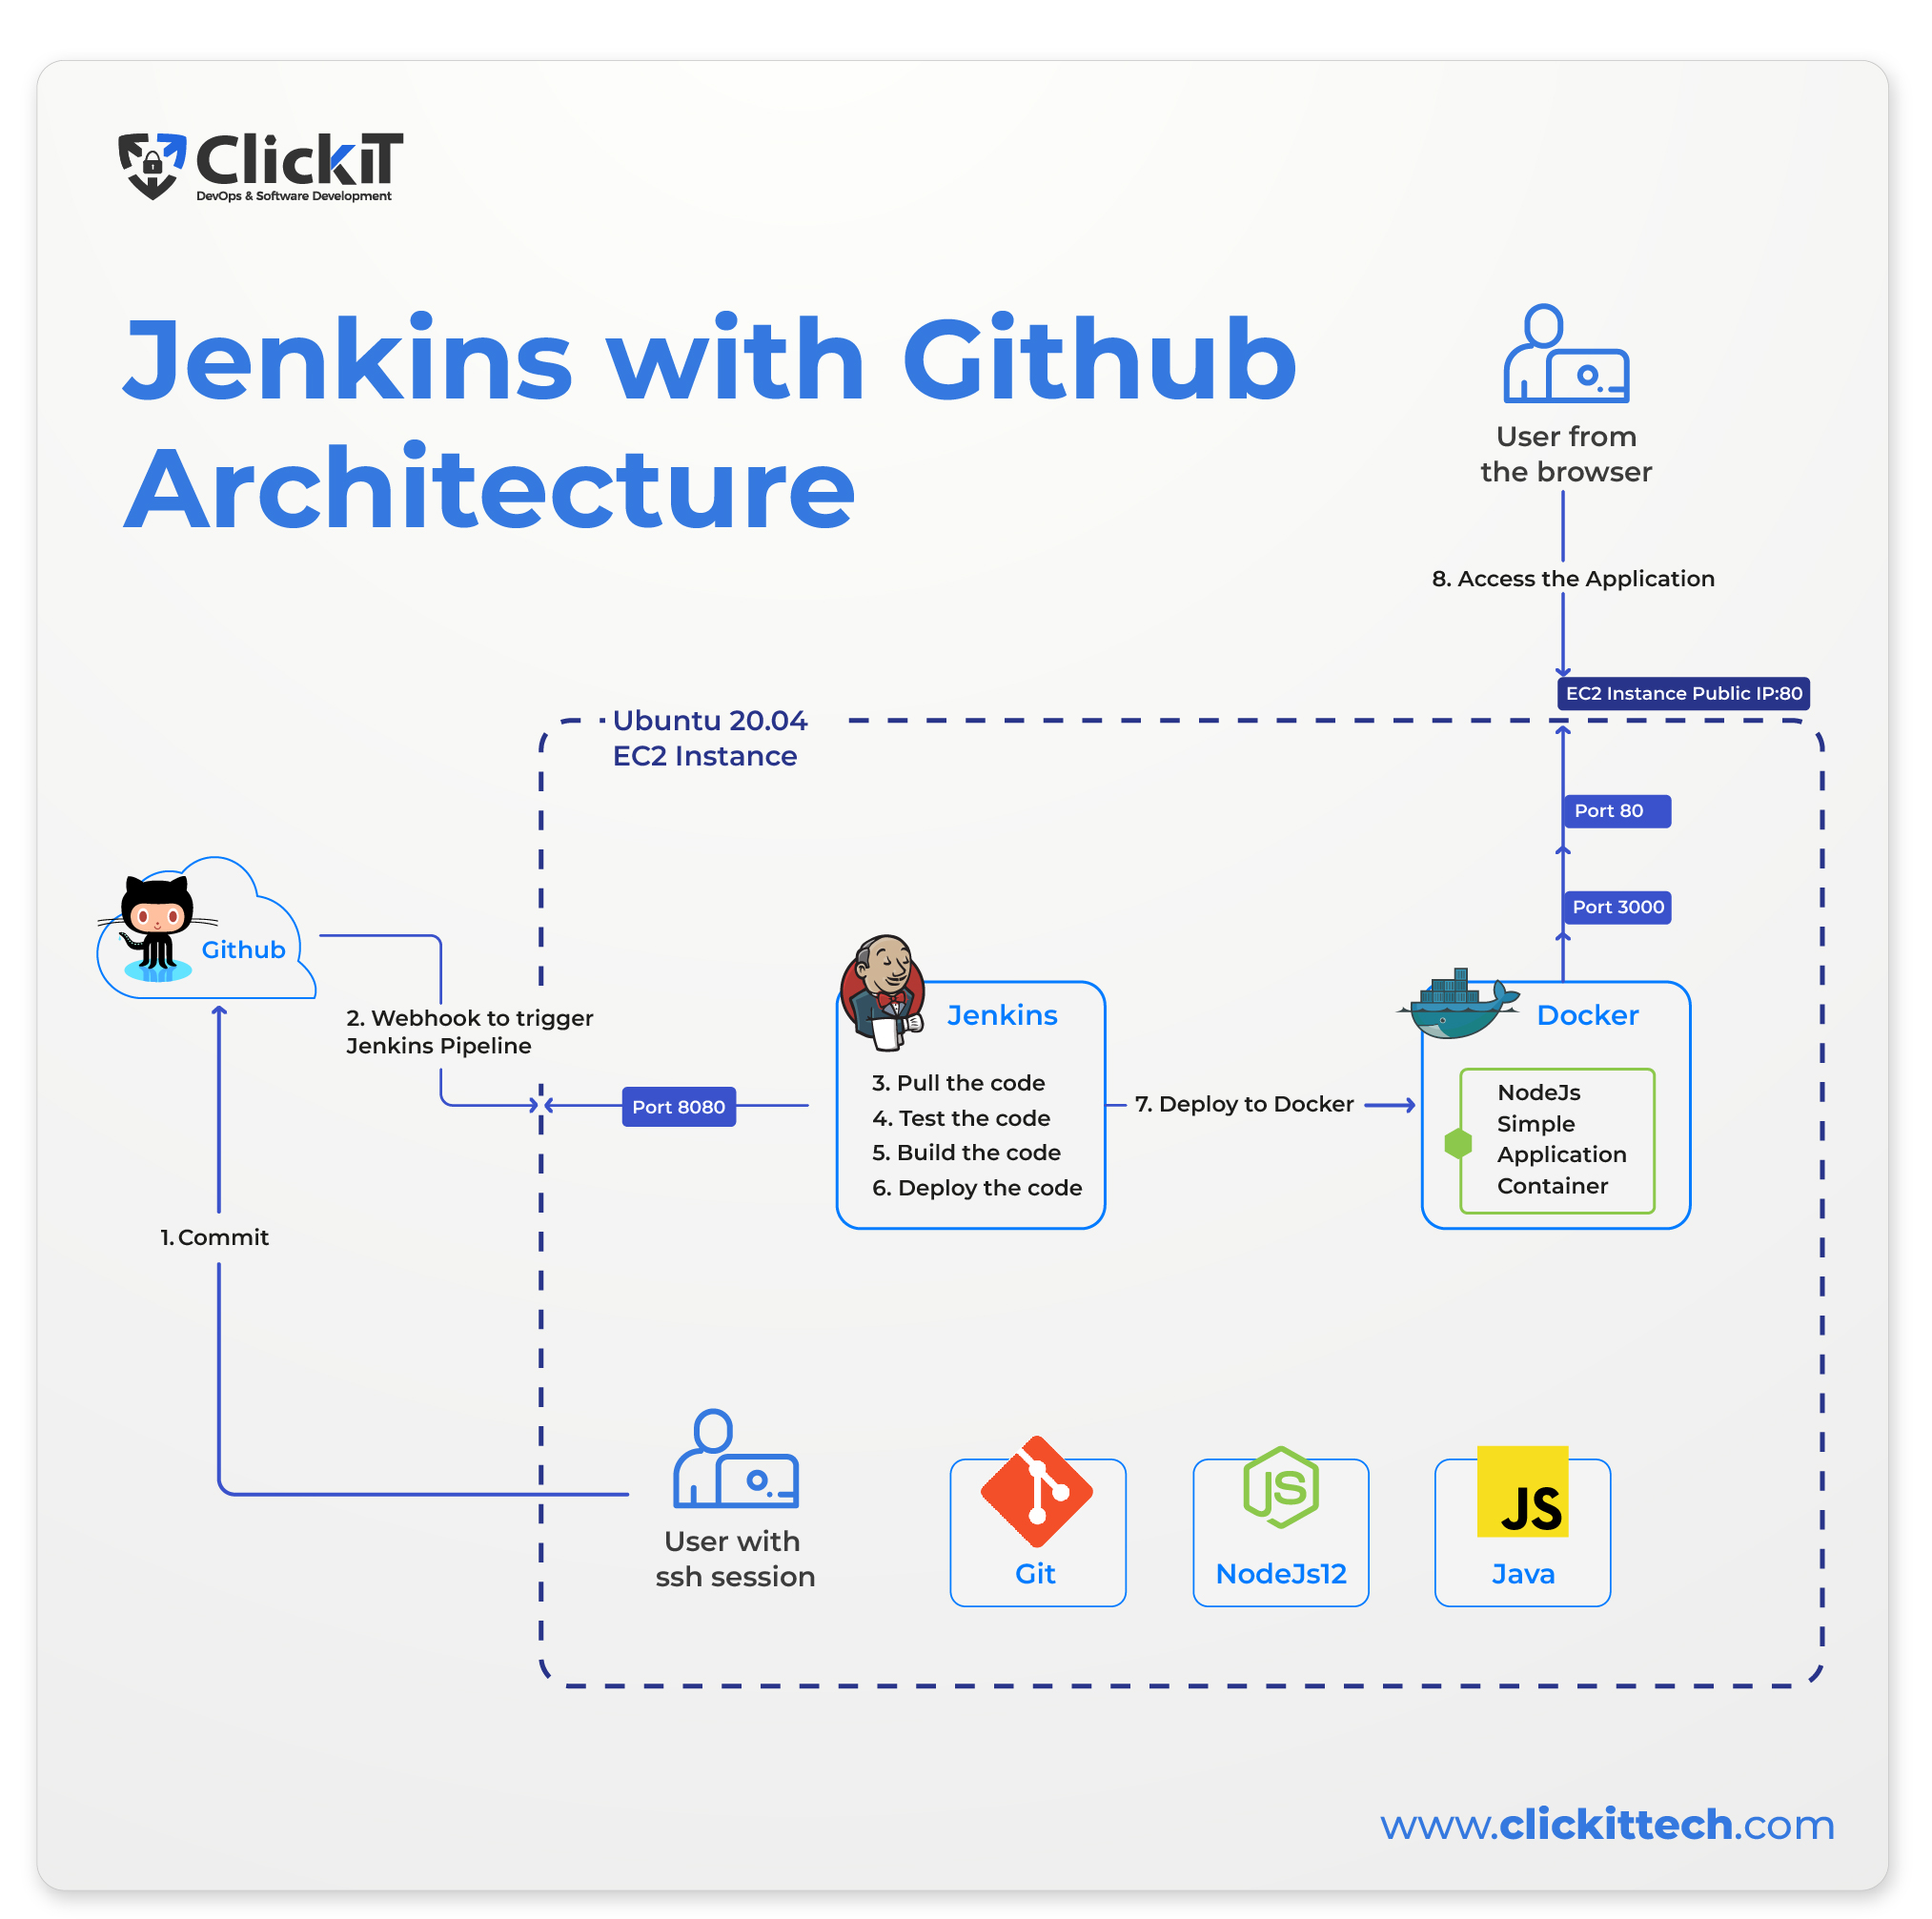
Jenkins with Github Architecture
This is how our architecture would look like after integrating Jenkins with Github.
After we successfully integrate Jenkins with Github, we will be able to push the code to the Github Repository, which will trigger the Jenkins Pipeline using the Jenkins Github Webhook. Once the pipeline is triggered, Jenkins will carry out steps like Code Test, Code Build, and Deployment. The sample application will be deployed as a Docker Container and available on the host port 80 for external access.
Prerequisites for Jenkins With GitHub
- Ubuntu 20.04 EC2 Instance on the AWS Account.
- Github Account.
- Setup Jenkins and other required tools.
- Setup Github Sample Application Repository.
Discover how to create a CI CD Pipeline with Jenkins.
Ubuntu 20.04 EC2 Instance on the AWS Account
EC2 Instance:
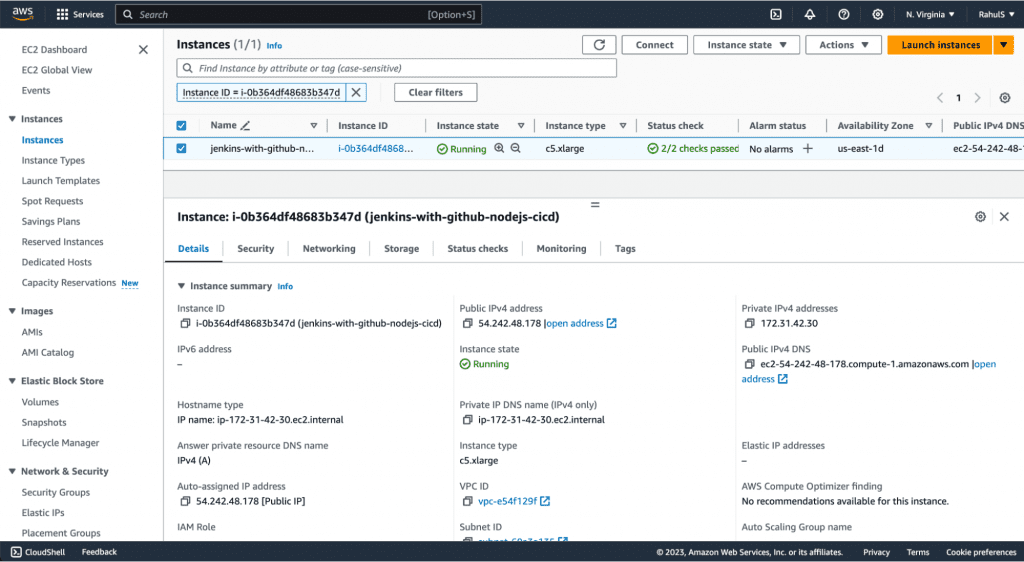
Ensure you have an Ubuntu 20.04 EC2 instance set up on your AWS account. This will serve as the environment for hosting and running Jenkins. Create an AWS account here if you don’t have it. You may try using your machine, virtual machine, or any other cloud provider to create a machine for you. However, the steps to access the machine and install the required packages may differ, make a note of this. Also, steps to allow connection from the GitHub Webhook to the Jenkins installed on this machine may change.
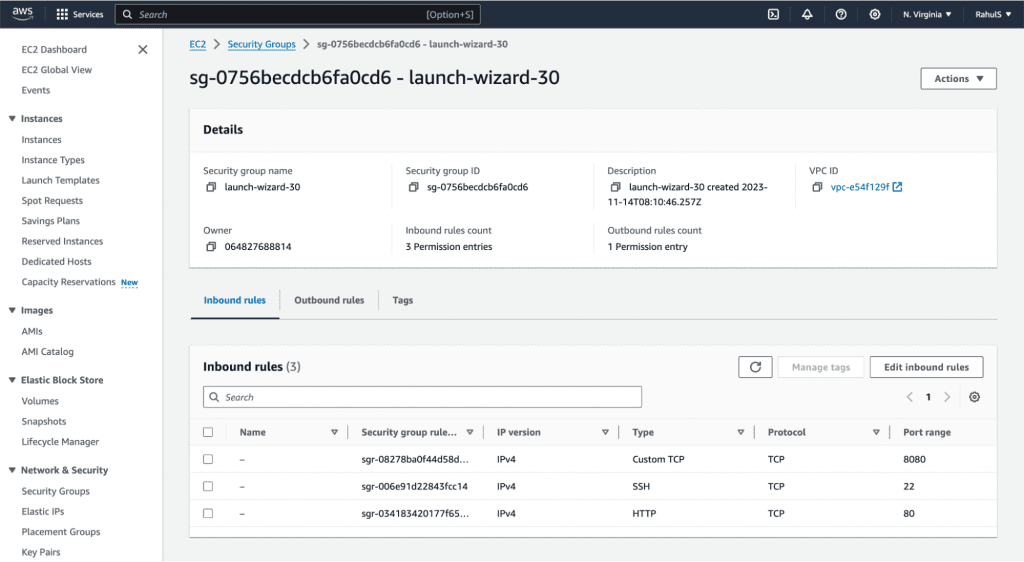
Security Groups:
Assuming that you have an EC2 instance with you, you would have to allow connection on SSH port 22, Jenkins port 8080 and sample Node.js application 80. Here, we have allowed all incoming connections on these ports, however, make a note that in the real world and production server, allowing connections from all the incoming connections must be avoided and only the required IP sources must be allowed.
We take care of managing your cloud infrastructure. Hire our AWS Certified engineers.
GitHub Account
A GitHub account is essential for version control and collaboration. Create one here if you don’t have it. This is where we will create a repository and store the sample application code along with the files like Jenkinsfile and Dockerfile.
Setup Jenkins and other required tools
Access the EC2 Instance:
This step may differ for you based on the machine that you are using. Since we have used the EC2 instance created on AWS and tried to access it from the Mac System, we have used the ssh command-line utility. If you are using a Windows System, you may have to use a tool like Putty and would need a .ppk file instead of the .pem file for authentication. If you are not using the AWS EC2 instance, the steps to authenticate could be different.
- Once you create a new Ubuntu 20.04 EC2 Instance with a new key, it will be downloaded for you. After it is downloaded, you must change its permissions to 400.
chmod 400 ~/Downloads/jenkins-with-github-nodejs-cicd.pem - Now you are ready to connect to the instance using its private key
ssh -i ~/Downloads/jenkins-with-github-nodejs-cicd.pem [email protected] -vvv
Check the Machine Configuration:
Perform a few checks before you proceed with the installation and setup.
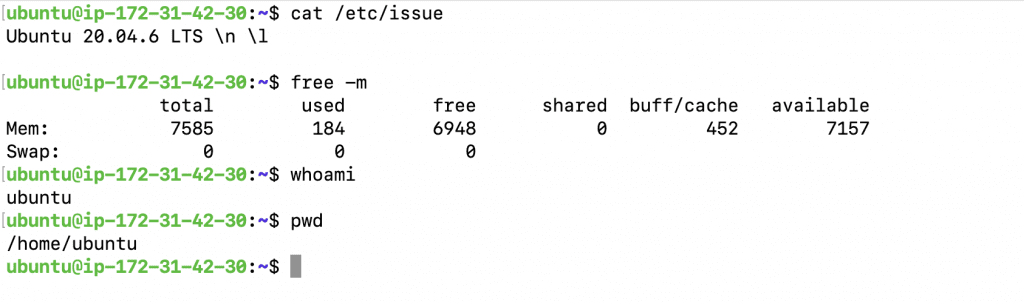
- Verify if the OS is Ubuntu 20.04 LTS
cat /etc/issue - Check the RAM, a minimum of 4 GB is what we require. We have used an instance with 8 GBs of RAM to be on the safer side because we are going to use the same instance to install Docker and show you some deployments.
free -m - The User that you use to log in to the server should have sudo privileges. “ubuntu” is the user available with sudo privileges for EC2 instances created using “Ubuntu 20.04 LTS” AMI.
whoami
4. Check your present working directory, it will be your home directory.
pwd
Install Java, Node.js, Git
- Update the apt package index
sudo apt update - Install fontconfig and OpenJDK 17
sudo apt install fontconfig openjdk-17-jre - Check the Java version
java–version - Add the NodeSource repository for Node.js 12
curl -sL https://deb.nodesource.com/setup_12.x | sudo -E bash – - Install the Node.js
sudo apt install nodejs - Confirm the Node and NPM version
node –version
npm –version
git version
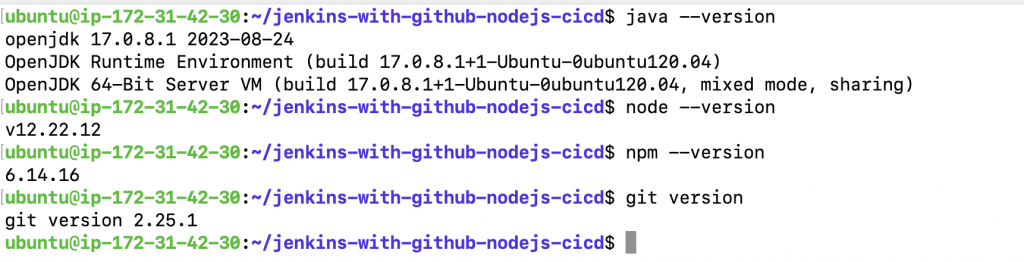
Make sure that you have all the required packages installed matching the versions as seen in the above screenshot.
Install Jenkins
- Download Jenkins GPG key to keyring
sudo wget -O /usr/share/keyrings/jenkins-keyring.asc \ https://pkg.jenkins.io/debian-stable/jenkins.io-2023.key - Add Jenkins repository to sources list
echo deb [signed-by=/usr/share/keyrings/jenkins-keyring.asc] \ https://pkg.jenkins.io/debian-stable binary/ | sudo tee \ /etc/apt/sources.list.d/jenkins.list > /dev/null - Update package information
sudo apt-get update - Install Jenkins using apt command
sudo apt-get install jenkins - Display Jenkins process information
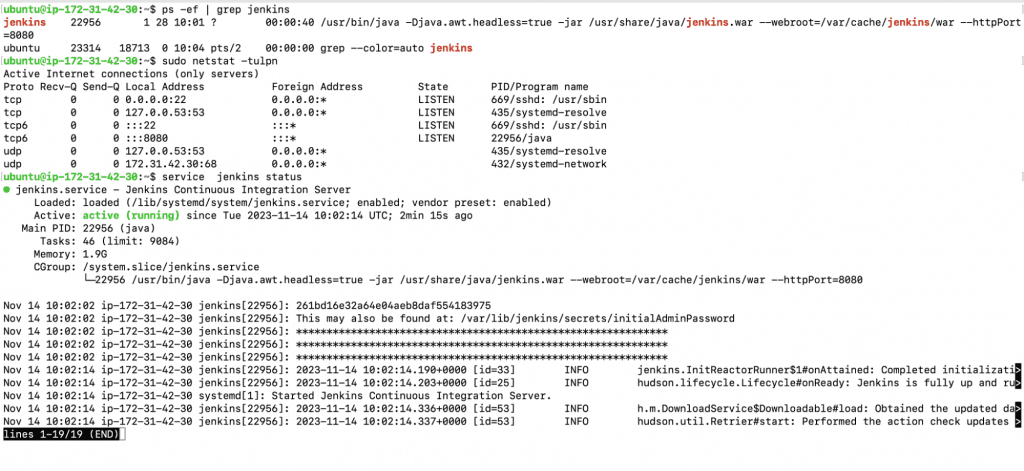
ps -ef | grep jenkins
Note: Note that the Jenkins process is started by the “jenkins” user. Check the first column of the output, that is the username “jenkins” . - Show listening ports on the system. You must see a service running on port 8080, and this is the Jenkins Service
sudo netstat -tulpn
Check Jenkins’ service status to make sure Jenkins is indeed up and running. Press “q” without single quotes to exit from the status page.
service jenkins status.
You should have your Jenkins up and running now. You may refer to the official documentation here if you face any issues with the installation.
Access and Configure Jenkins:
This section covers Jenkins’s basic setup. To access the Jenkins dashboard, you will be asked to retrieve the original administrative password that was generated during installation. After that, you have the option to install recommended plugins.
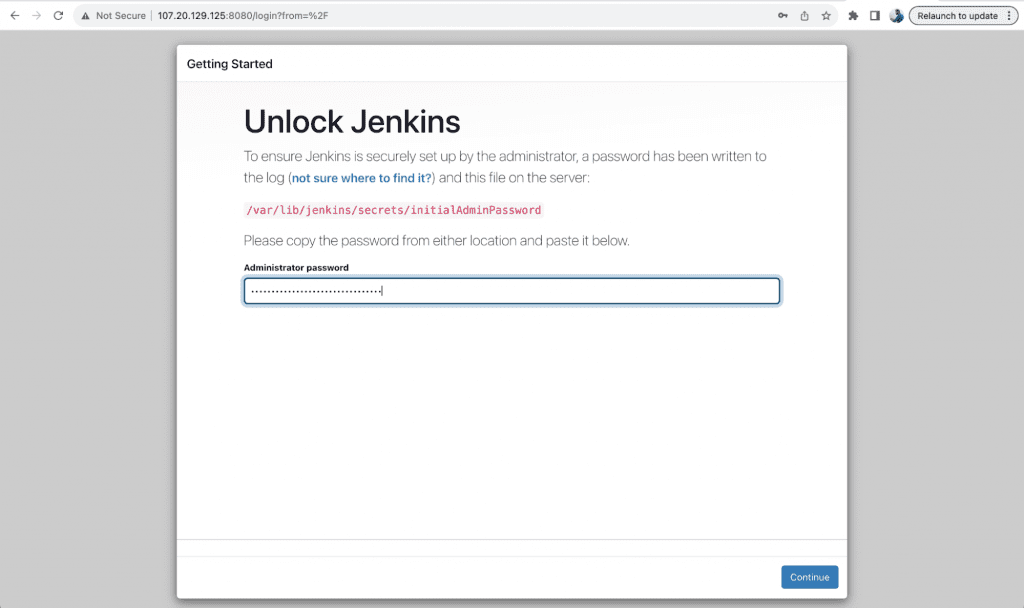
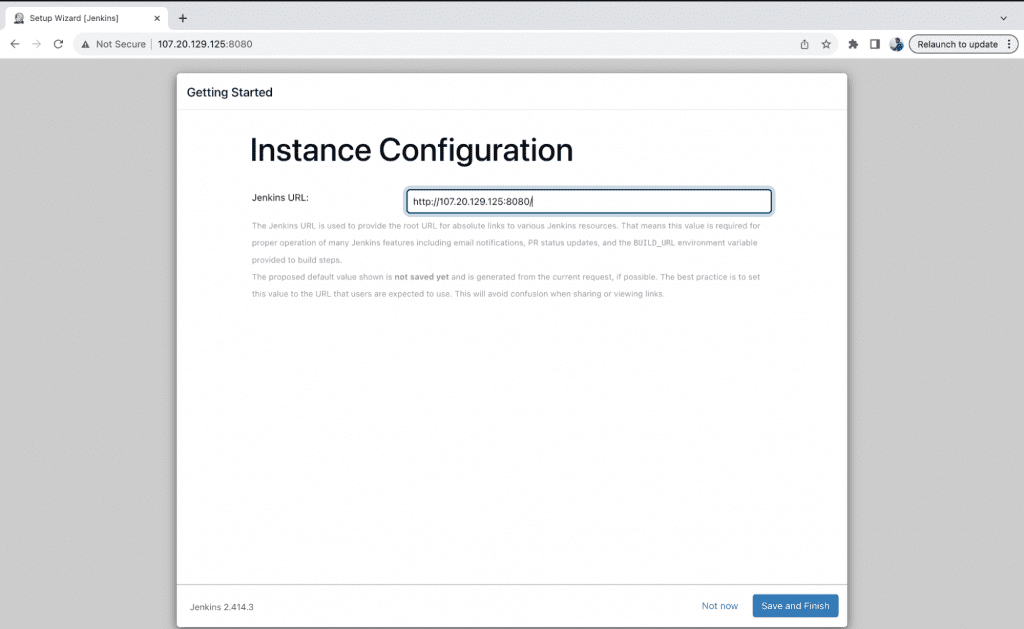
- The Jenkins will be available on port 8080 of the public IP of the EC2 Instance/Virtual Machine. For us it is http://107.20.129.125:8080/. This will be different for you. In case you are using EC2 Instance, you can find it on the “Details” tab/page of the EC2 Instance as “Public IPv4 address”.
- To Get the initial password, execute the following command on your machine. Copy the password and enter in the textbox to unlock Jenkins as shown in the following image.
sudo cat /var/lib/jenkins/secrets/initialAdminPassword
Note: Save this password securely on your machine. This will be required in the upcoming steps.
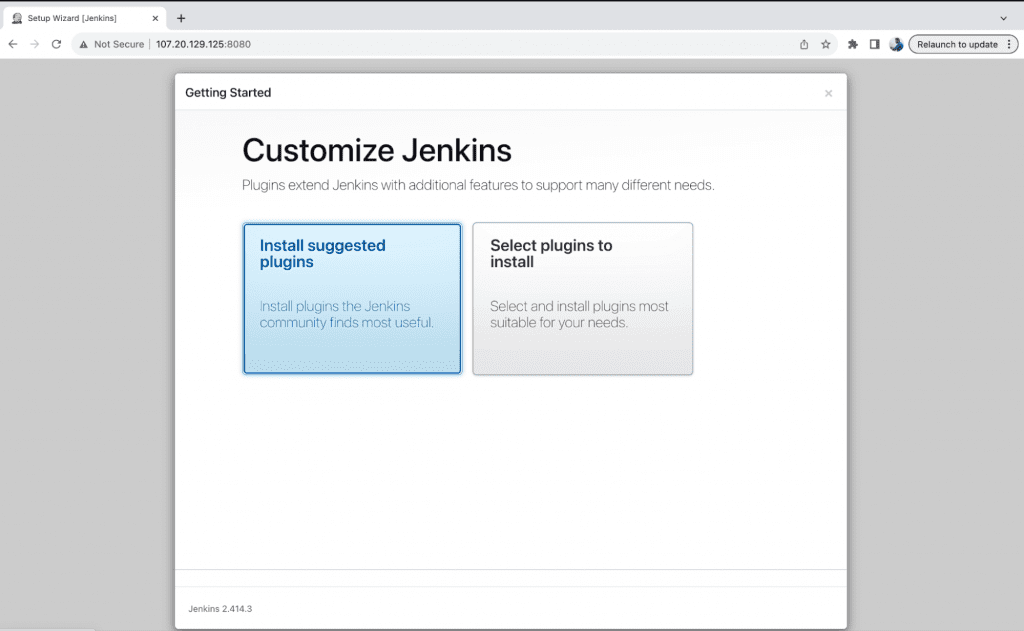
3. You can see 2 options, “Install the suggested plugins” or “Select plugins to install”. For now, you can proceed with the “Install suggested plugins” option.
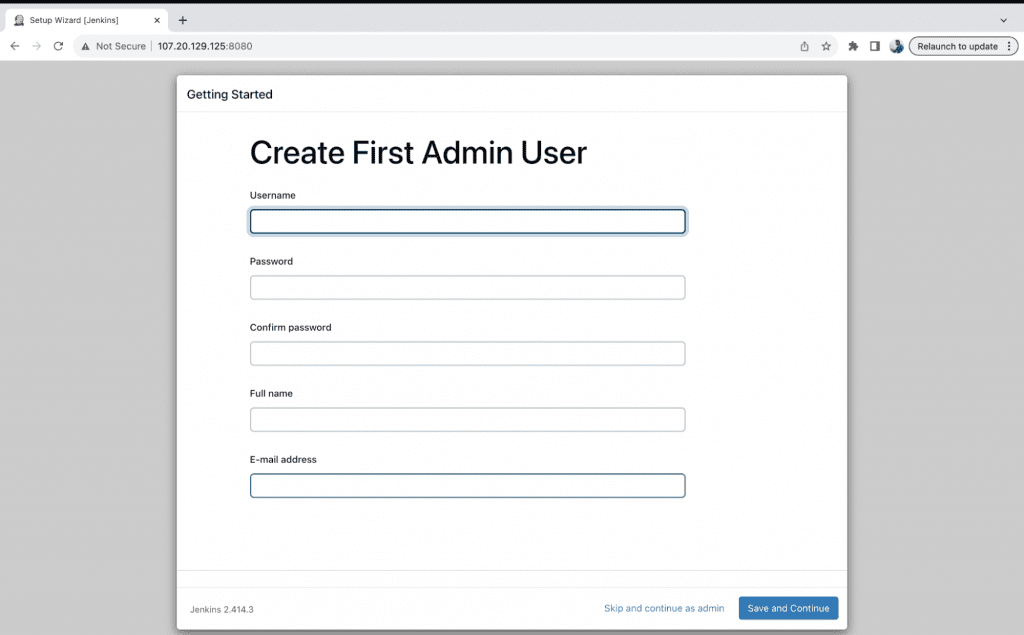
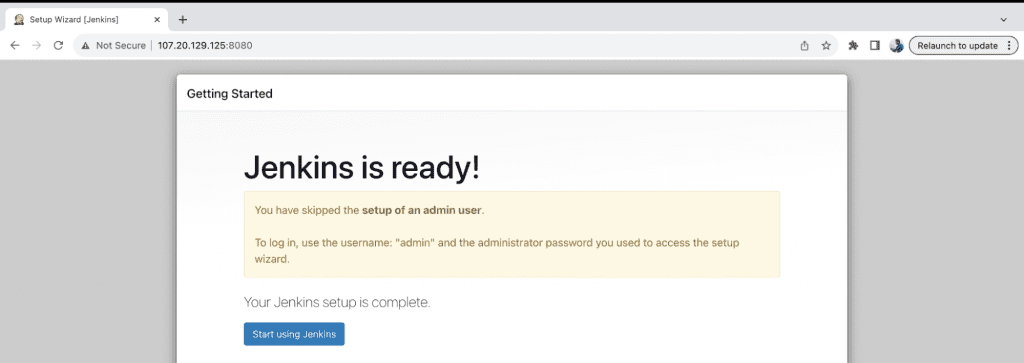
4. Click on the “Skip and continue as admin” button. Although configuring a user is not necessary at this time, it is important to create unique users in real-world situations or to have a strong authentication system in place based on requirements.
5. On this page, you can keep the default value unchanged and click on the “Save and Finish” button.
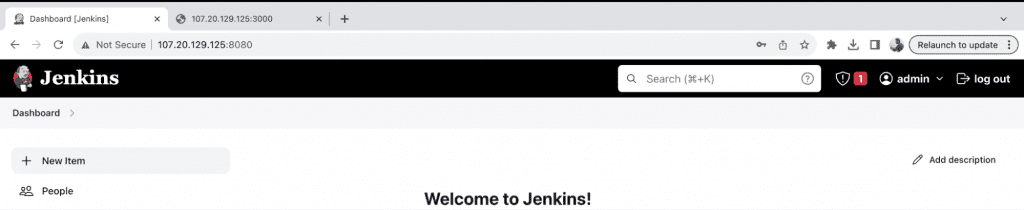
6. You are now ready to use Jenkins. On this page, click on the “Start using Jenkins” button.
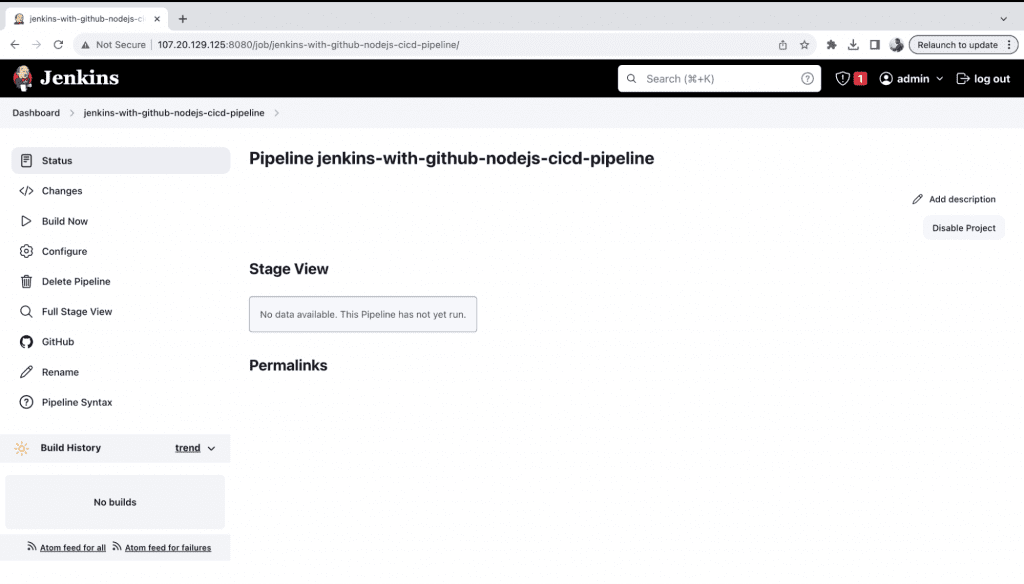
7. This is how the initial Jenkins Dashboard looks like.
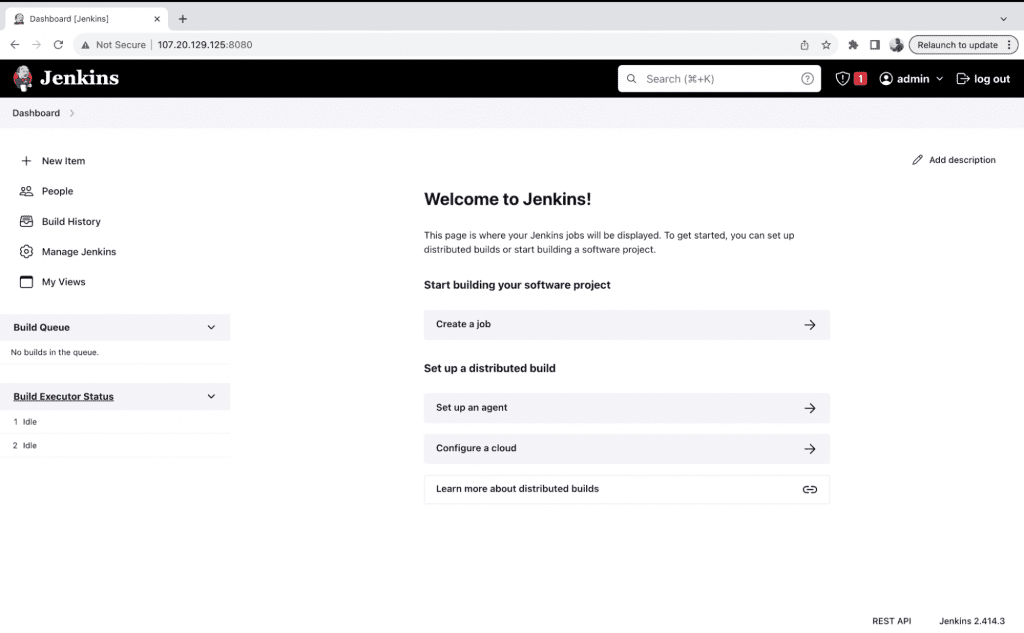
For now, we are good with the Jenkins Installation and basic setup. We will get back here later after installing Docker on the same EC2 Instance.
Install Docker
Check here for the latest installation instructions. The following instructions have been tried and tested as of 14/Nov/2023.
- Update package information:
sudo apt-get update - Install necessary packages:
sudo apt-get install ca-certificates curl gnupg - Create a directory for keyrings:
sudo install -m 0755 -d /etc/apt/keyrings - Download and save Docker GPG key:
curl -fsSL https://download.docker.com/linux/ubuntu/gpg | sudo gpg –dearmor -o /etc/apt/keyrings/docker.gpg - Set permissions for the Docker GPG key:
sudo chmod a+r /etc/apt/keyrings/docker.gpg - Add Docker repository to sources list:
echo \
“deb [arch=”$(dpkg –print-architecture)” signed-by=/etc/apt/keyrings/docker.gpg] https://download.docker.com/linux/ubuntu \
“$(. /etc/os-release && echo “$VERSION_CODENAME”)” stable” | \
sudo tee /etc/apt/sources.list.d/docker.list > /dev/null - Update package information after adding the Docker repository:
sudo apt-get update - Install Docker packages:
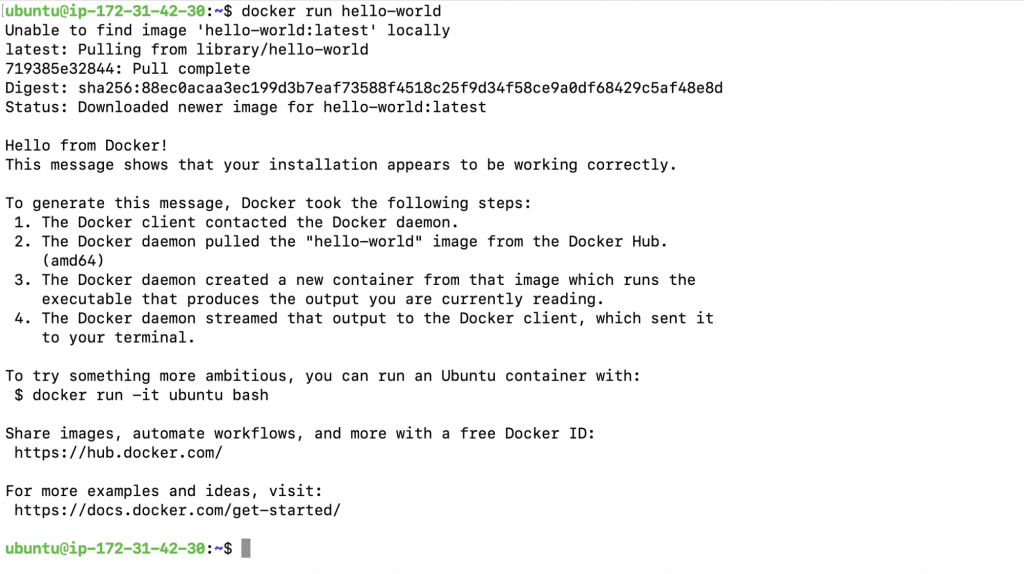
sudo apt-get install docker-ce docker-ce-cli containerd.io docker-buildx-plugin docker-compose-plugin - Run a test Docker container just to ensure that the Docker installation is functioning correctly. Here, observe that we used “sudo” before the docker run command.
sudo docker run hello-world - However, we would not want to use sudo before the docker command. To achieve this, we need to create a “docker” group and add users to it that do not need to use sudo before executing docker commands.
sudo groupadd docker - Now we can add the current user to the Docker group. This will help us avoid using “sudo” before the docker commands.
sudo usermod -aG docker $USER - To re-evaluated the group membership, you may have to log out and log back in. Alternatively, we can execute the following command to activate the changes to groups.
newgrp docker
This time you don’t have to use “sudo” before the docker commands. To test the same, run another test Docker container after group membership update.
docker run hello-world.
You may refer to the official documentation here if you face any issues with the installation.
Note: In the upcoming steps, we will revisit the step of adding a user to the docker group.
This step is necessary because the Docker daemon binds to a Unix socket, not a TCP port, and by default, it’s the root user who owns the Unix socket. Other users can only access it using sudo. The Docker daemon always runs as the root user.
To avoid prefixing the docker command with sudo, we need to create a Unix group named docker and add users to it. When the Docker daemon starts, it establishes a Unix socket accessible by members of the Docker group. Some Linux distributions automatically create this group when installing Docker Engine using a package manager, eliminating the need for manual group creation in such cases. Click here to learn more about this.
Setup Github Sample Application Repository
In this section, We’ll look at how to set up a sample repository that hosts Node.js code. Essential files including a Dockerfile and Jenkinsfile will be included in this repository.
Dockerfile:
The procedures for creating a Docker image are laid out in the Dockerfile, which is an essential part of containerized applications. It contains guidelines on how to add dependencies, configure the environment, and specify how the application behaves inside the container.
Jenkinsfile:
The Jenkinsfile acts as the pipelines’ orchestration script. Jenkins should build, test, and deploy the application according to the procedures outlined in this Jenkinsfile, which summarizes the CI/CD process. It’s an effective tool for setting up automatic and productive workflows in Jenkins.
Setup a new repository and create a personal access token:
- Go to https://github.com/ and sign up if you haven’t done so already
- Once logged in, you’ll land on your homepage or navigate to https://github.com/dashboard.
- Create a new public repository with a name of your preference, or opt for “jenkins-with-github- nodejs-cicd” to streamline subsequent steps. We recommend using “jenkins-with-github-nodejs-cicd” for a smoother process ahead. Note: In real-world scenarios or organizations, repositories are generally kept private for security and access control reasons.
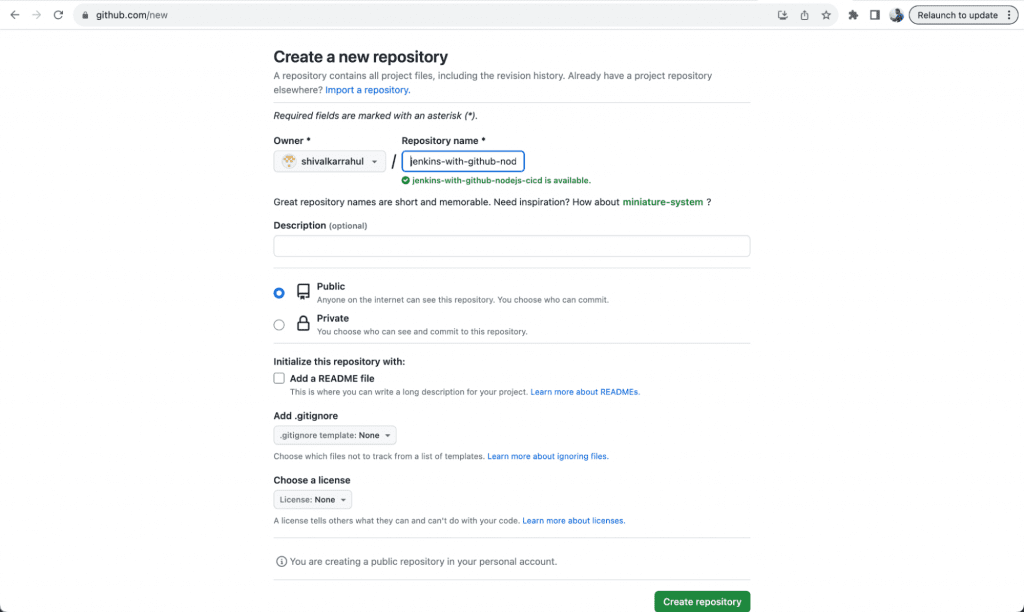
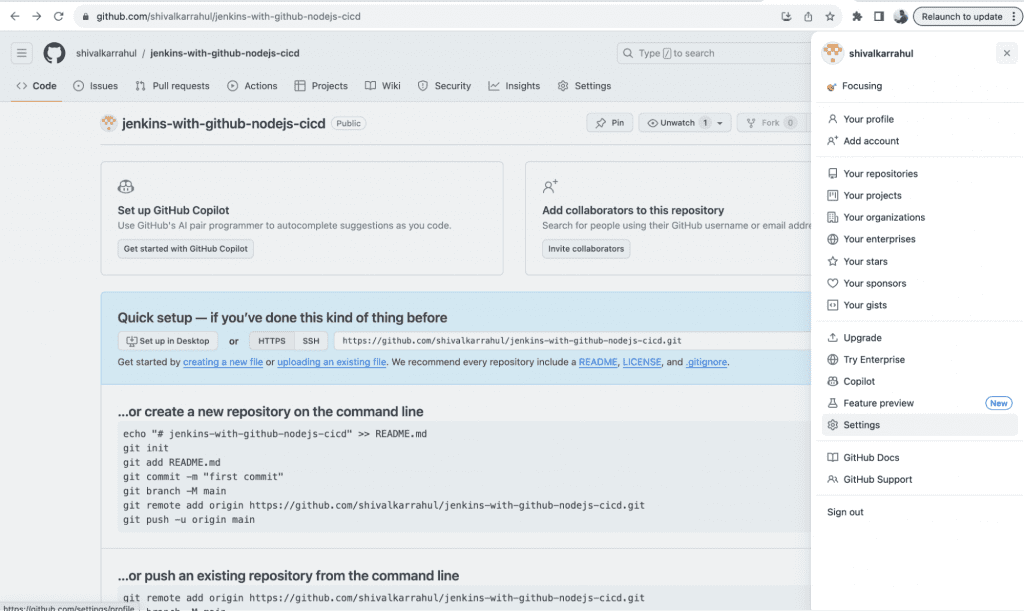
4. Following the creation of a repository, you will be redirected to the subsequent page. Copy the HTTPS URL, and make a note of it as it will be needed later; refer to it as the Repository URL.
In our case, it is: https://github.com/shivalkarrahul/jenkins-with-github-nodejs-cicd.git. Please note that your URL will differ.

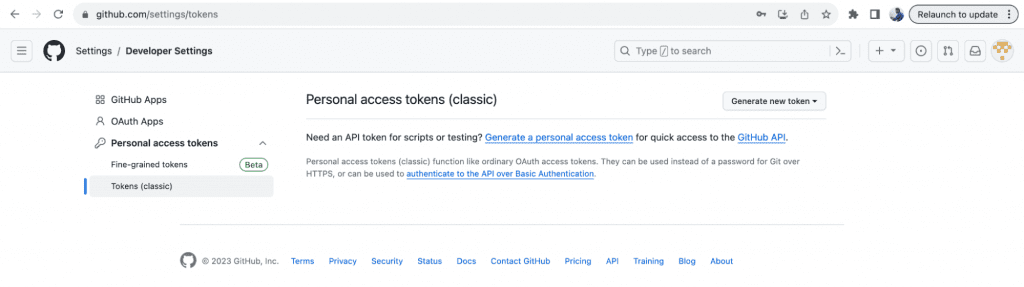
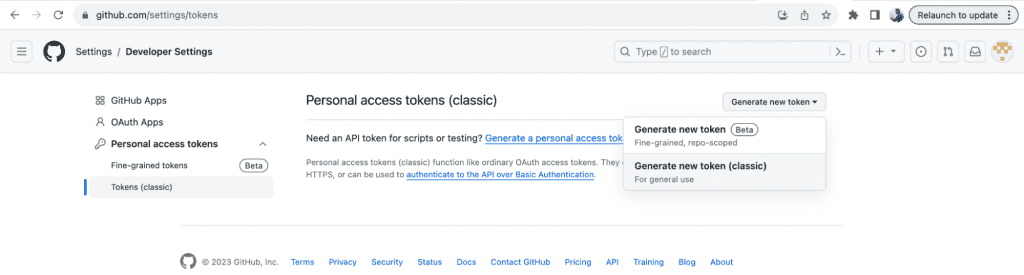
5. To generate a token, click on the profile icon in the top right and choose “Settings.” This token will be required to perform operations on the repository using the git commands as an authentication mechanism.
6. Navigate to “Developer Settings,” where you’ll encounter three options for token creation.
7. Opt for “Personal Access Tokens -> Token (Classic)”
8. Proceed to the “Generate New Token” dropdown, selecting “Generate New Token (Classic).”
9. Specify a note for future reference, set the expiration, and limit permissions by checking only the “repo” option. Scroll to the bottom of the page and click “Generate Token.”

10. The token will be displayed; save it on your machine, as it will be crucial for later steps
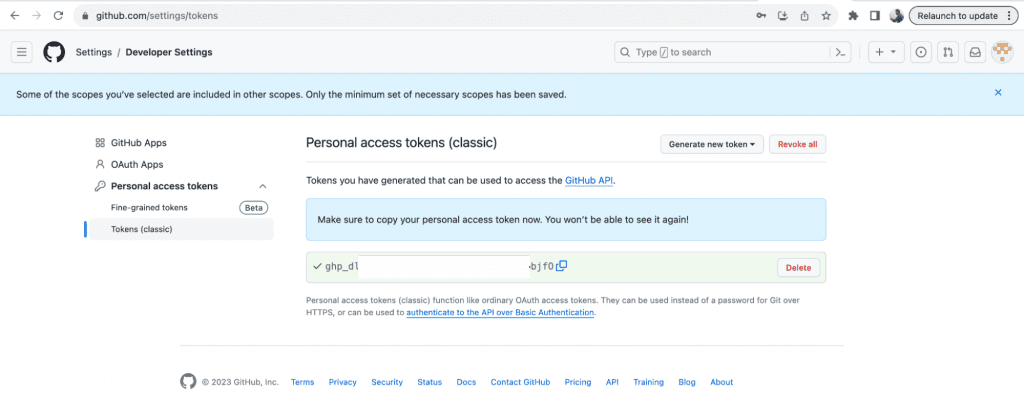
Note: Preserve this token on your machine, as it will be necessary in the subsequent steps; refer to it as a Personal Access Token.
Clone the sample app and setup the newly created repository:
- Navigate to your home directory by using the following command.
cd ~ - Clone the sample repository containing the necessary code, which includes Node.js code, a Dockerfile, and a Jenkinsfile.
git clone https://github.com/shivalkarrahul/jenkins-with-github-nodejs-cicd.git - Change the name of the repository you just cloned. This renames the cloned repository from “jenkins-with-github-nodejs-cicd” to “sample-application.”
mv jenkins-with-github-nodejs-cicd sample-application - Delete the .git folder from the repository since we plan to copy all contents from this repository to the one you’ll create to evaluate Jenkins and GitHub integration and deploy a sample application.
rm -rf sample-application/.git - Now, clone your repository. Specify the URL for the repository that you created in the previous step. Clone your own repository by providing the URL you obtained when you created it earlier.
git clone <your-repo-url> - Copy the contents of the sample application from the cloned repository to your own repository.
cp -r sample-application/* <your-repo-folder_name>/ - Now, change your working directory to the directory of your repository you just cloned.
cd <your-repo-folder_name> - Configure Git with your username for the commit messages.
git config –global user.name “YourName YourLastname” - Configure Git with your email for the commit messages.
git config –global user.email “[email protected]” - Stage all changes for the upcoming commit.
git add . - Commit the staged changes with a descriptive message.
git commit -m “Sample Application for How to integrate Jenkins with GitHub blog”
Push the committed changes to your GitHub repository. GitHub will prompt you for authentication; enter your GitHub Username and the Personal Access Token you created.
git push.
How to Integrate Jenkins with GitHub
Before delving into the integration process, let’s recap our progress and the information gathered thus far. We’ve familiarized ourselves with Jenkins and GitHub, and our EC2 instance is equipped with Java, Git, and Node.js12. Security Group modifications enable incoming connections on ports 22, 80, and 8080. Jenkins is installed on the same EC2 instance, with the initial setup completed using the password found in /var/lib/jenkins/secrets/initialAdminPassword.
Additionally, Docker is now part of our EC2 setup, allowing us to experiment with deploying a sample Node.js containerized application through Jenkins. We’ve walked through the steps of creating a new repository and transferring the sample application code from an existing repository, where it’s stored for reference.
With all prerequisites in order, we’re now poised to address the crucial question: “How to integrate Jenkins with GitHub?”
The solution to this question involves a two-fold process, with actions required both on the Jenkins and GitHub fronts. To initiate the integration, we must set up a Jenkins GitHub Webhook on the GitHub side. Simultaneously, on the Jenkins side, we need to incorporate the GitHub repository into the Jenkins Pipeline.
GitHub
Now, first let’s delve into the actions to be performed on the GitHub side to create a Jenkins with Github Webhook.
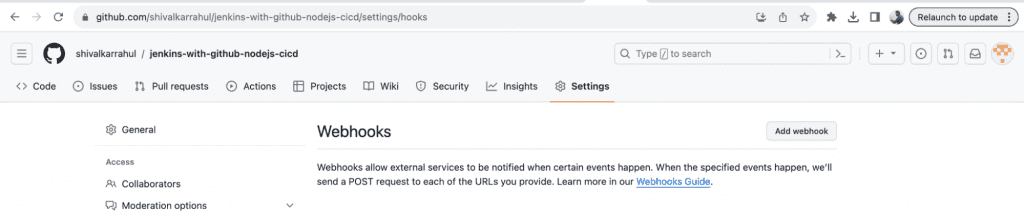
- Navigate to the repository you’ve created and where the sample application code is stored. Access the “Settings” tab.
2. Then on the left-hand side, select “Webhook.”
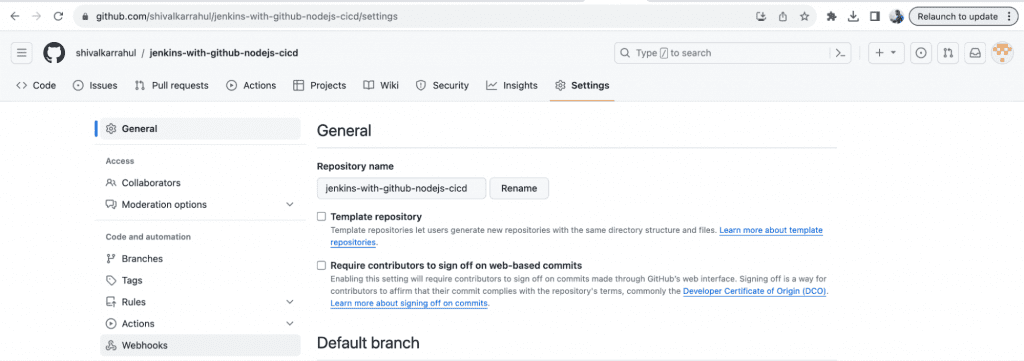
3. Proceed to click on “Add webhook.”
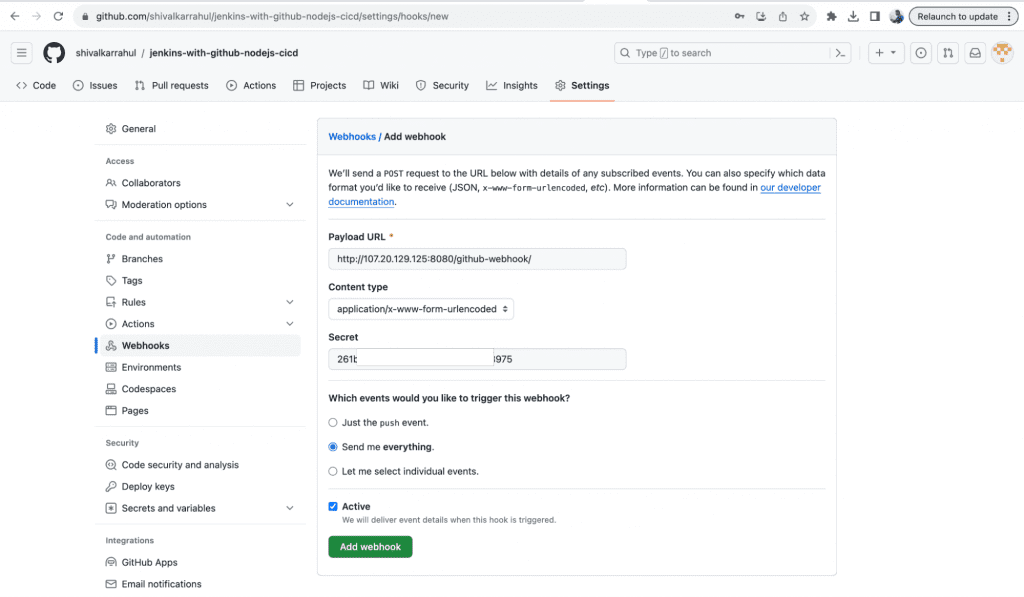
4. Make the configurations as follows to integrate jenkins with github
- In the “Payload URL” field, append the Jenkins URL with “/github-webhook/” at the end (e.g., http://your-jenkins-url/github-webhook/). Ensure there’s a trailing slash. For us it is http://107.20.129.125:8080/github-webhook/, here the IP will change for you.
- Maintain the “Content type” as “application/x-www-form-urlencoded.”
- Retrieve the Jenkins password using the “sudo cat /var/lib/jenkins/secrets/initialAdminPassword” command and input it into the “Secret” field.
- Select “Send me everything” for “Which events would you like to trigger this webhook?”
- Check the “Active” box and proceed to click on “Activate.”
5. Upon successful configuration, you should observe “Last delivery was successful” when hovering over the newly created Webhook. In case of an unsuccessful delivery, potential issues might involve the Webhook URL or connectivity on the Jenkins Port. Debugging may be required to address such situations.
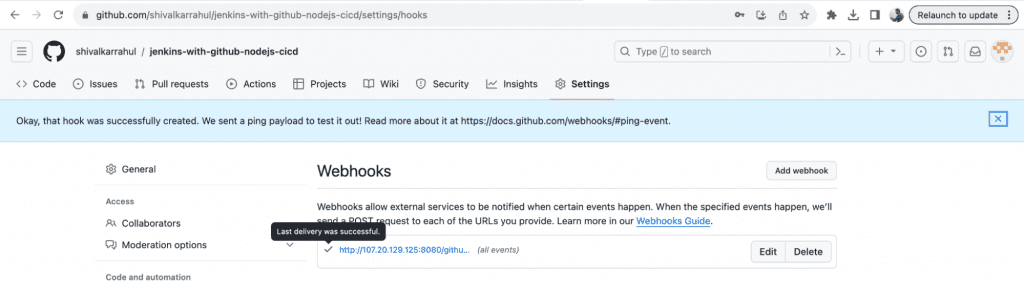
With this step, our first phase concludes as we successfully set up the Jenkins Github Webhook.
Next, let’s proceed to the second phase, creating a Jenkins Job and integrating it with the GitHub Repository.
Jenkins
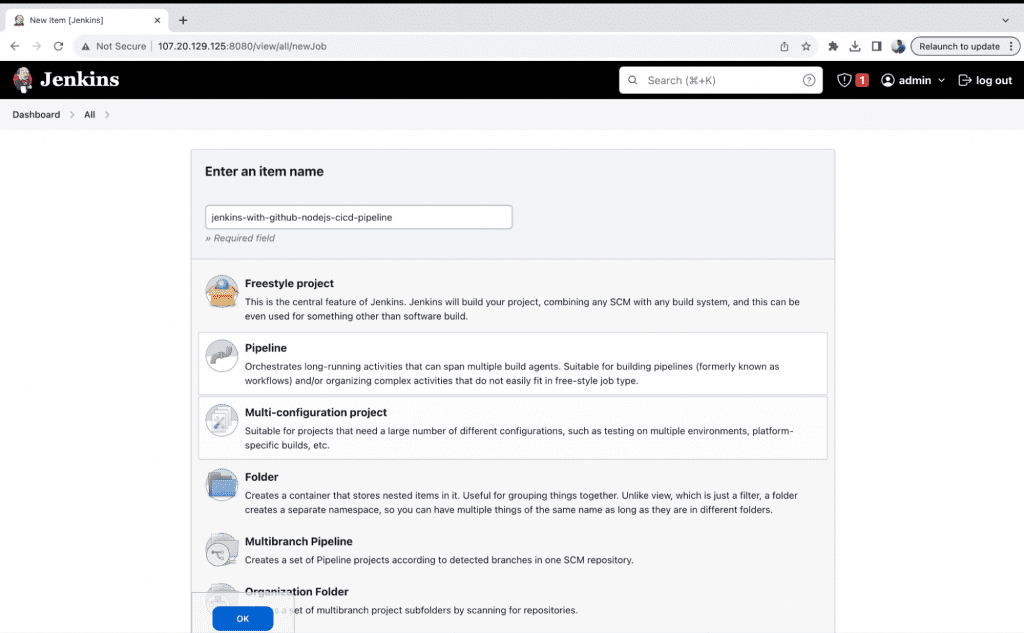
- Navigate to your Jenkins Server and select “New Item” to initiate the creation of our initial pipeline to integrate Jenkins with GitHub.
2. Assign the name “jenkins-with-github-nodejs-cicd-pipeline” to your pipeline, or choose a name that suits your preference. Opt for the 2nd “Pipeline” option and finalize the process by clicking the “OK” button to create the pipeline.
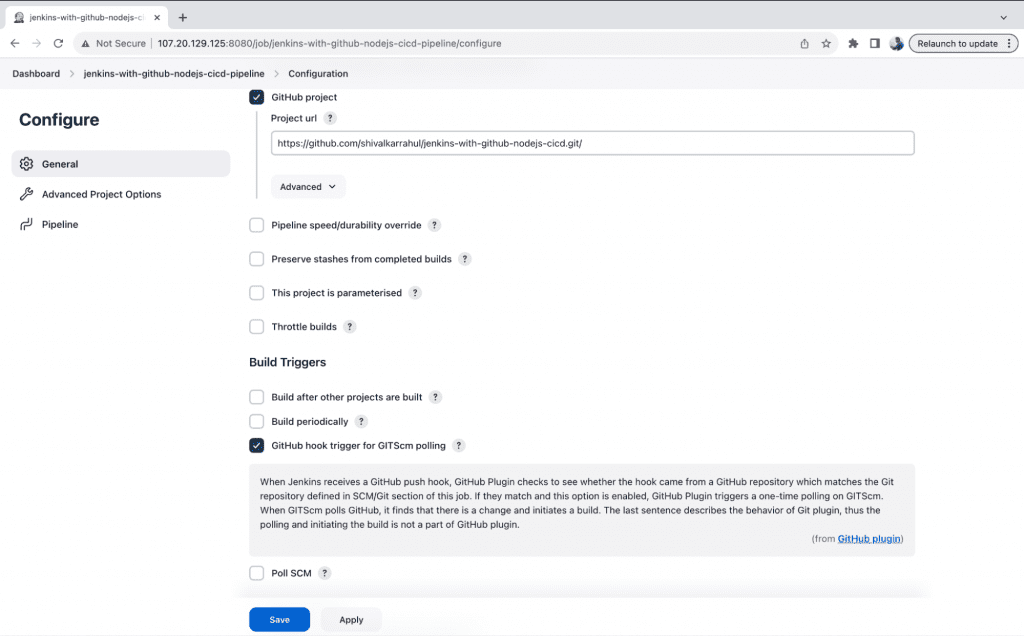
3. Check the “GitHub project” box and input the GitHub Repository URL into the “Project URL” field. Additionally, ensure to select the “GitHub hook trigger for GITScm polling” option.
4. Scroll down and configure the page as follows.
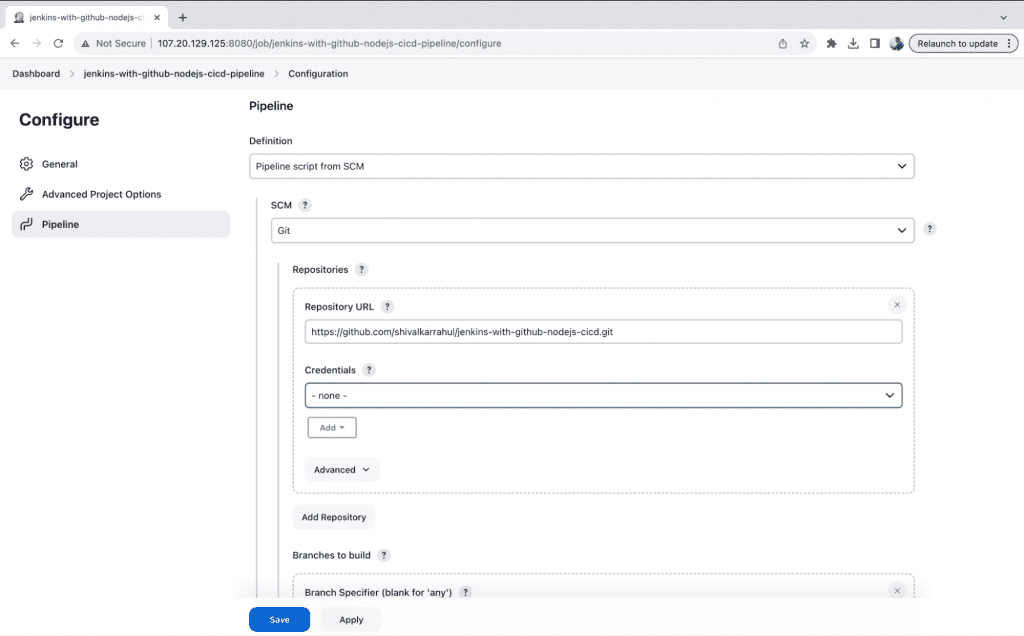
- Choose “Pipeline script from SCM” from the “Definition” dropdown option.
- In the “SCM” dropdown, select “Git” and input the Repository URL in the “Repository URL” text field. No credentials are needed for a public repository.
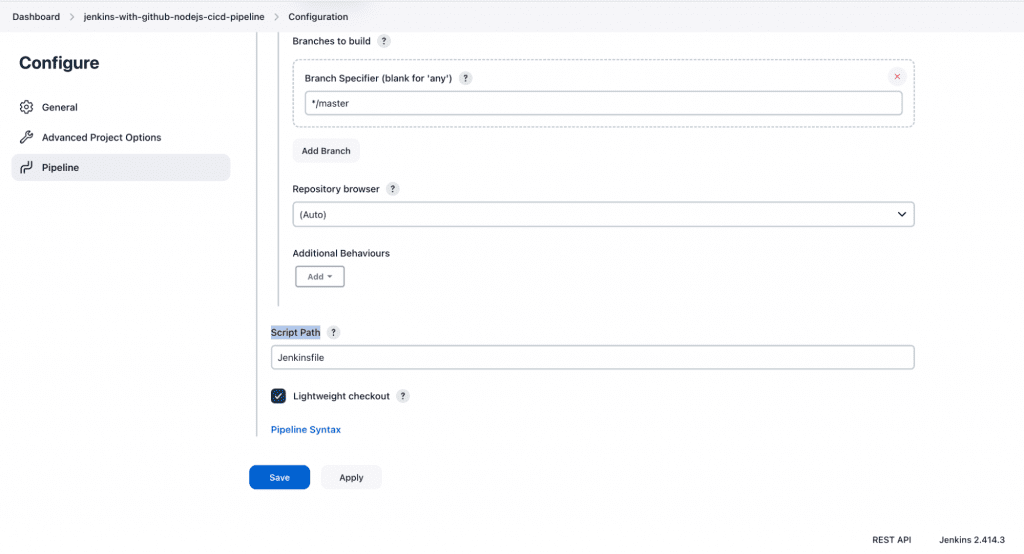
- Keep the remaining settings as default; there’s no need to change “Branches to build” since the default value is master, and the code in the repository has been committed to the master branch.
- Scroll down and you will see an option “Script Path”, keep it unchanged and the reason for not changing it is because it is the relative location to the Jenkinsfile that we have in our source code repository.
- Finally click the “Save” button to save the pipeline.
5. Once you’ve saved the configuration, locate the “Build Now” option in the pipeline. Click on it to manually initiate the pipeline build. While we have successfully created the pipeline, it’s important to note that, before testing to trigger the pipeline upon commits, we are ensuring that everything is properly set up.
6. However, it’s surprising to note that an error occurs when clicking on “Build Now” to test the pipeline manually.
Error:
“ERROR: permission denied while trying to connect to the Docker daemon socket at unix:///var/run/docker.sock: Get “http://%2Fvar%2Frun%2Fdocker.sock/_ping”: dial unix /var/run/docker.sock: connect: permission denied”
Recall the note from the “Install Docker” section?
This error occurred because the Jenkins process is initiated by the “jenkins” user, who is not a member of the “docker” group, and we have not used “sudo” before the docker command. Additionally, the “jenkins” user lacks sudo permissions, rendering the use of “sudo” before the docker command ineffective. The solution to this problem is to add the “jenkins” user to the “docker” group, enabling the “jenkins” user to execute the docker command successfully without the need for “sudo.”

7. So, to add the “jenkins” user to the “docker” group and restart the Jenkins service execute the following commands
sudo usermod -aG docker jenkins
sudo service  jenkins restart
sudo service  jenkins status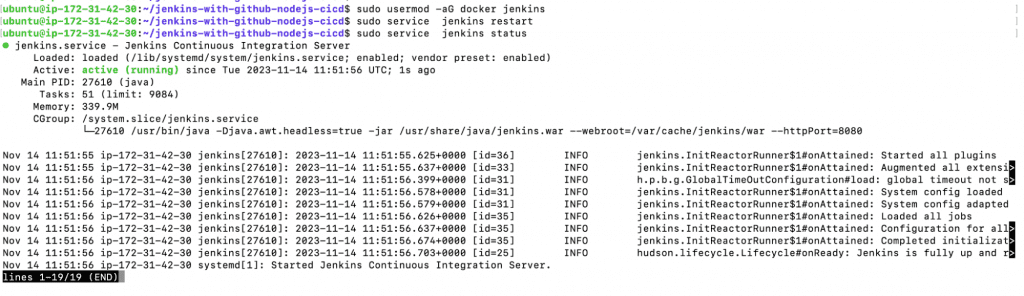
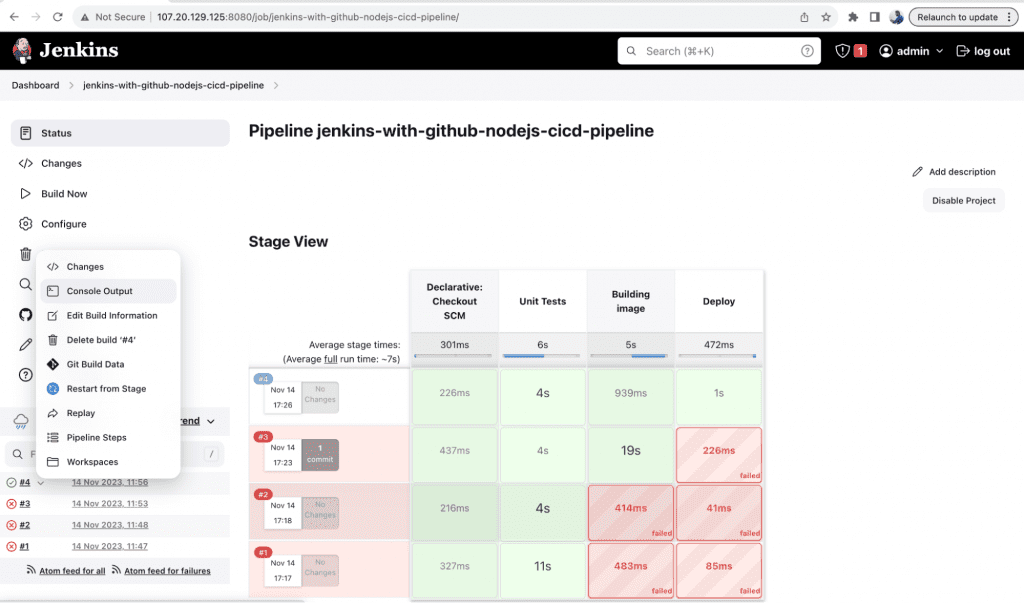
8. After restarting the Jenkins service, log in again to Jenkins UI using the “admin” user and the password available in the /var/lib/jenkins/secrets/initialAdminPassword file. Click on the “Build Now” option to rebuild the pipeline. Navigate to the build number and access the “Console Output” screen to review the logs.
Note: Disregard the build count displayed in the following screenshot, and don’t be concerned if you observe discrepancies, such as having only 2 builds while the screenshot shows 4. This is due to multiple attempts at building while addressing various issues while writing this blog. Simply overlook the build count variations.
9. This time, there should be no errors, and you can attempt to access the sample application deployed on the same EC2 Instance using the Public-IP-of-the-EC2-Instance:80.

10. Now, let’s modify the src/server.js file and push it to test if the pipeline is automatically triggered due to the webhook we created earlier.
- Open the file and change the text message in response.end
vim src/server.js - Check the status to see what has been changed in the repository on the local machine
git status - Review the changes in the file
git diff src/server.js - Add the file to the staging area
git add src/server.js - Commit the changes with a descriptive message
git commit -m “Changed the message to test auto trigger” - Push the changes to the repository git push
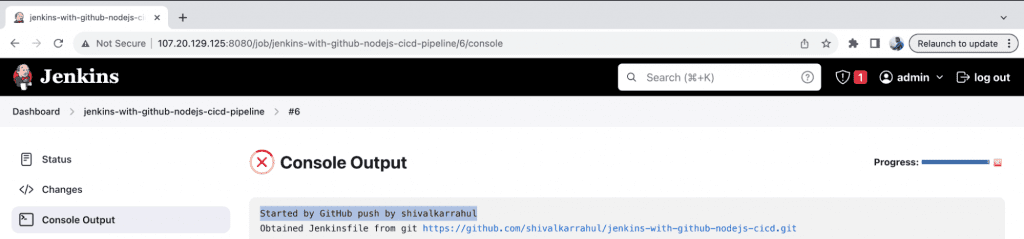
11. Navigate to the pipeline, and you will notice a new build. Check the logs of the new build, where you can observe that the build was initiated by a GitHub Push. This indicates that the integration is successful, and we can build the Jenkins Pipeline by making changes in GitHub.
12. Revisit the sample application URL, and you should observe the modifications you made in the response.end message in the src/server.js file.

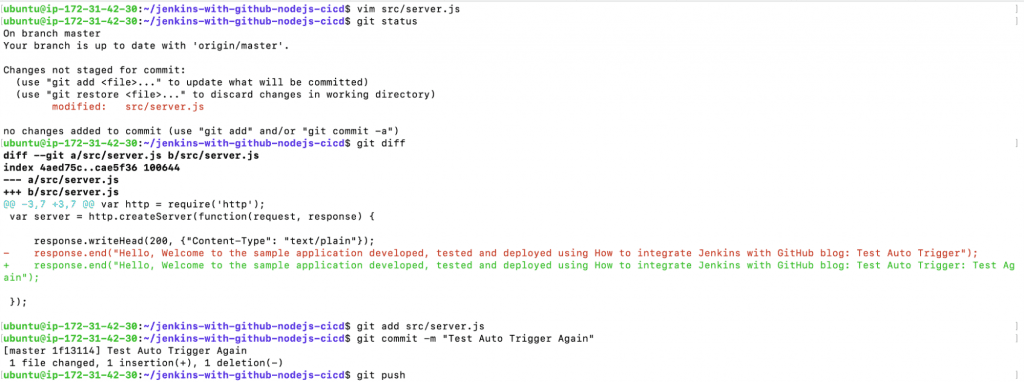
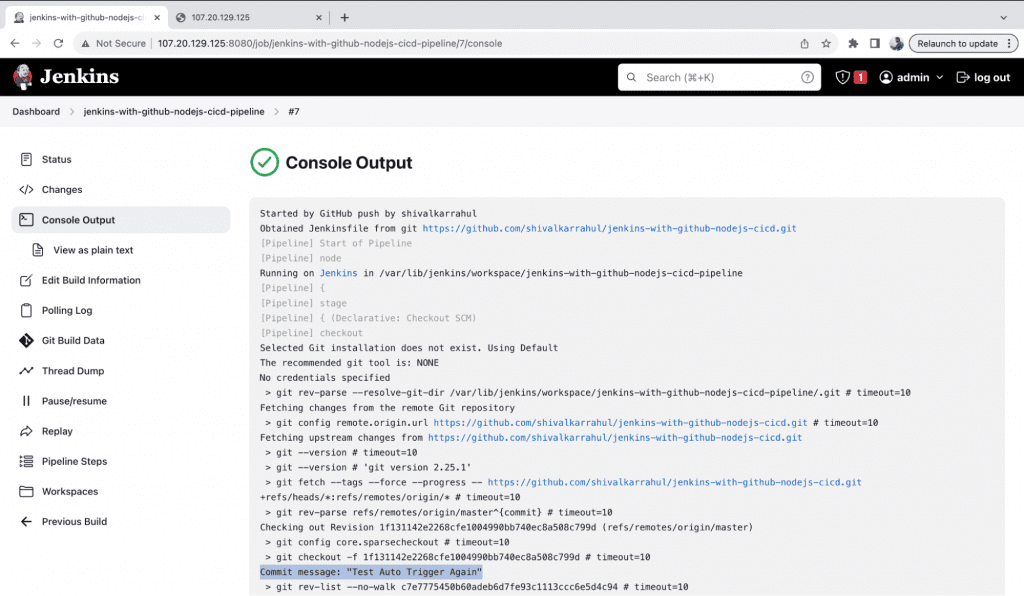
13. You can try again to make changes in response.end message in src/server.js file and push it
- Open the file and change the text message in response.end
vim src/server.js - Check the status to see what has been changed in the repository on the local machine
git status - Review the changes in the file
git diff src/server.js - Add the file to the staging area
git add src/server.js - Commit the changes with a descriptive message
git commit -m “Changed the message to test auto trigger” - Push the changes to the repository git push
14. Once again, go to the new build and examine its logs. You can verify the GitHub push triggered by checking for the “Started by GitHub push by…” message. Additionally, you can find the commit message as highlighted in the screenshot below for confirmation.
15. You can verify this by visiting the application URL. Here, you should observe your change reflected in the message.

And here we complete the 2-step of the Jenkins with GitHub Integration, enabling the Jenkins Pipeline to build automatically upon every commit to the master branch of the GitHub Repository. This is achieved by creating a Webhook in the GitHub Repository and integrating the GitHub Repository in the Jenkins Pipeline.

In conclusion, the combination of Jenkins and GitHub creates a potent synergy that streamlines processes and increases software development productivity. This blog has guided you through the essential processes, from setting up an Ubuntu EC2 machine to configuring Jenkins and creating a sample application repository on GitHub.
Developers can create reliable continuous integration and deployment pipelines by utilizing GitHub’s collaboration features and Jenkins’ automation capabilities.
As you integrate Jenkins with GitHub, remember to modify the processes to fit your project’s unique needs. Ongoing learning and experimentation with new features and plugins will further enhance your development pipeline.
Now that you know how to integrate Jenkins with GitHub, use this integration’s potential to transform your development process completely. Please do not hesitate to contact us if you need help implementing the solution customized to your company’s needs. We’re here to help!
Jenkins with GitHub FAQs
To fully utilize the capabilities of both platforms, Jenkins and GitHub integration is essential. While GitHub offers strong version control and collaboration tools, Jenkins offers strong automation capabilities. When combined, they produce a smooth CI/CD pipeline that optimizes development operations and guarantees code integrity all the way through.
Definitely, Jenkins supports projects created in a range of programming languages and is language-neutral. Setting up build procedures and plugins relevant to the project’s tech stack is crucial.
Jenkins supports both public and private repositories with Github integration. To ensure safe integration, make sure the authentication and authorization settings are correct; private repositories need authentication from Jenkins.
Jenkins is made to manage concurrent builds for various repositories, yes. This flexibility is useful when several projects have separate CI/CD processes.