So, you decided to start using AWS as your cloud provider. Well, there are a lot of services that can be used on the go, but one of the most basic and probably the most common is Amazon EC2. In this blog, you will see the basic concepts, and we’ll tell you step-by-step how to create EC2 instances.
Table of contents
- What is Amazon EC2
- Why Use Amazon EC2
- EC2 Instance Types
- What’s An AMI
- How to create EC2 Instances and launch them
- And you are in
We are about to start to create EC2 instance. Keep in mind that this is just the 2nd Part of our sequence of How to create a High-Performance WordPress with Autoscaling on AWS.
The complete sequence is here:


What is Amazon EC2
EC2 (Elastic Cloud Compute) is the service where you can create servers (from now on I’m going to call them instances since it’s the name used inside AWS) to launch your websites or applications.
Why Use Amazon EC2
Since there are a bunch of other providers on the network that can host your app, we choose Amazon EC2 because it offers a lot of possibilities. You can start with a small instance, and then, when you get more traffic, grow it up to a bigger option, making EC2 more flexible and adaptable than other technologies to host your application.
It is easy to increase your hard drive size in case you need to store more code or images for your app, without mentioning that you are two clicks away from starting using the load balancer on AWS, considering that you just literally have to select your load balancer and add an instance to it. The thing is that most of the common hosting users are afraid of how much AWS would cost, but considering its capacity and flexibility, your application will be in good hands on AWS.
AWS has more time on the market, so the services have been improved since it started, refining them every year for better user experience and technology innovation. All of these reasons made AWS the top provider chosen by millions of companies around the globe.
EC2 Instance Types
One of the first things that you are going to find when you try to create EC2 instance, is the instance type/size. There are several options for each kind of workload you want to do.
General Purpose EC2 Instance
These kinds of instances are used the most for testing purposes. General purpose instances are divided into “T” and “M” varieties.
“T” instances are targeted to simple jobs just like testing environments, and they have a modest networking on the most basic options. So, in general, they are not your choice if you want a production environment. On the other hand, if you are taking the option for your dev or staging environments, you should give them a try.
“M” Instances are for general use when you don’t want a testing environment but want an all-purpose instance. They offer more balanced resources compared to “T” instance, so if you are looking for an instance for your production environment and you don’t want to worry a lot about the resources, “M” instance is what you are looking for.
Note: “T and M” instances offer two types of virtualization: PV and HVM. The first was the one provided by AWS in the past, and it’s available on t1 and m1 instance types. I wouldn’t recommend it because you can’t take advantage of all the hardware, and in some cases are a bit slower.
Another restriction is that you are going to be able to increase your instance type to instances only based on PV, and the newer instance types are not going to be available. My suggestion is always to use HVM instances.
Compute Optimized
If your application requires to process a lot of information like math operations, load balancing, rendering task or sometimes video encoding, you need an instance that can process all that information in less time. “C” instance is your ally in this stressful operation since it has more CPUs capacity and lower RAM.
Memory Optimized
If your app doesn’t require too much CPU but instead needs more and faster RAM, you should check out the available options on the “X1e, X1, and R” instances.
“X1e” instances are targeted for high-performance databases or in RAM applications, but it’s commonly used just by enterprise applications. This instance (x1e.32xlarge) type has an option with almost 4TB of RAM, and it’s certified by SAP to be used with the Business Suite S/HANA.
“X1”, like “X1e”, is targeted to enterprise applications that require fewer resources, but they are also a pretty good option for Big Data operations and high-performance computing. instead of “X1e” options, we only have two options to choose from from with “X1” instances.
“R4” instances are the new generation of “R” instances, an excellent choice for data mining and data analysis, and in-memory applications such as databases, they have more accessible options with resources that a common user can choose.
“R3” instances are the old generation of the “R” instances, and compared with “R4” are expensive, so if you are considering this option, you better choose “R4”.
Accelerated Computing
Creating a movie and rendering the textures? Need to design with power? Or you just have money to spend and want to play games on streaming? If you feel identified, P and G instances are what you are looking for, all these instances have their own NVIDIA Graphics card and vary the amount of GPU that they have depending on the instance size.
“P2” is a “general” purpose instance, but the older version of the “P” instances are more accessible compared with the new ones and offer the power that you need for data science, data analysis, and rendering power.
“P3”, the latest version of the “P” instances, offer more power with its NVIDIA Tesla V100. Like the “P2”, this is an excellent option for data analysis, but it will also be incredible at speech recognition and for autonomous vehicles.
“G3” instances are perfect for creating your remote graphics station, the best option for 3D rendering, video encoding or application streaming (yes you can stream an application which requires too many resources, even run a game and stream it to your laptop).
Storage Optimized
This Kind of instances are provisioned with a more significant amount of TB for storage, and you are going to have the best I/O Performance. These instances are a great option for those databases that need to be writing regularly on the disk, here we have three groups of instances: H, I and D.
“H” instances are the best option for distributed file systems or centralized log processing.
“I” instances are also a great choice for databases especially for NoSQL or data warehouse
“D” instances similar to H ones but offer better performance for Massive Parallel Processing data warehousing and distributed computing like Hadoop and MapReduce.
These are all the available instance types and some of their uses I hope with this little explanation it’s easier to you to choose from one or another.
What’s An AMI
Now, before we enter into how to create an ec2 instance, let’s discuss what an AMI is; it’s the acronym for Amazon Machine Image. Pretty clear right? I don’t think so. To make this a bit easier to understand, I’ll give you an example.
If you have worked with old computers or even with physical servers, you probably know that you need to update or install the same stack on more than three devices. This is done by using tools like Norton Ghost or Acronis True Image to create disk snapshots which let you take a picture of the current state of the disk to load it on the other devices in less time, compared to doing it manually.
Well, an AMI has the same idea, but it is a combination of multiple snapshots. This means that if the instance has more than one disk, the AMI it’s going to contain the other disks.
That’s the theory, but you also have to know that all the OS
offered by AWS are packed as an AMI so that you can find empty images with Ubuntu, Fedora, Centos, RedHat, Amazon Linux, and even with Windows Server.
There are other AMI options on the marketplace with preinstalled software like LAMP and LEMP stacks, Redis optimized or hardened software to launch your brand new instances. But be careful my friend, some of those marketplace AMI are not only smiled, some of them include a fee per hour for you to use it (plus the cost per hour of the instance). So, if you want to choose an AMI from the AWS Marketplace check the prices of it.
Note: To Use some of the instances you need to accept an agreement, sometimes you are going to be redirected to the AWS Marketplace to take it and, in other cases, you will have to access the marketplace to accept it.
How to Create EC2 Instances in AWS and launch them
Now you know the basics of the EC2 service and know that there are a lot of options and things to do. But the most important thing is to apply the knowledge. So let’s see how to create EC2 instances and launch them using an AWS Marketplace AMI so you can see the complete process to create EC2 Instance.
This tutorial will show you how to create EC2 instances from scratch, but if you already have a WordPress site to migrate from cPanel you can check this tutorial.
Requirements:
1 x AWS account (if it’s an IAM user verify that you have permission to launch EC2 instances)
Instructions:
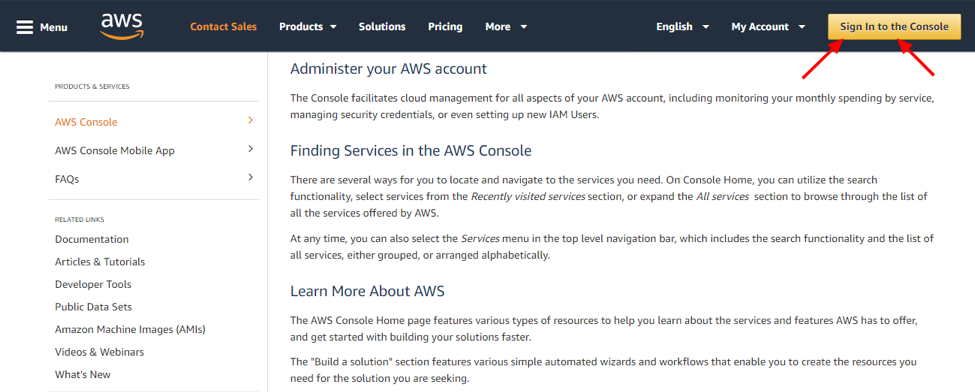
Step 1 on How to Create ec2 Instance
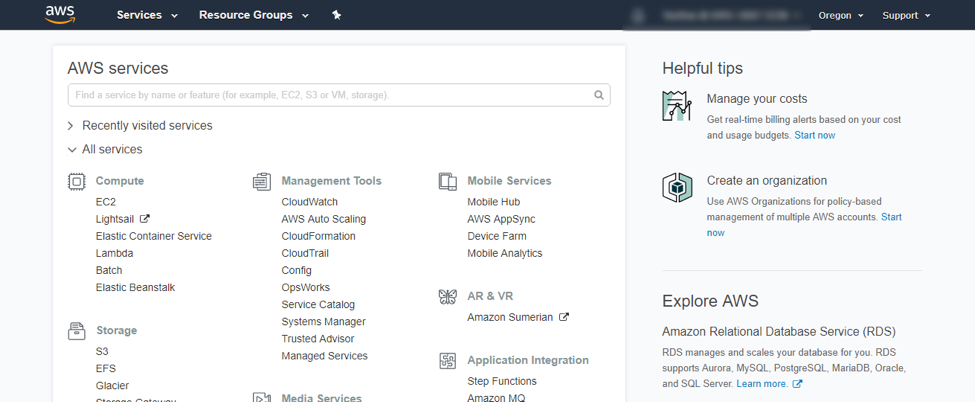
First of all, we need to login into the AWS Console, access using this URL: https://aws.amazon.com/console/and you are going to see this page, click the button “Sign In to the Console.”
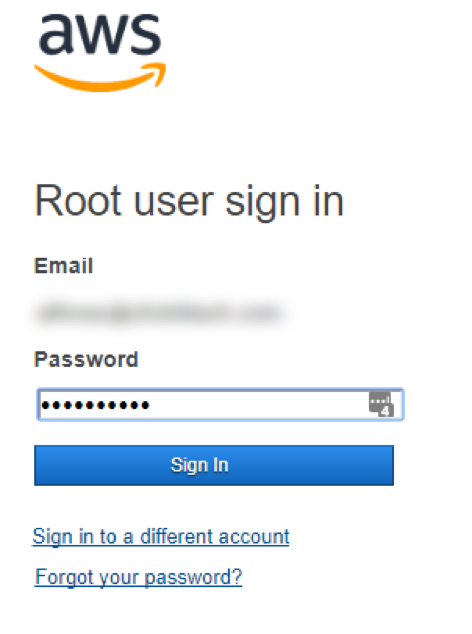
Step 2 on How to Create ec2 Instance
It’s going to open a page requesting your username or email. Type your password.
Step 3 on How to Create ec2 Instance
This it’s what the AWS console looks like:
Step 4 on How to Create ec2 Instance
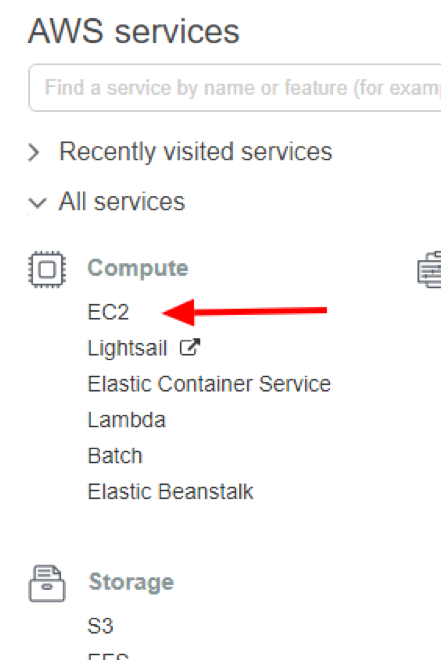
Click on EC2.
Step 5 on How to Create ec2 Instance
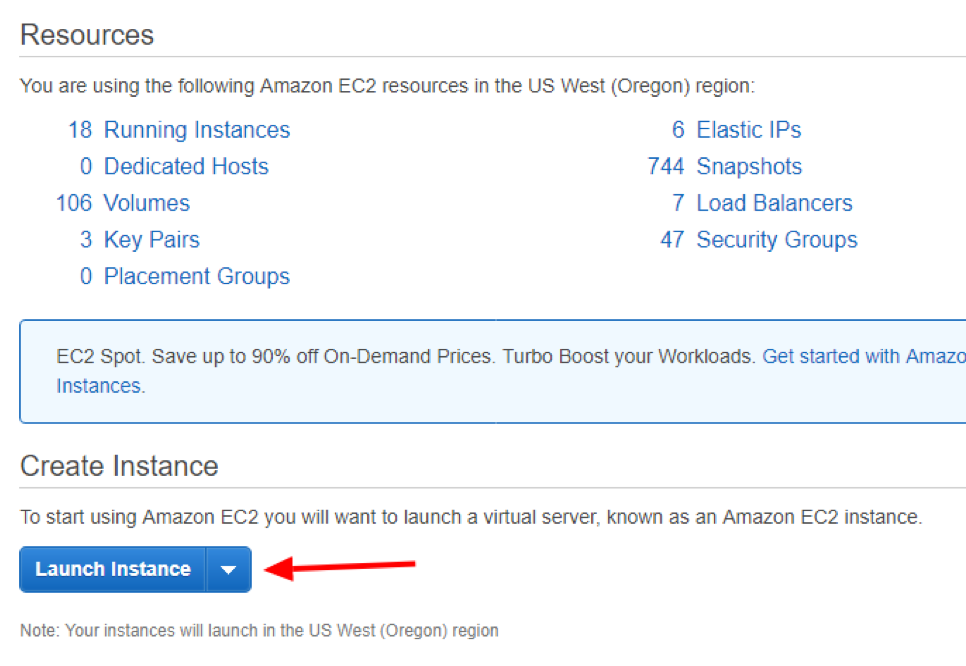
This is how the EC2 Dashboard looks.

Step 6 on How to Create ec2 Instance
Click the big blue button “Launch Instance.”
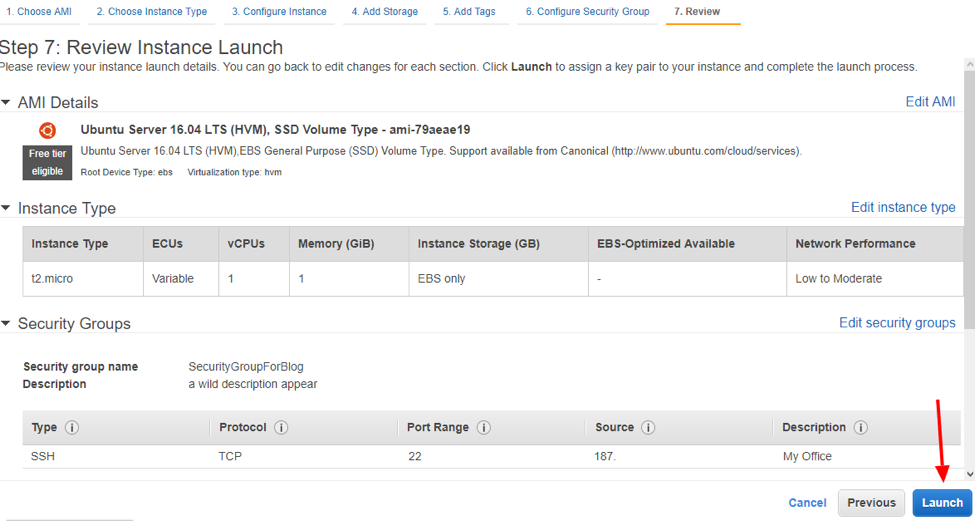
Step 7 on How to Create ec2 Instance
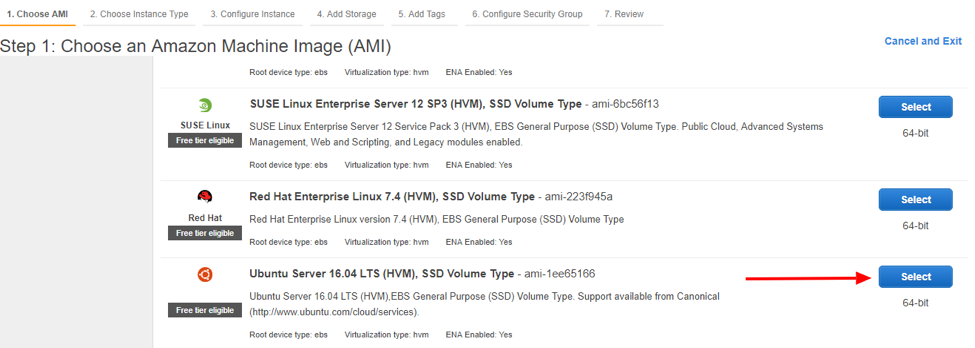
Immediately after you click the button a list of AMIs is going to appear. There you can select the one that you prefer, in this case, I’m going to choose Ubuntu Server 16.04 LTS.
Step 8 on How to Create ec2 Instance
After you click the select button of your chosen AMI, you are going to be able to select the EC2 instance type from the list, for this example, I’m going to use t2.micro, select and the next button.
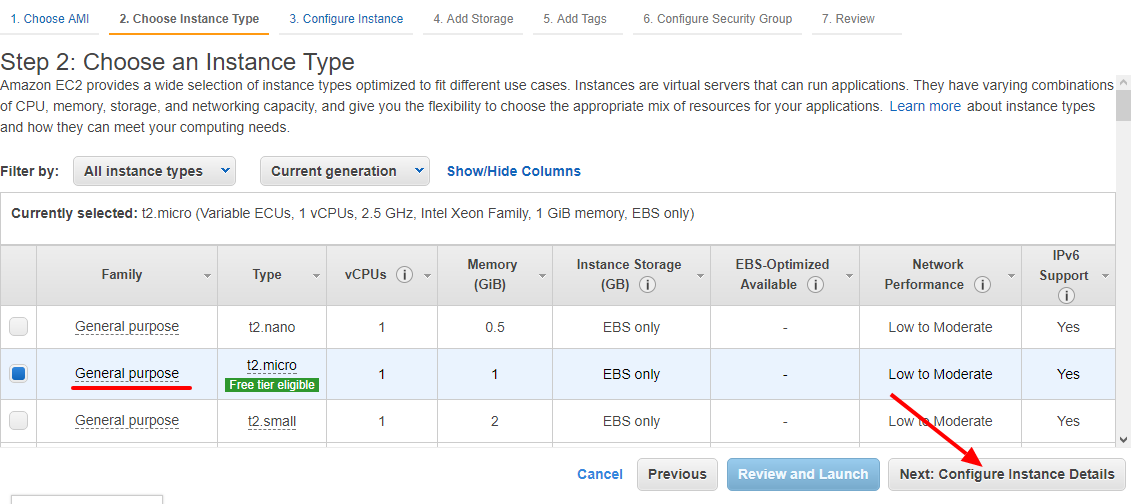
Step 9 on How to Create ec2 Instance
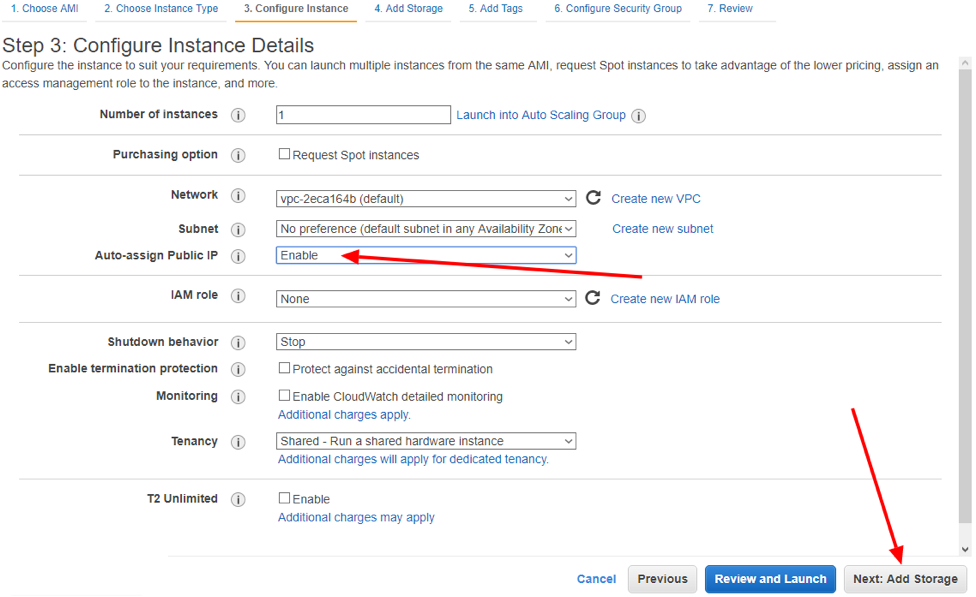
Now to create ec2 instance, the next page is going to show you some options to set up your instance. For the moment, just be sure that the Auto-assign Public IP it’s set to enable and click next.
Step 10 on How to Create ec2 Instance
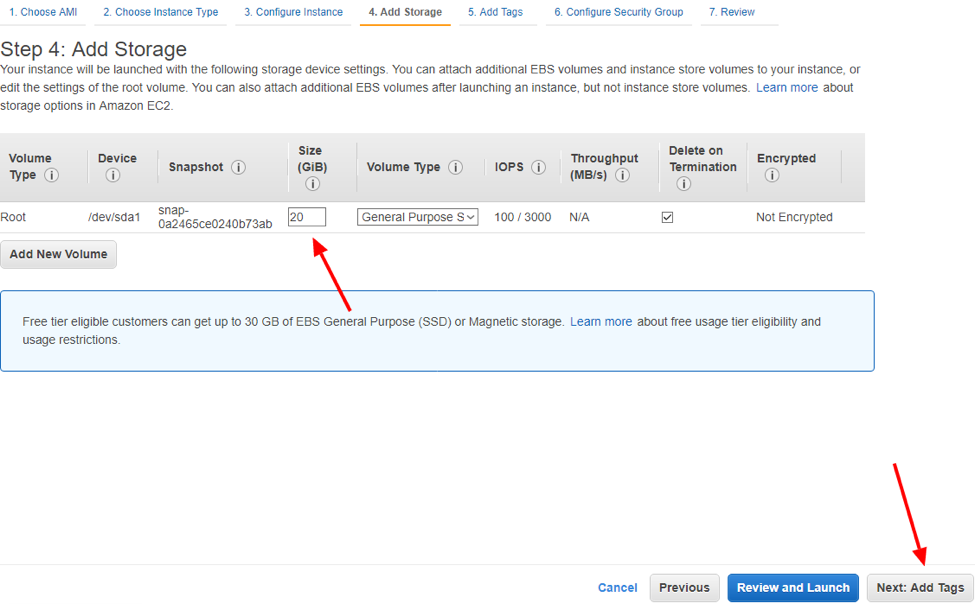
To create ec2 instance on this page, you can choose the amount of GB that your hard drive it’s going to have.
Note: Never leave the default 8gb, if you want to be on the free tier limits you can set a value around 20gb -24gb, because sometimes you leave it as default and your instance is not going to have too many spaces to do many things, and click next.
Step 11 on How to Create ec2 Instance
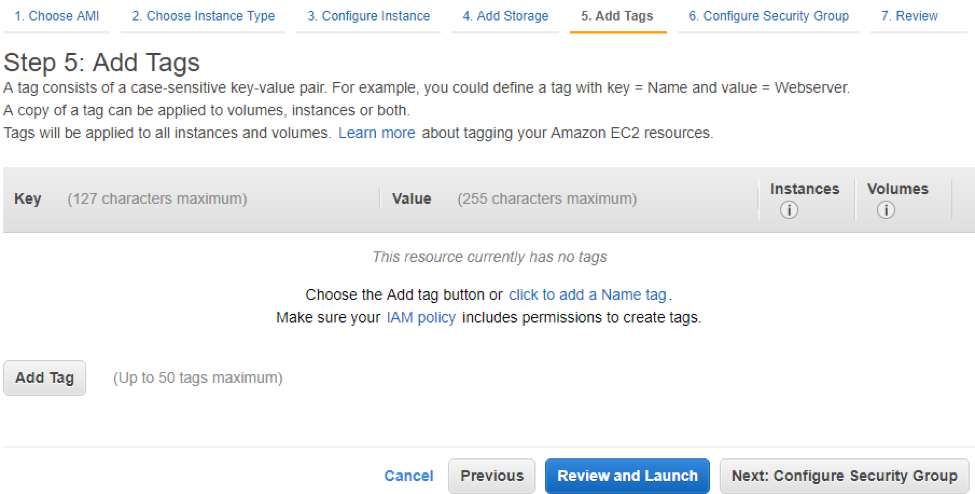
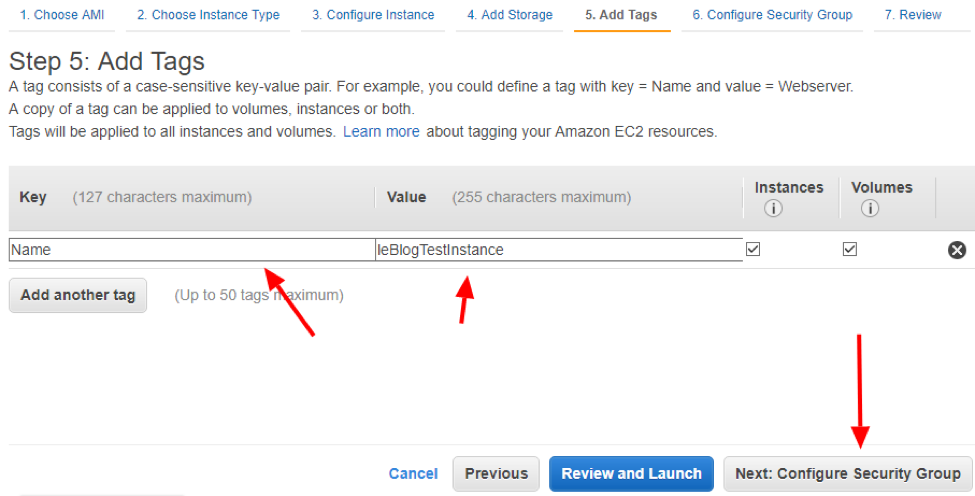
You should be on the Tags screen to create ec2 instance.
Step 12 on How to Create ec2 Instance
Let’s click on the button “Add Tag” and on the key column type “Name” and on the value type the name that you want to give to your instance and click on next.
Step 13
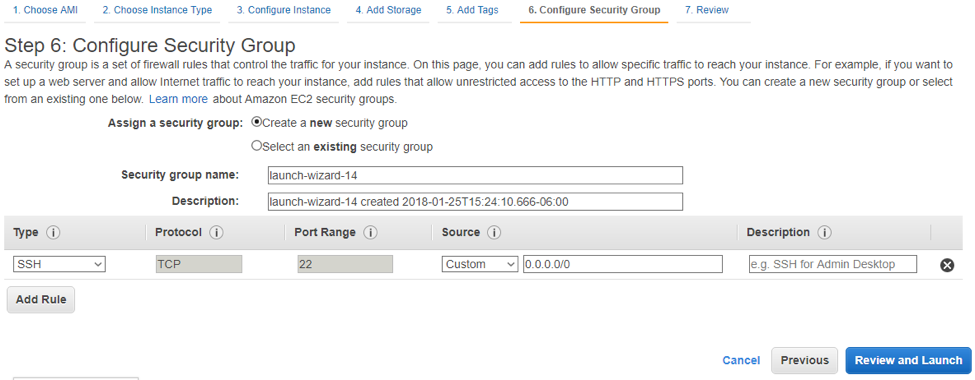
Setup a Security Group: A Security group it’s like the firewall for your instance. Here, you have to open the ports that you are going to use: i.e., if you want to have a web server, you need to open port 80. If you want SSH access, you need port 22, so let’s create a new one.
Step 14
Now to create ec2 instance, let’s give a name and description to the new Security Group

Step 15
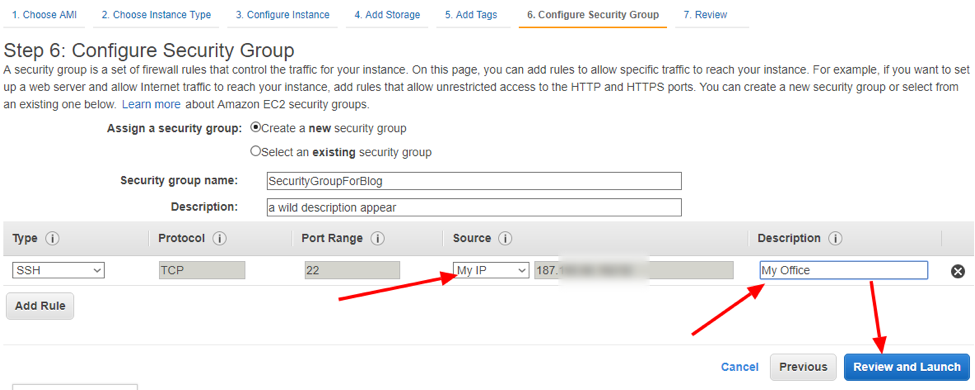
Ports: The port 22 (ssh) open world (0.0.0.0/0) is added by default; we can leave it like that or choose “my IP” on the list of the source column. As a security measure, AWS only open ssh port to the ones that you trust and don’t leave it open world, add a description to identify and click on “Review and Launch.”
Step 16
A Summary of all the setting that you have set it’s going to be shown on screen if everything looks fine, click on Launch, if not you can return to change everything that you need.
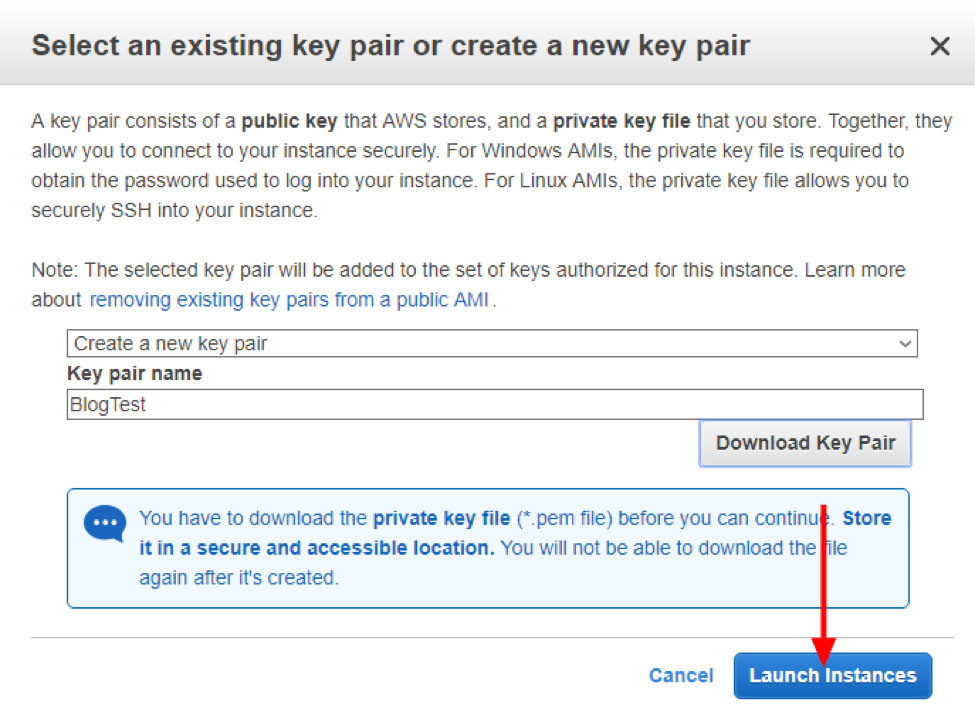
Step 17
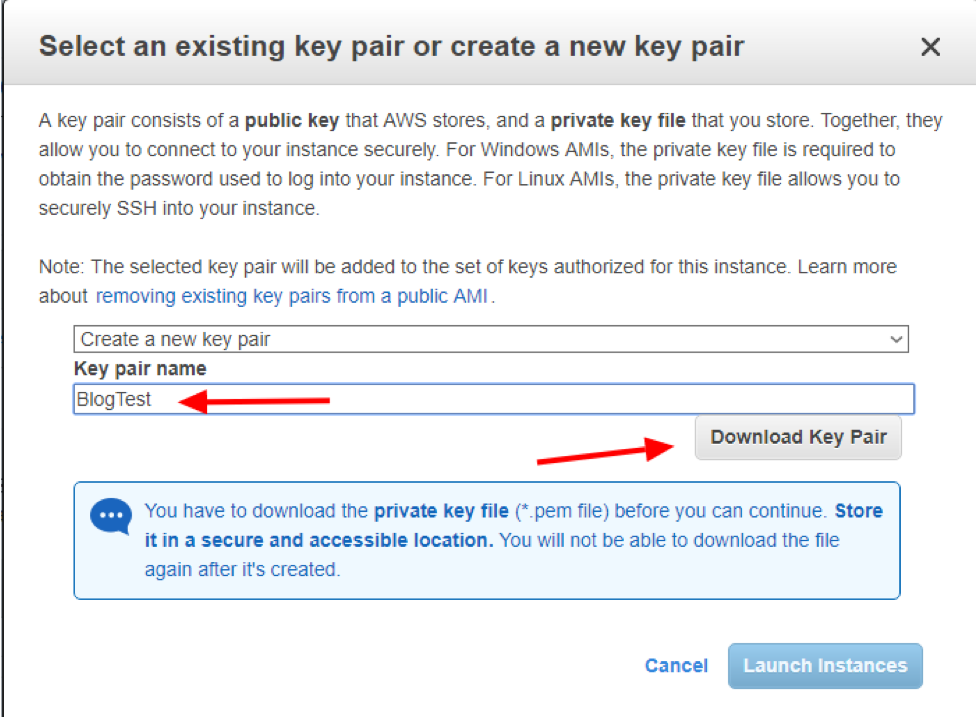
A key? This little thing is what you need to be able to access your brand new instance. Give it a name and click the button “Download Key Pair.” Then, save that file because you are not going to be able to get it in another time. AWS doesn’t store keys, so if you lose it, you are going to lose access to your instance.
Step 18
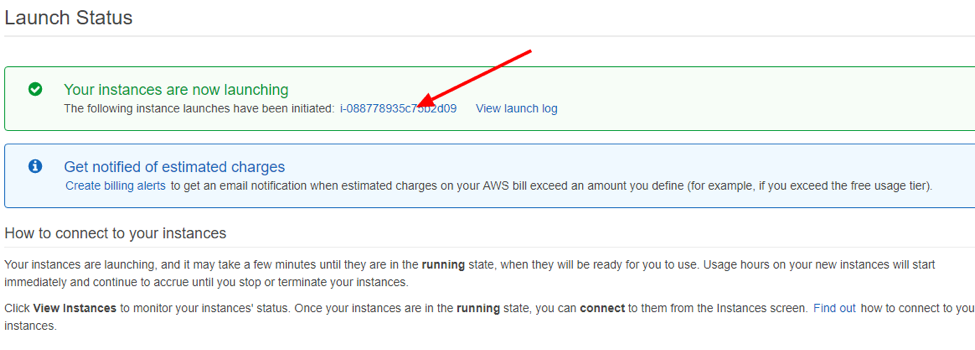
Click on “Launch Instance” to create ec2 instance.
If everything goes well you are going to see the next screen, click on the id to view it on the dashboard.
Step 19
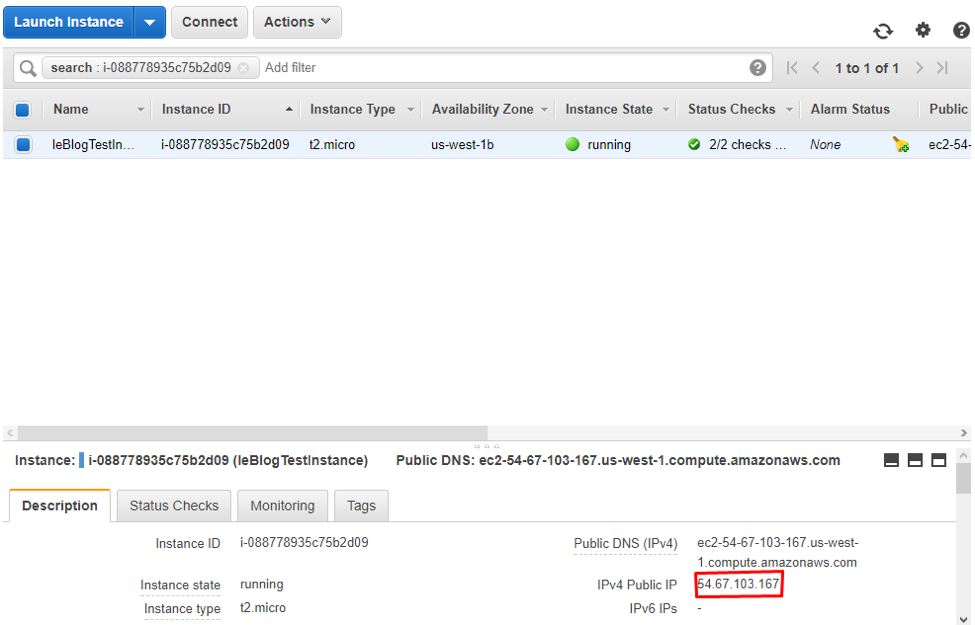
Access to the instance
On the image above you can see the public IP of the instance. Save it, since we are going to use for access purposes. To access using Linux or Mac, you need to change the permissions of the key before using it.

For copy/paste purposes:
chmod 400 YourKeyName.pem
Time to get connected to the instance. You need to know that since we have launched an Ubuntu Instance, the user it’s Ubuntu, you can check this information on the AMI information.
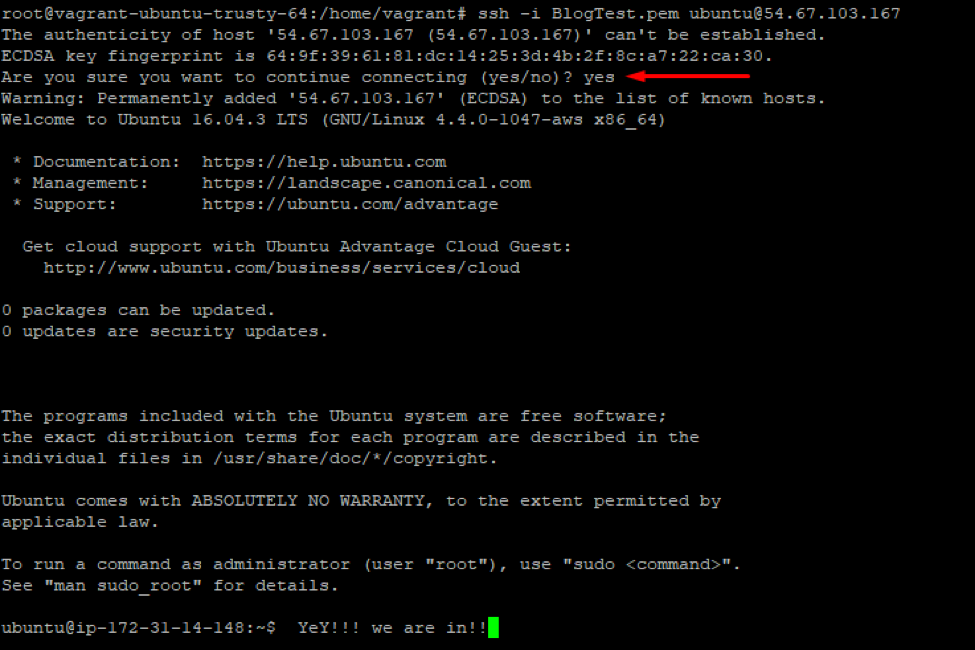
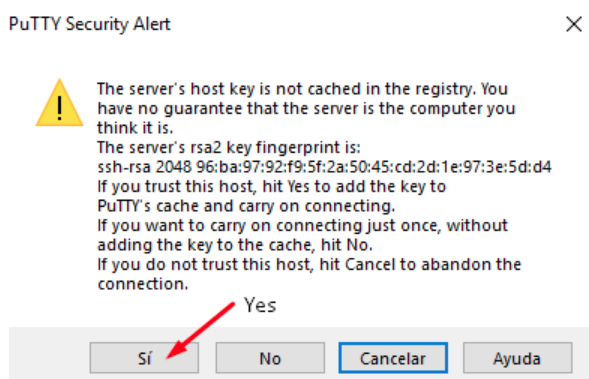
Since is the first time you are going to get connected it’s going to ask you if you want to trust on the remote host (your instance) type “yes” and press enter, and you are going to get in.
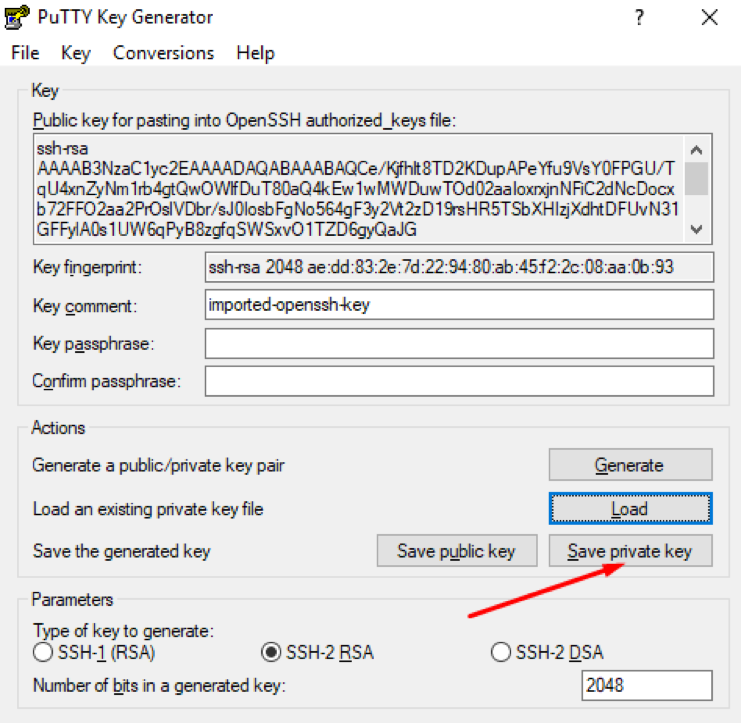
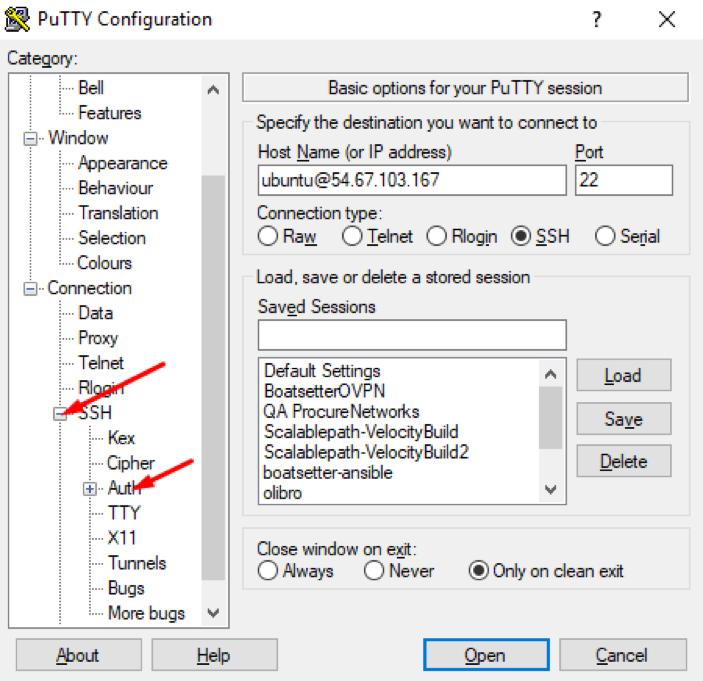
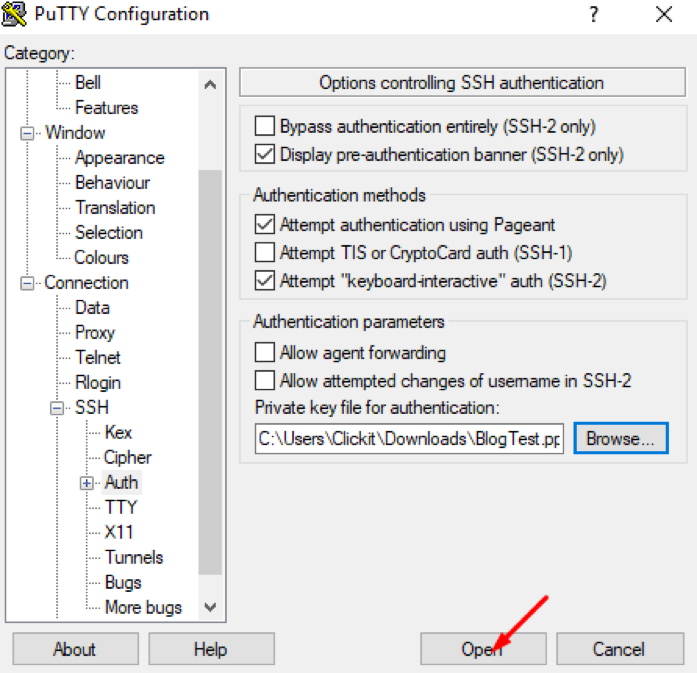
If you are using windows depends on the tool that you are using, let us PuTTY, this tool doesn’t accept pem files, so we need to convert the file using a tool provided by PuTTY: PuTTYgen.

Click on load and choose your pem file and you are going to see the loaded key, just press “save private key.”
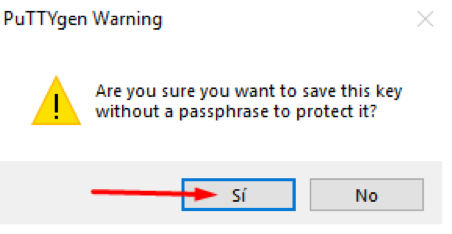
It’s going to ask you if you want to add a passphrase (another layer of security) just press yes to continue without it.
And save the file, this it’s going to create a file with the “.ppk” extension.
Now let us it to get connected using PuTTY
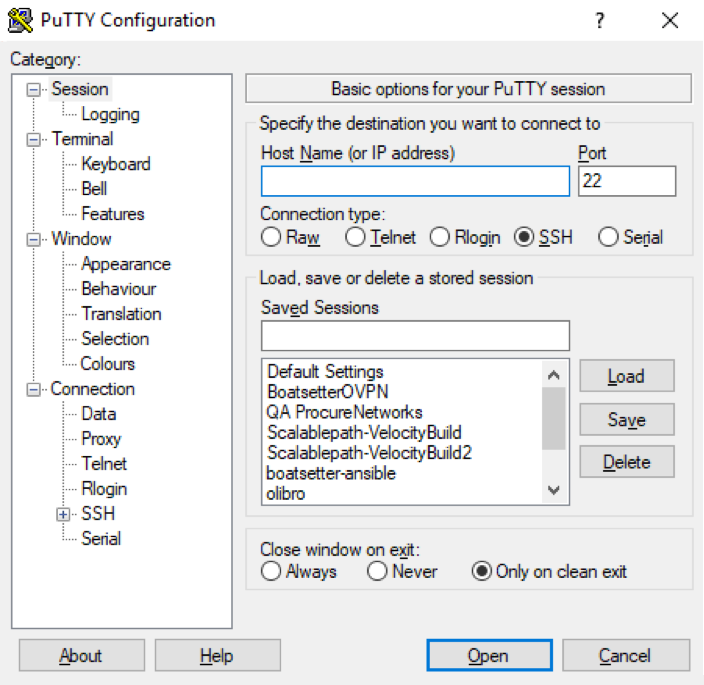
On hostname type
ubuntu@IPADDRESS
Now like on the image above click on the + on the left to SSH and select Auth, there click on the browse button and select the ppk file created by PuTTYgen and click open.
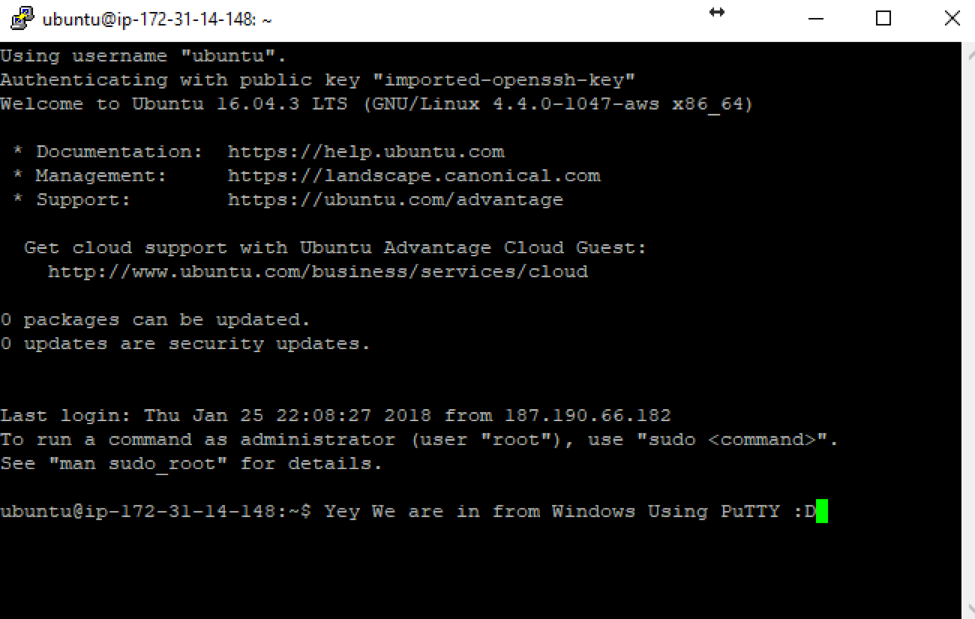
Same as happened on Linux it’s going to ask you if you want to trust the host, just click yes, and you will be there.
And you are in
With this, you know the basics to create EC2 instances, some concepts, you know how to launch an instance, and how to access it. If you have any doubts, feel free to post them in the comments section, I hope you enjoyed this fast tutorial.
Take into consideration that “Create and configure an instance EC2” is just the 2nd Part of our sequence of How to create a High-Performance WordPress with Autoscaling on AWS. Stay alert to the next publications on our site so that you can be aware of the complete sequence.

FAQs
Step 1: Log in to the AWS Console using the URL provided: https://aws.amazon.com/console/ and click “Sign In to the Console.”
Step 2: Enter your username or email and password.
Step 3: Access the AWS console.
Step 4: Click on “EC2.”
Step 5: Navigate to the EC2 Dashboard.
Step 6: Click “Launch Instance.”
Step 7: Select an AMI, such as Ubuntu Server 16.04 LTS.
Step 8: Choose the EC2 instance type (e.g., t2.micro) and click “Next.”
Step 9: Set “Auto-assign Public IP” to enable and proceed.
Step 10: Specify the size of the hard drive (e.g., around 20-24GB) and click “Next.”
Step 11: Add tags to your instance.
Step 12: Create a tag with “Name” as the key and your desired name as the value, then proceed.
Step 13: Set up a Security Group to define firewall rules.
Step 14: Provide a name and description for the Security Group.
Step 15: Configure ports and sources for access, ensuring proper security measures.
Step 16: Review all settings and click “Launch.”
Step 17: Download the key pair required for accessing the instance and save it securely.
Step 18: Click “Launch Instance” to initiate the creation process.
Step 19: Access the instance using the public IP address, adjusting permissions for Linux/Mac and converting the key for Windows (if necessary), and connecting via SSH or PuTTY.
An EC2 instance is a virtual server offered by Amazon Web Services (AWS) through their Elastic Compute Cloud (EC2) service. It allows users to rent computing capacity in the cloud to run applications, host websites, and perform various computing tasks without the need for physical hardware.
To create a private EC2 instance:
Log in to the AWS Management Console.
Navigate to the EC2 Dashboard.
Click on “Launch Instance.”
Choose an appropriate Amazon Machine Image (AMI).
Select the desired instance type and configuration.
Configure the instance details, including network settings.
Choose a security group that restricts access to the instance (do not allow public access).
Review the instance details and launch it.
Optionally, configure any additional settings or attach storage volumes as needed.