Over the years, WordPress has become one of the most popular CMS of our time, taking into account that searches in Google about WordPress and WP reach huge numbers nowadays. WordPress dominates other markets, so it’s definitely not just for blogging. This popular CMS has been used to create e-commerce platforms for years since the creation of e-commerce integration plugins for WordPress sites.
Table of contents
- Use of “Let’s Encrypt”
- Use of a Self Signed certificate and validate it with Cloudflare
- Use of a certificate “SSL For Free”
- Conclusion
One of the most robust plugins for WordPress eCommerce sites is WooCommerce; it has become an essential complement for websites that are looking to sell products online. It is recognized for its simple integration and adaptation to the WordPress user-friendly platform, and also taking into account the infinity of plugins and themes that make the development process way to easier, and at the same time ensuring a flawless user experience that will clearly improve your sales.
By having an online store supported by these technologies, we must take into account that customers seek to buy without fear of the inappropriate use of their personal information since digital crimes are the most common nowadays. That is why, if you want to transmit that trust to your visitors, we will show you how to use SSL certificates on your WordPress site with WooCommerce.
Speaking of SSL certificates, these are the ones that provide your visitors with the necessary information to see that your site is authentic and that your personal information will not be used in the wrong way. Given this information, we can say that an SSL certificate allows the encryption of our data within a website, so it can not be viewed, and there is no risk of being a victim of cyber crimes such as identity theft, among others.
Now is time to show you 3 ways to add an SSL certificate on your WordPress site with WooCommerce. Keep in mind that these SSL certificates are free, so you don´t have to worry about extra cost for having a secure eCommerce.
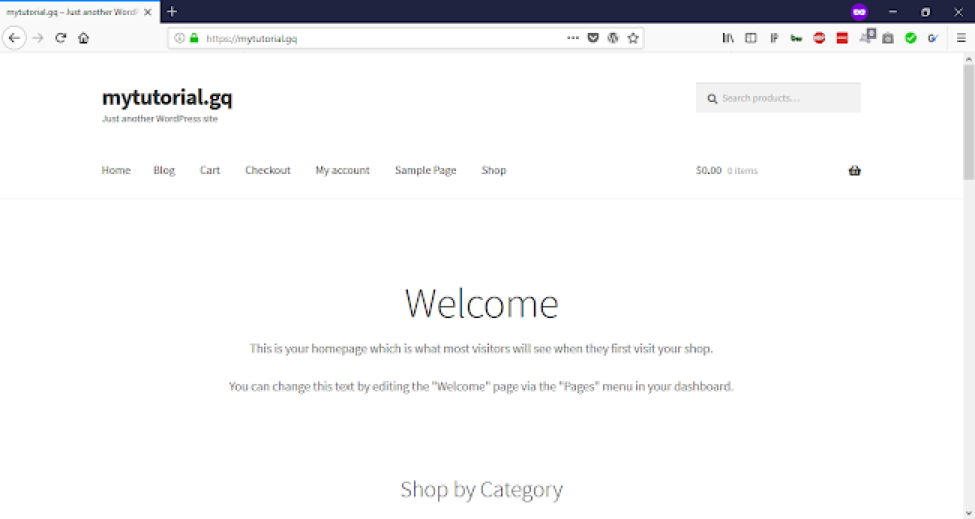
NOTE: This tutorial was done on a server with Ubuntu operating system 16.04 LTS that is currently using LAMP stack for the administration of the website and with the domain mytutorial.gq.
Use of “Let’s Encrypt”.
This method is one of the most recurrent for system administrators today, used to request a certificate for a domain registered with the use of the tool “Certbot” within servers with Linux operating system.
Pre-requirements:
- To have a WordPress website online with WooCommerce.
- To have a registered domain.
To obtain an SSL certificate with Certbot, we need to do the following steps:
1. Install Certbot on your server.
Access your server by SSH and run the following list of commands to install the Certbot tool on your web server.
$ sudo apt-get update$ sudo apt-get install software-properties-common$ sudo add-apt-repository ppa:certbot/certbot$ sudo apt-get update$ sudo apt-get install python-certbot-apache
If you use Nginx as a web server, you must change the final line to
$ sudo apt-get install python-certbot-nginx
2. Request and validate a Let’s Encrypt certificate with Certbot.
Once Certbot has been installed on your web server it was time to request a certificate for your domain.
One of the advantages of certbot is that it adds the necessary configuration corresponding to your web server, either Apache or Nginx.
Write the command $ certbot –apache -d mytutorial.gq -d www.mytutorial.gq to request and configure your SSL certificate, where –apache adds the necessary configuration for the Apache web server, -d is to add the domain to the which we are requesting the SSL certificate.
In case of using Nginx as your web server it must be changed –apache by –nginx so that Certbot adds the necessary configurations in the virtual host file that Nginx handles for your site.
If you want a certificate for both the domain with and without www you only add the -d flag with the www in the domain.
Next, it will ask you for an email for urgent updates and security news.

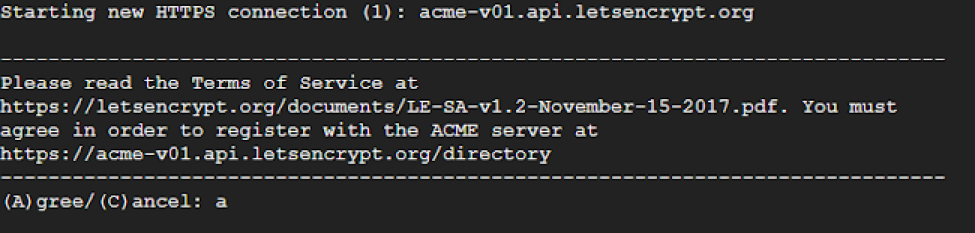
Once finished this will ask us if we agree to the terms of service exposed in the address https://letsencrypt.org/documents/LE-SA-v1.2-November-15-2017.pdf , as shown in the following image and we accept to continue with the request.
Next, ask us if we want our email address to be shared with the Electronic Frontier Foundation, a founding partner of the Let’s Encrypt project. After deciding this, we proceed to the next step.

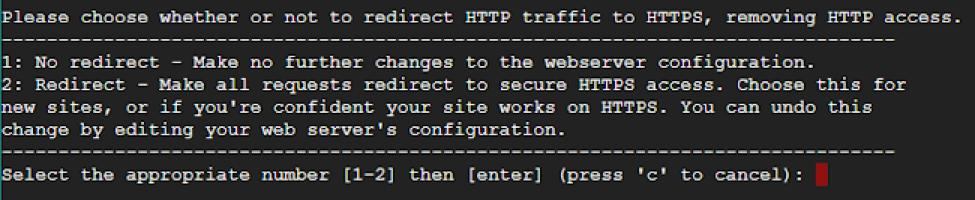
Now, it allows us to choose if we want our site to redirect or not to https, this is depending on the needs of your site. As a general recommendation, the one that redirects to https is the best option for your clients to access the secure site without having to type in the URL of the https site at the beginning.
Once it’s finished, it will show us a message with which it confirms that our certificate has been installed successfully.
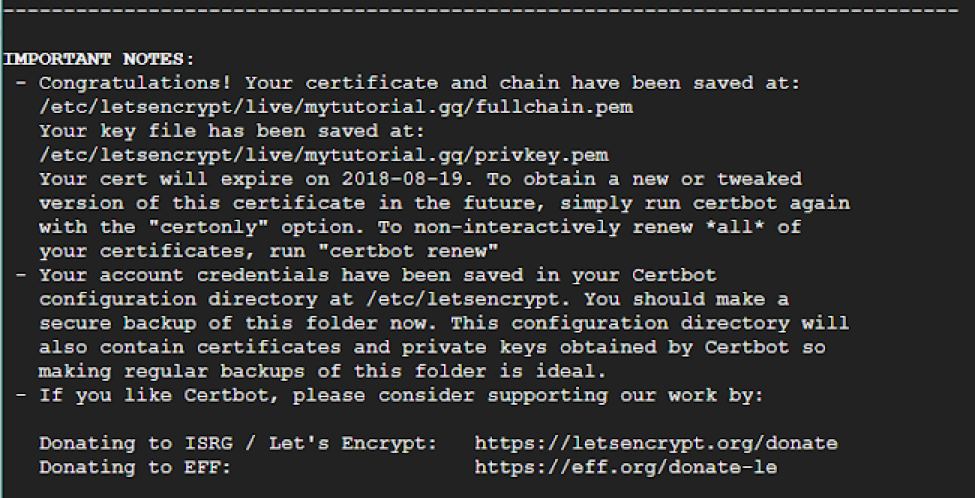
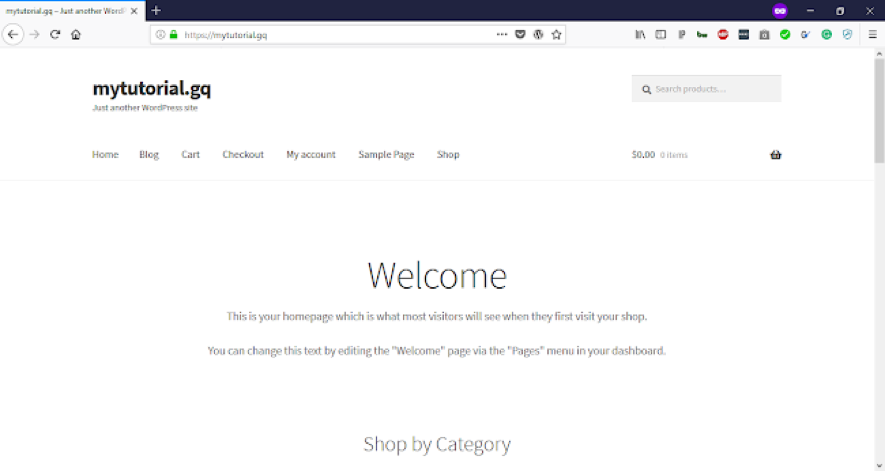
To confirm this, access your site, and you will see the certificate that you recently installed on your site.
3. Certificate Renewal.
To renew your certificate after it expires, use the command $ sudo certbot renew –dry-run so your certificate is valid again.

Use of a Self Signed certificate and validate it with Cloudflare.
A Self Signed certificate is a certificate that can be issued by oneself, instead of a certifying authority, its use within your website will show us that the site is unsafe, and this is not what we are looking for. On the other hand, the use of this type of certificates can be validated if your domain is registered in Cloudflare.
Cloudflare is a service that offers security and performance features (among other things) to a broad network of websites. It acts as a reverse proxy, an intermediary between you, the user, and a specific website. When you visit that site, you will be directed to one of the Cloudflare servers instead of the actual site servers. Among the security features that it offers us is the validation of your certificate so that it is shown securely to everyone who accesses your site.
Next, we will install a Self Signed certificate and proceed to validate with Cloudflare.
NOTE: You must have a registered domain and using Cloudflare as your DNS administrator.
1. Create a Self Signed certificate and configure your web server.
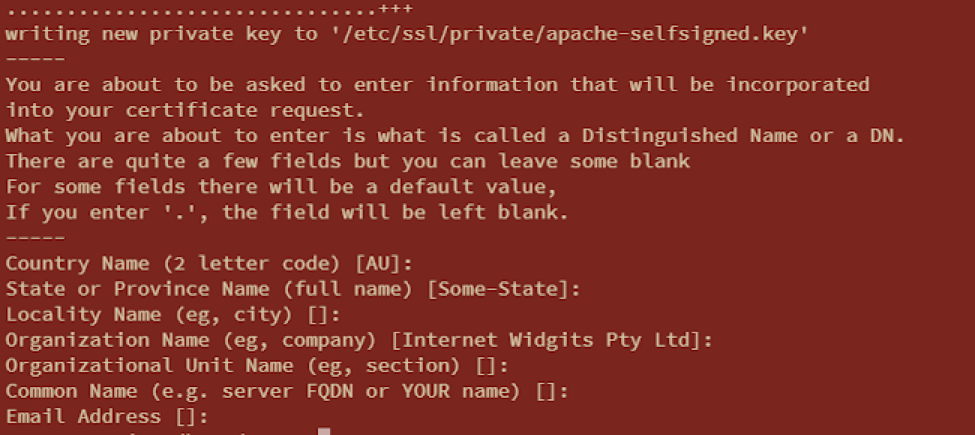
First, access your server by SSH and execute the command $ sudo openssl req -x509 -nodes -days 365 -newkey rsa: 2048 -keyout /etc/ssl/private/apache-selfsigned.key -out / etc / ssl / certs /apache-selfsigned.crt
Where:
openssl is the command that allows the request and generation of OpenSSL keys and certificates.
-req -x509 is a subcommand that determines the creation of a new “X.509” certificate. It is a new open source infrastructure standard that SSL and TLS are achieving for the administration of keys and certificates.
-nodes specifies OpenSSL to omit the option to protect our certificate with a passphrase.
-days is the option where we say how long the certificate will be valid.
-newkey rsa:2048 specifies that we want to generate a new certificate and a new key. The RSA part: 2048 tells you to create an RSA (Rivest-Shamir-Adleman) key of 2048 bits in length.
-keyout determines where the key we want to create will be stored.
-out determines where the certificate will be stored.
When executing the command, it will request information from our website, as shown in the following image.
Now you have to add the necessary configuration to the configuration file of your web server.
In case you use Apache as a web server, your virtual host should look like this.
<VirtualHost *:80> ServerName www.example.com ServerAdmin webmaster@localhost DocumentRoot /var/www/html ErrorLog ${APACHE_LOG_DIR}/error.log CustomLog ${APACHE_LOG_DIR}/access.log combined</VirtualHost> # vim: syntax=apache ts=4 sw=4 sts=4 sr noetTo make your site work with the SSL certificate that we just created, you must add the following lines to your virtual host.
<VirtualHost *:80> ServerName www.mytutorial.gq ServerAlias mytutorial.gq ServerAdmin webmaster@localhost DocumentRoot /var/www/wordpress ErrorLog ${APACHE_LOG_DIR}/error.log CustomLog ${APACHE_LOG_DIR}/access.log combined #Enable HTTPS redirection RewriteEngine on RewriteCond %{SERVER_NAME} =mytutorial.gq [OR] RewriteCond %{SERVER_NAME} =www.mytutorial.gq RewriteRule ^ https://%{SERVER_NAME}%{REQUEST_URI} [END,NE,R=permanent]</VirtualHost>#Configuration block for the use of the Apache SSL mod#In case of being used<IfModule mod_ssl.c> <VirtualHost *:443> ServerName www.mytutorial.gq ServerAlias mytutorial.gq DocumentRoot /var/www/wordpress ErrorLog ${APACHE_LOG_DIR}/error.log CustomLog ${APACHE_LOG_DIR}/access.log combined #SSLEngine is enabled here SSLEngine on#Here is the route where the Self Signed certificate is SSLCertificateFile /etc/ssl/certs/apache-selfsigned.crt#Here is the path where the private key that was created with the Self Signed certificate is placed SSLCertificateKeyFile /etc/ssl/private/apache-selfsigned.key </VirtualHost></IfModule># vim: syntax=apache ts=4 sw=4 sts=4 sr noet
In the case of using nginx as your web server, your virtualhost file should look like this.
server { listen 80; root /var/www/wordpress; index index.php index.html; server_name mytutorial.gq www.mytutorial.gq; location / { try_files $uri $uri/ =404; } location ~ \.php$ { include fastcgi_params; fastcgi_pass unix:/run/php/php7.0-fpm.sock; fastcgi_index index.php; fastcgi_param SCRIPT_FILENAME $document_root/$fastcgi_script_name; }}You must add the following highlighted lines in blue corresponding to the configuration for your SSL certificate
server { root /var/www/wordpress; index index.php index.html; server_name mytutorial.gq www.mytutorial.gq; location / { try_files $uri $uri/ =404; } location ~ \.php$ { include fastcgi_params; fastcgi_pass unix:/run/php/php7.0-fpm.sock; fastcgi_index index.php; fastcgi_param SCRIPT_FILENAME $document_root/$fastcgi_script_name; }#SSL configuration#Https port listen 443 ssl; #Here is the route where the Self Signed certificate is ssl_certificate /etc/ssl/certs/nginx-selfsigned.crt; #Here the path where the private key created together with the Self Signed certificate is placed ssl_certificate_key /etc/ssl/certs/nginx-selfsigned.key;} server { if ($host = www.mytutorial.gq) { return 301 https://$host$request_uri; } if ($host = mytutorial.gq) { return 301 https://$host$request_uri; } listen 80; server_name mytutorial.gq www.mytutorial.gq; return 404;}Now you must have your Self Signed certificate on your website. It’s time to log in to Cloudflare.
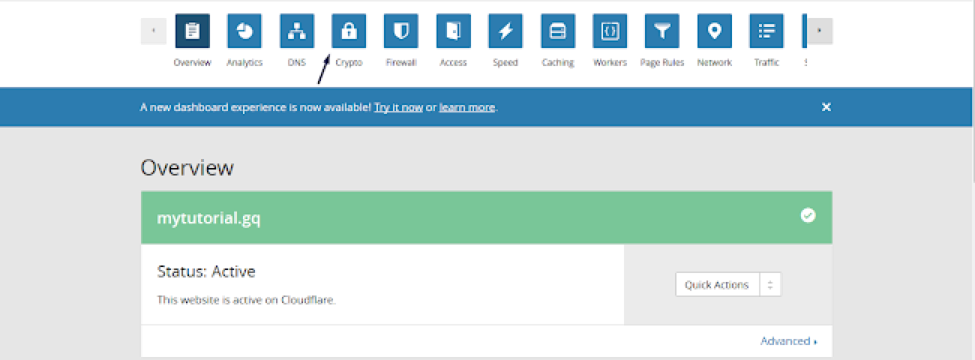
2. Manage your SSL in Cloudflare.
Log in to your Cloudflare account and select your domain, then you need to choose the “Crypto” option as shown in the image.
Now, on the screen you can see the SSL option, it is necessary to change the option of this block and put it in FULL, because when enabling this option we assume that we have an SSL certificate on our server, which we have previously configured.
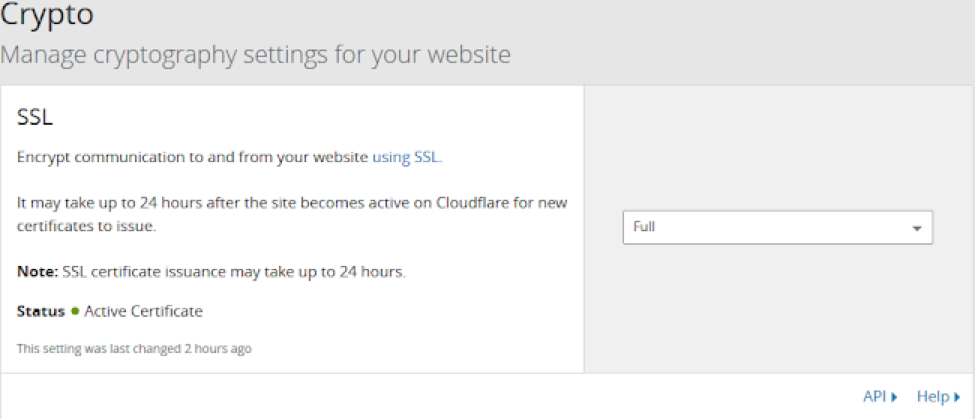
For more information on why to use FULL as an option or to know more about the other options, read this blog https://support.cloudflare.com/hc/en-us/articles/200170416-What-do-the-SSL-options-mean- that describes each of the alternatives.
Note: Cloudflare mentions that the behavior of the site with SSL could take around 24 hours, but the change is usually immediate.
Now you can verify that your site instead of having notice of insecurity, you can see that your site is safe.
Use of a certificate “SSL For Free”
SSL For Free allows us to obtain an SSL certificate for free and giving us options to acquire it quickly, with detailed instructions during the process.
If you access the page we can see sections about how it works, advanced options frequently asked questions with their respective answers and credits.
1. Request certificate.
Now you can start issuing your certificate by accessing the page SSL For Free and typing your domain, as in the image shown below.
When you add your domain and click on “Create Free SSL Certificate” we can proceed to the next section, which is to verify that the domain that you accessed is yours.
For this, there are three ways that SSL For Free shows us on the screen, use the option that best suits your needs.
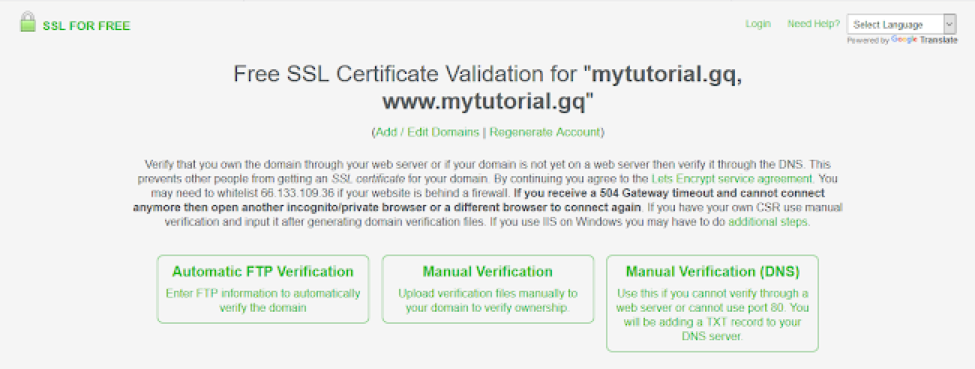
By clicking on one of the options shown on the screen, it describes the step by step to verify that we are the owner of our domain.
We highly recommend the first two being that the third option requires a TXT record with a very low TTL, and many DNS providers do not allow that propagation time.
In the case of selecting the option “Automatic FTP Verification,” you must provide your username and password, in addition to the directory where you will put the files and the protocol that can be SFTP, FTP or FTPS.
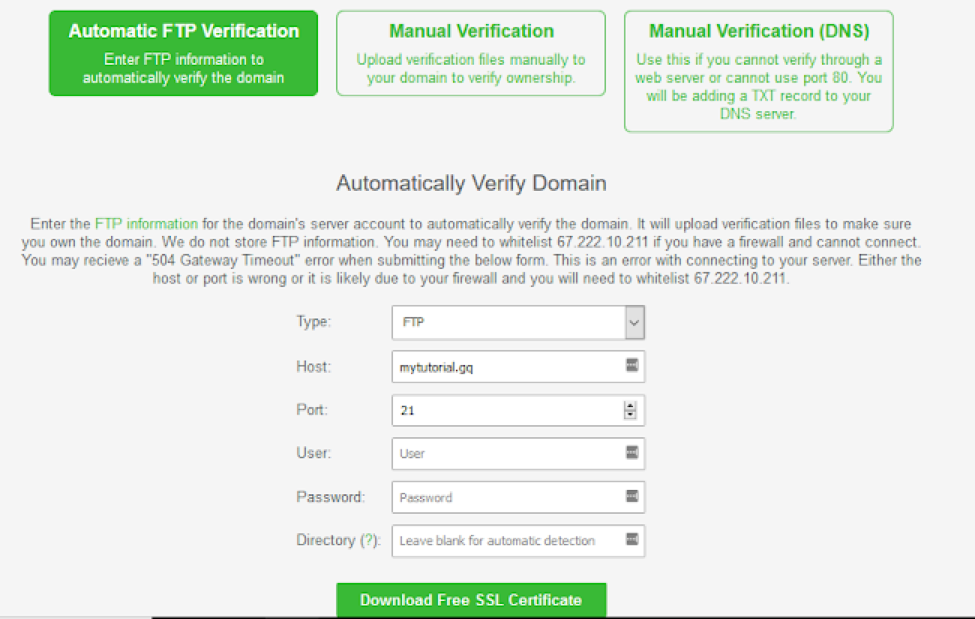
Once your credentials have been verified and you do not have any details with your access to your server, click on “Download Free SSL Certificate.”
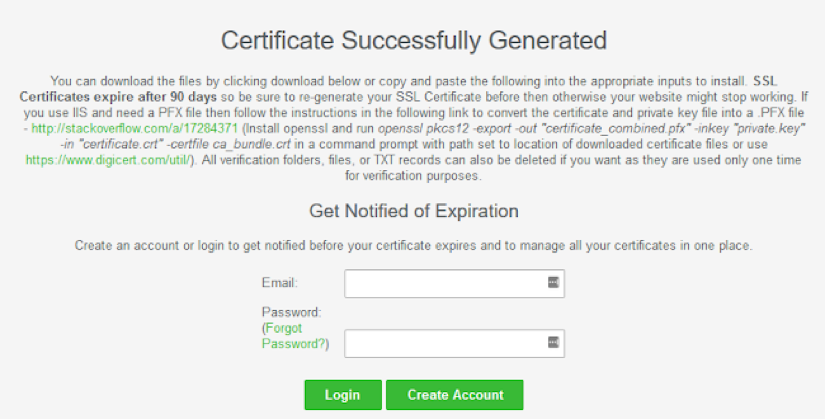
Next, you will see a message on the screen saying that your certificate was successfully generated, and you can download or copy the text and create the files inside your server, as shown in the following image.
In case of selecting the option “Manual Verification,” you need to have your server by port 80, and if not, you should temporarily put it to listen to port 80, knowing this, we can continue with the verification.
The following steps for the verification of your domain are that you download two verification files, which will be uploaded to your server and after verifying your domain you will be able to download your SSL Certificate.
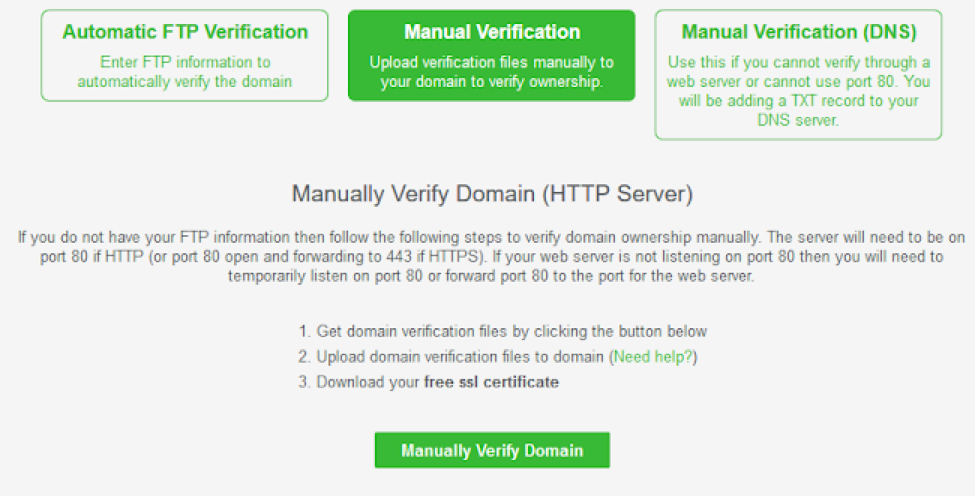
To obtain the files it is necessary to click on the button “Manually Verify Domain,” which will show us the most detailed instructions to perform, as can be seen in the image below.
There are the files that we must download, to proceed to upload them to the server in the directory where our site is.
The files must be placed in a folder called acme-challenge, which must be in a folder called .well-known, and it must be set in the directory corresponding to your site.
Once the files are on your site, you must enter the URL that SSL For Free gives you, which will direct you to the files that we have uploaded now.
Once verified that the URLs open on the screen alphanumeric characters we can proceed to download our SSL certificate by clicking on the “Download SSL Certificate” button.

If everything went correctly, we could download the certificate without any problem, to proceed to place it inside our server.
Note: You may or may not register an account within SSL For Free to receive notification by email when your certificate expires.
2. Install the certificate.
Now we will proceed to configure what is necessary within our web server so that our site works with SSL, once we have downloaded the files needed to have our certificate we must place them in a directory that provides us with their location.
Access your server by SSH and create a folder that has the name SSL within the directory of your web server, either Apache or Nginx.
Inside the SSL directory, we will put the certificates that we have previously downloaded. We extract the files from the SSL directory, and we can see that the content of the SSL folder is similar to the one shown below.

Now we proceed to add the configurations to our web server.
In the case of using Apache as a web server, the configuration is similar to the one we used in the previous point; we just changed the path of our certificate and our key to the /etc/apache2/ssl directory as shown below.
#Apache Virtualhost.<VirtualHost *:80> ServerName www.mytutorial.gq ServerAlias mytutorial.gq ServerAdmin webmaster@localhost DocumentRoot /var/www/wordpress ErrorLog ${APACHE_LOG_DIR}/error.log CustomLog ${APACHE_LOG_DIR}/access.log combined #Enable HTTPS redirection RewriteEngine on RewriteCond %{SERVER_NAME} =mytutorial.gq [OR] RewriteCond %{SERVER_NAME} =www.mytutorial.gq RewriteRule ^ https://%{SERVER_NAME}%{REQUEST_URI} [END,NE,R=permanent]</VirtualHost>#Configuration block for the use of the Apache SSL mod#In case of being used<IfModule mod_ssl.c> <VirtualHost *:443> ServerName www.mytutorial.gq ServerAlias mytutorial.gq DocumentRoot /var/www/wordpress ErrorLog ${APACHE_LOG_DIR}/error.log CustomLog ${APACHE_LOG_DIR}/access.log combined #SSLEngine is enabled here SSLEngine on#Here is the route where the Self Signed certificate is SSLCertificateFile /etc/apache2/ssl/certificate.crt#Here the route where the key that was created with the Self Signed certificate is placed SSLCertificateKeyFile /etc/apache2/ssl/private.key#Here is the path where the certificate chain file is#This is from the certifying authority SSLCertificateChainFile /etc/apache2/ssl/ca_bundle.crt </VirtualHost>
In the case of using Nginx as your web server, your virtualhost file should look similar to the example in the previous point.
server { root /var/www/wordpress; index index.php index.html; server_name mytutorial.gq www.mytutorial.gq; location / { try_files $uri $uri/ =404; } location ~ \.php$ { include fastcgi_params; fastcgi_pass unix:/run/php/php7.0-fpm.sock; fastcgi_index index.php; fastcgi_param SCRIPT_FILENAME $document_root/$fastcgi_script_name; }#Configuración SSL#Puerto https listen 443 ssl; # Here is the route where the Self Signed certificate is ssl_certificate /etc/nginx/ssl/certificate.crt; # Here is the path where the private key is, along with the Self Signed certificate ssl_certificate_key /etc/nginx/ssl/private.key;} server { if ($host = www.mytutorial.gq) { return 301 https://$host$request_uri; } if ($host = mytutorial.gq) { return 301 https://$host$request_uri; } listen 80; server_name mytutorial.gq www.mytutorial.gq; return 404;}Once you have added the configuration and it is correct, restart the web server and access your site to verify that you already have your SSL certificate.
Conclusion
In this tutorial we learned how to generate or acquire an SSL certificate in three possible ways for your WordPress site with WooCommerce for free for the benefit of your website. Thus, you can transmit your customers more security when purchasing any type of item that you offer within your portal on the Internet.