You must know certain Terraform Best Practices when writing your Terraform Configuration Files to define your Infrastructure as Code and for your Terraform workspace. As you may already know, Terraform by HashiCorp is an Infrastructure as Code solution that allows you to specify both cloud and on-premise resources in human-readable configuration files that can be reused and shared.
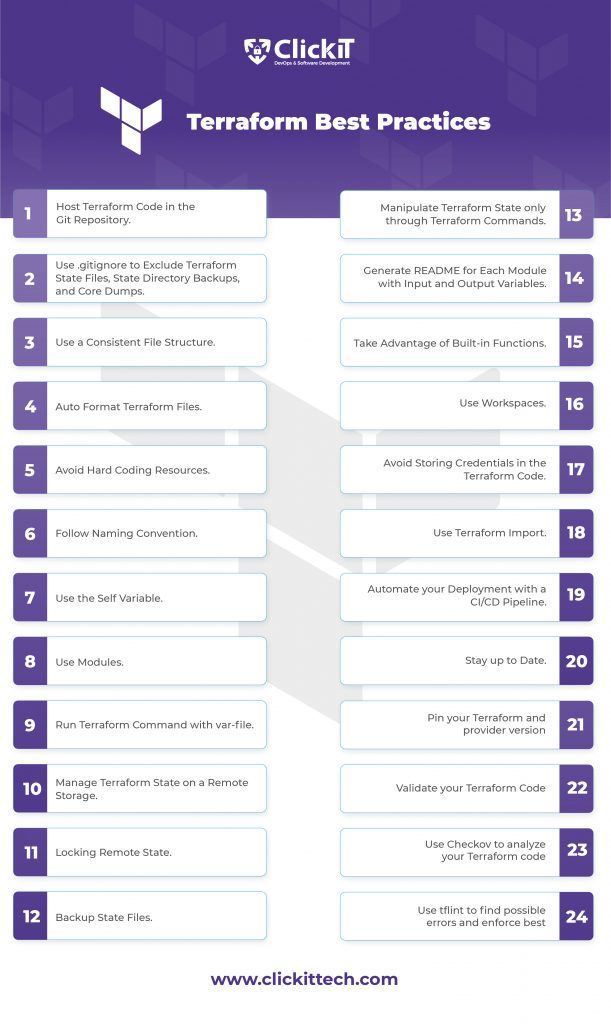
This article will introduce you to 24 practices we recommend adopting while writing your Terraform Configuration Files.
We have designed this blog so you can try these Terraform workspace’s best practices right now. You can also learn about and implement them later while working on your Terraform project. So, without further ado, let’s get started!
Top 10 Terraform Best Practices Video
Table of contents
Prerequisites
You will need the following prerequisites to try these best practices on your own right now. If you don’t want to work with sample examples, you can skip these prerequisites.
- AWS Account:
It’s good if you already have an AWS account. If not, click here to create a free tier account. - Admin IAM User:
Create an admin IAM user with an Access Key and a Secret Access Key. You will need these keys to configure credentials in the CLI. - S3 Bucket:
Create an S3 bucket, this will be required later down the line for the remote state. - DynamoDB Table:
Create a DynamoDB table with hash_key = “LockID” and attribute { name = “LockID”, type = “S” }. Click here to learn more about the foregoing. This will be required later forstate locking. - GitHub Personal Access Token:
- Click here to learn how to create a personal access token on Github. It will be required to push your Terraform files to your Github Repository.
- Click here to learn how to create a personal access token on Github. It will be required to push your Terraform files to your Github Repository.
- Ubuntu 18.04 EC2 Instance with Terraform Installed in it:
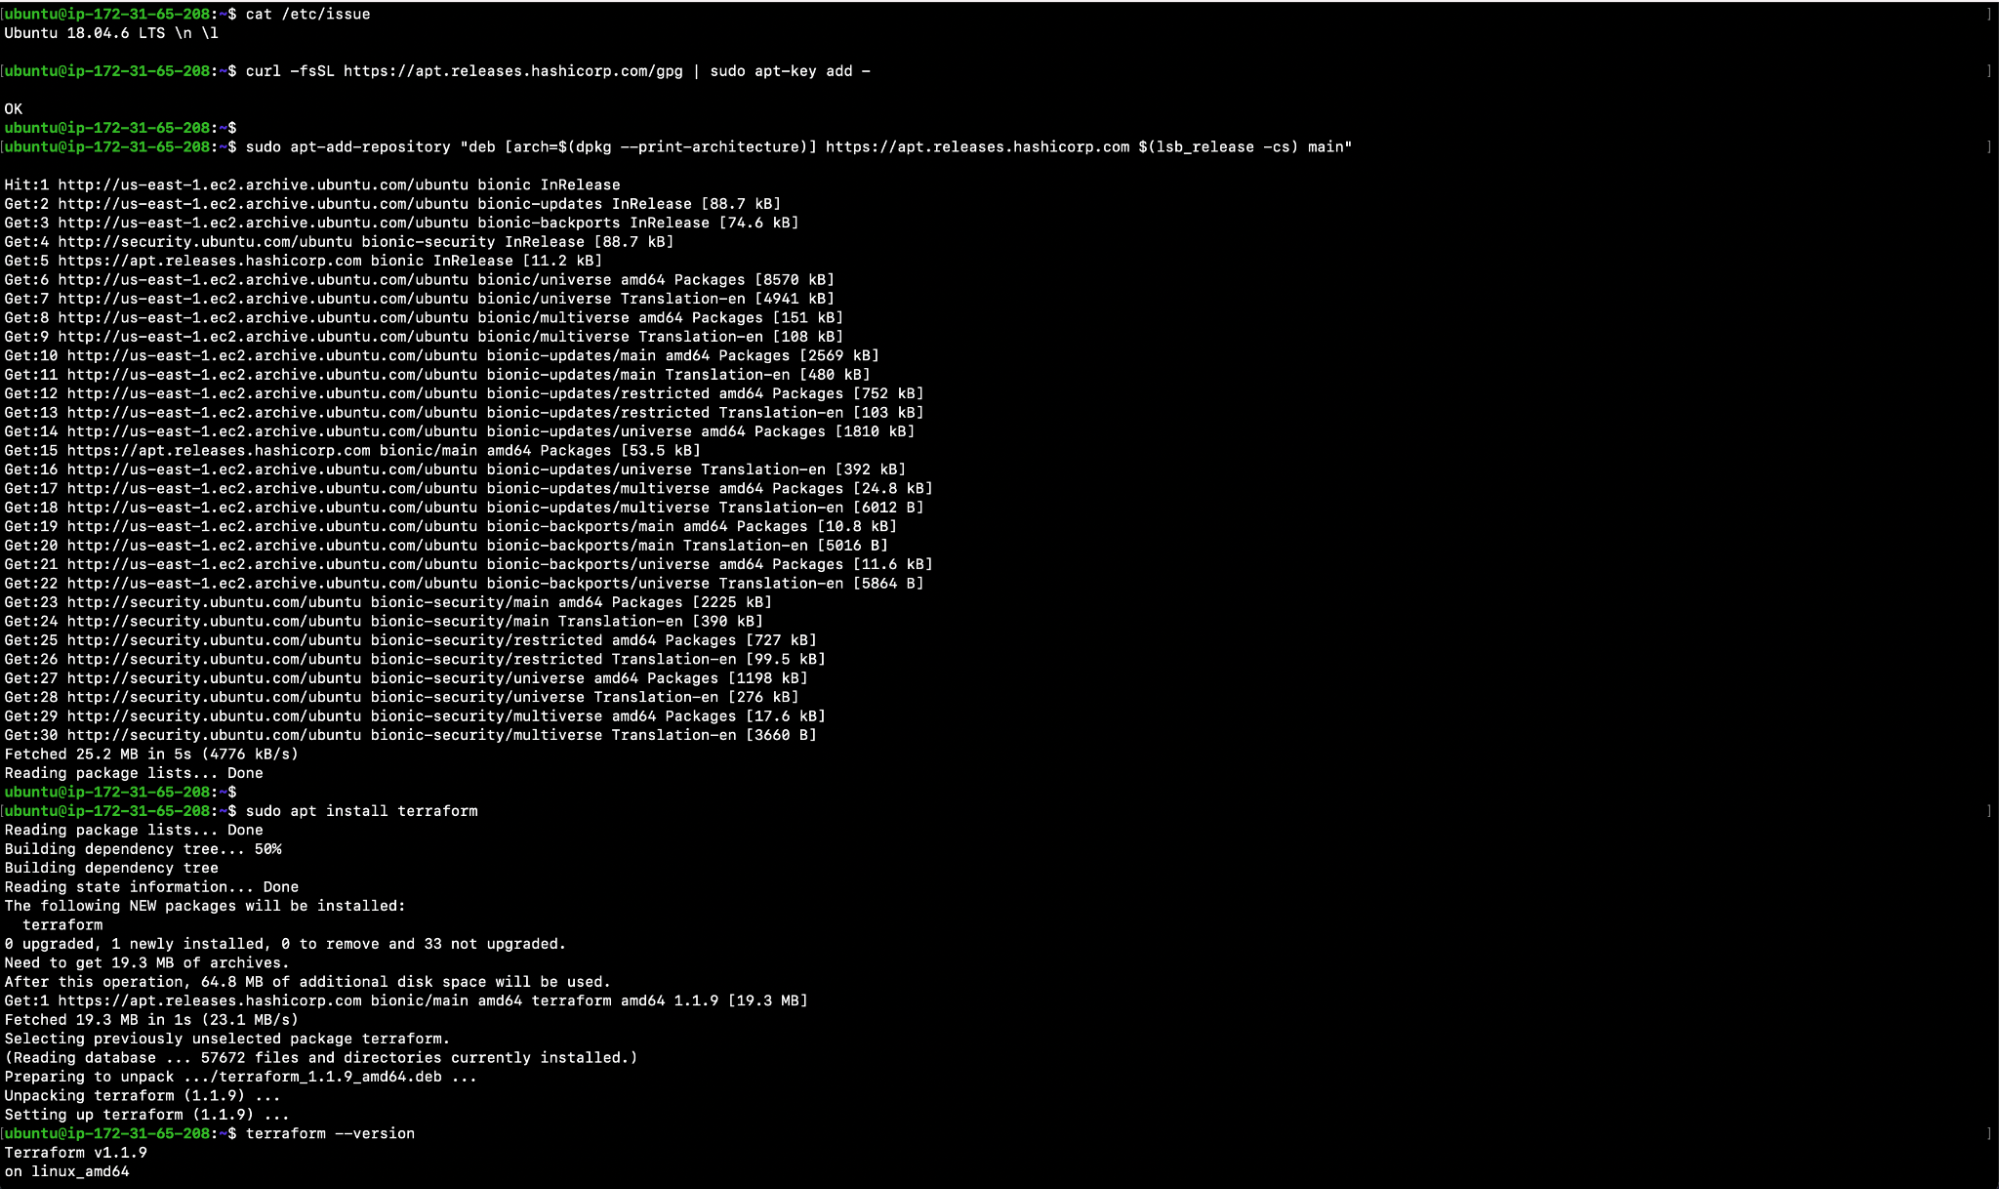
You can use any OS of your choice. However, the steps below relating to the installation of Terraform are compatible and tested with Ubuntu 18.04 EC2 Instance. Click here to learn more about Terraform installation and compatibility with other OSs.- cat /etc/issue
- curl -fsSL https://apt.releases.hashicorp.com/gpg | sudo apt-key add –
- sudo apt-add-repository “deb [arch=$(dpkg –print-architecture)] https://apt.releases.hashicorp.com $(lsb_release -cs) main”
- sudo apt install terraform
- terraform –version
- Install Third-Party Tools:
Below are a few third-party tools that you will need while following the steps in this blog. Install them on the machine that you will be using to execute your Terraform commands.- Update the local packages
- sudo apt-get update
- Install tree command
- sudo apt-get install tree
- Install git command
- sudo apt-get install git
- Install zip command
- sudo apt install zip
- Install aws cli utility
- curl “https://awscli.amazonaws.com/awscli-exe-linux-x86_64.zip” -o “awscliv2.zip”
- unzip awscliv2.zip
- sudo ./aws/install
- Install terraform-docs utility
- curl -Lo ./terraform-docs.tar.gz https://github.com/terraform-docs/terraform-docs/releases/download/v0.16.0/terraform-docs-v0.16.0-$(uname)-amd64.tar.gz
- tar -xzf terraform-docs.tar.gz
- chmod +x terraform-docs
- sudo mv terraform-docs /usr/local/terraform-docs
- Update the local packages
- Configure AWS Command Line Interface (AWS CLI) to Interact with AWS:
- Export AWS_ACCESS_KEY_ID=<YOUR_AWS_ACCESS_KEY_ID>
- Export AWS_SECRET_ACCESS_KEY=<YOUR_AWS_SECRET_ACCESS_KEY>
- Export AWS_DEFAULT_REGION=<YOUR_AWS_DEFAULT_REGION>
- aws s3 ls
Check if you are able to list S3 buckets in order to verify your authentication with the AWS Account.

Terraform Best Practices
Practice 1: Host Terraform Code in the Git Repository
Infrastructure can definitely benefit from GitHub’s source of truth and collaboration. GitHub is a comprehensive DevOps and collaboration platform which is well recognized for its version control features. Version Control Systems (VCS) are commonly used to maintain a collection of software files, allowing users to document, track, undo, and merge changes made by multiple users in real-time.
GitHub is a collaboration platform for millions of developers through conversations in pull requests and issues. Using GitHub for version control and collaboration, operators can better cooperate with application developers throughout the software lifecycle. As a Terraform user, you should save your configuration files in a Version Control System (VCS). You can version control and collaborate on infrastructure by storing it as code in a VCS.
Tip 1
Creating a Git repository to store your Terraform configuration is the first Best Practice we recommend when starting with Terraform. You should create a Git repository before you start writing your Terraform code.
Now, let’s initialize a local Git repository and create one on Github.
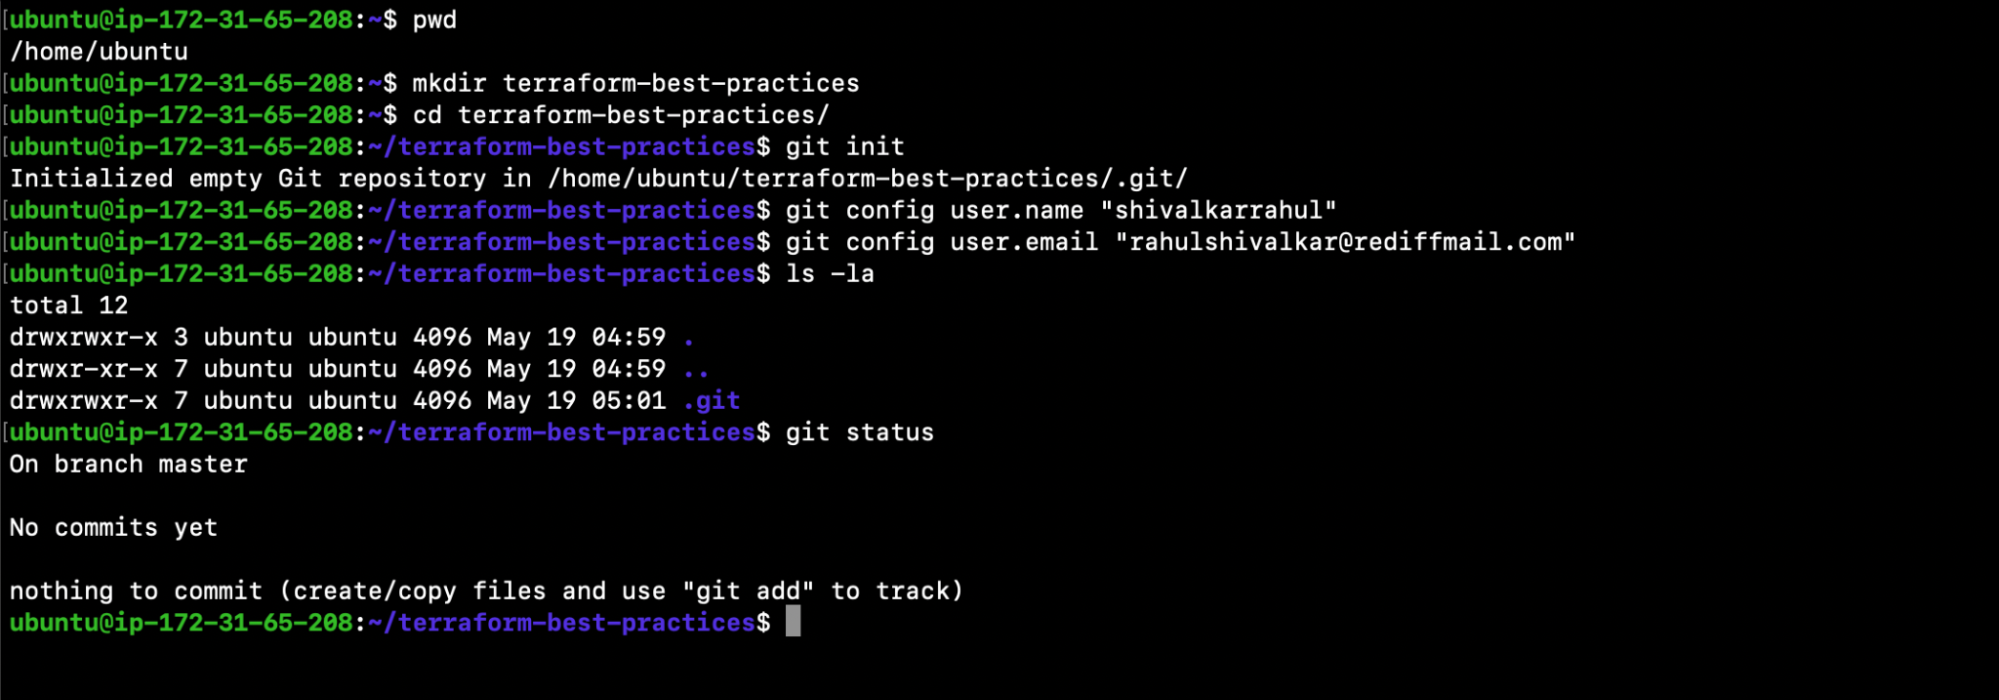
Login to your machine and execute the following commands:
- pwd
- mkdir terraform-best-practices
Note: This will be our working directory throughout the blog unless changed. - cd terraform-best-practices/
- git init
- git config user.name “<USERNAME_FOR_GIT_COMMITS>“
- git config user.email “<USEREMAIL_FOR_GIT_COMMITS>“
- ls -la
- Git status
9. Create a Github Repo by visiting https://github.com/.
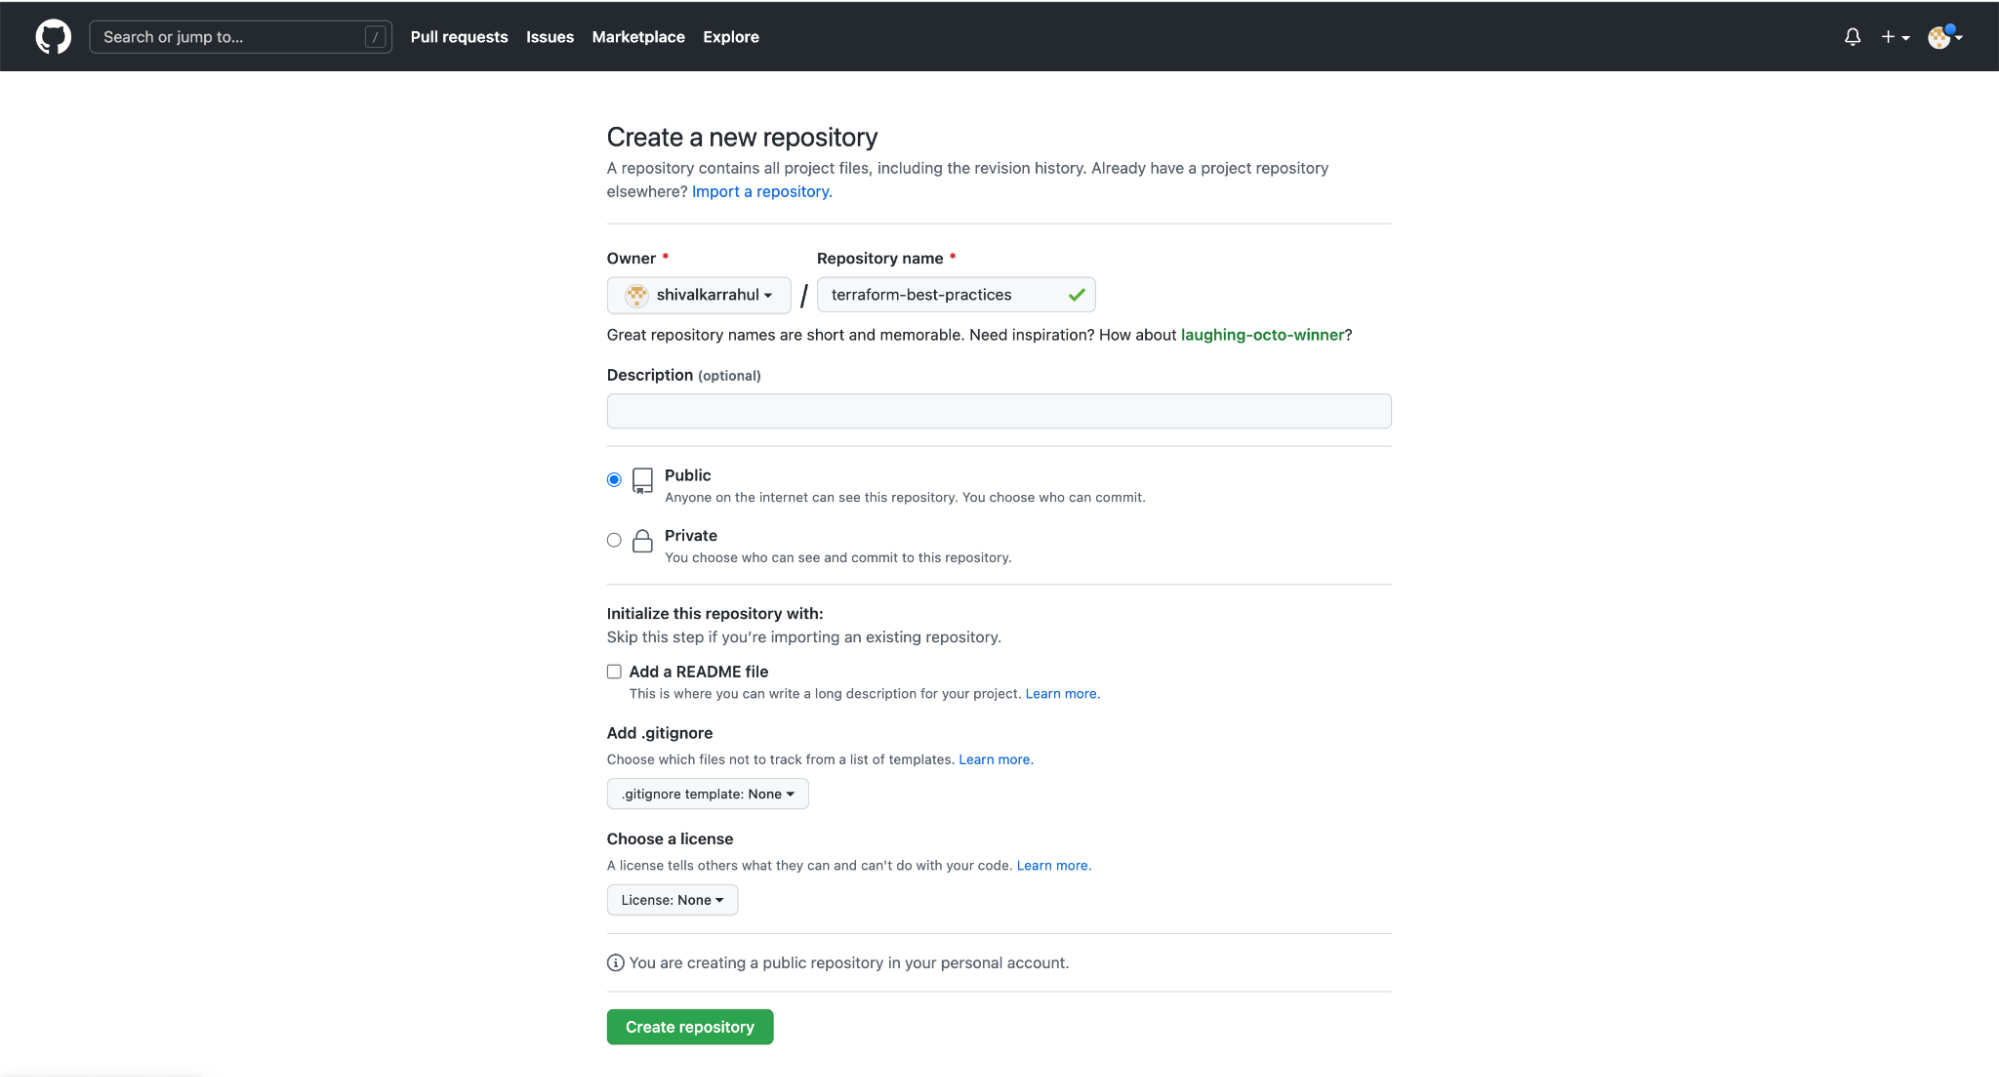
10. Once you’ve created a repository on Github, you should see the following screen. You will need commands from this screen in the next step.

Practice 2: Use .gitignore to Exclude Terraform State Files, State Directory Backups, and Core Dumps
The Terraform init command creates a working directory that contains Terraform configuration files. This command conducts a series of startup procedures to prepare the current working directory for Terraform use. Terraform init will automatically discover, download, and install the appropriate provider plugins for providers published in the public Terraform Registry or a third-party provider registry.
All locally downloaded files need not be pushed to the Git Repository with other Terraform configuration files. Furthermore, other files like SSH keys, state files, and log files do not need to be pushed either.
You can inform Git of which files and directories to ignore when you commit by placing a .gitignore file in the root directory of your project. Commit the .gitignore file to your repository to share the ignore rules with other users who may want to clone it. A local .gitignore file must be kept in the project’s root directory.
Below, you will find a specific example; however, you can play with it depending on your needs. Git will ignore all the files with extensions mentioned in the following .gitignore and, therefore, will not push them.
Tip 2
Our second Terraform Best Practice is always to have a .gitignore file in your repository with all the required rules to ignore unnecessary files by Git. This way, you won’t push files unknowingly.
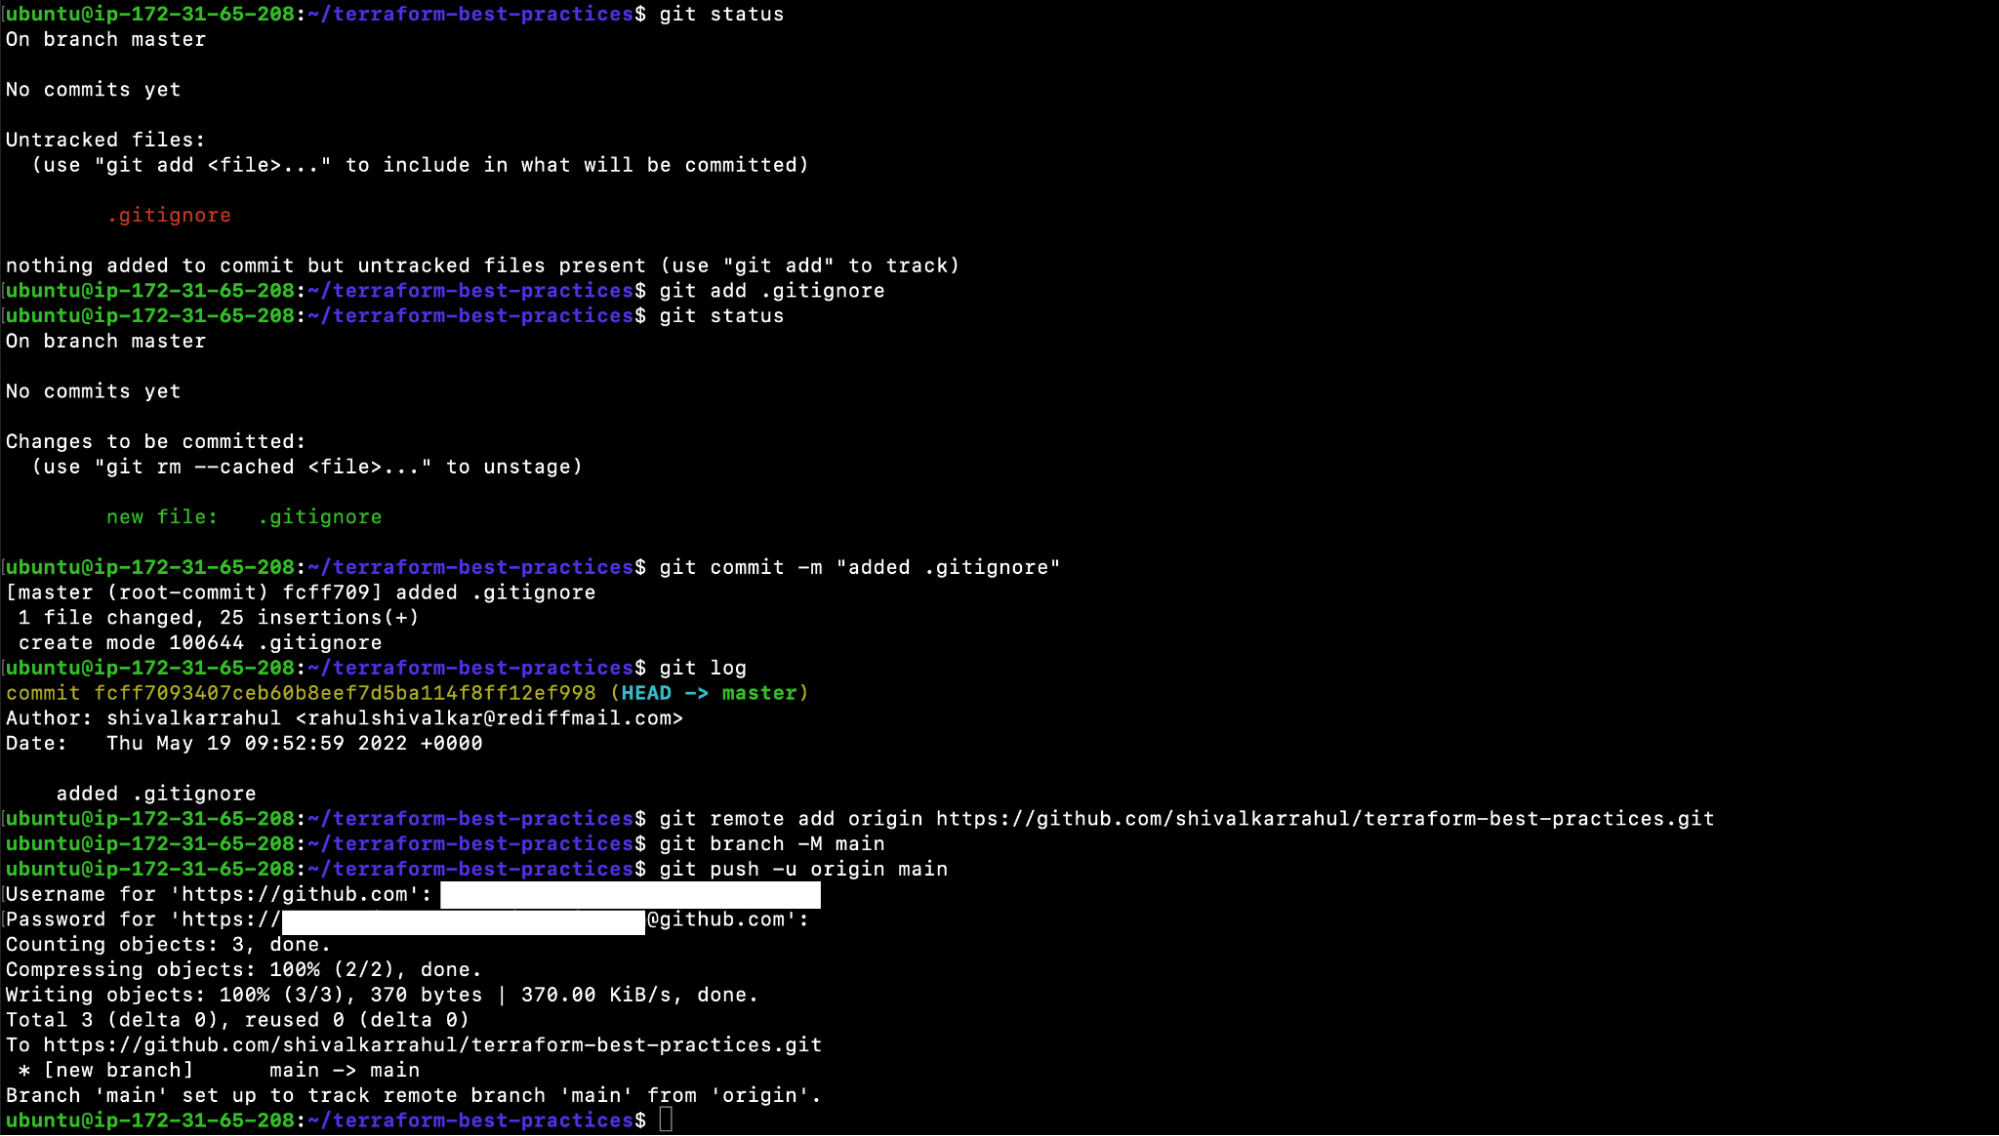
Let’s create a .gitingore file and commit it to the Github repository. Perform the following steps on your local machine from the same working directory you used in the last step.
- touch .gitignore
- vim .gitignore
| # Compiled files *.tfstate *.tfstate.backup *.tfstate.lock.info*.terraform.lock.hcl # logs *.log # Directories .terraform/ # SSH Keys *.pem # Backup files *.bak # Ignored Terraform files *gitignore*.tf # Ignore Mac .DS_Store files .DS_Store # Ignored vscode files .vscode/ |
- git status
- git add .gitignore
- git status
- git commit -m “added .gitignore”
- git log
- git remote add origin https://github.com/shivalkarrahul/terraform-best-practices.git
- git branch -M main
- git push -u origin main
Practice 3: Use a Consistent File Structure
It’s up to you how you divide your Terraform code into files. For a basic project, it may be far more convenient to put everything in one file and forget about it. However, as a Terraform Best Practice, we recommend formatting your files in the same way for every project, whether it be big or small. Here are some suggestions for simple projects.
- Use folders in your project structure when using modules. Modules are folders that contain config files that have been created in a way that allows for the code to be reused.
- A README.md file should be included in each repository.
- Create main.tf to call modules, store locals, and data sources to create all the required resources.
- It’s a good idea to have a provider.tf with provider details.
- Have variables.tf file where you can store declarations of variables used in main.tf and outputs.tf should contain outputs.
- Use terraform.tfvars to automatically load a number of variable definitions.
Tip 3
Always keep the file structure consistent across all Terraform projects.
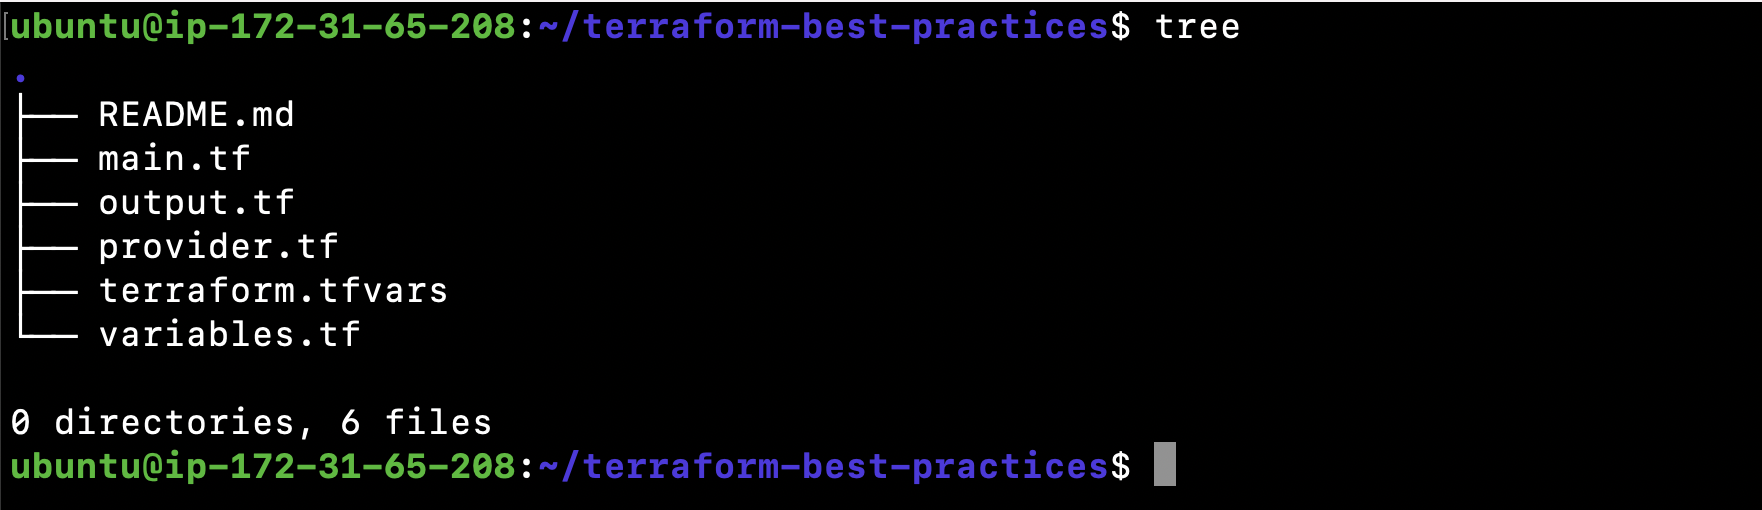
Let’s create a sample consistent file structure, you can add more files but remember, the file structure has to be consistent across all projects. Commit all of the files to the Github repository once they are created.
- ls -l
- ls -la
- touch README.md
- touch main.tf
- touch provider.tf
- touch variables.tf
- touch output.tf
- touch terraform.tfvars

9. tree
10. git status
11. git add
12. git commit -m “Use a Consistent File Structure”
13. git push
Practice 4: Auto Format Terraform Files
Should we just avoid writing ugly code? After all, we all despise reading it.
The HashiCorp Terraform language follows the same style guidelines as most other computer languages. A single missing bracket or excessive indentation can make your Terraform configuration files difficult to read, maintain, and understand, resulting in a negative experience.
However, you can use the ‘terraform fmt’ command to repair all code discrepancies at once. Terraform configuration files are rewritten in a consistent structure and style using the ‘terraform fmt’ command.
Tip 4
Always use ‘terraform fmt -diff’ to check and format your Terraform configuration files before you commit and push them.
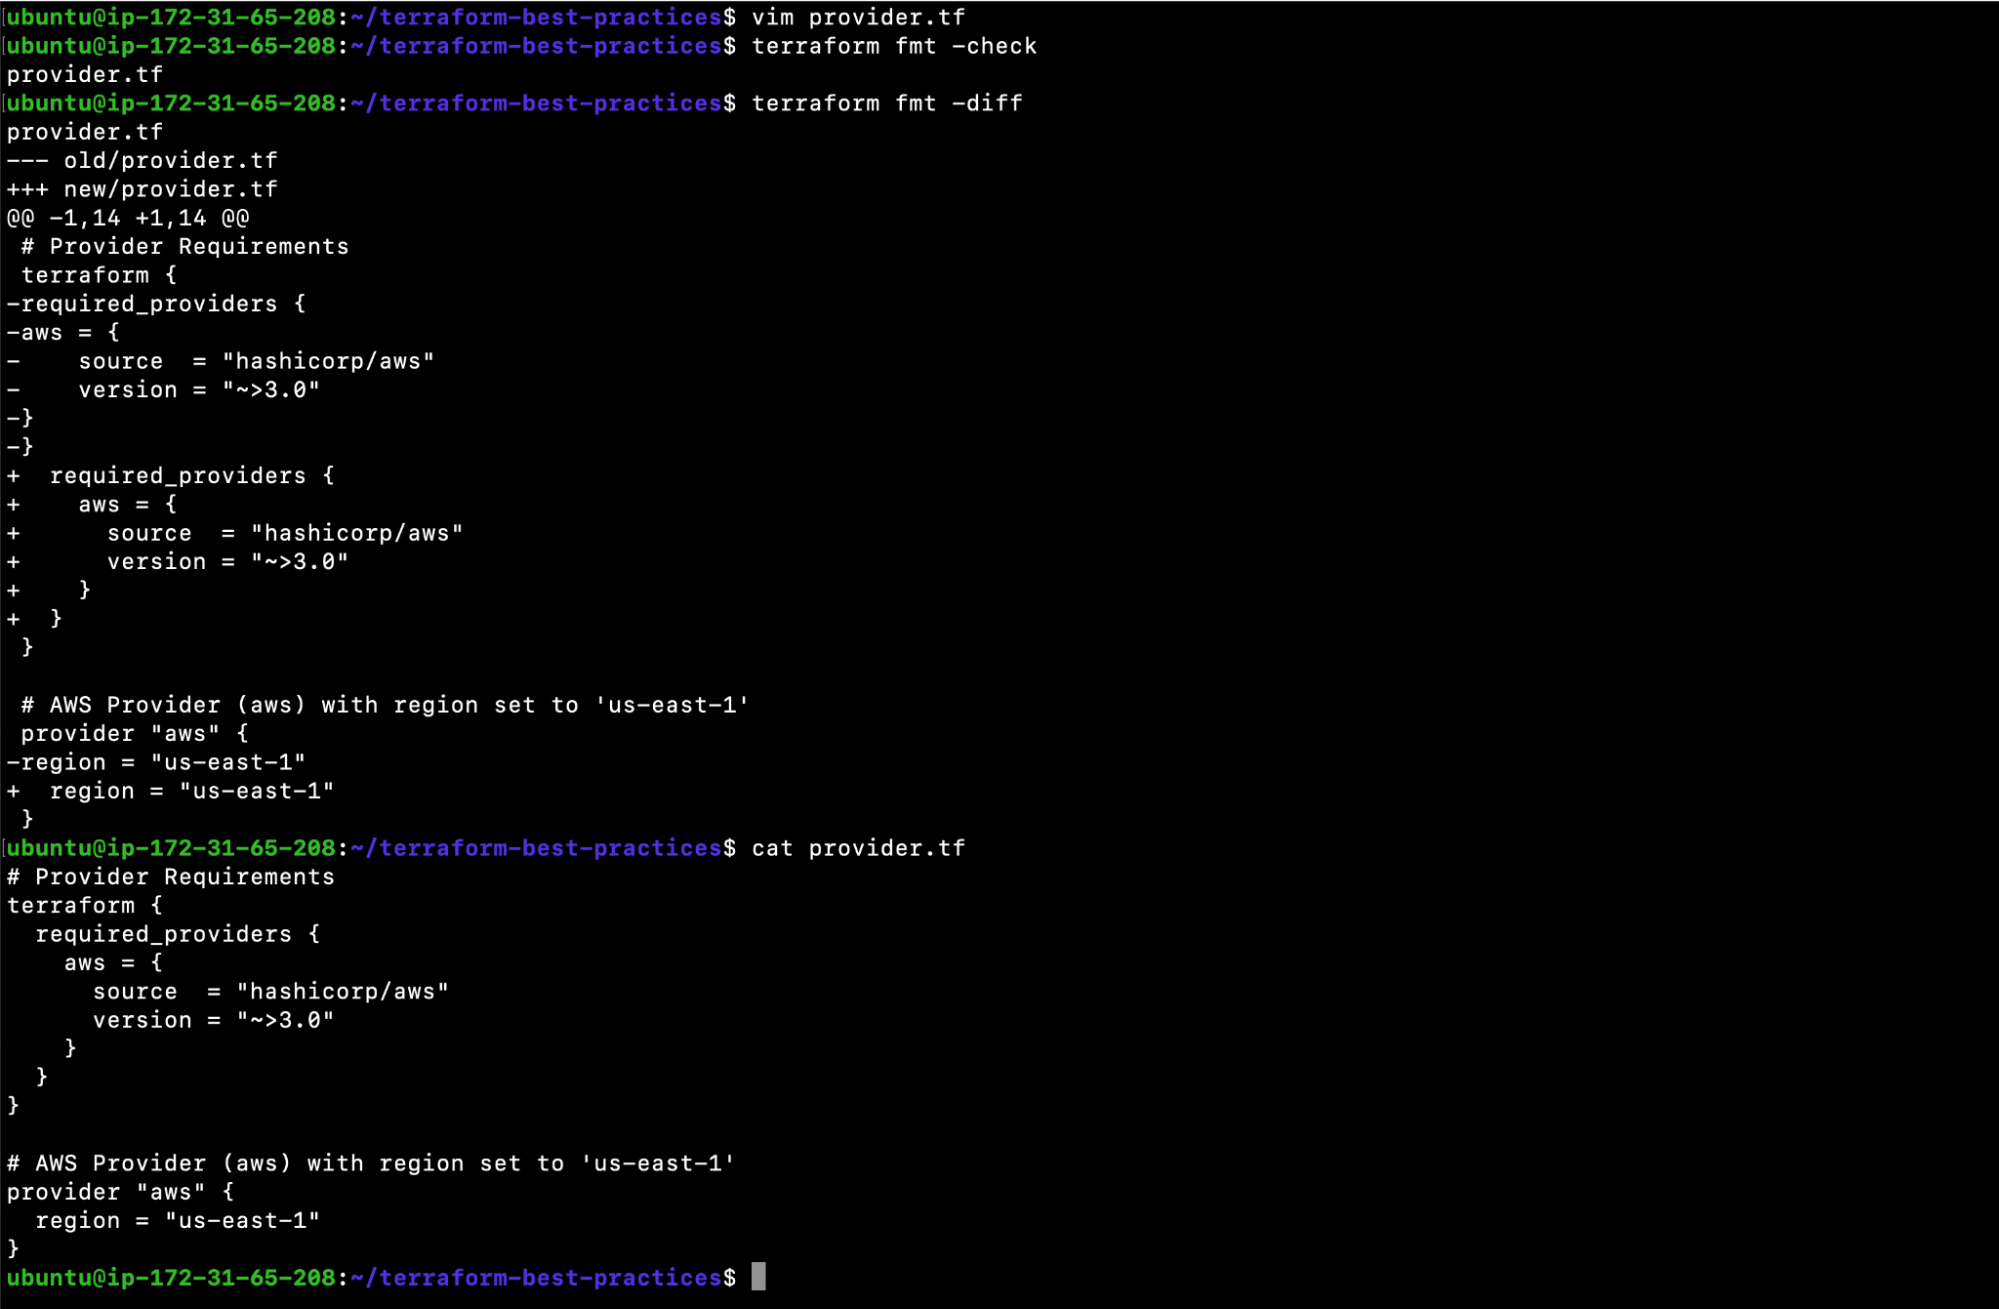
Let’s start with a provider.tf file containing Terraform provider details. The following content is not correctly formatted, we will therefore try to format it to see how the final result will look.
- vim provider.tf
| # Provider Requirements terraform { required_providers { aws = { source = “hashicorp/aws” version = “~>3.0” } } } # AWS Provider (aws) with region set to ‘us-east-1’ provider “aws” { region = “us-east-1” } |
Once you have created a file, execute the following command. The command will auto format the file. You need to auto format the files before you commit your files to your remote git repository.
2. terraform fmt -check
3. terraform fmt -diff
- git status
- git add provider.tf
- git commit -m “Auto format Terraform files, added provider”
- git push
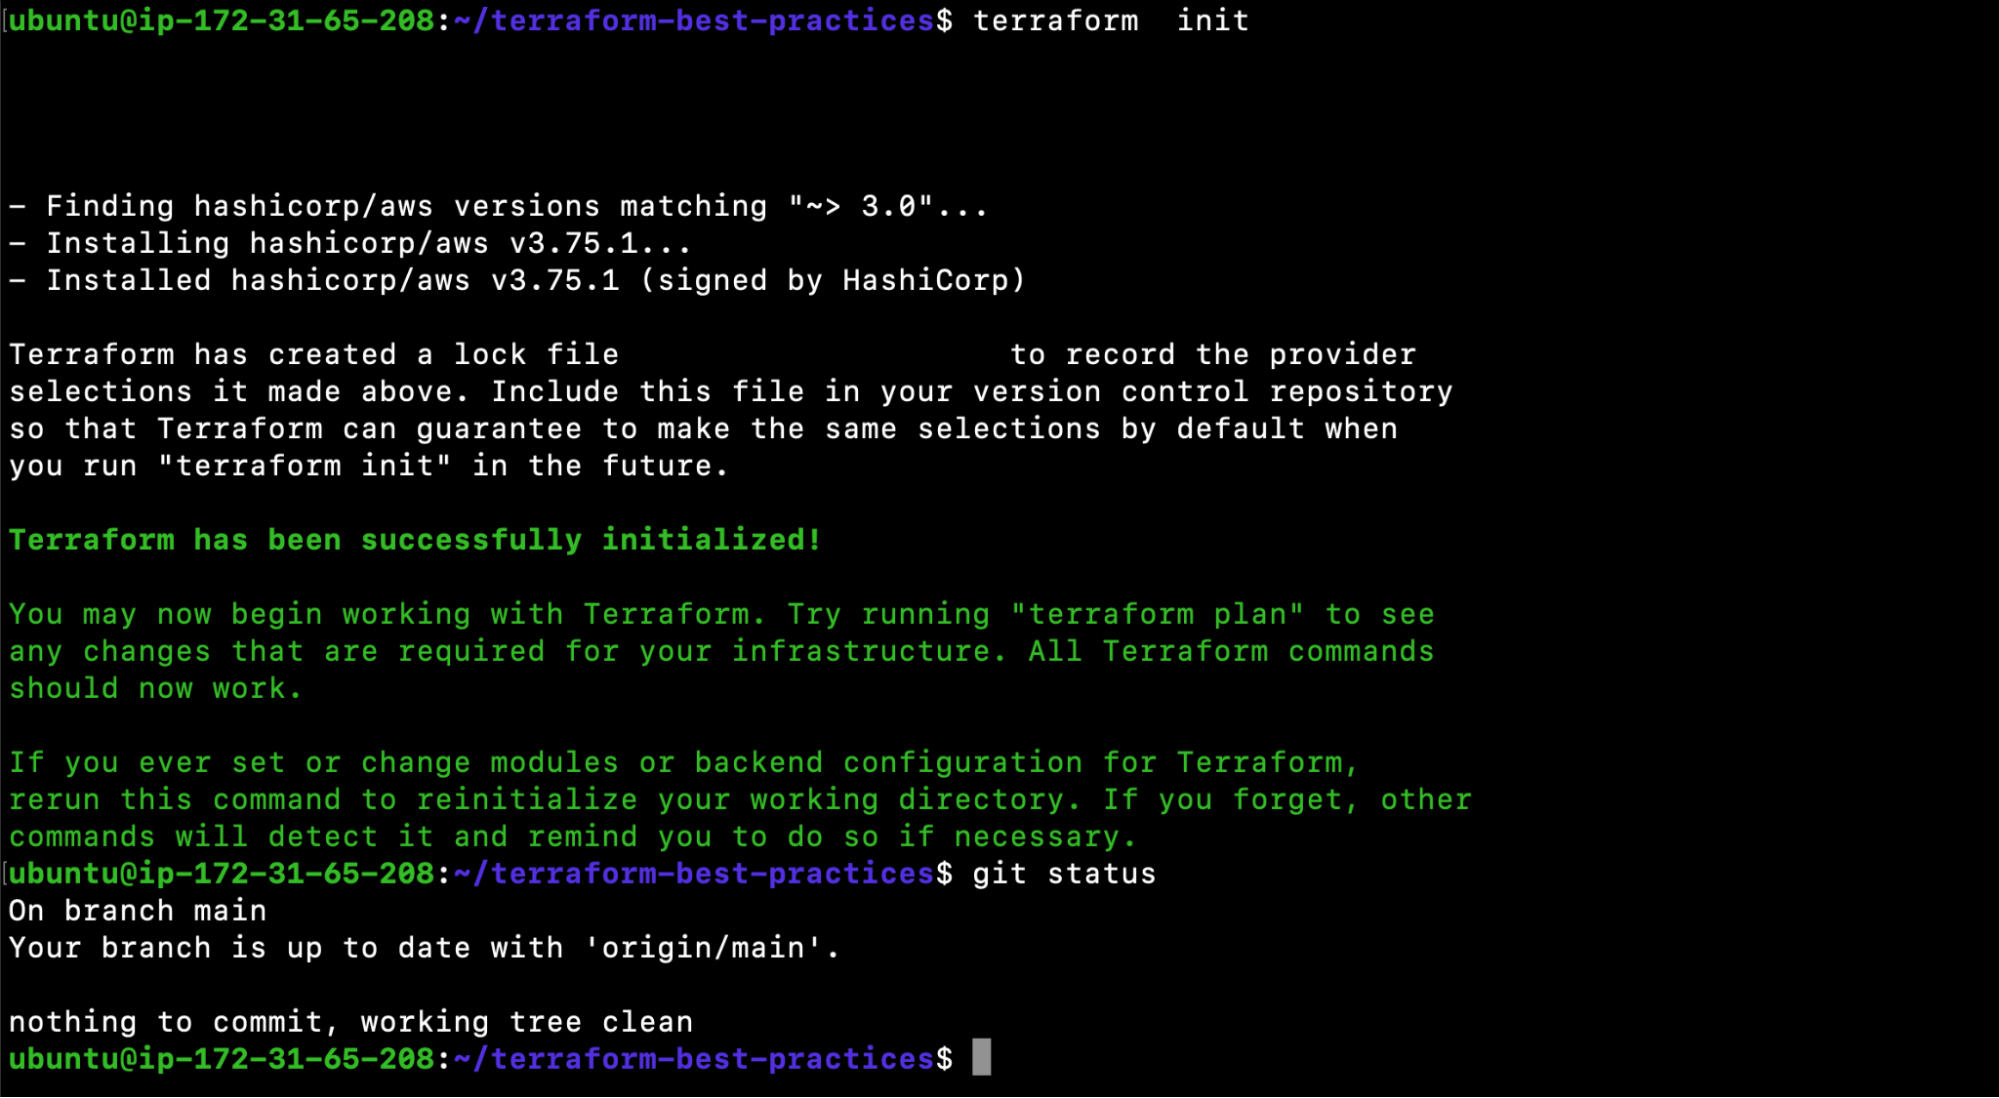
- terraform init
Practice 5: Avoid Hard Coding Resources
Due to lack of time, you’ll most likely end up hard coding all of the default settings. You might think to yourself: “I’ll just make it work for now and figure out how to improve it later when I have some spare time.” That said, as time passes, you’re assigned a new task and you’ve forgotten what you did to “make it work now”. You also worry about ruining something that works by trying to improve it.
As a result, it’s best practice to avoid hard coding resources in Terraform configuration files. Instead, the values should be placed as variables.
Tip 5
Always use variables and assign values to them. Then, use them where required.
For example, if you want to create an EC2 instance, do not hard code AMI ID, Instance Type, or anything else, as depicted in the following snippet.
| resource “aws_instance” “my_example” { ami = “ami-005de95e8ff495156” instance_type = “t2.micro” tags = { Name = “instance-1” } } |
Instead, declare, define, and use variables. Carry out the following steps to declare, define and use variables to create your first resource using Terraform. Next, commit and push the files to Github.
- Create variables.tf
| variable “instance_ami” { description = “Value of the AMI ID for the EC2 instance” type = string default = “ami-005de95e8ff495156” } variable “instance_type” { description = “Value of the Instance Type for the EC2 instance” type = string default = “t2.micro” } variable “instance_name” { description = “Value of the Name Tag for the EC2 instance” type = string default = “instance-1” } |
- Create main.tf
| resource “aws_instance” “my_example” { ami = var.instance_ami instance_type = var.instance_type tags = { Name = var.instance_name } } |
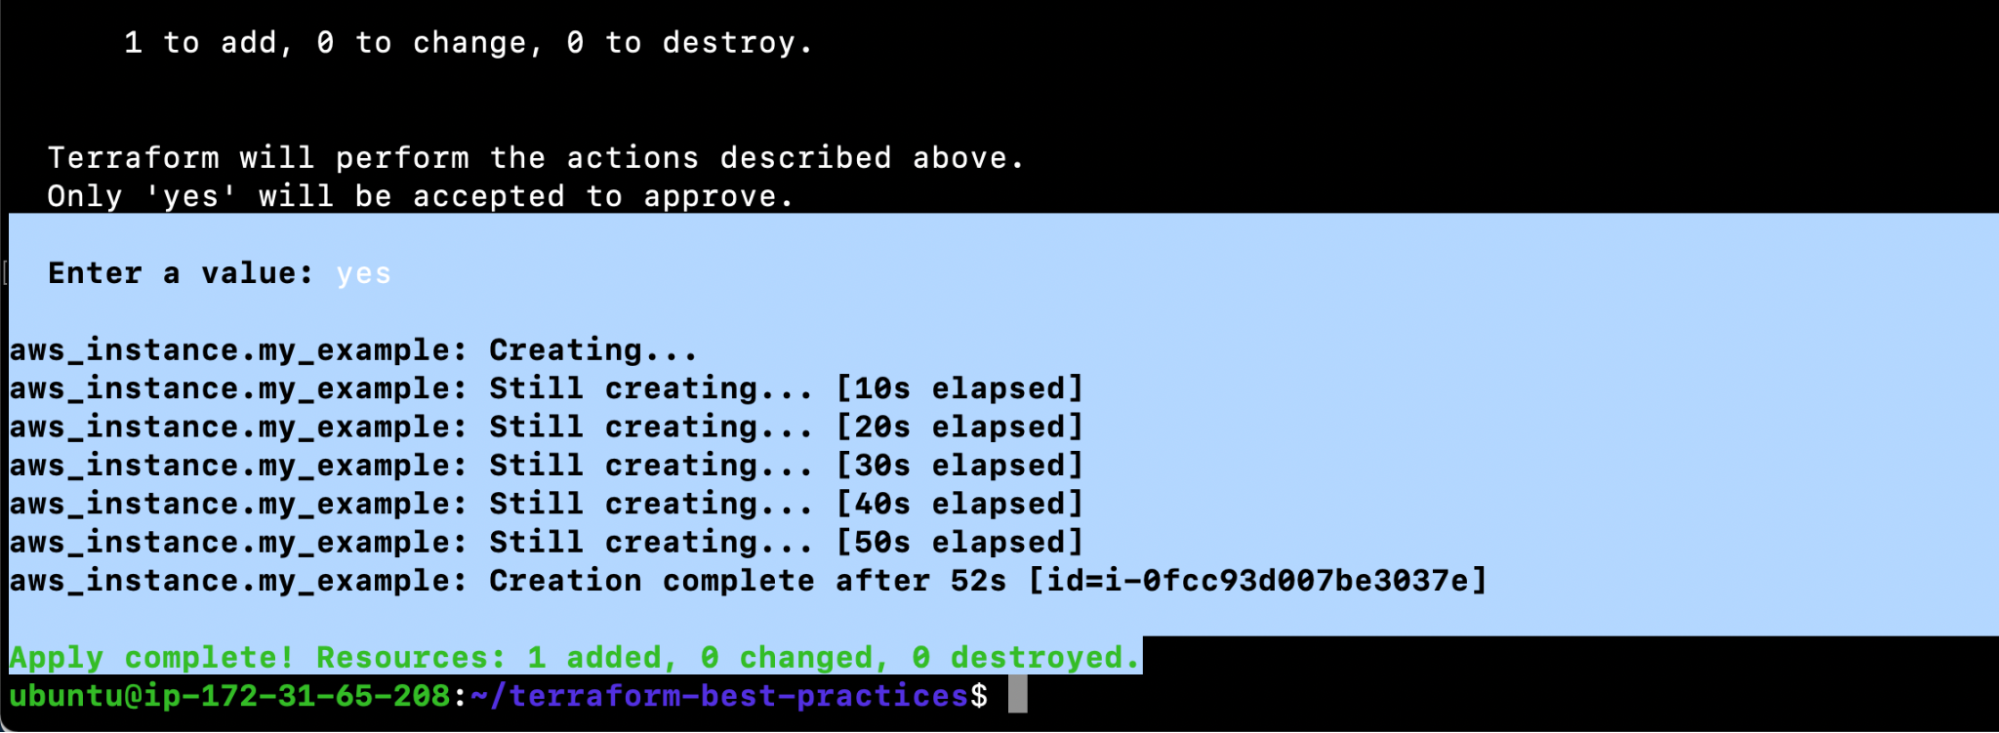
- terraform init
- terraform plan
- terraform apply
- git status
- git add main.tf variables.tf
- git commit -m “Avoid Hard Coding Resources”
- git push
Practice 6: Follow the Naming Convention
Your Terraform code is partly subjective regarding how you name your resources. You can avoid confusion and make your code easier to follow by establishing certain principles and norms within your team.
Here are a few things that you can consider.
- Instead of – (dash), use _ (underscore) everywhere (in resource names, data source names, variable names, outputs, etc.).
- Use lowercase letters and numbers whenever possible.
- When it comes to names, single nouns should always be used.
- Use -(dash) inside arguments and in locations where the value will be visible to a human (e.g.:, name of EC2 instance, name of RDS instance).
Tip 6
Set certain standards or norms within your team for naming resources and follow them at all times.
In the following example you can see that, _(underscore) has been used to name resource blocks (e.g. resource “aws_instance” “instance_1“), -(dash) has been used to name a resource (e.g. default = “instance-1“), and variables and output have been named consistently. Follow the steps below to try it yourself.
- vim variables.tf
| variable “instance_1_ami” { description = “Value of the AMI ID for the EC2 instance” type = string default = “ami-005de95e8ff495156” } variable “instance_1_type” { description = “Value of the Instance Type for the EC2 instance” type = string default = “t2.micro” } variable “instance_1_name” { description = “Value of the Name Tag for the EC2 instance” type = string default = “instance-1” } |
- vim main.tf
| resource “aws_instance” “instance_1” { ami = var.instance_1_ami instance_type = var.instance_1_type tags = { Name = var.instance_1_name } } |
- vim output.tf
| output “instance_1_id” { description = “The ID of the instance-1” value = try(aws_instance.instance_1.id) } |
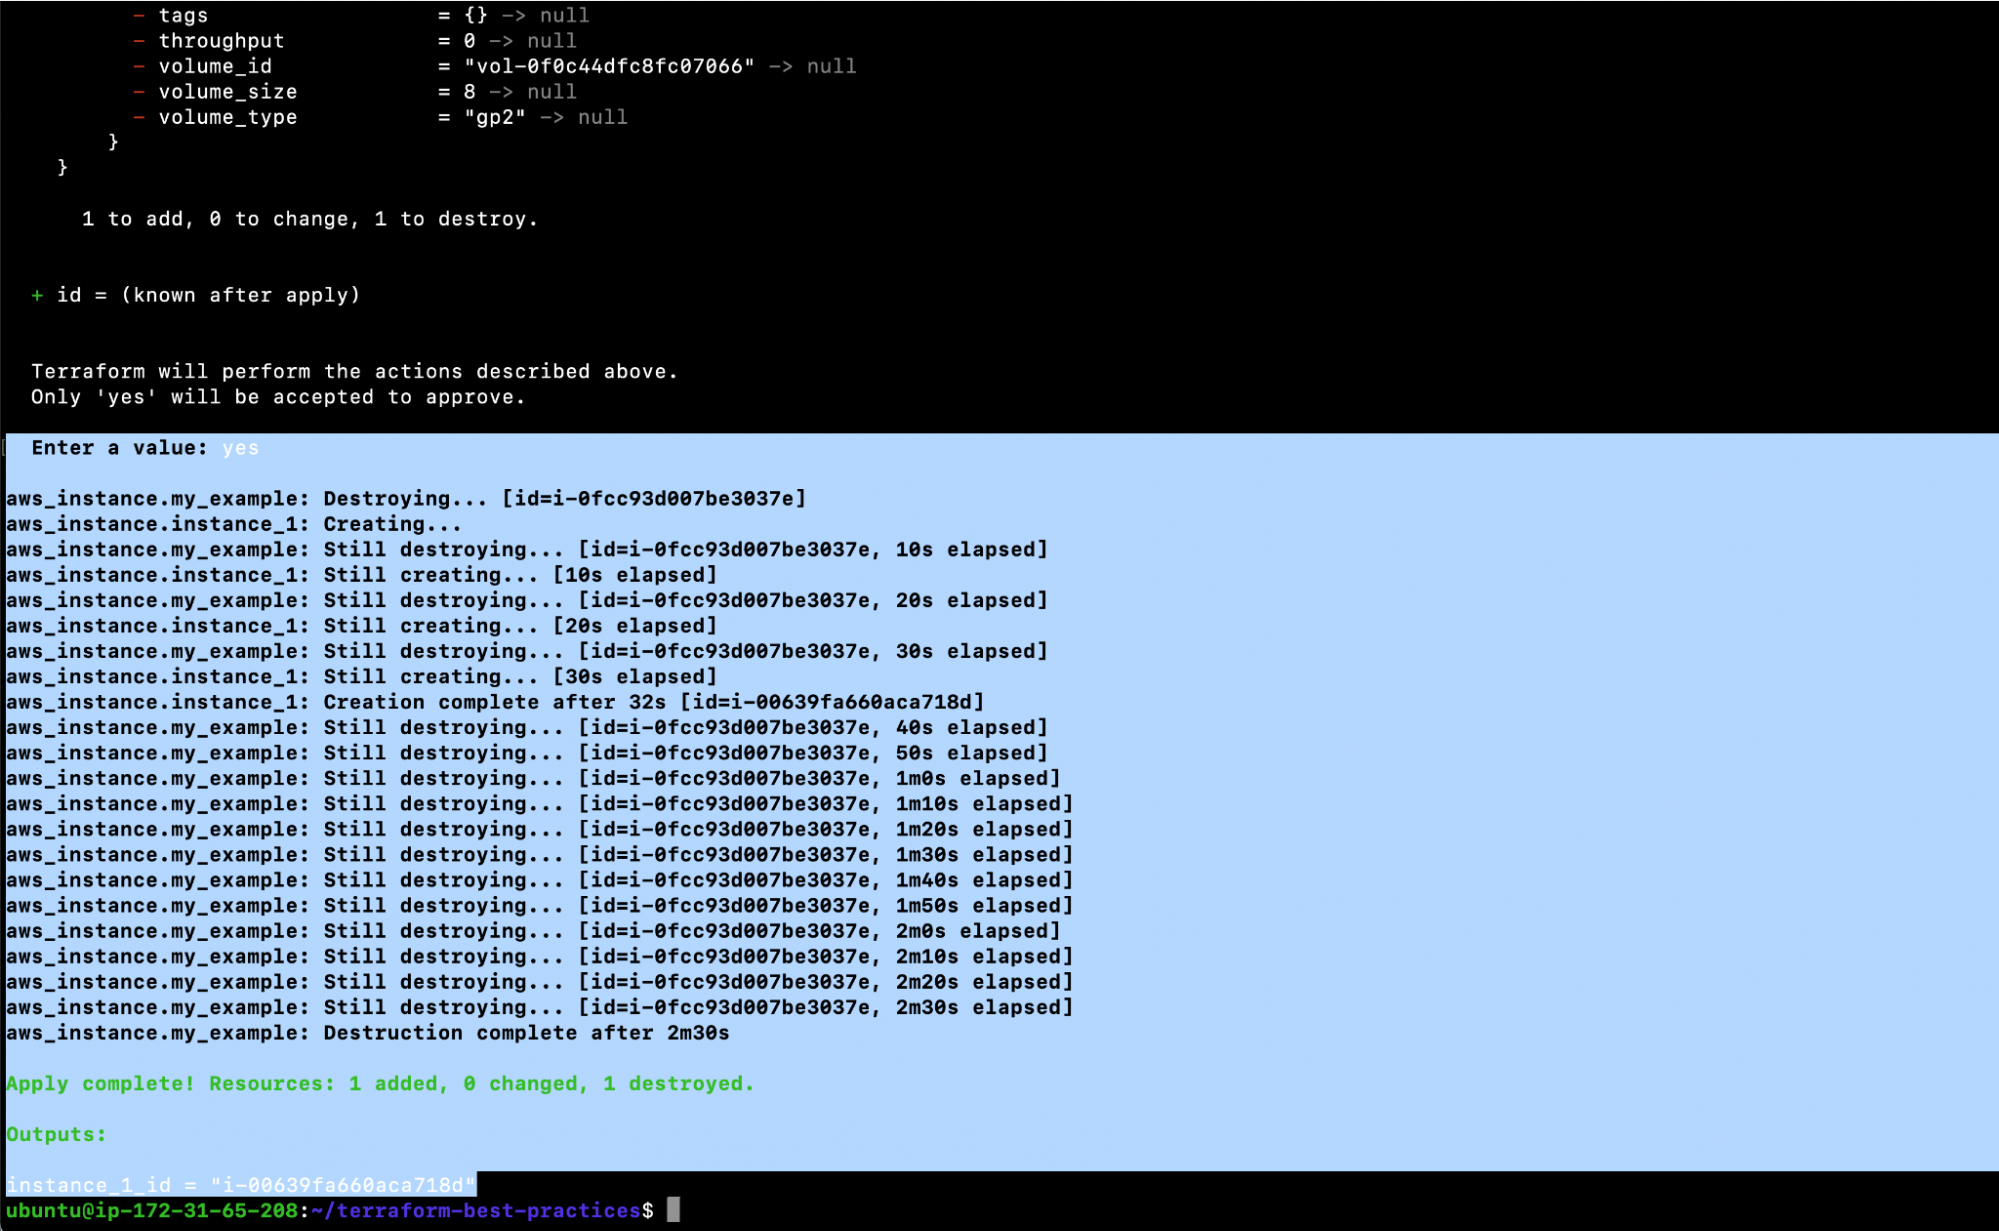
- terraform plan
- terraform apply
- git add main.tf output.tf variables.tf
- git commit -m “Follow Naming Convention”
- git push
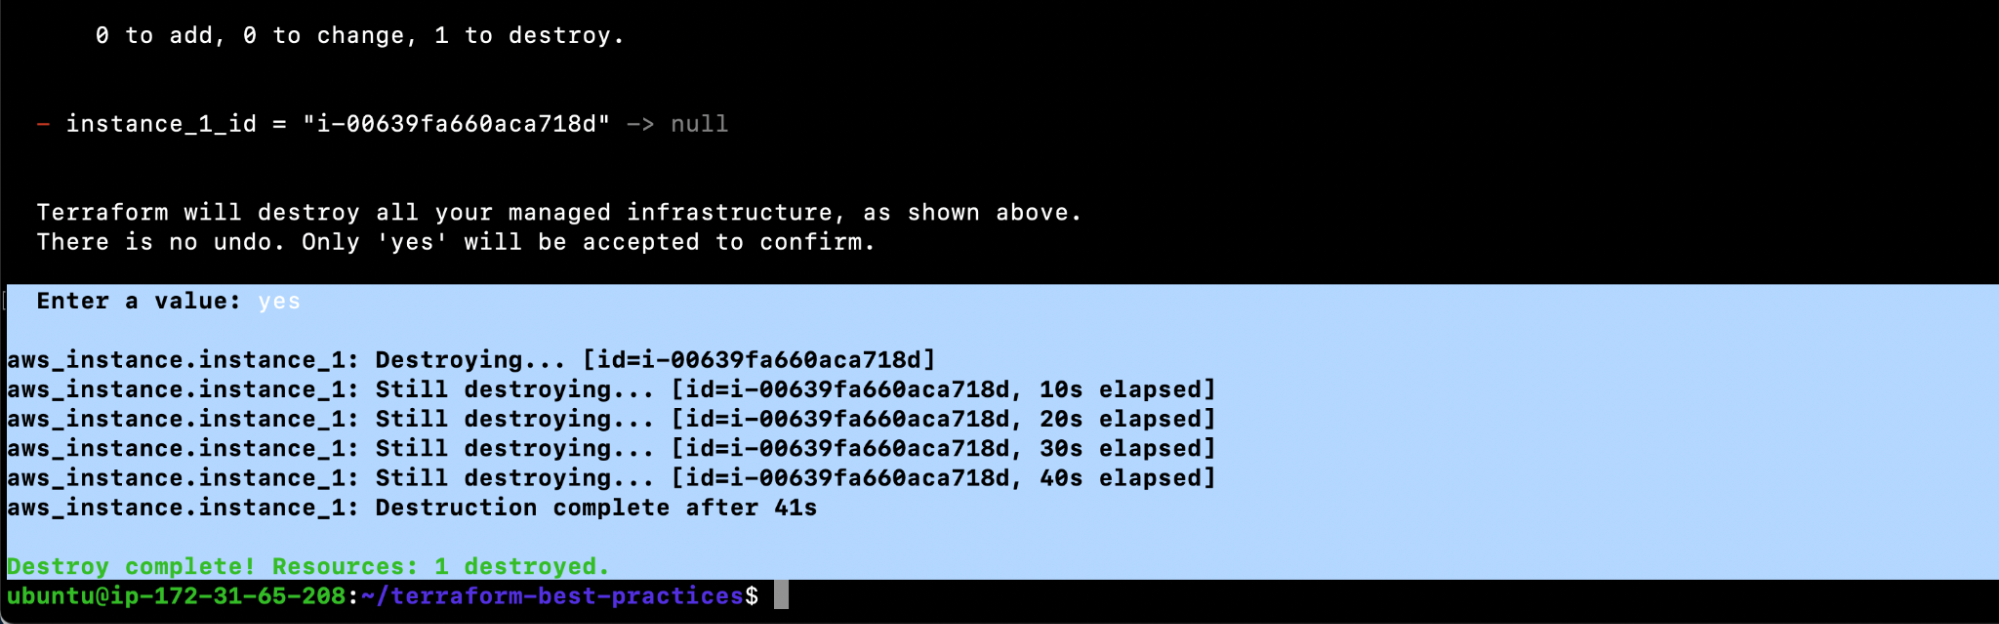
Before we move on to other Terraform best practices, let’s clean up the resources we created.
- terraform destroy
Practice 7: Use the Self Variable
The general variables are useful in various ways; however, they are missing one important element: the ability to predict the future. A self variable is a type of value unique to your resources and populated at the time of creation. This variable type is utilized when a variable’s value is unknown prior to deploying infrastructure.
It’s important to note that only the connection and provisioner blocks of the Terraform setup enable these variables.
For example, self.private_ip can be used to obtain the private IP address of a machine after the initial deployment even though the IP address isn’t known until it gets assigned.
Tip 7
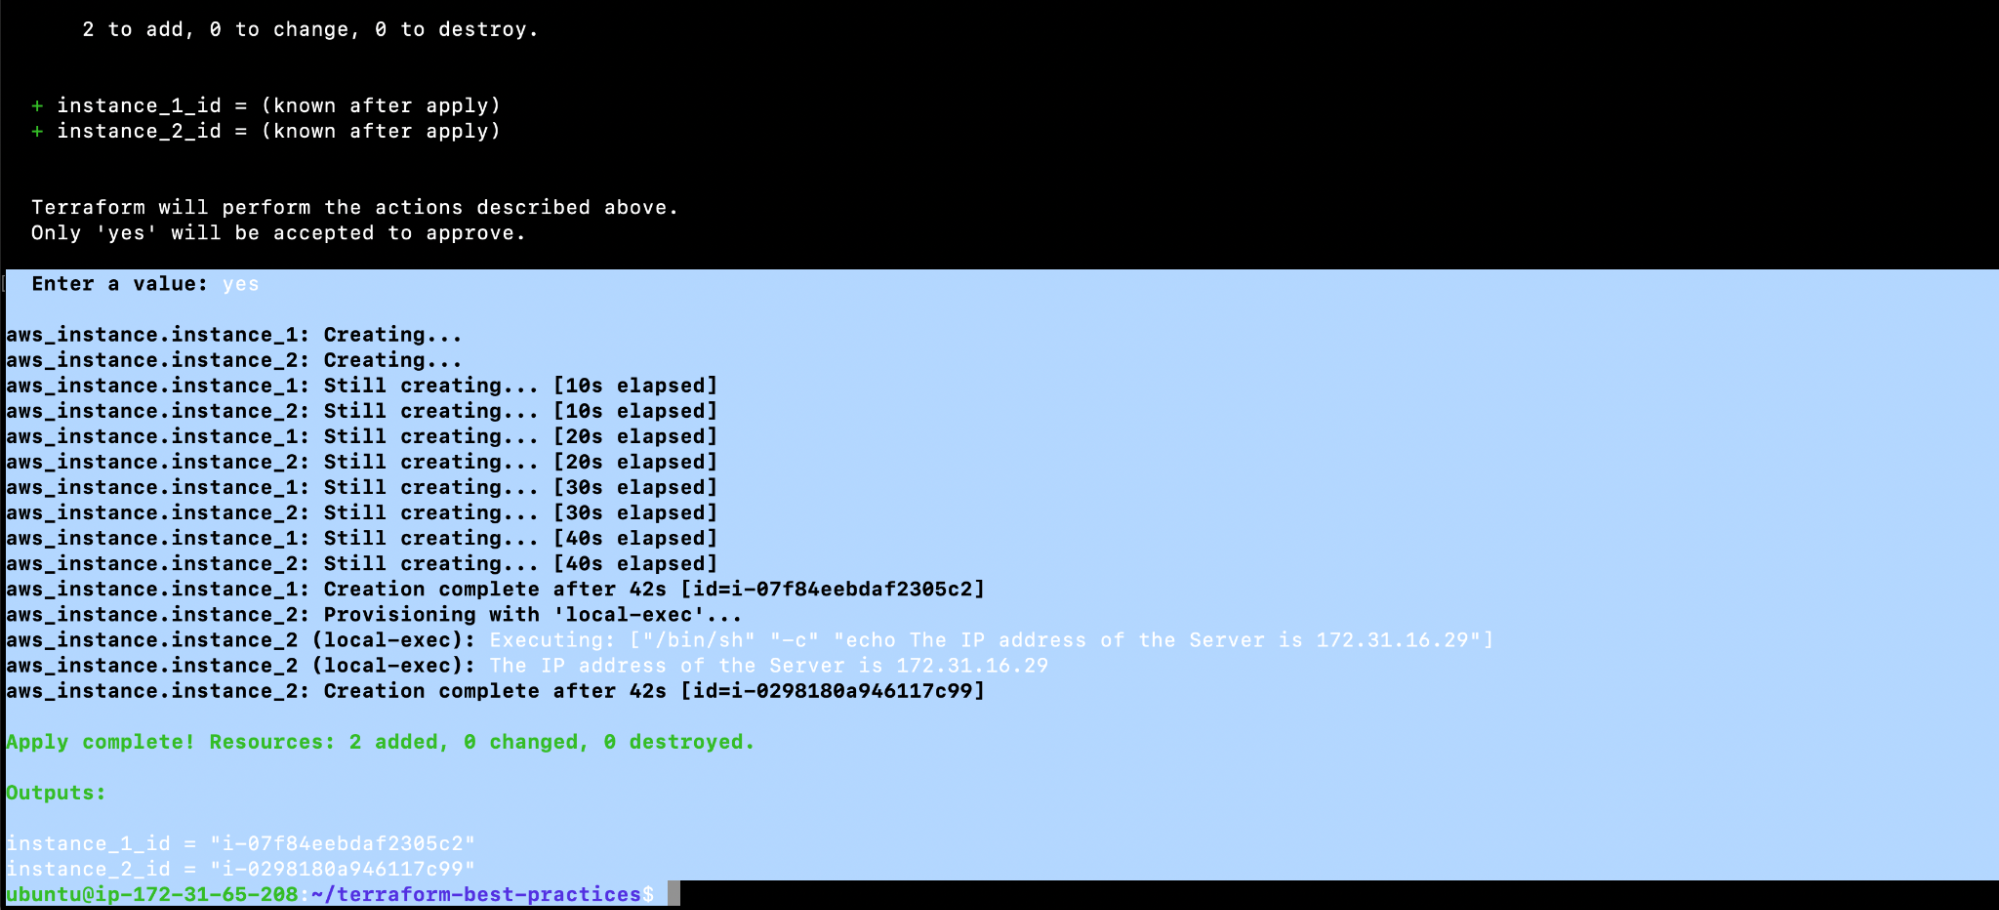
Use ‘self’ variable when you don’t know the value of the variable before deploying an infrastructure.
| resource “aws_instance” “instance_2” { # … provisioner “local-exec” { command = “echo The IP address of the Server is ${self.private_ip}” on_failure = continue } } |
- main.tf
| resource “aws_instance” “instance_1” { ami = var.instance_1_ami instance_type = var.instance_1_type tags = { Name = var.instance_1_name } } resource “aws_instance” “instance_2” { ami = var.instance_2_ami instance_type = var.instance_2_type tags = { Name = var.instance_2_name } provisioner “local-exec” { command = “echo The IP address of the Server is ${self.private_ip}” on_failure = continue } } |
- variables.tf
| variable “instance_1_ami” { description = “Value of the AMI ID for the EC2 instance” type = string default = “ami-005de95e8ff495156” } variable “instance_1_type” { description = “Value of the Instance Type for the EC2 instance” type = string default = “t2.micro” } variable “instance_1_name” { description = “Value of the Name Tag for the EC2 instance” type = string default = “instance-1” } variable “instance_2_ami” { description = “Value of the AMI ID for the EC2 instance” type = string default = “ami-005de95e8ff495156” } variable “instance_2_type” { description = “Value of the Instance Type for the EC2 instance” type = string default = “t2.micro” } variable “instance_2_name” { description = “Value of the Name Tag for the EC2 instance” type = string default = “instance-2” } |
- output.tf
| output “instance_1_id” { description = “The ID of the instance-1” value = try(aws_instance.instance_1.id) } output “instance_2_id” { description = “The ID of the instance-2” value = try(aws_instance.instance_2.id) } |
- terraform plan
- terraform apply
- git status
- git add main.tf output.tf variables.tf
- git commit -m “Use the self variable”
- git push
Practice 8: Use Modules
By using Terraform to manage your infrastructure, you’ll be able to design increasingly sophisticated configurations. The complexity of a single Terraform configuration file or directory has no inherent limit. This can be mitigated by using modules.
A module is a container for a collection of related resources. Modules can be used to construct lightweight abstractions allowing your infrastructure to be described in terms of its architecture rather than in terms of its physical objects. You can put your code within a Terraform module and reuse it numerous times throughout the lifespan of your Terraform project.
For example, you’ll be able to reuse code from the same module in both the Dev and QA environments, rather than having to copy and paste the same code.
Every Terraform practitioner should employ modules in accordance with the following guidelines:
- Begin writing your setup.
- Organize and encapsulate your code using local modules.
- Find relevant modules by searching the public Terraform Registry.
- Share modules with your team after they’ve been published.
Tip 8
Always use modules. This will save you a lot of coding time. There’s really no need to reinvent the wheel.
Now, let’s take a look at how modules can help you avoid writing the same code multiple times. In the following example, we will show you the steps which need to be followed to write a module and create S3 Buckets. The module is used to create two S3 Static Buckets. Read through the following steps, write a module, and use it. Next, commit and push the newly created and update files to Github.
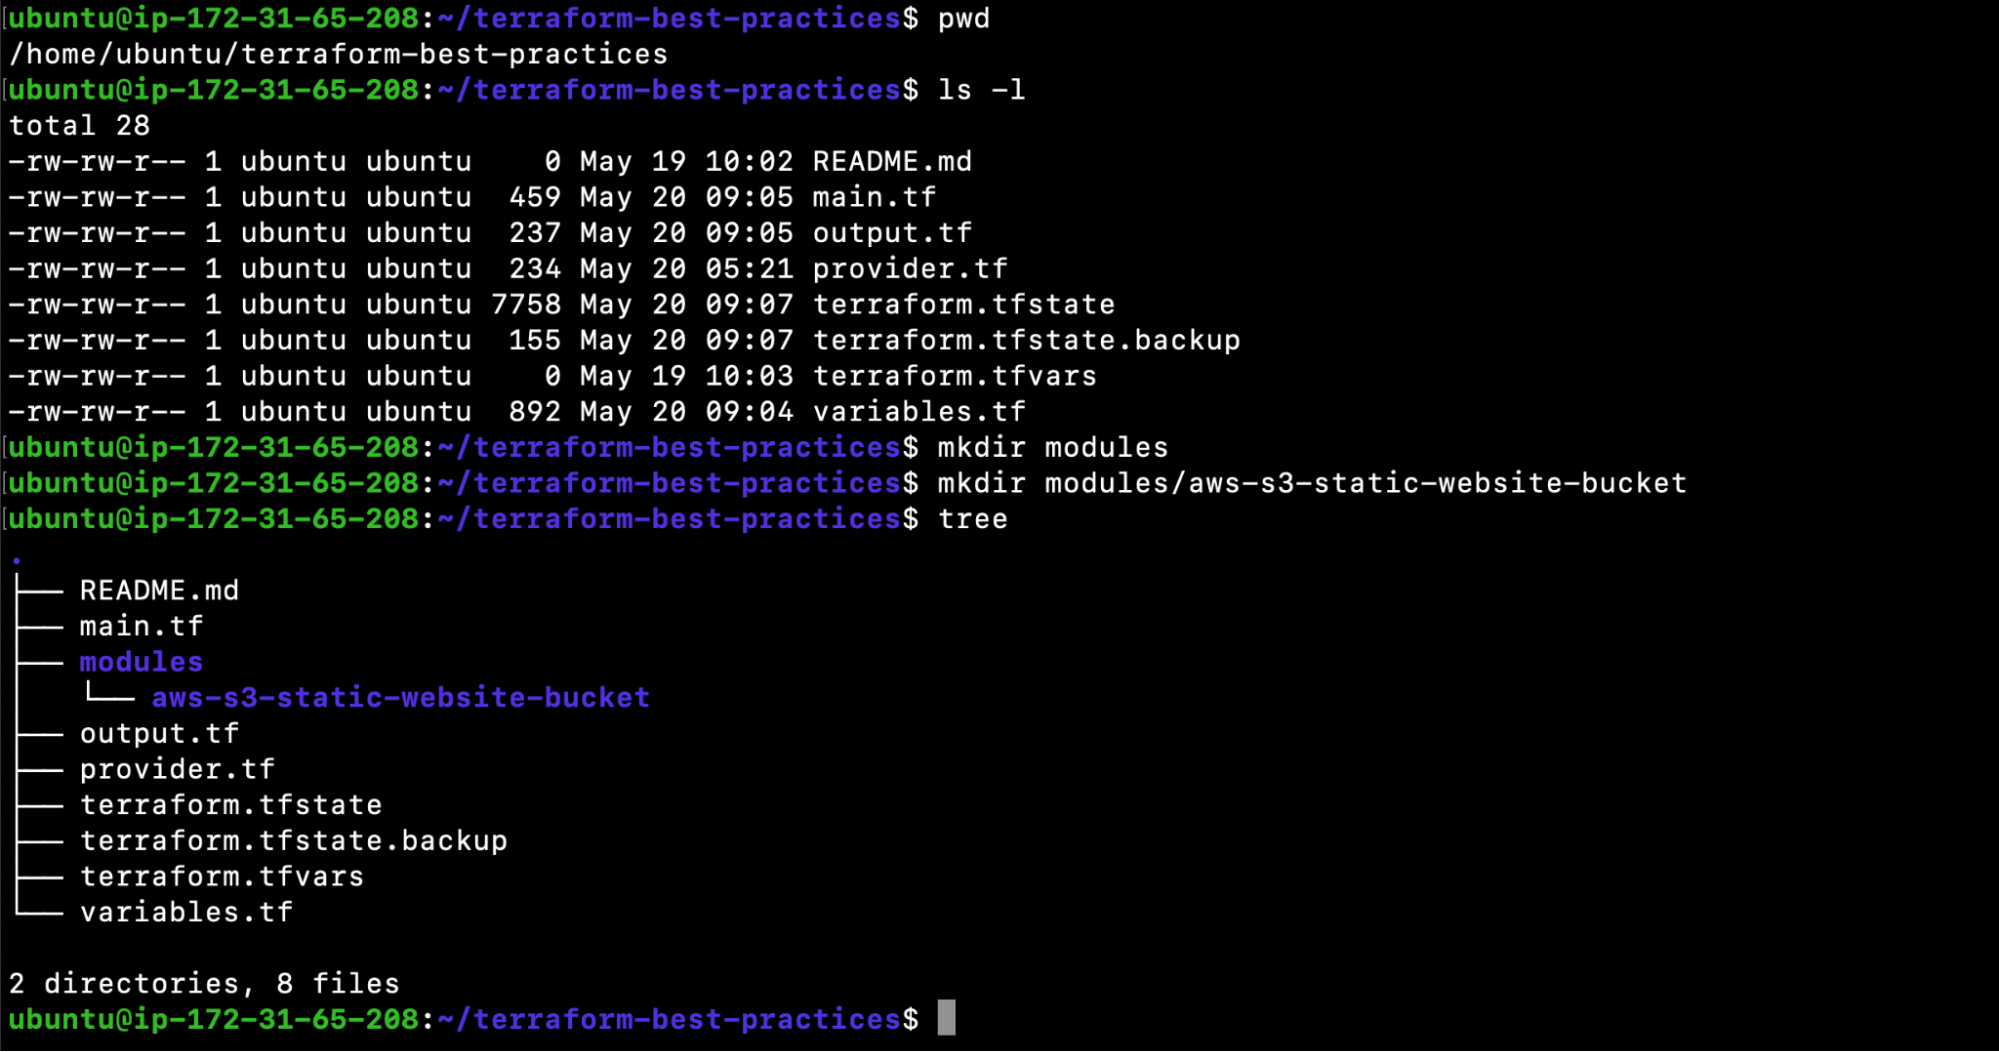
- pwd
- ls -l
- mkdir modules
- mkdir modules/aws-s3-static-website-bucket
- mkdir modules/aws-s3-static-website-bucket/www
- tree
- vim modules/aws-s3-static-website-bucket/README.md
| # AWS S3 static website bucket This module helps provisions AWS S3 static website buckets. |
- vim modules/aws-s3-static-website-bucket/main.tf
| resource “aws_s3_bucket” “s3_bucket” { bucket = var.bucket_name tags = var.tags } resource “aws_s3_bucket_website_configuration” “s3_bucket” { bucket = aws_s3_bucket.s3_bucket.id index_document { suffix = “index.html” } error_document { key = “error.html” } } resource “aws_s3_bucket_acl” “s3_bucket” { bucket = aws_s3_bucket.s3_bucket.id acl = “public-read” } resource “aws_s3_bucket_policy” “s3_bucket” { bucket = aws_s3_bucket.s3_bucket.id policy = jsonencode({ Version = “2012-10-17” Statement = [ { Sid = “PublicReadGetObject” Effect = “Allow” Principal = “*” Action = “s3:GetObject” Resource = [ aws_s3_bucket.s3_bucket.arn, “${aws_s3_bucket.s3_bucket.arn}/*”, ] }, ] }) } |
- vim modules/aws-s3-static-website-bucket/variables.tf
| # Input variable definitions variable “bucket_name” { description = “Name of the s3 bucket. Must be unique.” type = string } variable “tags” { description = “Tags to set on the bucket.” type = map(string) default = {} } |
- vim modules/aws-s3-static-website-bucket/outputs.tf
| # Output variable definitions output “arn” { description = “ARN of the bucket” value = aws_s3_bucket.s3_bucket.arn } output “name” { description = “Name (id) of the bucket” value = aws_s3_bucket.s3_bucket.id } output “domain” { description = “Domain name of the bucket” value = aws_s3_bucket_website_configuration.s3_bucket.website_domain } |
- vim main.tf
| resource “aws_instance” “instance_1” { ami = var.instance_1_ami instance_type = var.instance_1_type tags = { Name = var.instance_1_name } } resource “aws_instance” “instance_2” { ami = var.instance_2_ami instance_type = var.instance_2_type tags = { Name = var.instance_2_name } provisioner “local-exec” { command = “echo The IP address of the Server is ${self.private_ip}” on_failure = continue } } module “website_s3_bucket” { source = “./modules/aws-s3-static-website-bucket” bucket_name = “clickittech-terraform-best-practices” tags = { Terraform = “true” Environment = “test” } } |
- vim modules/aws-s3-static-website-bucket/www/error.html
| <!DOCTYPE html> <html lang=”en” dir=”ltr”> <head> <meta charset=”utf-8″> <title>Error</title> </head> <body> <p>Something is wrong here</p> </body> </html> |
- vim modules/aws-s3-static-website-bucket/www/index.html<!DOCTYPE html>
| <html lang=”en” dir=”ltr”> <head> <meta charset=”utf-8″> <title>Static Website</title> </head> <body> <p>This is a sample static website hosted in AWS S3 bucket</p> </body> </html> |
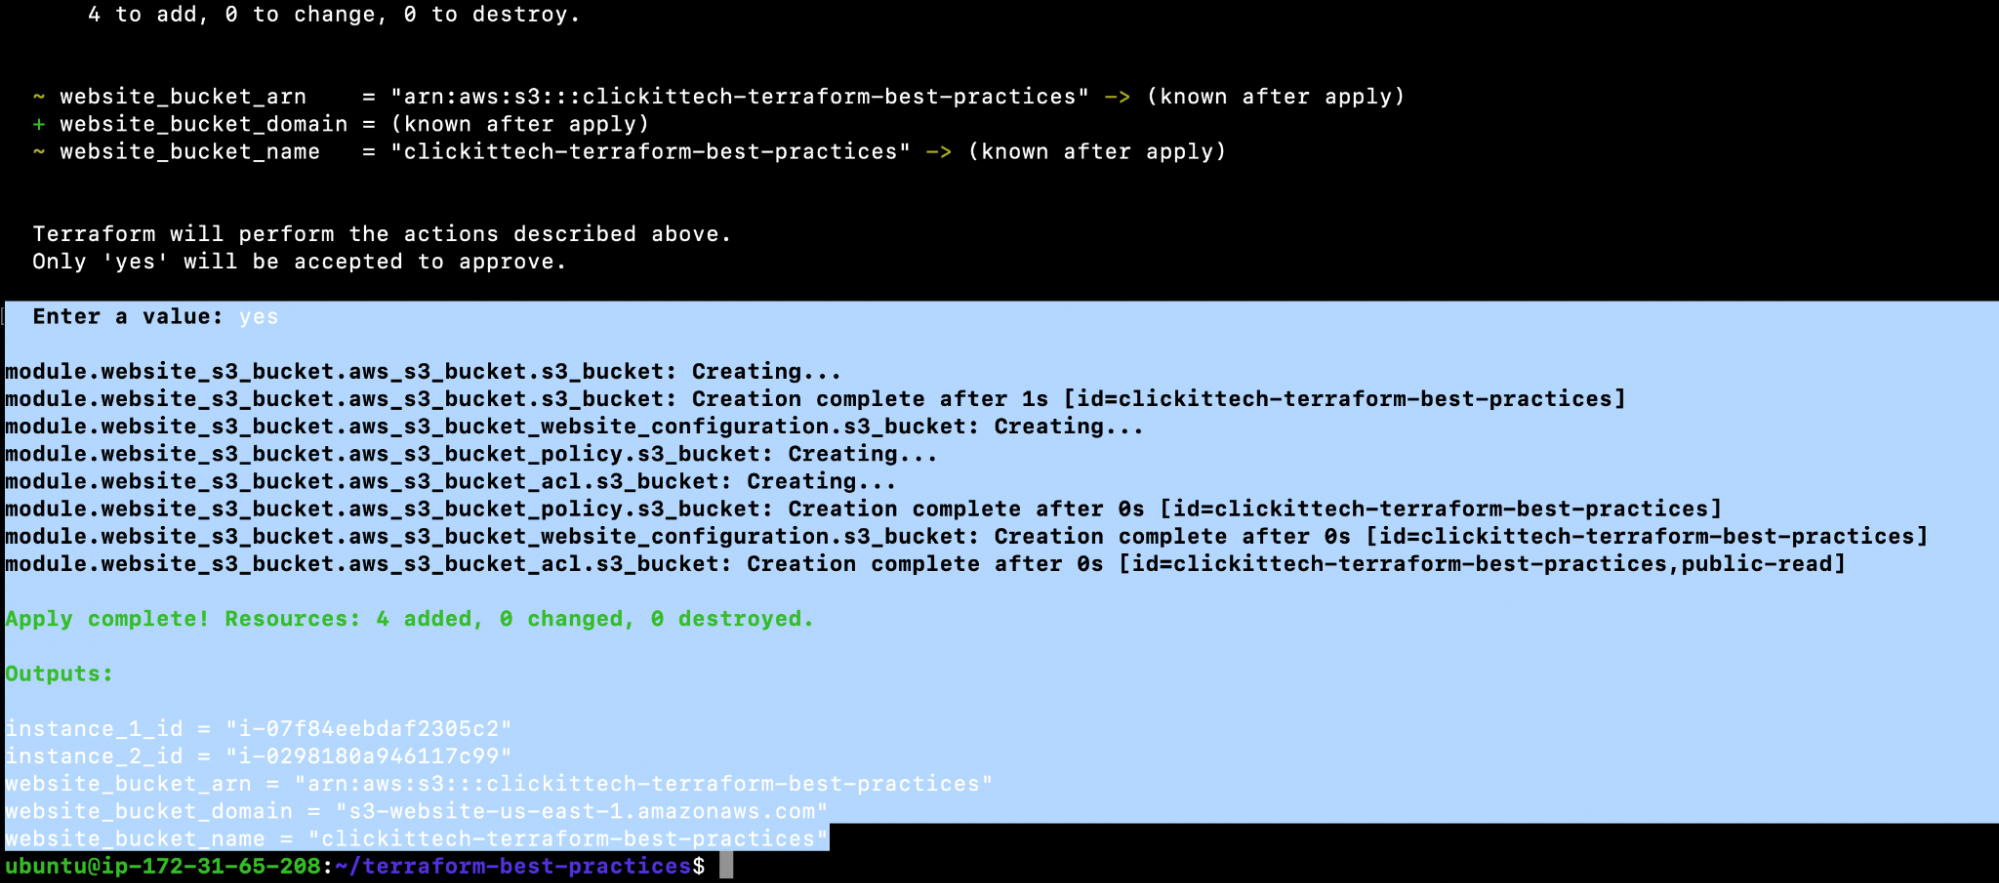
- terraform init
- terraform plan
- terraform apply
- aws s3 cp modules/aws-s3-static-website-bucket/www/ s3://$(terraform output -raw website_bucket_name)/ –recursive

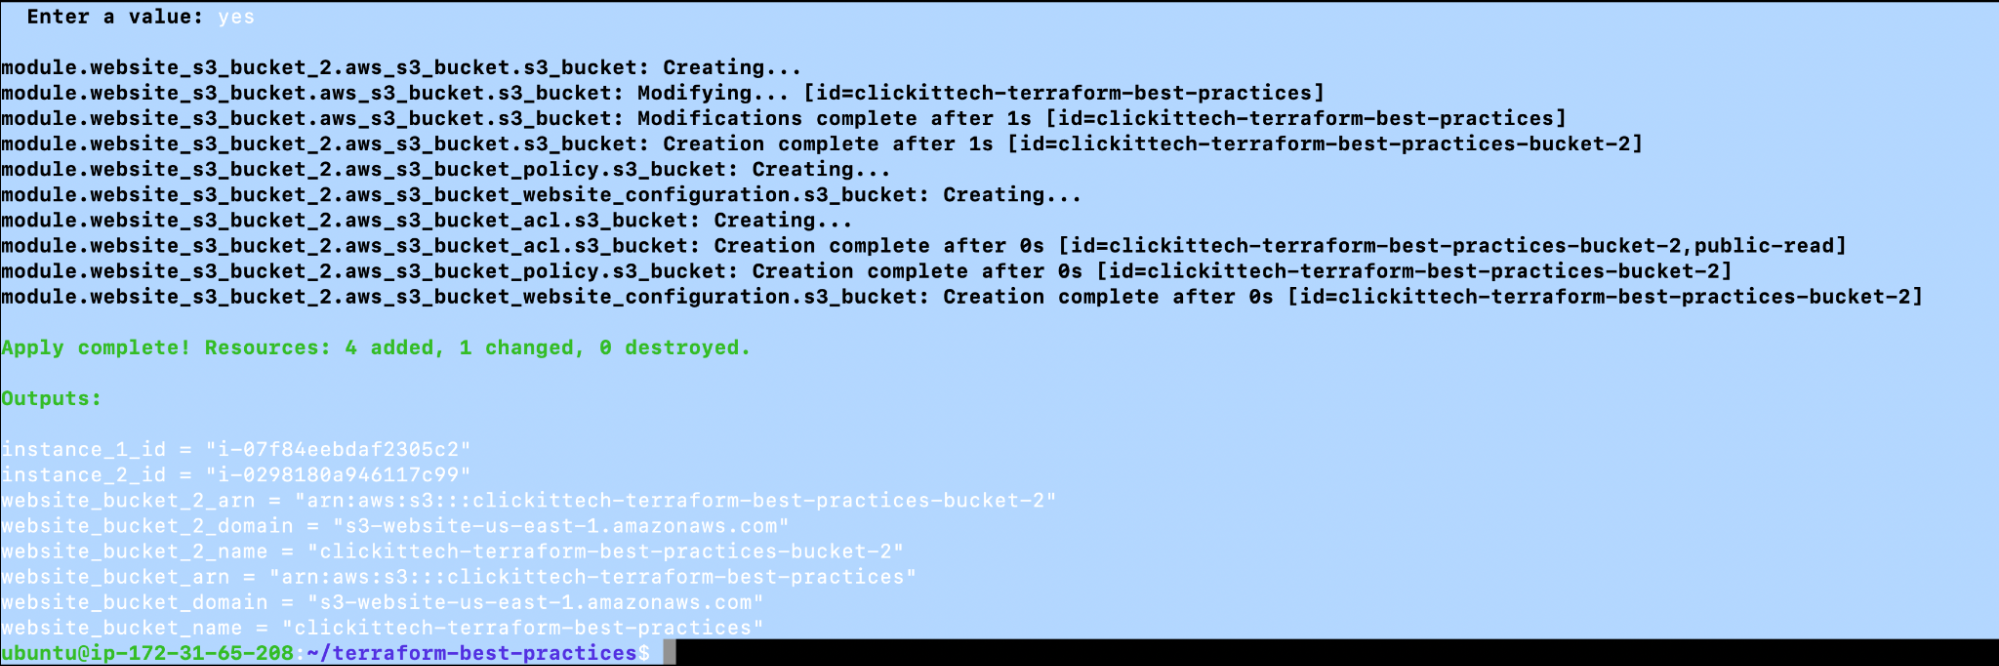
- Update main.tf
Append the following block of code at the end of the file.
| module “website_s3_bucket_2” { source = “./modules/aws-s3-static-website-bucket” bucket_name = “clickittech-terraform-best-practices-bucket-2” tags = { Terraform = “true” Environment = “test” } } |
- Update output.tf
Append the following block of code at the end of the file.
| output “website_bucket_2_arn” { description = “ARN of the bucket” value = module.website_s3_bucket_2.arn } output “website_bucket_2_name” { description = “Name (id) of the bucket” value = module.website_s3_bucket_2.name } output “website_bucket_2_domain” { description = “Domain name of the bucket” value = module.website_s3_bucket_2.domain } |
- terraform init
- terraform plan
- terraform apply
- aws s3 cp modules/aws-s3-static-website-bucket/www/ s3://$(terraform output -raw website_bucket_2_name)/ –recursive

- git status
- git add modules main.tf output.tf
- git commit -m “Use Modules”
- git push
Again, before we move ahead and look at other Terraform best practices, let’s clean up the resources we created.
- aws s3 rm s3://$(terraform output -raw website_bucket_name)/ –recursive
- aws s3 rm s3://$(terraform output -raw website_bucket_2_name)/ –recursive
- terraform destroy
Practice 9: Run Terraform Command with var-file
The -var-file parameter is used to pass values of input variables to Terraform plan and apply commands via a file. This allows you to save the values of the input variables in a file with the .tfvars suffix, which you can check into source control for any variable environments you need to deploy.
Keep in mind that if the current directory contains a terraform.tfvars file, Terraform will automatically use it to populate variables. If the file has a different name, you can explicitly supply it using the -var-file flag.
Once you have one or more.tfvars files, you can use the -var-file flag to direct Terraform as to which file it should use to supply input variables to the Terraform command.
Tip 9
Maintain multiple .tfvars files with the definition of variables so that you can pass the required file with var-file flag to the ‘terraform plan’ or ‘terraform apply’ command.
- vim test.tfvars
| instance_1_ami = “ami-005de95e8ff495156” instance_1_type = “t2.micro” instance_1_name = “instance-1” instance_2_ami = “ami-005de95e8ff495156” instance_2_type = “t2.micro” instance_2_name = “instance-2” website_s3_bucket_1_name = “clickittech-terraform-best-practices-1” website_s3_bucket_2_name = “clickittech-terraform-best-practices-2” terraform = “true” environment = “test” |
- vim main.tf
| resource “aws_instance” “instance_1” { ami = var.instance_1_ami instance_type = var.instance_1_type tags = { Name = var.instance_1_name } } resource “aws_instance” “instance_2” { ami = var.instance_2_ami instance_type = var.instance_2_type tags = { Name = var.instance_2_name } provisioner “local-exec” { command = “echo The IP address of the Server is ${self.private_ip}” on_failure = continue } } module “website_s3_bucket_1” { source = “./modules/aws-s3-static-website-bucket” bucket_name = var.website_s3_bucket_1_name tags = { Terraform = var.terraform Environment = var.environment } } module “website_s3_bucket_2” { source = “./modules/aws-s3-static-website-bucket” bucket_name = var.website_s3_bucket_2_name tags = { Terraform = var.terraform Environment = var.environment } } |
- vim variables.tf
| variable “instance_1_ami” { description = “Value of the AMI ID for the EC2 instance” type = string } variable “instance_1_type” { description = “Value of the Instance Type for the EC2 instance” type = string } variable “instance_1_name” { description = “Value of the Name Tag for the EC2 instance” type = string } variable “instance_2_ami” { description = “Value of the AMI ID for the EC2 instance” type = string } variable “instance_2_type” { description = “Value of the Instance Type for the EC2 instance” type = string } variable “instance_2_name” { description = “Value of the Name Tag for the EC2 instance” type = string } variable “website_s3_bucket_1_name”{ description = “Value of the Name Tag for the S3 bucket” type = string } variable “website_s3_bucket_2_name”{ description = “Value of the Name Tag for the S3 bucket” type = string } variable “terraform”{ description = “Value of the Terraform Tag for the S3 bucket” type = string } variable “environment”{ description = “Value of the Environment Tag for the S3 bucket” type = string } |
- vim output.tf
| output “instance_1_id” { description = “The ID of the instance-1” value = try(aws_instance.instance_1.id) } output “instance_2_id” { description = “The ID of the instance-2” value = try(aws_instance.instance_2.id) } output “website_bucket_1_arn” { description = “ARN of the bucket” value = module.website_s3_bucket_1.arn } output “website_bucket_1_name” { description = “Name (id) of the bucket” value = module.website_s3_bucket_1.name } output “website_bucket_1_domain” { description = “Domain name of the bucket” value = module.website_s3_bucket_1.domain } output “website_bucket_2_arn” { description = “ARN of the bucket” value = module.website_s3_bucket_2.arn } output “website_bucket_2_name” { description = “Name (id) of the bucket” value = module.website_s3_bucket_2.name } output “website_bucket_2_domain” { description = “Domain name of the bucket” value = module.website_s3_bucket_2.domain } |
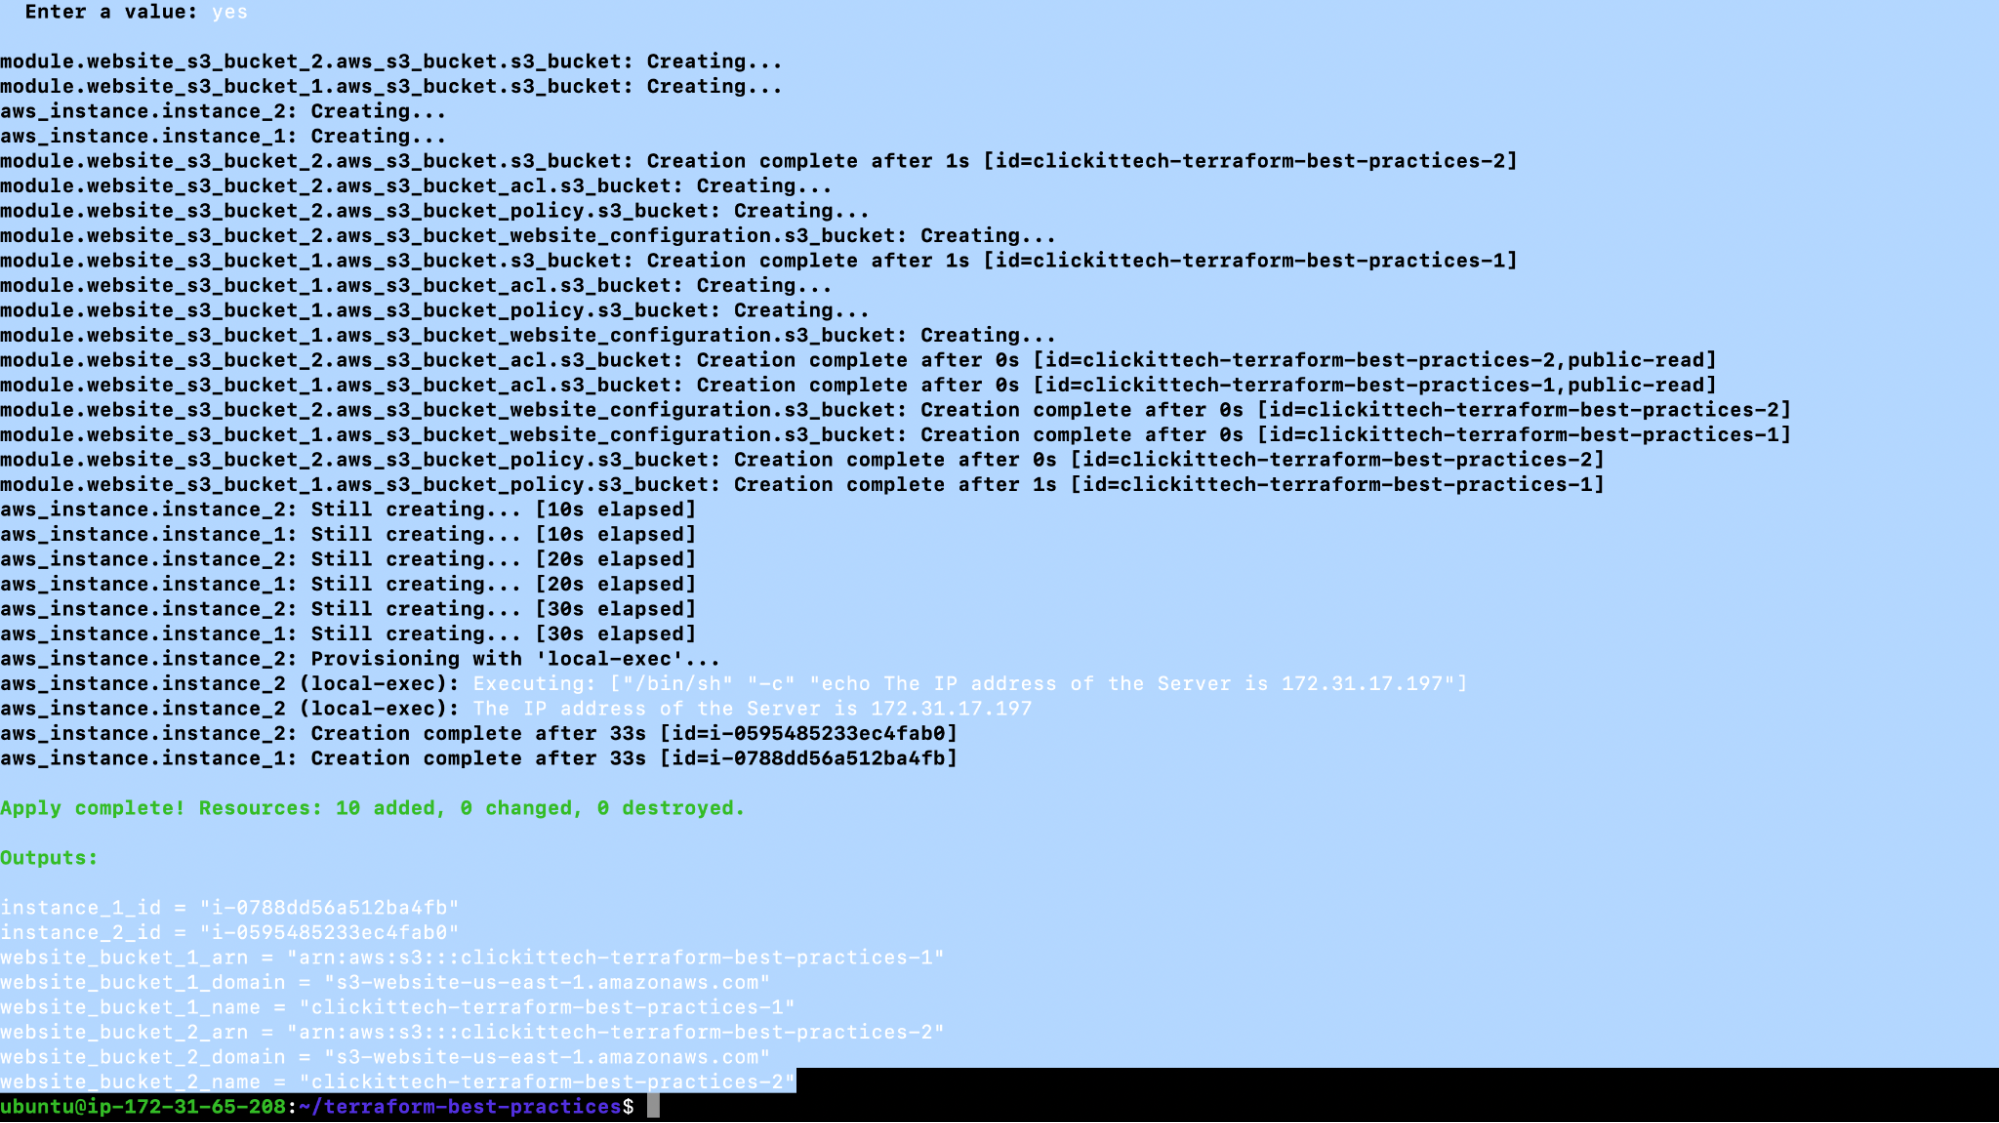
- terraform apply -var-file=”test.tfvars”
- git status
- git add main.tf output.tf variables.tf test.tfvars
- git commit -m “Run Terraform Command with var-file”
- git push
Practice 10: Manage Terraform State on a Remote Storage
The state of Terraform is divided into two parts: remote state and state locking. Terraform saves state by default in a file called terraform.tfstate on your local machine. This does the job for personal projects, but when it comes to Terraform group projects, using a local file becomes complicated seeing as each user must ensure that they have the most recent state data before running Terraform and that no one else is running Terraform at the same time.
Terraform in a remote environment with shared access to the state is the best approach for group projects. The remote state addresses the aforementioned issues. In a nutshell, using a remote state simply means that the state file will be stored on a remote server rather than on your local storage. By storing resource state remotely in a single state file, teams can ensure they always have the most up-to-date state file.
Tip 10
When you’re working on a project with multiple users, you should always use Terraform backends to save the state file in a shared remote store.
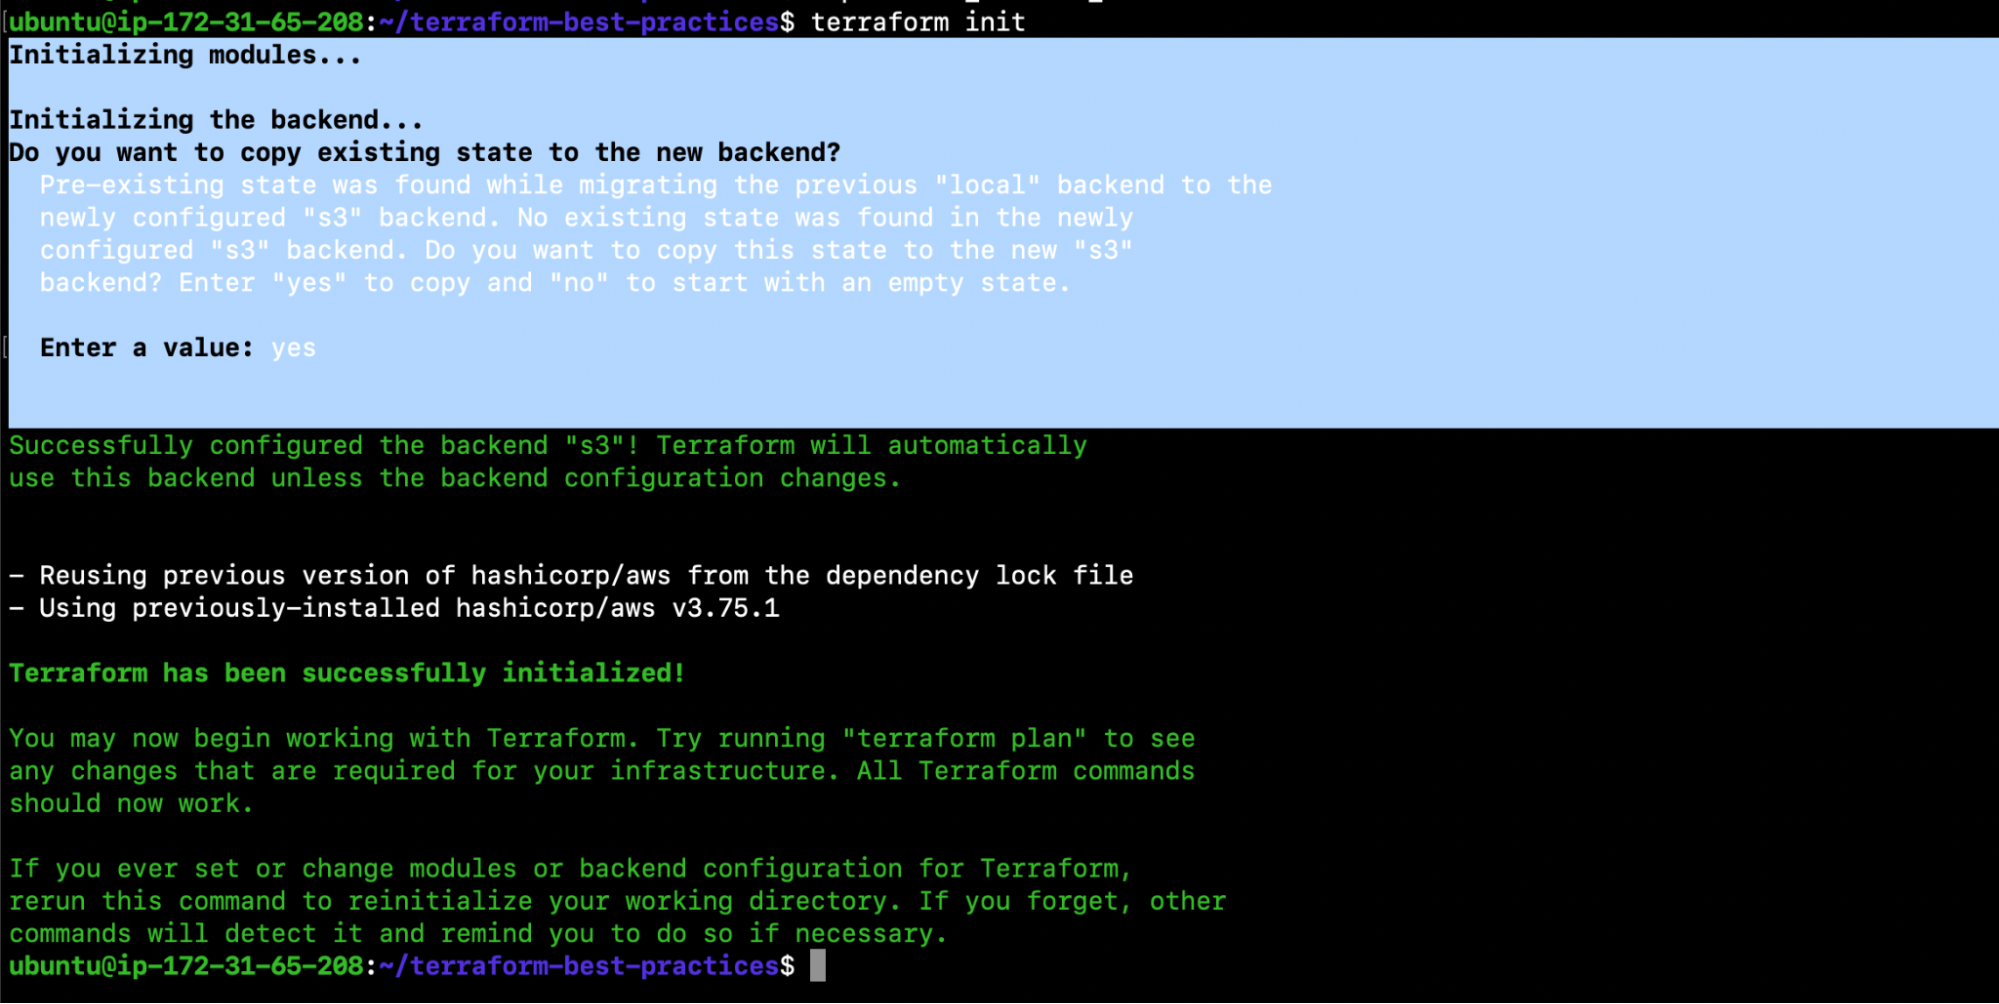
To store Terraform state in S3 Bucket on AWS, add a backend block as explained in the following steps, and initialize the project repo. Additionally, you should always push your changes to the repo.
- vim backend.tf
| terraform { backend “s3” { bucket = “terraform-best-practices” key = “terraform.tfstate” region = “us-east-1” } } |
- terraform init
- git add backend.tf
- git commit -m “Manage Terraform State on a Remote Storage”
- git push

Practice 11: Locking Remote State
We know that the state of Terraform is divided into two parts: remote state (which we discussed in the previous section) and state locking.
When two or more users operate on the infrastructure at the same time, they may run into issues with resource creation seeing as there may arise a situation where another process is executed before the current state is completed.
In such a situation, if your backend supports it, Terraform will lock your state for any operations that potentially write state. This prevents outsiders from gaining access to the lock and corrupting your state. As a result, Terraform state locking is required to prevent other users from simultaneously destroying your infrastructure by utilizing the same state file.
Tip 11
Always use state locking when using a remote backend to store your Terraform state.
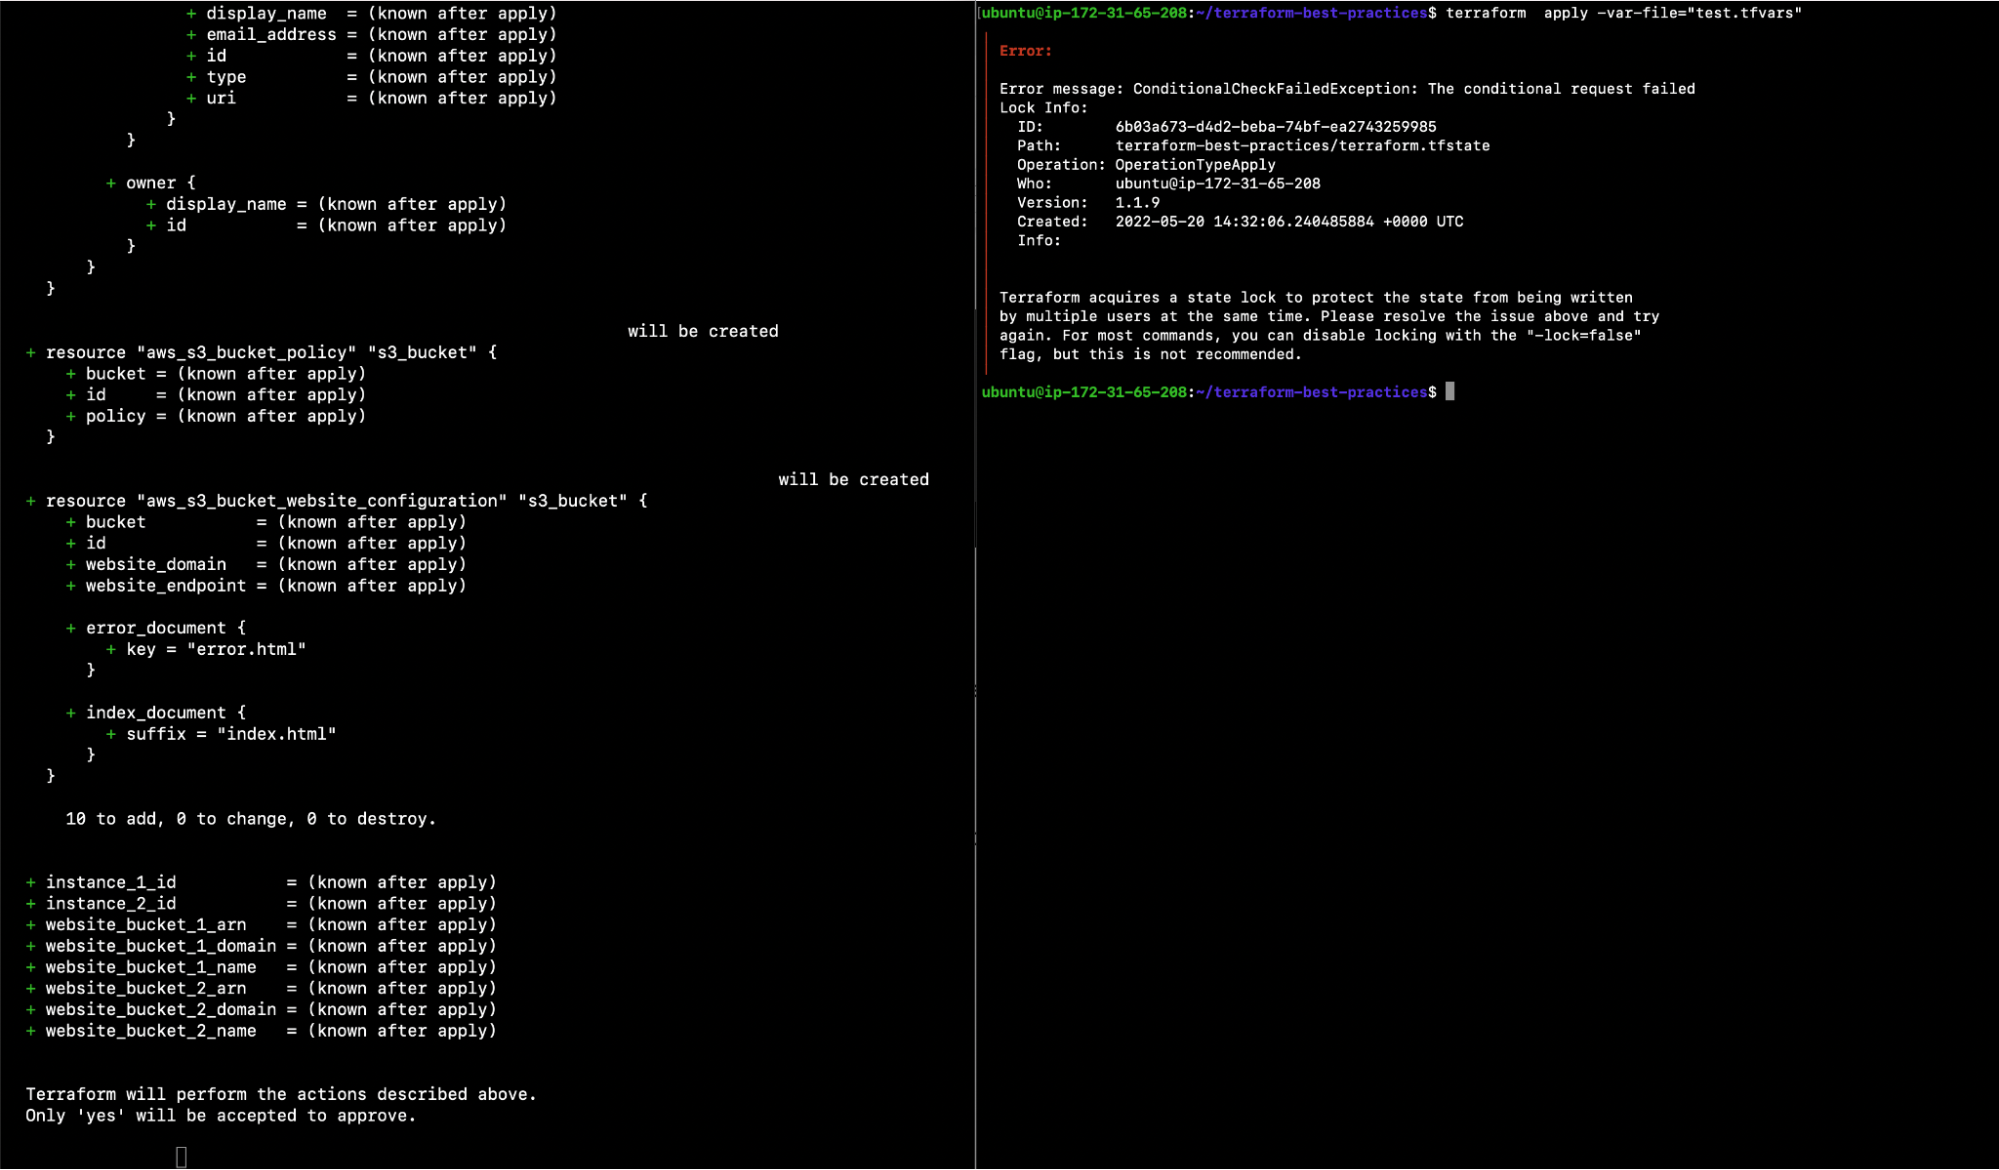
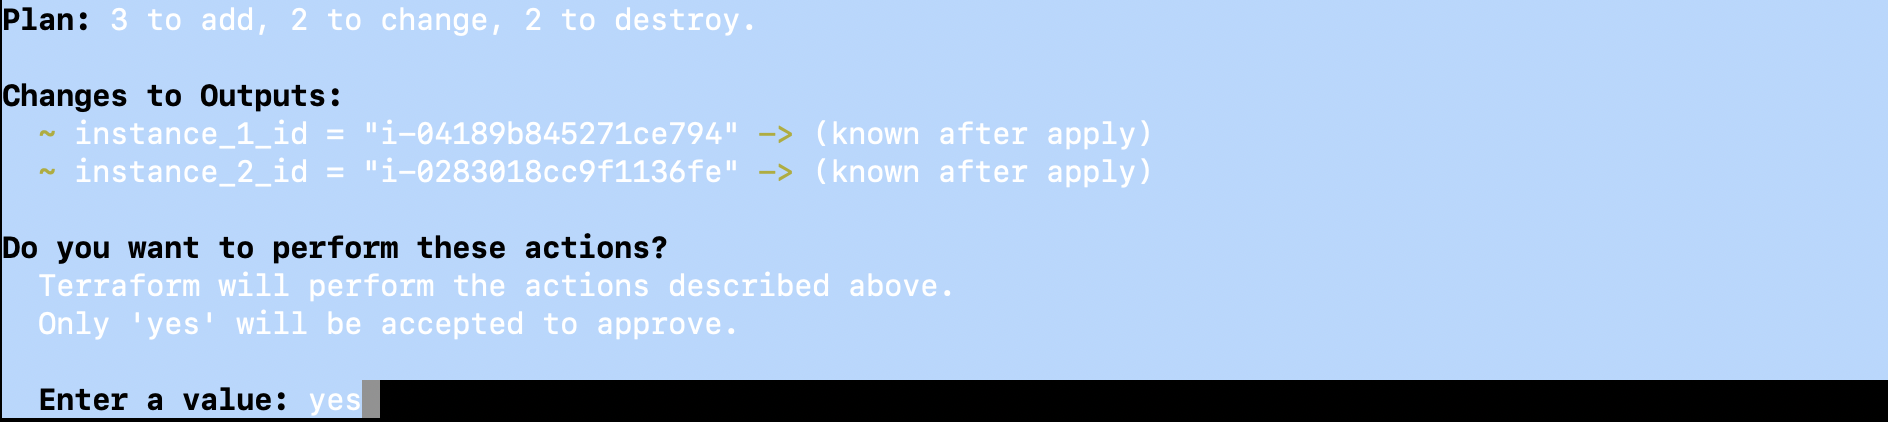
To learn how state locking works, carry out the following steps by modifying the backend.tf, adding dynamodb_table, and running the ‘terraform apply’ operation simultaneously. Don’t forget to push your changes to the repo.
- vim backend.tf
| terraform { backend “s3” { bucket = “terraform-best-practices” key = “terraform.tfstate” region = “us-east-1” dynamodb_table = “terraform_locks” } } |
- terraform init -reconfigure
- terraform destroy -var-file=”test.tfvars”
- terraform apply -var-file=”test.tfvars”
Execute this command from two different sessions one after the other, as depicted in the following screenshot.
- git add backend.tf
- git commit -m “Locking Remote State”
- git push
Practice 12: Backup State Files
The status of the infrastructure is kept in a file named terraform.tfstate.Terraform.tfstate.backup also contains a backup of the previous state. When you run ‘terraform apply’, it creates a new terraform.tfstate and backup. Terraform uses this method to keep track of the remote state. If you hit ‘terraform apply’ again after the remote state changes, Terraform will apply the changes to the right remote state.
However, if you lose your Terraform state file, you won’t be able to administer the existing resources on your cloud provider. WithTerraform’s backend functionality, the Terraform state can also be saved remotely, with ‘local backend’ as the default backend.
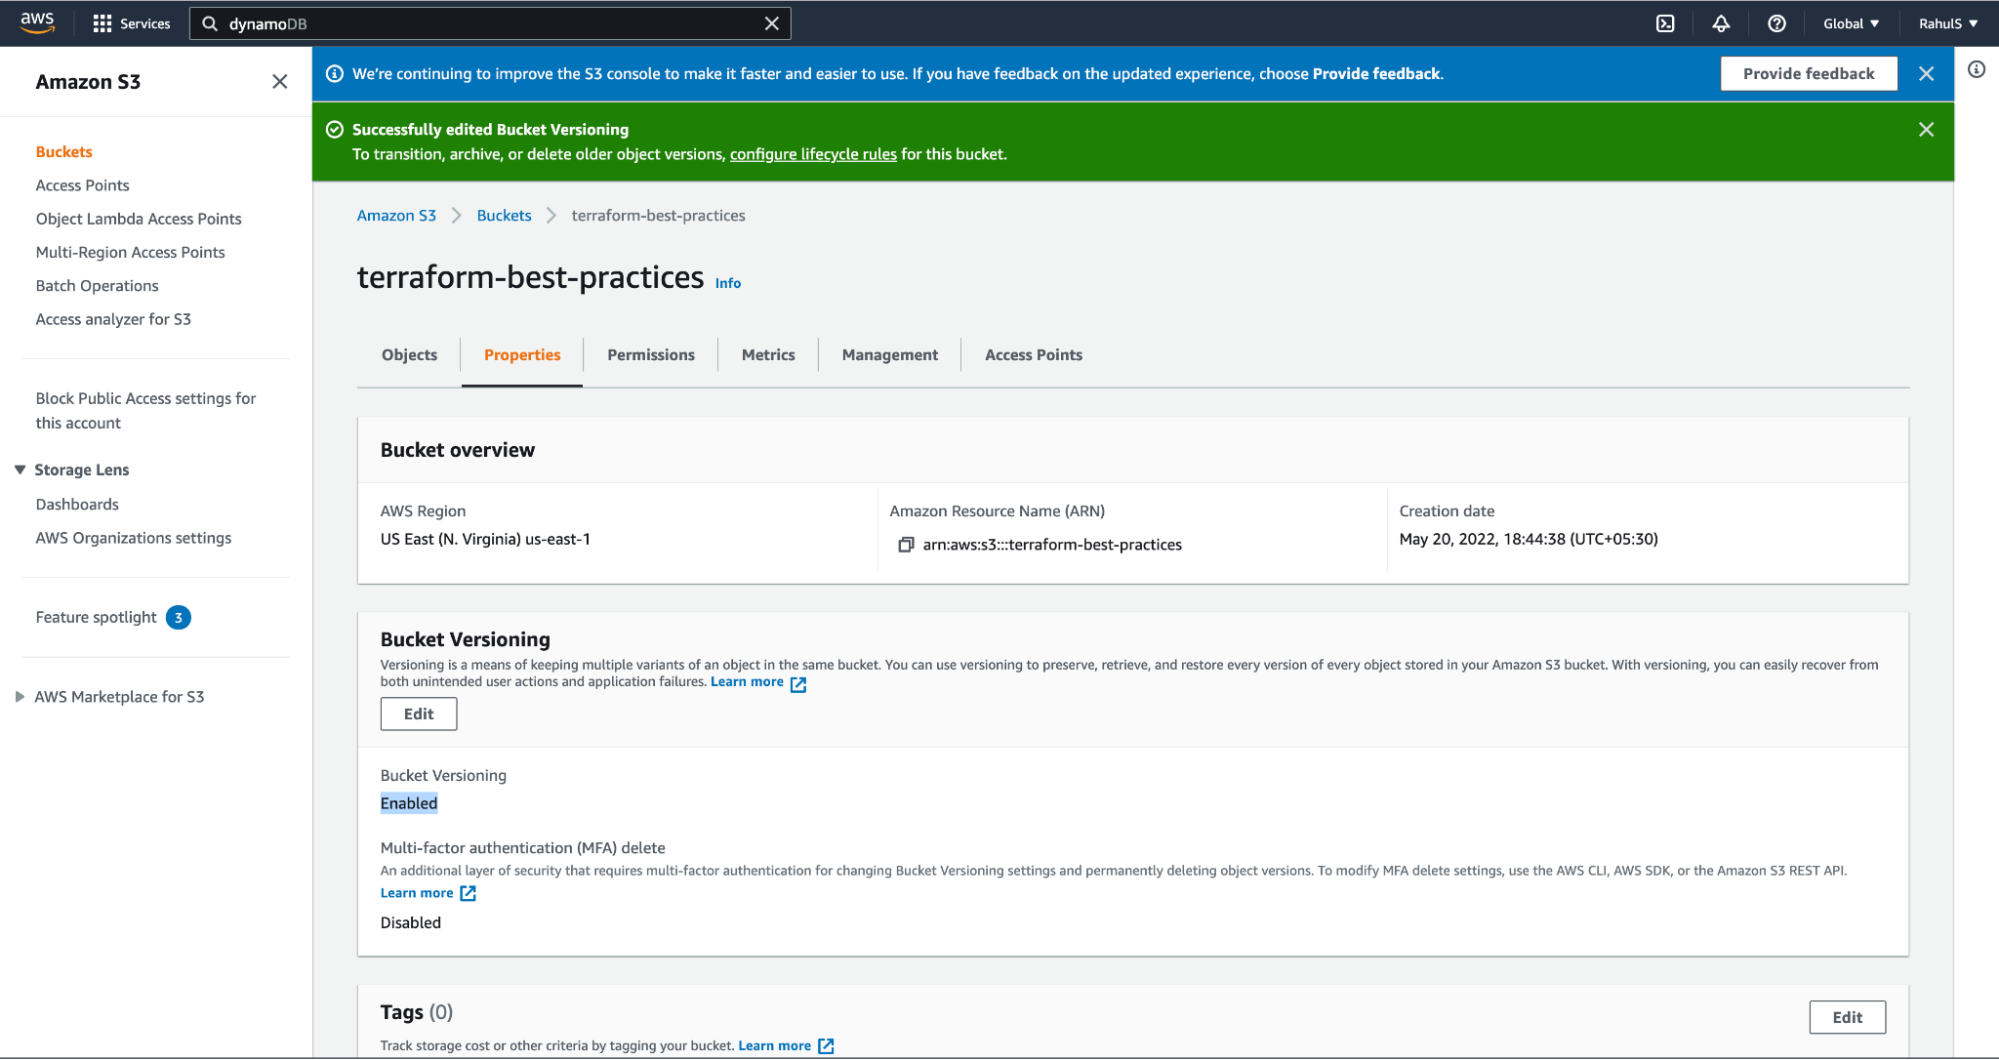
If you’re using a remote backend like AWS S3 Bucket, versioning on the S3 bucket is highly encouraged. This way, your state file looks like it’s corrupted or in an incorrect state, and the bucket supports bucket versioning, you may be able to recover by restoring a previous version of the state file.
Tip 12
Always enable versioning on your remote backend storage in case you need to recover from unexpected failures.
Perform the following steps in order to enable versioning on AWS S3 Bucket, create resources, and check the different versions of the state file.
- Enable versioning
- terraform apply -var-file=”test.tfvars”
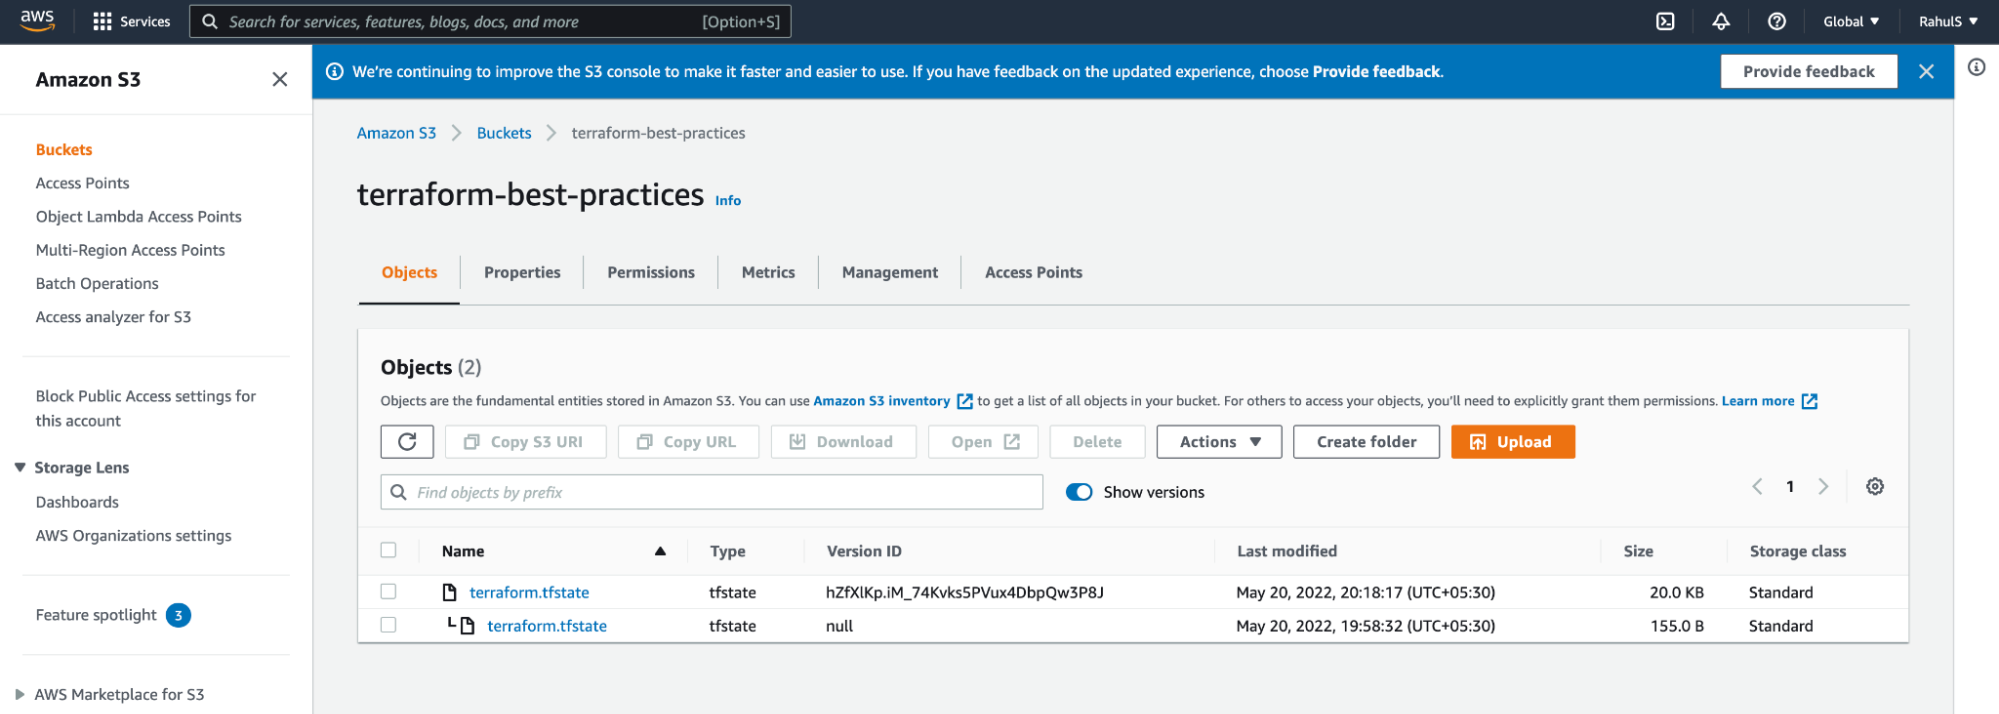
- Check versions
Practice 13: Manipulate Terraform State Through Terraform Commands Only
Thanks to state data, Terraform remembers which real-world object corresponds to each resource in the configuration, allowing it to modify an existing object when its resource declaration changes. Terraform automatically updates the state during ‘terraform plan’ and ‘terraform apply’ operations. That said, making deliberate alterations to Terraform’s state data remains necessary in certain cases.
Modifying state data outside of a normal ‘terraform plan’ or ‘terraform apply’ operation may lead to Terraform losing track of controlled resources. In light of the foregoing, we recommend using the Terraform CLI, a more secure option, which provides commands for inspecting state, forcing re-creation, moving resources, and disaster recovery.
To learn more about this, you can consult the official documentation here.
Tip 13
Always manipulate terraform state using terraform CLI and avoid making manual changes in the state file.
Practice 14: Generate README for each Module with Input and Output Variables
There are several stages on the road to automation. Some are simpler than others and documentation is one of the least well-known stages.
The readme file is usually the first file that people open. It’s a text file that contains user-friendly information on a product, or project. Basically, it’s nothing more than a paper that explains the project’s goal. However, it’s the file that reflects the project, therefore it needs to be a part of your Terraform projects.
Now that we’ve established the importance of a decent readme file, let’s take a look at how to generate one using an available utility. Indeed, we will be diving into a terraform-docs utility which automatically generates a README.md so that you can avoid having to manually write it for input variables and outputs. Click here to learn more about the utility.
Tip 14
You must have a self-explanatory README.md as a part of all your Terraform projects.
In order to generate a README.md in your current working directory, execute the following commands.
- /usr/local/terraform-docs markdown table –output-file README.md –output-mode replace modules/aws-s3-static-website-bucket/
- /usr/local/terraform-docs markdown table –output-file README.md –output-mode replace .
- git status
- git add README.md modules/aws-s3-static-website-bucket/README.md
- git commit -m “modules/aws-s3-static-website-bucket/README.md”
- git push
- Check my README.md files for reference.
Practice 15: Take Advantage of Built-in Functions
Terraform has a lot of built-in functions that you can call on within expressions to alter and combine variables, ranging from math operations to file manipulation.
For example, to read your private SSH key file, you can use the built-in function provided by Terraform, which allows you to establish a secure SSH connection without storing the key in the setup.
It is to be noted that the Terraform language does not support user-defined functions; therefore, only the built-in functions are accessible.
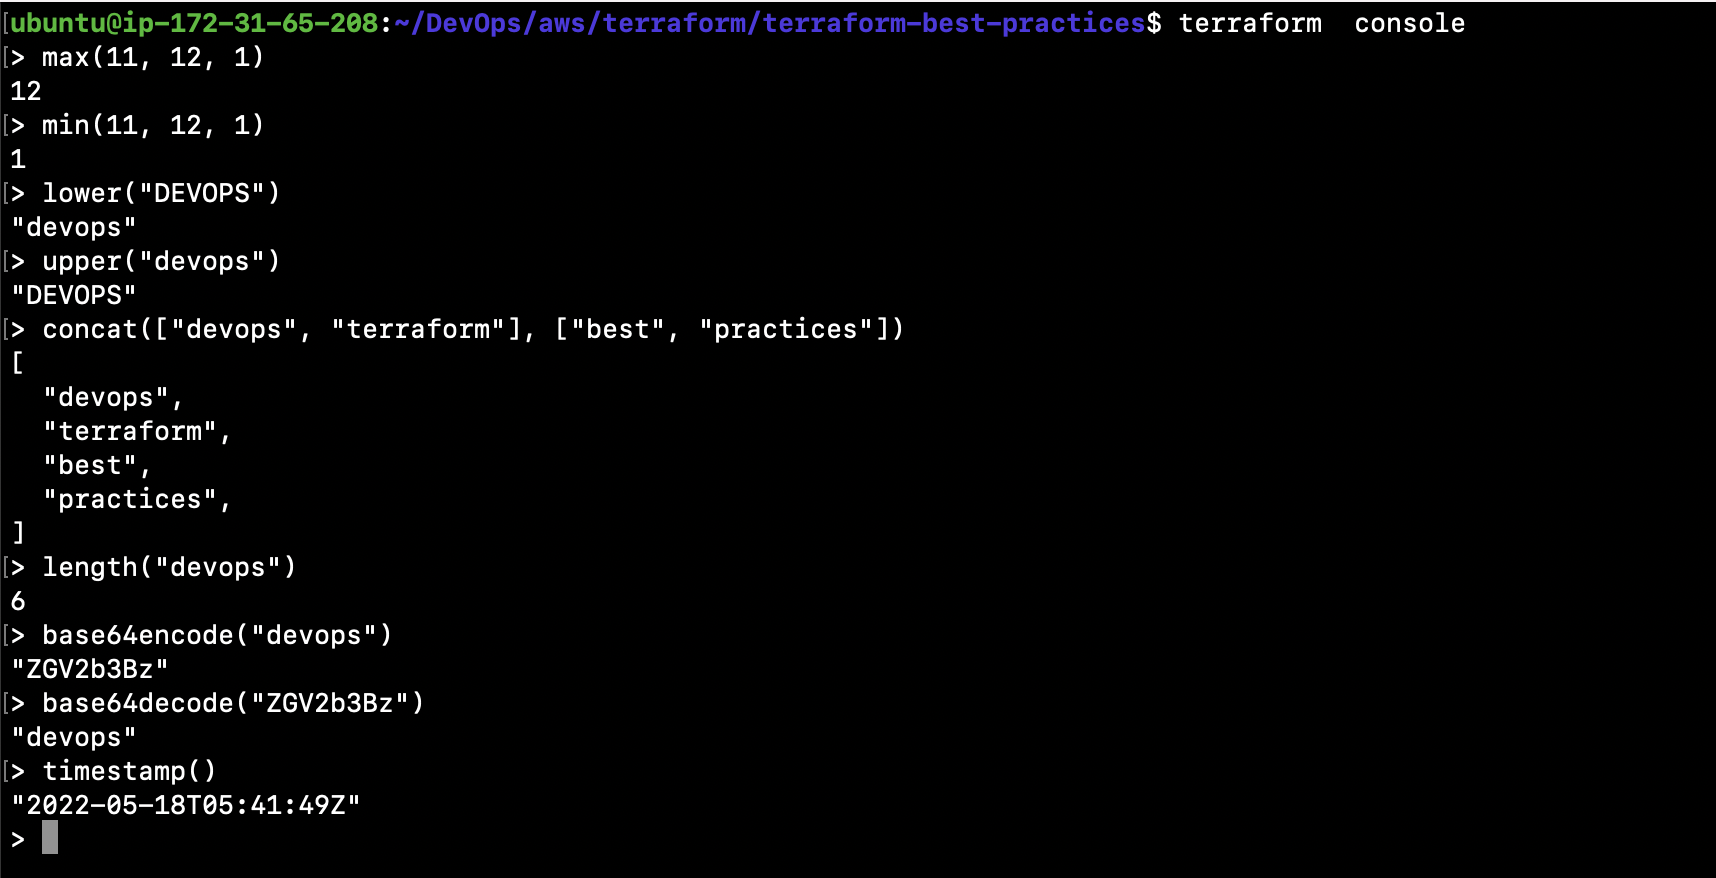
The Terraform console command allows you to experiment with the behavior of Terraform’s built-in functions from the Terraform expression console.
Tip 15
Use Terraform’s built-in functions to manipulate values and strings within your Terraform configuration, perform mathematical computations, and execute other tasks.
Let’s execute the “terraform console” command and try some functions.
- terraform console
- max(11, 12, 1)
- min(11, 12, 1)
- lower(“DEVOPS”)
- upper(“devops”)
- concat([“devops”, “terraform”], [“best”, “practices”])
- length(“devops”)
- base64encode(“devops”)
- base64decode(“ZGV2b3Bz”)
- timestamp()
Now, let’s create an ssh-key, update our Terraform files and try to use the file() function. This function will read any public ssh-key file passed to it and pass it to the instance.
To achieve the desired task, carry out the following operations:
- ssh-keygen
- ls -l /home/ubuntu/.ssh/id_rsa*

- vim main.tf
| resource “aws_key_pair” “terraform_best_practices_demo” { key_name = “terraform-best-practices-demo-key” public_key = file(“/home/ubuntu/.ssh/id_rsa.pub”) } resource “aws_instance” “instance_1” { ami = var.instance_1_ami instance_type = var.instance_1_type tags = { Name = var.instance_1_name } key_name = “${aws_key_pair.terraform_best_practices_demo.key_name}” } resource “aws_instance” “instance_2” { ami = var.instance_2_ami instance_type = var.instance_2_type tags = { Name = var.instance_2_name } provisioner “local-exec” { command = “echo The IP address of the Server is ${self.private_ip}” on_failure = continue } key_name = “${aws_key_pair.terraform_best_practices_demo.key_name}” } module “website_s3_bucket_1” { source = “./modules/aws-s3-static-website-bucket” bucket_name = var.website_s3_bucket_1_name tags = { Terraform = var.terraform Environment = var.environment } } module “website_s3_bucket_2” { source = “./modules/aws-s3-static-website-bucket” bucket_name = var.website_s3_bucket_2_name tags = { Terraform = var.terraform Environment = var.environment } } |
- terraform plan -var-file=”test.tfvars”
- terraform apply -var-file=”test.tfvars”
Practice 16: Use Workspaces
Using multiple working folders is the simplest way to manage numerous instances of a setup with totally distinct state data. However, this isn’t the most practical technique for dealing with different states.
When it comes to preserving different states for each collection of resources you manage using the same working copy for your configuration and the same plugin and module caches, the Terraform Workspace comes to the rescue. Workspaces make transitioning between many instances of the same configuration within the same backend a breeze.
Workspaces are nothing but different instances of state data that can be used from the same working directory, which allow you to manage numerous non-overlapping resource groups with the same configuration. Furthermore, you can use ${terraform.workspace} to include the name of the current workspace in your Terraform configuration.
E.g.
If you have a Terraform project that provisions a set of resources for your Dev environment, you can use the same project directory to provision the same resources for another environment, QA, by leveraging Terraform Workspace. You can even create a new workspace and then use the same Terraform project directory to set up another environment. This way, you’ll have different state files belonging to different workspaces for both environments.
Tip 16
Terraform workspaces best practices like, create multiple environments like Dev, QA, UAT, Prod, and more using the same Terraform configuration files and saving the state files for each environment in the same backend.
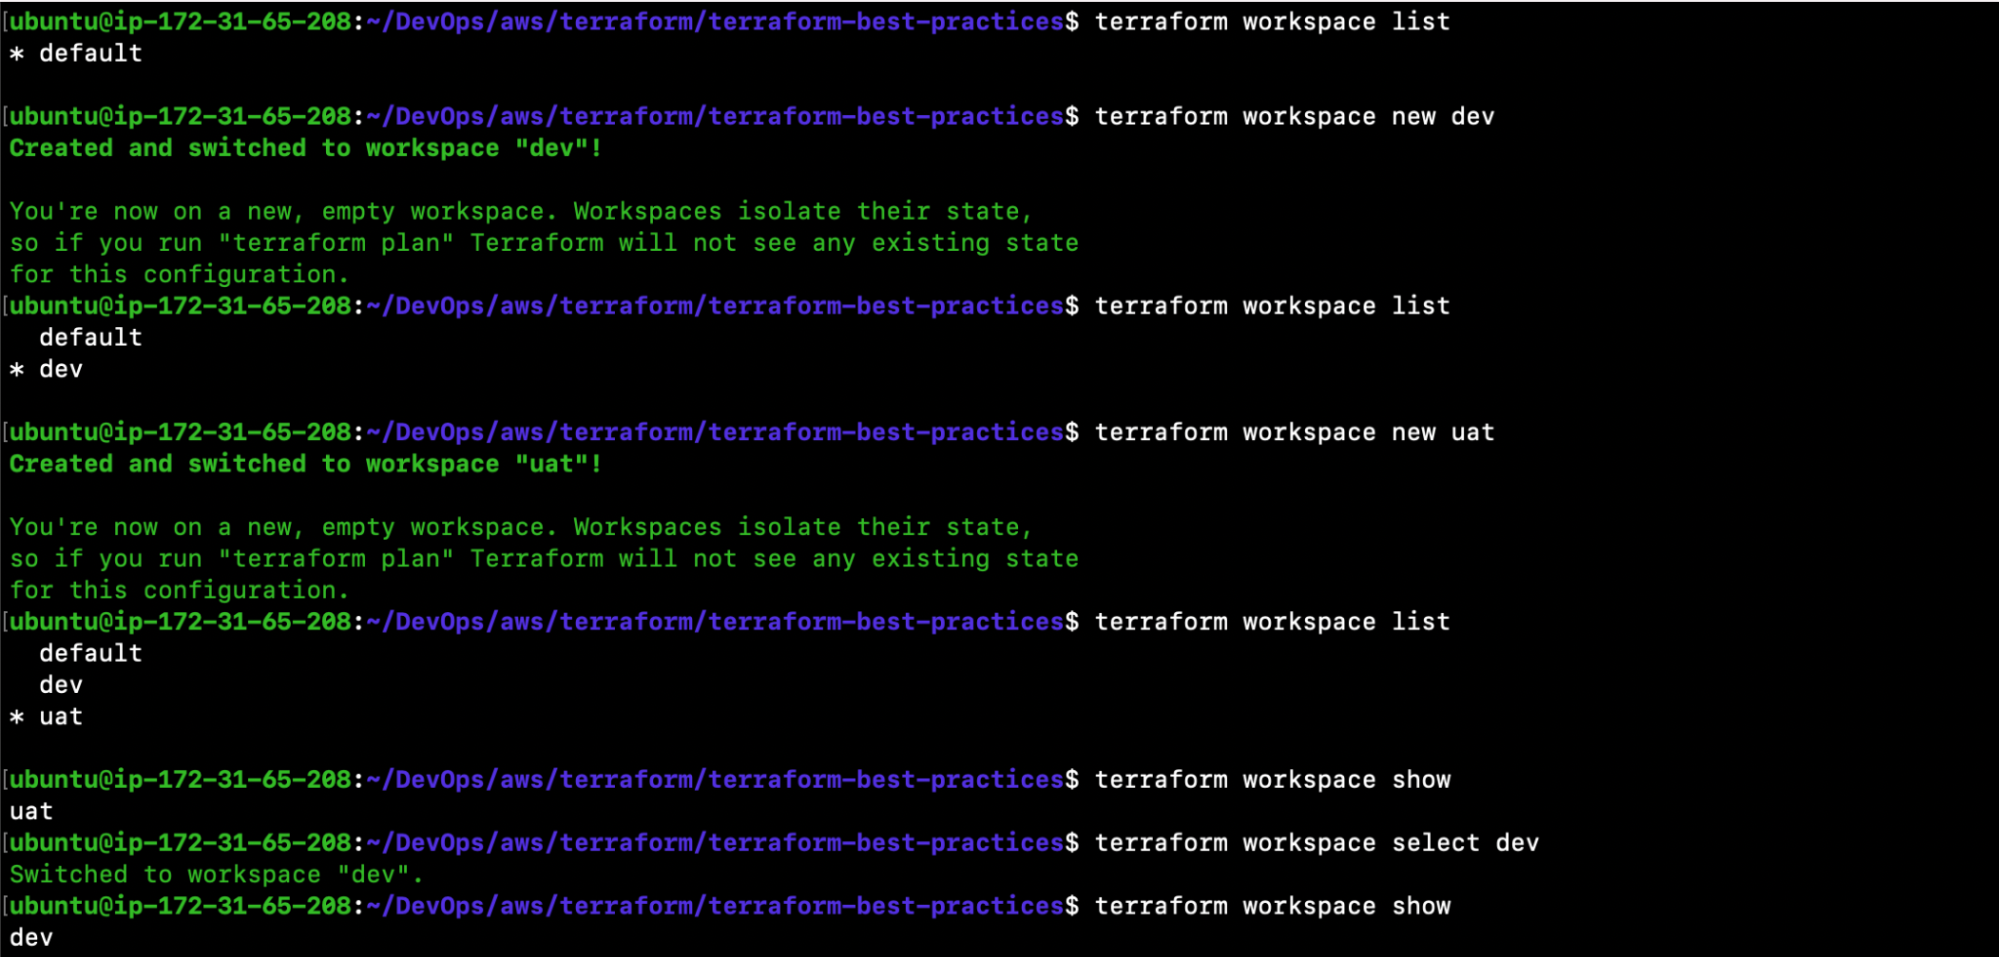
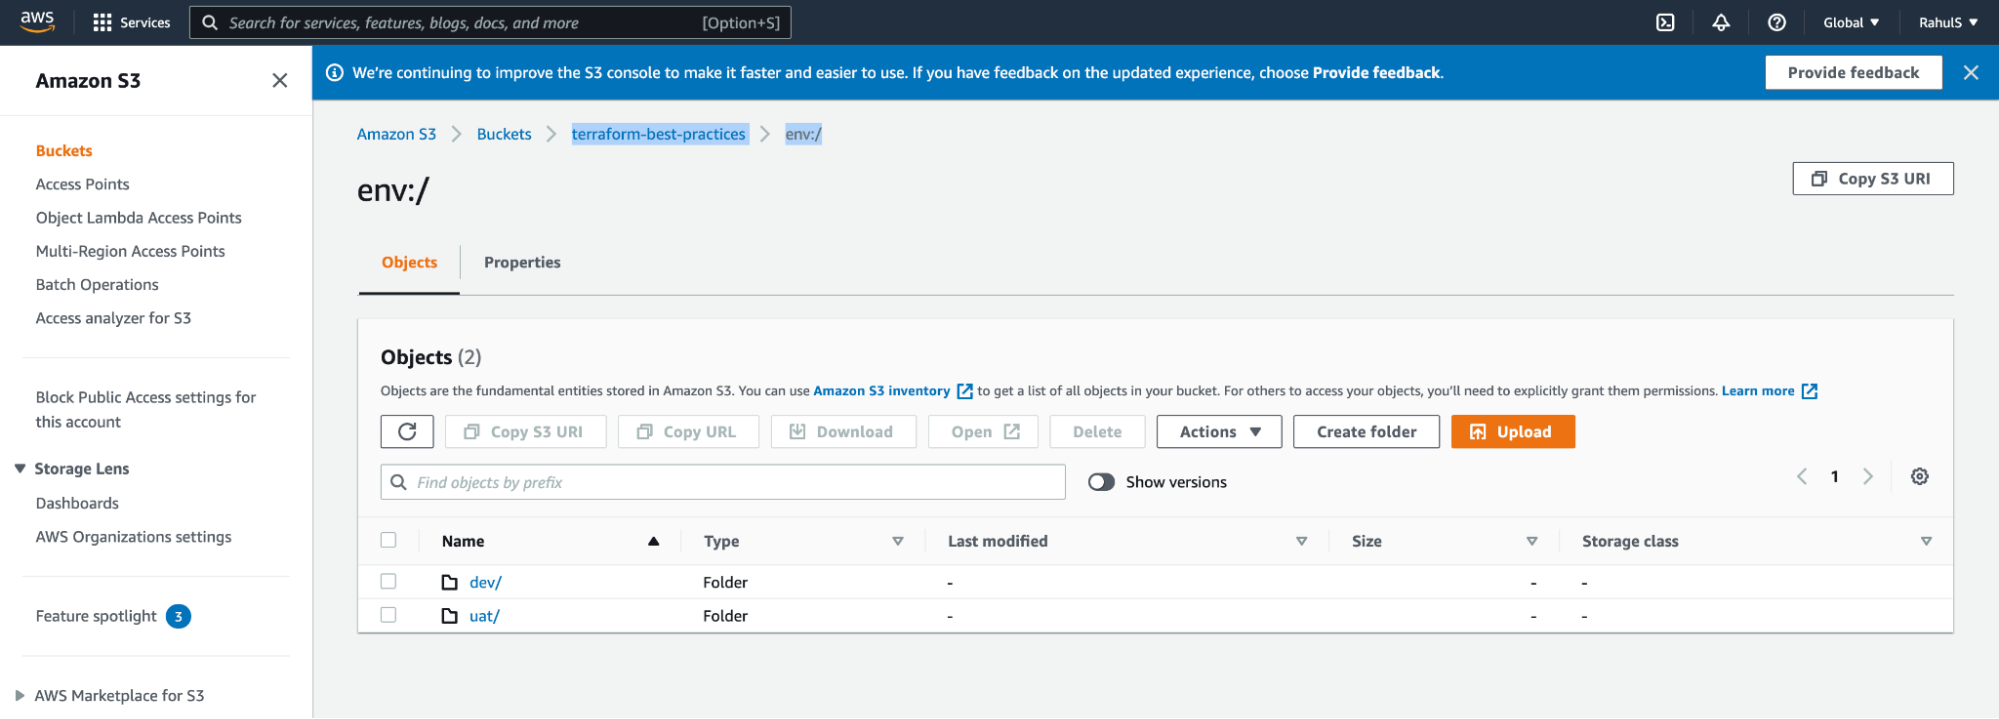
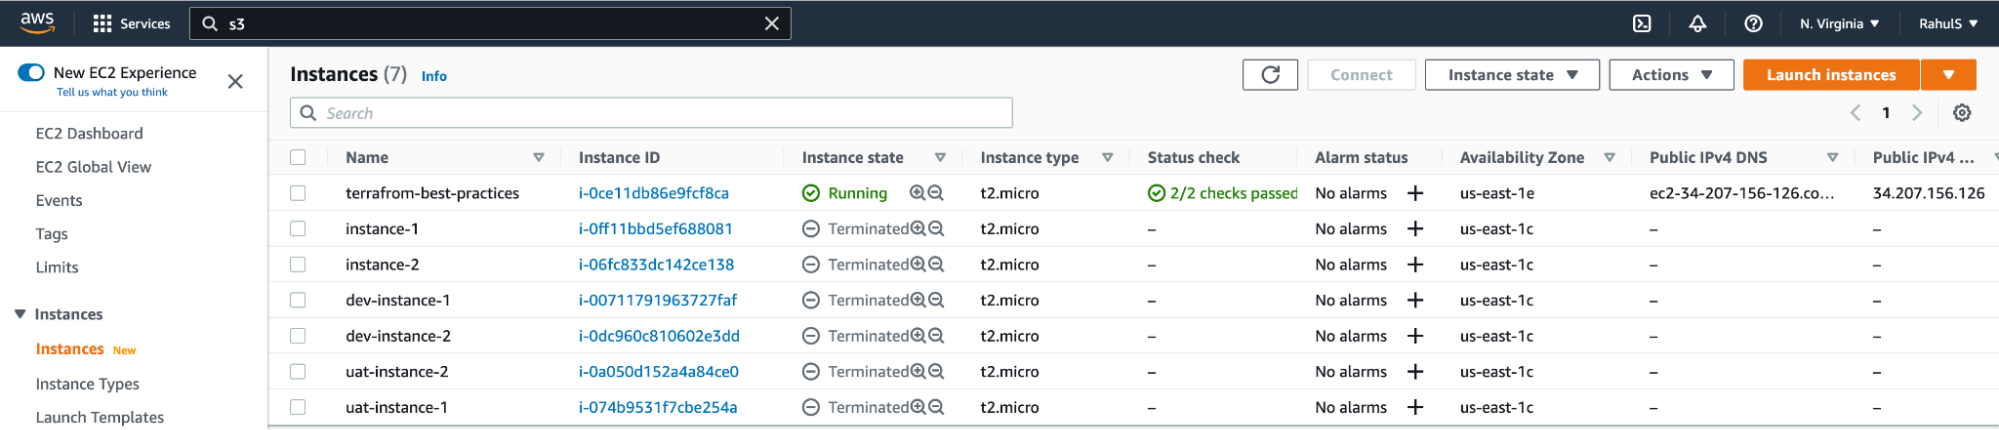
Now, let’s take a look at how this works in real-time. Execute the following commands to list, create and use workspace. Once you’ve created workspaces, a different state file for each workspace will be generated and can be verified in your backend bucket.
- terraform workspace list
- terraform workspace new dev
- terraform workspace list
- terraform workspace new uat
- terraform workspace list
- terraform workspace show
- terraform workspace select dev
- terraform workspace show
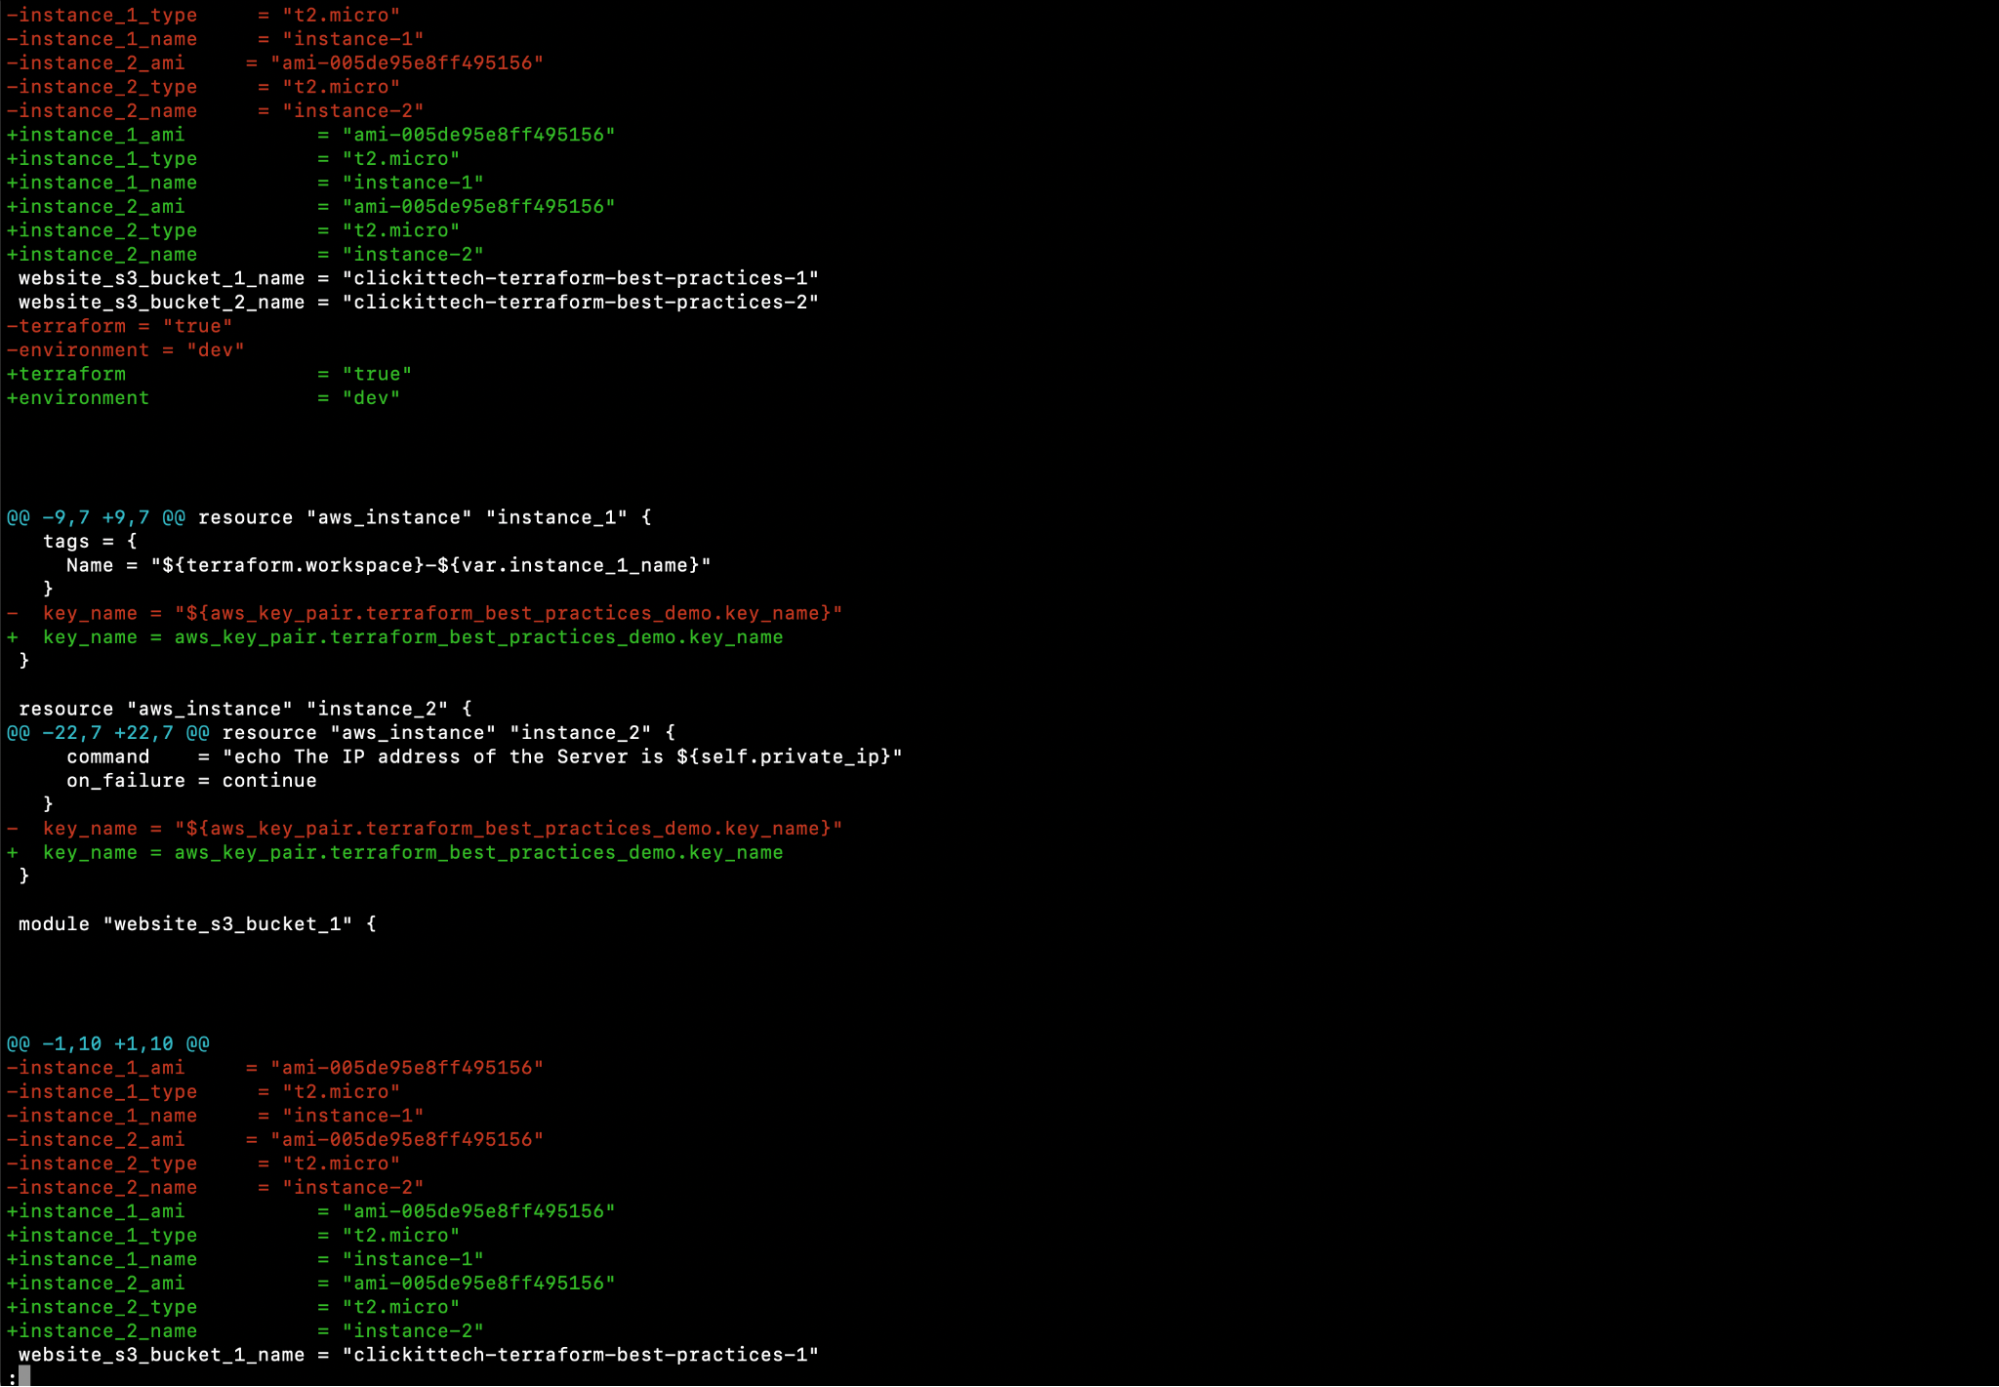
Next, let’s update main.tf and use ${terraform.workspace} as a prefix to resource names.
- vim main.tf
| resource “aws_key_pair” “terraform_best_practices_demo” { key_name = “${terraform.workspace}-terraform-best-practices-demo-key” public_key = file(“/home/ubuntu/.ssh/id_rsa.pub”) } resource “aws_instance” “instance_1” { ami = var.instance_1_ami instance_type = var.instance_1_type tags = { Name = “${terraform.workspace}-${var.instance_1_name}” } key_name = “${aws_key_pair.terraform_best_practices_demo.key_name}” } resource “aws_instance” “instance_2” { ami = var.instance_2_ami instance_type = var.instance_2_type tags = { Name = “${terraform.workspace}-${var.instance_2_name}” } provisioner “local-exec” { command = “echo The IP address of the Server is ${self.private_ip}” on_failure = continue } key_name = “${aws_key_pair.terraform_best_practices_demo.key_name}” } module “website_s3_bucket_1” { source = “./modules/aws-s3-static-website-bucket” bucket_name = “${terraform.workspace}-${var.website_s3_bucket_1_name}” tags = { Terraform = var.terraform Environment = var.environment } } module “website_s3_bucket_2” { source = “./modules/aws-s3-static-website-bucket” bucket_name = “${terraform.workspace}-${var.website_s3_bucket_2_name}” tags = { Terraform = var.terraform Environment = var.environment } } |
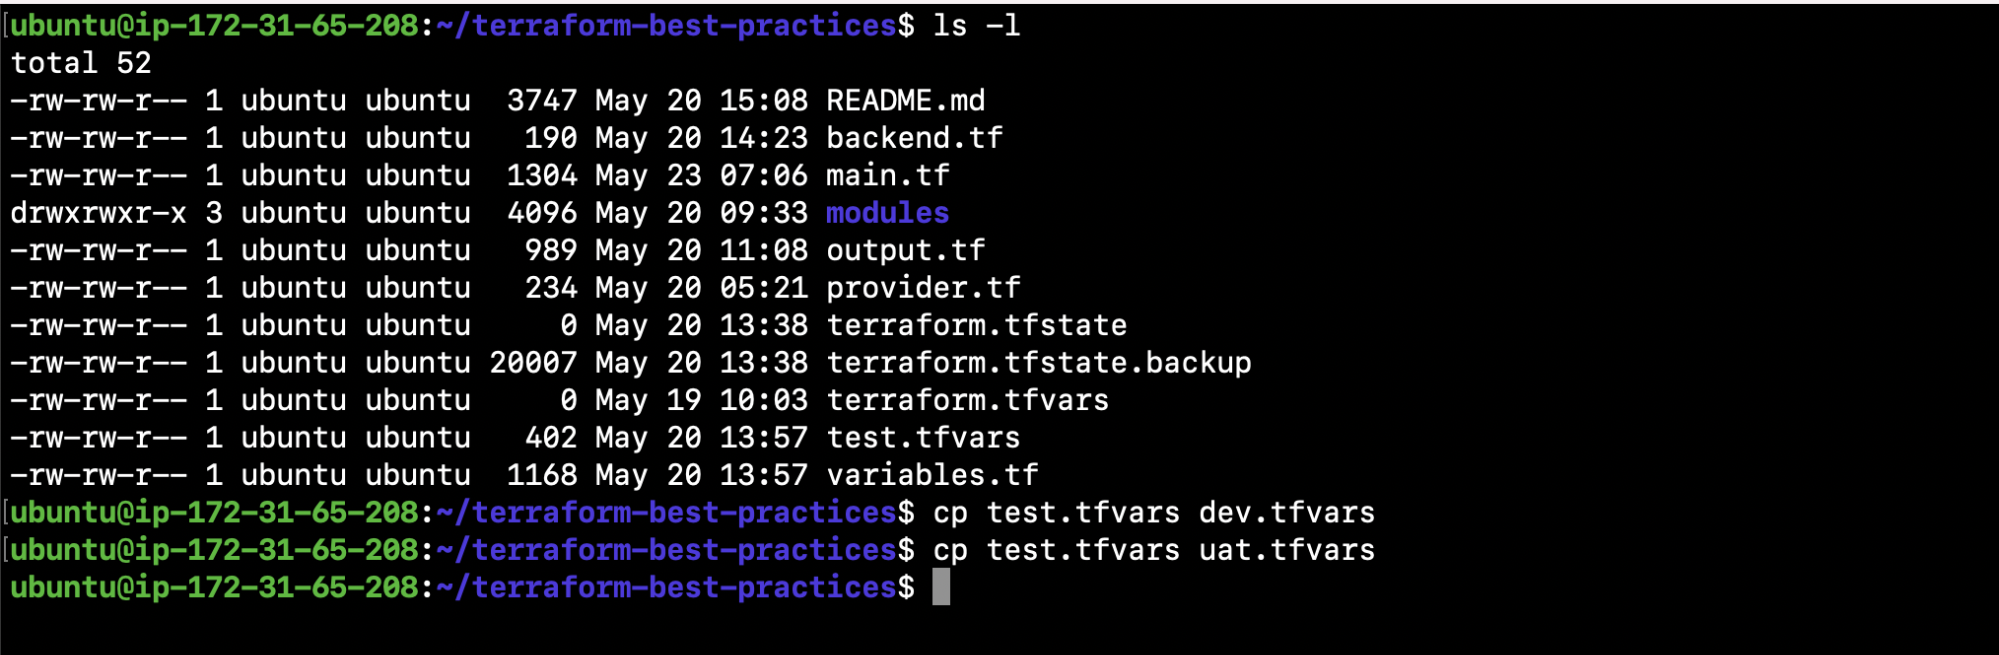
- ls -l
Copy test.tfvars to create dev.tfvars and uat.tfvars.
- cp test.tfvars dev.tfvars
- cp test.tfvars uat.tfvars
Switch to ‘dev’ workspace and change the value of the ‘environment’ variable in both newly created files before moving on to provision the resources.
- terraform workspace select dev
- vim dev.tfvars
- vim uat.tfvars

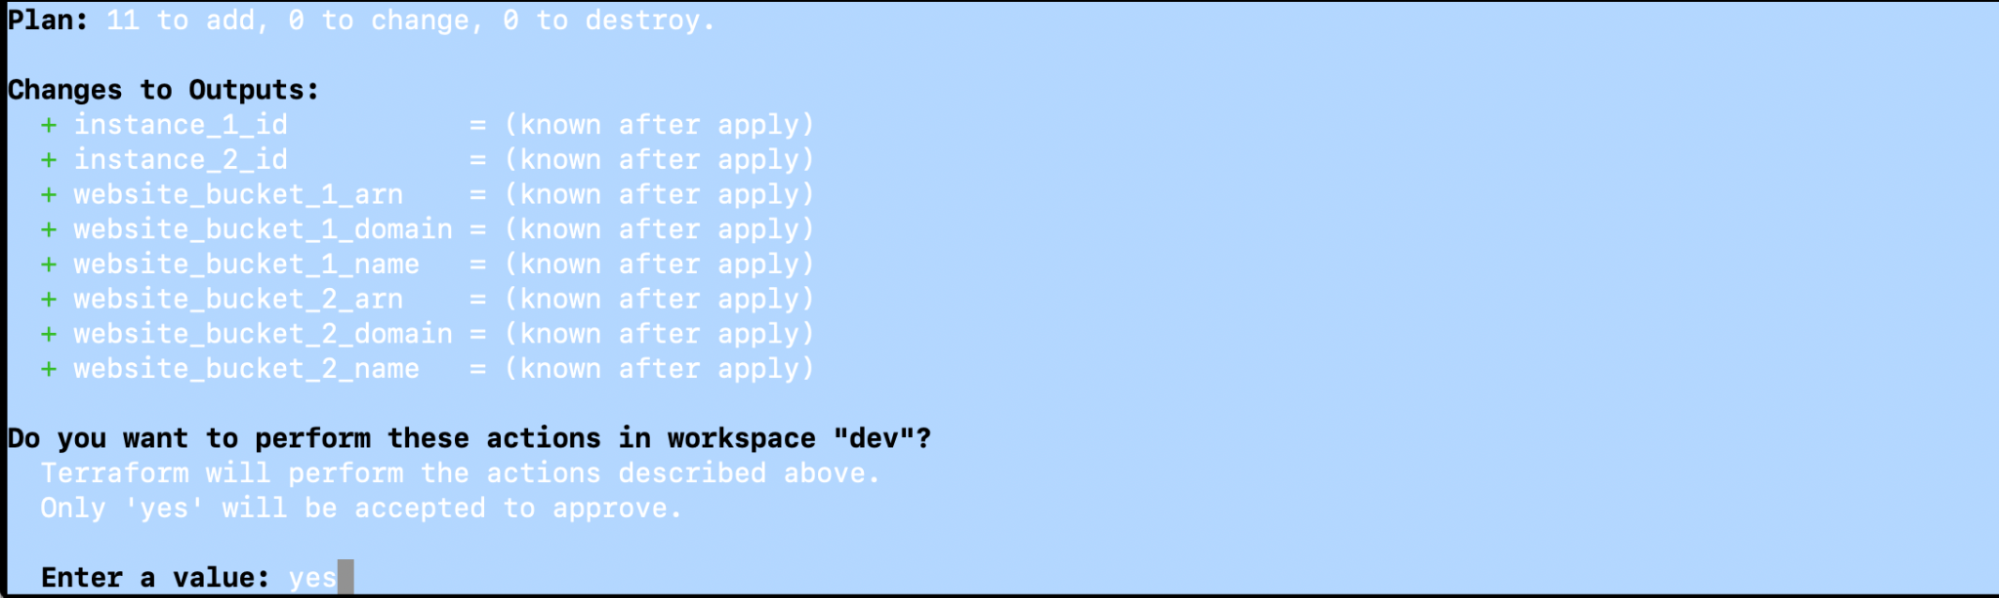
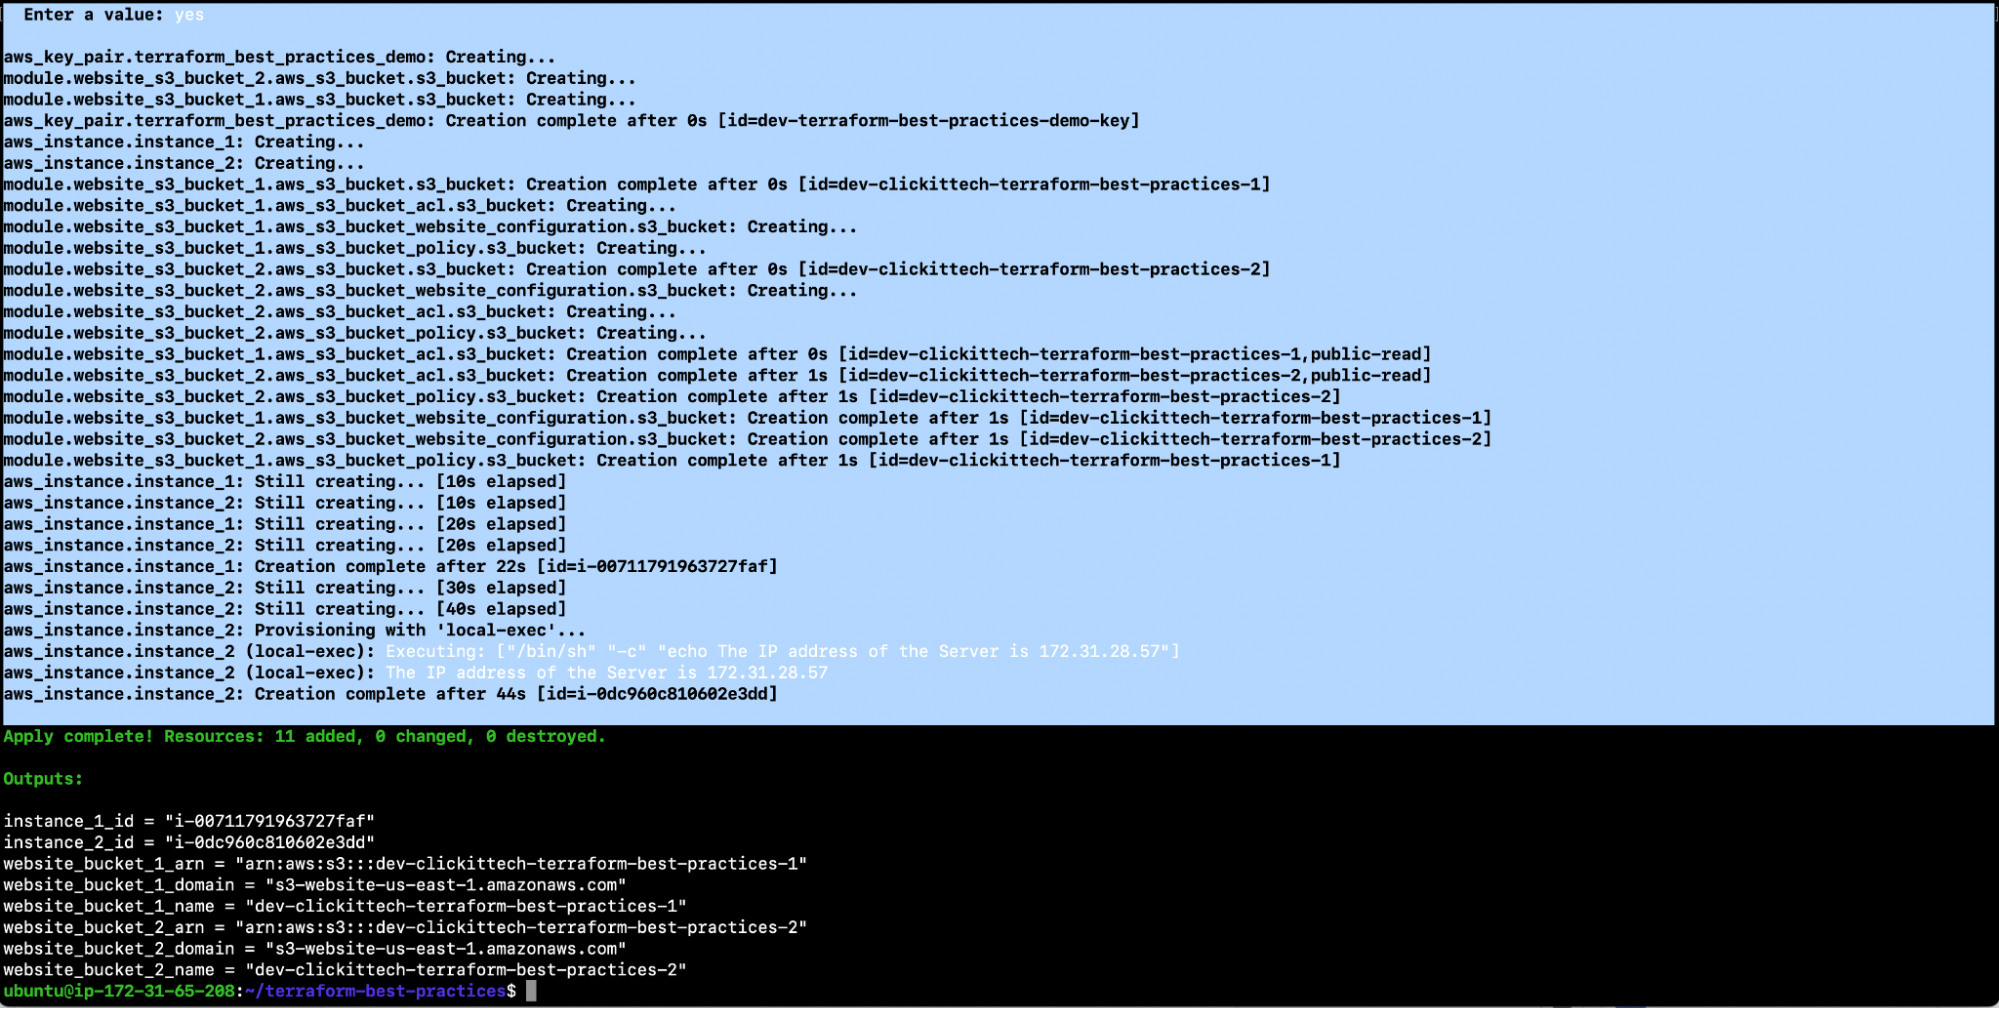
- terraform plan -var-file=”dev.tfvars”
- terraform apply -var-file=”dev.tfvars”
This time switch to ‘uat’ workspace and then provision the resources.
- terraform workspace select uat
- terraform apply -var-file=”uat.tfvars”
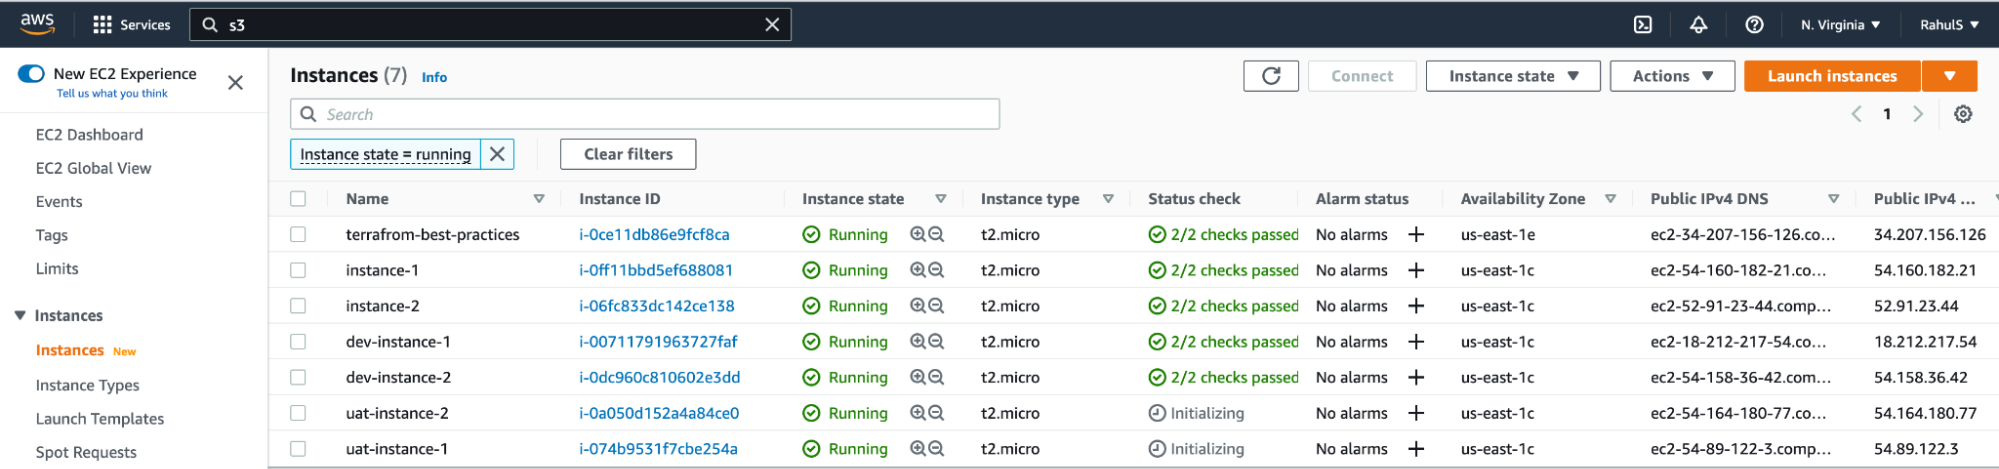
In the screenshot above you can see that new resources for each workspace have been created with a workspace name as a prefix to their names.
Now, let’s destroy the resources before we proceed with other Terraform best practices.
- terraform destroy -var-file=”uat.tfvars”
- terraform workspace select dev
- terraform destroy -var-file=”dev.tfvars”
- terraform workspace select default
- terraform destroy -var-file=”test.tfvars”
Note: We made a lot of changes to our Terraform configuration files, however we omitted to format them. Therefore, let’s format our files and push them in order to make them aesthetic and consistent as this is one of our recommended Terraform best practices.
Execute the following commands to verify the files that need formatting, format them, commit the changes and then push the changes to the repository.
- git status
- terraform fmt -check
- terraform fmt
- git status
- git diff

- git add
- git commit -m “terraform format”
- git push
Practice 17: Avoid Storing Credentials in the Terraform Code
Terraform requires the credentials to your cloud account to provision resources in the cloud. The information that Terraform requires for authentication is generally sensitive and should always be kept hidden, seeing as it grants access to your services. For example, AWS access key and secret key should not be stored in plain text format in Terraform configuration files since Terraform stores the state file locally by default in unencrypted JSON form. This means anyone accessing the project files can view the secrets.
Also, secrets should never be committed to source control, including in Terraform configuration. Instead, upload them to Secret Management Systems like HashiCorp Vault, AWS Secrets Manager, and AWS Param Store before you reference them.
Tip 17
Do not store sensitive information in Terraform configuration files, instead use Secret Management Systems like HashiCorp Vault, AWS Secrets Manager and AWS Param Store.
As can be seen in the following example, the username and password are passed in plain text format. This should be avoided.
| resource “aws_db_instance” “my_example” { engine = “mysql” engine_version = “5.7” instance_class = “db.t3.micro” name = “my-db-instance” username = “admin” # DO NOT DO THIS!!! password = “admin@123Password” # DO NOT DO THIS!!! } |
Instead of passing sensitive information in the plain text format, you should store it in a Secret Management System and then refer to it from there.
| resource “aws_db_instance” “my_example” { engine = “mysql” engine_version = “5.7” instance_class = “db.t2.micro” name = “my-db-instance” # Let’s assume you are using some secure mechanism username = “<some secure mechanism like HashiCorp Vault, AWS Secrets Manager, AWS Param Store, etc>” password = “<some secure mechanism like HashiCorp Vault, AWS Secrets Manager, AWS Param Store, etc>” } |
Practice 18: Use Terraform Import
Existing infrastructure is imported using the ‘terraform import’ command, which allows you to bring resources that you’ve provisioned with another method under Terraform administration. This is an excellent technique to migrate infrastructure to Terraform gradually or to ensure that you will be able to utilize Terraform in the future. To import a resource, you must create a resource block for it in your configuration and give it a name that Terraform will recognize.
Tip 18
Even if you have provisioned resources manually, import them into Terraform. This way, you’ll be able to use Terraform to manage these resources in the future and throughout their lifecycle.
Practice 19: Automate your Deployment with a CI / CD Pipeline
Terraform automates several operations independently. It generates, modifies, and versions your cloud and on-prem resources. Even though many teams use Terraform locally, using it in the CI/CD pipeline can improve your organization’s performance and ensure consistent deployments.
Running Terraform locally implies that all dependencies are in place: Terraform is installed and available on the local machine, and providers are kept in the .terraform directory. This is not the case when you move to stateless pipelines. One of the most frequent solutions is to use a Docker image with a Terraform binary.
Terraform can be run in a container environment with configuration files mounted as a Docker volume once the environment has been constructed. Development teams can use the continuous integration workflow to automate, self-test, fast produce, clone, and distribute software. By incorporating environment creation and cleanup into your CI/CD pipelines, you can limit the number of problems that occur as deployments migrate between environments. This way, seeing your infrastructure is documented, your team can communicate, review, and deploy it utilizing automated pipelines rather than manual orchestration.
Terraform defines infrastructure as code, so there’s no reason not to follow software development best practices. Validating planned infrastructure changes, testing infrastructure early in the development process, and implementing continuous delivery make as much sense for infrastructure as they do for application code. The Terraform and CI/CD integration is one of the must-have Terraform best practices to keep your organization up and running.
Keep Terraform code in the same repository?
Finally, since you will be storing Terraform code in Source Code Management (SCM) systems while implementing CI/CD, here are a few points to help you decide whether to keep Terraform code in the same repository as application code or in a separate infrastructure repository.
- The Terraform and application code are combined into one unit, which makes it easy for a single team to maintain.
- If you have a specialized infrastructure team, a separate repository for infrastructure is more convenient seeing as it’s an independent project.
- When infrastructure code is stored with the application code, you may need to use additional pipeline rules in order to separate triggers from code sections. That said, in some cases, modifications to either the program or the infrastructure code will trigger the deployment.
Tip 19
Decide on whether you want to store your Terraform Configuration in a separate repository or combine it with your application code and have a CI/CD pipeline in place to create the infrastructure.
Practice 20: Stay Up to Date
The Terraform development community is quite active, and new functions are being released on a regular basis. When Terraform releases a major new function, we suggest that you start working with the most recent version. Otherwise, if you skip numerous major releases, upgrading becomes quite difficult.
Tip 20
Always update your Terraform version and code upon major releases.
Terraform Best Practice 21: Pin your Terraform and provider version
The terraform{} configuration block is used to configure behaviors of Terraform itself, such as Configuring Terraform Cloud, Configuring a Terraform Backend, Specifying a Required Terraform Version, and Specifying Provider Requirements.
The functionality of the provider can change over time because each plugin for a provider has its own set of available versions. Therefore, each provider dependency you define should have a version constraint specified in the version argument so that Terraform can choose a single version per provider that all modules are compatible with.
Although Terraform will accept any version of the provider as compatible if the version argument is not included as the version argument is optional, we highly recommend that you provide a version limitation for each provider on which your module depends and specify a provider version is one of the Terraform Best Practices.
The same holds true for the Terraform version. To determine which versions of Terraform can be used with your configuration, the required_version parameter accepts a version restriction string. If the current Terraform version does not adhere to the limitations set forth, an error will be generated, and Terraform will terminate without doing any more activities. Hence, setting the Terraform version is also very important.
E.g Here, in the following terraform{} configuration block, required_providers is set to version = “~> 4.16” and required_version = “>= 1.2.0” is the requirement of the Terraform version.
| terraform { required_providers { aws = { source = “hashicorp/aws” version = “~> 4.16” } } required_version = “>= 1.2.0” } |
Tip 21
Always set required_providers version and Terraform required_version in the terraform{} configuration block.
Terraform Best Practice 22: Validate your Terraform Code
The goal of building infrastructure as code (IaC) with Terraform is to manage and deploy infrastructure reliably while utilizing best practices. To identify and address problems as early in the development process as feasible, the ‘terraform validate’ command verifies the configuration files in a directory, referring exclusively to the configuration.
Regardless of any specified variables or current state, the validation process executes checks to ensure a configuration is internally coherent and syntactically sound.
Therefore, we advise you to develop the habit of running the “terraform validate” command frequently and early while creating your Terraform configurations. It is quicker and requires fewer inputs than running a plan.
Tip 22
Always run the ‘terraform validate’ command while working on writing Terraform configuration files, and make it a habit to identify and address problems as early as possible.
Terraform Best Practice 23: Use Checkov to analyze your Terraform code
Misconfigurations in the Terraform templates used to build the infrastructure pose serious production concerns because security is a key component of all cloud architecture frameworks. And this is where Checkov steps in to save the day.
Checkov is a static code analysis tool for checking infrastructure as code (IaC) files or your Terraform configuration files for configuration errors that could cause security or compliance issues. Checkov has more than 750 preconfigured rules to look for typical misconfiguration problems. After you use Checkov to scan the entire Terraform code, you’ll be able to see which tests were successful and which were unsuccessful and what you can do to fix the problems.
Tip 23
You should test your Terraform code just like any other piece of code; hence a tool like Checkov is essential and recommended.
Terraform Best Practice 24: Use tflint to find possible errors and enforce best practices
TFLint is a linter that examines your Terraform code for potential errors, best practices, etc. Before errors occur during a Terraform run, it will also assist in identifying provider-specific problems. TFLint assists Major Cloud providers in identifying potential issues like as illegal instance types, alerts about deprecated syntax or unnecessary declarations, and enforces standard practices and naming rules. Hence, testing your Terraform code using a linter called TFLint is important and recommended.
Tip 24
To check for potential errors within your Terraform code and enforce best practices, you should consider a linter like TFLint.
Raed our blog comparing Terraform vs CloudFormation.

Conclusion
Writing clean Terraform configuration isn’t as simple as it seems, but the benefits of learning are well worth the effort. This article presented you with 24 Terraform best practices that will allow you to build better Terraform configuration code and contribute effortlessly. These Terraform best practices will help you from when you start writing your first Terraform Configuration file to when you provision the infrastructure on any supported cloud platform.
Following these Terraform best practices will ensure that your Terraform code is clean and readable and is available to other team members over a Source Code Management system. Your team members will therefore be able to contribute and reuse the same code. Some of these Terraform best practices, such as using Terraform Workspace and Terraform Import, will help you leverage Terraform features that can help you deploy a new copy of the exact same infrastructure and import existing infrastructure.
We use these 24 Terraform best practices and gained insight through experience.
Summary Table of Terraform Best Practices
| Sr. No. | Terraform Best Practices | Tips |
| #1 | Host Terraform Code in the Git Repository | Create the Git repository before you start writing your Terraform code. |
| #2 | Use .gitignore to Exclude Terraform State Files, State Directory Backups, and Core Dumps | To save a lot of coding time, always use modules. There’s no need to reinvent the wheel. |
| #3 | Use a Consistent File Structure | Always keep the file structure consistent across all Terraform projects. |
| #4 | Auto Format Terraform Files | Always use ‘terraform fmt -diff’ to check and format your Terraform configuration files before you commit and push them. |
| #5 | Avoid Hard Coding Resources | Always use variables, assign values to them, and then use them where required. |
| #6 | Follow Naming Convention | Set standards or norms within your team for naming resources and follow them. |
| #7 | Use the Self Variable | Use ‘self’ variable when you don’t know the value of a variable before deploying an infrastructure. |
| #8 | Use Modules | Always use modules to save a lot of coding time. There’s no need to reinvent the wheel. |
| #9 | Run Terraform Command with var-file | Always use modules to save a lot of coding time. There’s no need to reinvent the wheel. |
| #10 | Manage Terraform State on a Remote Storage | When working on a project that isn’t limited to your personal use, it’s always recommended to use Terraform backends to save the state file in a shared remote store. |
| #11 | Locking Remote State | Always use State Locking when using a Remote Backend to store your Terraform State. |
| #12 | Backup State Files | Always enable versioning on your Remote Backend storage to recover from unexpected failures. |
| #13 | Manipulate Terraform State only through Terraform Commands | Always manipulate Terraform state using Terraform CLI and avoid making manual changes to the state file. |
| #14 | Generate README for Each Module with Input and Output Variables | Keep a self-explanatory README.md for all of your Terraform projects. |
| #15 | Take Advantage of Built-in Functions | Always manipulate the Terraform state using Terraform CLI and avoid making manual changes to the state file. |
| #16 | Terraform Workspaces Best Practices | Terraform workspaces to create multiple environments, such as Dev, QA, UAT, and Prod, using the same Terraform configuration files |
| #17 | Avoid Storing Credentials in the Terraform Code | Don’t store sensitive information in Terraform configuration files, instead use a Secret Management System such as HashiCorp Vault, AWS Secrets Manager or AWS Param Store. |
| #18 | Use Terraform Import | Even if you have manually provisioned resources, import them in Terraform so that you can use Terraform in the future to manage these resources throughout their lifecycle. |
| #19 | Automate your Deployment with a CI/CD Pipeline | Use Terraform’s built-in functions to manipulate values and strings within your Terraform configuration, perform mathematical computations, and execute other tasks. |
| #20 | Stay up to Date | Always update your Terraform version and code when major new features are released. |
| #21 | Pin your Terraform and provider version | Always set required_providers version and Terraform required_version in the terraform{} configuration block. |
| #22 | Validate your Terraform Code | Always run the ‘terraform validate’ command while you are working on writing Terraform configuration files. |
| #23 | Use Checkov to analyze your Terraform code | You should test your Terraform code just like you would any other piece of code hence a tool like Checkov is essential and recommended |
| #24 | Use tflint to find possible errors and enforce best practices | To check for potential errors within your Terraform code and enforce best practices, you should consider a linter like TFLint. |
FAQs
Terraform is one of the Infrastructure as Code tools used to provision resources on multi-cloud and on-prem servers. Therefore, if you have multiple clouds to work with, you can use the same tool, i.e. Terraform, instead of using a cloud-specific service for infrastructure provisioning.
If you’re working on a Terraform project with a group and there’s no remote backend to save a state file, the file will be saved locally.
Using a local file complicates the use of Terraform, as each user must ensure that they have the most recent state data before running Terraform and that no one else is running Terraform simultaneously. You can store your State File on remote backend storage like AWS S3 Bucket to overcome this. This is one of our Terraform best practices.
There are generally multiple environments such as Dev, QA, and Prod for deploying different types of software. There is no need to write separate Terraform configuration files in order to provision infrastructure for different environments. With Terraform Workspaces you can use the same Terraform configuration files and create infrastructure for multiple environments.
A Terraform module is a single directory containing Terraform configuration files. Modules allow you to organize your setup into logical components, which can help you reduce the amount of code you need to write for related infrastructure components.