If you’re looking to migrate Replit to AWS, chances are that you’ve hit the “scale wall,” or you can see it coming from a quarter mile out.
This is not a knock on Replit, because it is impressive for what it is. It is a cloud-based, AI-powered development platform.It lets you build, test, deploy, and host apps from a browser tab. There’s no need for local setup; it supports over 50 languages, has instant environment configuration, and an AI pair programmer baked right in.
The problem surfaces once your app starts pulling sustained, real-world traffic. Replit applications run inside containerized environments with defined resource limits, which is perfectly fine when you’re iterating on an MVP at hackathon speed or validating an idea. Under heavy production traffic, you start seeing resource limits, cold starts, and unpredictable latency.
At the same time, Replit DB, a simple key-value store, quickly becomes an architectural ceiling for relational or complex data workloads. Replit plans integrate Neon for serverless Postgres, which helps, but the underlying constraints around compute and infrastructure control remain.
Then there’s the reality of security and compliance. SOC 2, HIPAA, VPC isolation, and fine-grained IAM policies are table stakes for any enterprise sales conversation. If you don’t migrate Replit to AWS because of scale constraints, an internal security review will eventually force the issue.
That’s why I’ve written this guide to explain when it makes sense to move off Replit and the practical steps for migrating your application to AWS infrastructure.
Choosing an Expert to Help Migrate Replit to AWS
Executing this migration correctly requires simultaneous expertise across AWS service configuration, containerization, CI/CD, IAM design, and database migration.
A misconfiguration at any layer can lead to downtime, data loss, or a security gap that manifests at the worst possible moment.
This is why most teams prefer to have an expert manage the migration while their engineering team focuses on the product.
With 50+ AWS-certified engineers, ClickIT has handled this exact migration pattern for small to large-scale AI startups and SaaS companies, managing the entire process from automation and risk mitigation, including post-migration support and ongoing monitoring.
If you’d rather have a team that’s done this before own the process, speak to an engineer here.
Why Migrate Replit to AWS? The Business Case
A well-planned migration from Replit to AWS doesn’t mean torching your entire codebase and rebuilding from zero. If done right, you preserve the development velocity that made Replit valuable and gain the infrastructure control, security posture, and horizontal scalability that your next growth phase demands.
Here are concrete reasons why migrating Replit to AWS is good for business:
Cost Control
Replit operates on a subscription model. Core runs $20/month, Pro is $100/month, and both have usage credits that can finish surprisingly fast once you’re leaning on the AI Agent or running resource-heavy workloads.
Once those credits burn through, the overage charges can stack and become difficult to predict or budget around.
AWS pricing is usage-based, meaning you pay for the compute, storage, and requests your application actually consumes. While AWS billing can become complex at scale, it also allows teams to right-size infrastructure, implement autoscaling, and enforce spending controls through tools like AWS Budgets.
For early-stage projects with light traffic, Replit’s flat subscription is simpler and usually cheaper. But once you run high-traffic production workloads, you can right-size EC2 instances. You can schedule Auto Scaling policies. You can also set hard limits with AWS Budgets.This gives you granular cost control that a subscription model rarely offers. You pay for, and in most cases, see exactly what you consume.
Security Compliance
Replit achieved SOC2 Type II certification in August 2025, which is great for security posture. However, Replit does not support HIPAA compliance and does not sign Business Associate Agreements (BAAs).
This means if your application touches protected health information (PHI) in any way, Replit is a non-starter from a legal and compliance standpoint.
On the other hand, AWS offers a broad catalog of HIPAA-eligible services and will sign a BAA, which is a hard legal requirement for any entity handling PHI.
Beyond healthcare, migrating to an AWS Virtual Private Cloud (VPC) gives you the network-level isolation, security group configurations, and audit logging that enterprise security teams expect when evaluating your vendor risk.
SOC 2, HIPAA, FedRAMP, PCI DSS: AWS has certifications and compliance programs for practically every regulatory framework your customers might care about. So, you see, it makes business sense to migrate Replit to AWS once compliance requirements enter the picture.
Otherwise, a procurement team’s security review will make you do it. And you may have lost that business at that point.
Advanced AI and Native Access to Multi-Model Infrastructure
Replit’s built-in AI tools are great for code generation and debugging inside the platform. Some may see it as a “closed loop”, though. Because you use what Replit gives you, configured how Replit configures it.
Bedrock provides serverless access to dozens of foundation models from Anthropic, Meta, Mistral, Cohere, AI21, and Amazon, all through a single unified API.
That means you can build multi-step agentic workflows that chain model calls together, swap models without rewriting application code, and plug directly into your existing AWS data layer (S3 buckets, Aurora databases, OpenSearch clusters) for retrieval-augmented generation.
Bedrock also ships with Knowledge Bases for managed RAG pipelines and Guardrails for content filtering and responsible AI policies. These services integrate with AWS IAM and can be accessed privately through VPC endpoints, allowing you to keep AI workloads within your broader AWS security architecture.
For an AI startup that needs to experiment across models, fine-tune for specific use cases, or simply keep inference costs competitive by routing to the right model for each task, this level of flexibility is not something you can replicate smoothly inside Replit’s ecosystem.

How to Migrate Replit to AWS
Step 1: Handling “Replit-isms”
Before you touch any AWS infrastructure, you need to decouple your codebase from Replit’s platform-specific abstractions. Admittedly, this is the unglamorous part of the migration.
There are three categories of Replit-specific dependencies you need to address: secrets management, dependency declarations, and proprietary database calls.
Replit’s Secrets tool stores API keys and credentials as environment variables scoped to your Repl. It’s convenient, but it’s also entirely contained within Replit’s ecosystem.
AWS Secrets Manager is the production-grade equivalent: encrypted at rest using KMS, auditable via CloudTrail, and supports automatic rotation for credentials like database passwords.
Moving from Replit Secrets to AWS Secrets Manager
Replit doesn’t provide a built-in export workflow for secrets, so the migration usually involves manually copying them or extracting them from environment variables inside the runtime.
- Open your Repl workspace and navigate to the Secrets tab in the sidebar.
- Copy each key and its corresponding value to a secure temporary location. An encrypted local file works. Do not paste this into a Notion page, Slack message, or Google Doc. You’d actually be surprised how often that happens, so I had to clarify.
- In the AWS Management Console, navigate to Secrets Manager and confirm your target region.
- Click “Store a new secret” and select “Other type of secret.”
- Enter your key-value pairs and assign a structured name following a hierarchy like prod/myapp/stripe-key, prod/myapp/db-password. I recommend this because that naming convention pays dividends later when you’re writing IAM policies with path-based access control.
- Configure rotation if the secret supports it, particularly for database credentials, and then store it.
If your team has a dozen more secrets, you may consider using the AWS CLI.
aws secretsmanager create-secret \
–name prod/myapp/stripe-key \
–secret-string ‘{“STRIPE_SECRET_KEY”:”sk_live_xxx”}’ \
–region us-east-1
Repeat the process for each secret, or script it with a loop over your exported key-value file.
Once your secrets are in Secrets Manager, update your application to retrieve them at runtime via the AWS SDK. To do this:
First, ensure the IAM role attached to your compute (EC2 instance profile, ECS task role, Lambda execution role) has secretsmanager:GetSecretValue permission scoped to the specific secrets it needs. I wouldn’t recommend using a wildcard resource ARN here, simply because the principle of least privilege matters.
Then replace your Replit environment variable reads with SDK calls.
Here’s a Node.js example using the AWS SDK v3:
import {

  SecretsManagerClient,

  GetSecretValueCommand,

} from "@aws-sdk/client-secrets-manager";

const client = new SecretsManagerClient({ region: "us-east-1" });

async function getSecret(secretName) {

  const response = await client.send(

    new GetSecretValueCommand({ SecretId: secretName })

  );

  return JSON.parse(response.SecretString);

}

// Usage

const secrets = await getSecret("prod/myapp/stripe-key");

const stripeKey = secrets.STRIPE_SECRET_KEY;
Dependency Auditing: Generating a Clean Dependency File from a Nix Environment
Replit uses Nix under the hood to manage system-level packages. In some projects, that means runtime dependencies may not be fully documented in a requirements.txt or other dependency file, so it’s worth verifying them before migrating.
For Python, skip pip freeze. In a Nix environment, it captures every package installed at the system level, including transitive dependencies that your application never directly imports. That produces a bloated, often broken requirements file.
A cleaner approach is to use pipreqs, which scans your actual source code for import statements and generates a minimal requirements file:
pip install pipreqs
pipreqs /path/to/your/project –force
For Node.js, audit your package.json and confirm every dependency your application actually needs is listed explicitly.
Pay particular attention to the scripts section: services like AWS App Runner and Elastic Beanstalk rely on a defined start script to know how to run your application.Also, confirm that your application explicitly binds to a port (for example process.env.PORT in Node). Replit automatically exposes ports, but most Amazon Web Services compute services expect your application to listen on a defined port.
The Code Refactor: Replacing Replit DB with Standard Data Stores
This step depends on which database layer your Replit app uses, and they require different approaches.
If you used Replit DB, the built-in key-value store, there is no pg_dump path. Replit DB exposes a simple HTTP API, so your export process is a script that iterates over your keys and writes them out:
import Client from "@replit/database";

const db = new Client();
const keys = await db.list();
const data = {};

for (const key of keys) {
  data[key] = await db.get(key);
}
console.log(JSON.stringify(data));
From there, the target depends on your data model. A document-oriented structure maps reasonably to DynamoDB. Anything relational should go to Amazon RDS or Aurora.
If your Replit project used PostgreSQL via the Neon integration, the export path is more straightforward:
pg_dump -h <replit-neon-host> -U <username> -d <database> -F c -f replit_backup.dump
Then restore into your RDS instance:
pg_restore -h <rds-endpoint> -U <username> -d <database> replit_backup.dump
Update your connection strings to point at the new RDS endpoint, and make sure your application’s security group allows inbound traffic on port 5432 from whatever compute layer you’re running on. If you were relying on Replit’s automatic connection string injection, you’ll now pull those credentials from Secrets Manager (which you set up in the previous step).
Once these three areas are addressed, your codebase is effectively decoupled from Replit and ready for deployment on standard cloud infrastructure.
Static Assets and File Storage
If your application writes to the local filesystem, such as user uploads or generated reports, that data lives inside the Replit container filesystem. While it persists within a single Repl environment, it isn’t designed for distributed or production-scale workloads and won’t translate cleanly when deploying to AWS compute environments.
Move anything that needs to persist between deployments to Amazon S3, and update your application code to read and write using the AWS SDK instead of local filesystem calls. fs.writeFile becomes an S3 PutObject, fs.readFile becomes a GetObject.
For files served publicly, put CloudFront in front of your S3 bucket rather than exposing the bucket URL directly.
For private user files, generate pre-signed URLs with a short expiry instead of serving them directly from S3.
Step 2: The Migration Architecture (The ClickIT Way)
Now that your codebase is decoupled from Replit’s platform-specific dependencies, you need to decide which compute platform will run it.
There are two solid paths here, and the “right choice” for you depends entirely on your application’s complexity and your team’s appetite for infrastructure management.
Option A: AWS App Runner (The “Replit-Like” Experience) – Easier for Developers
If what you liked about Replit was pushing code and having it just run, App Runner is the closest equivalent on AWS.
Of the two options here, this is the one that is easier to manage for developers because it’s a fully managed compute service where you point it at a GitHub repository, define your build and runtime configuration, and App Runner handles the rest. This includes building the container image, deploying it, load balancing, scaling, and TLS termination. No cluster management, task definitions, or container orchestration required.
Here’s how that workflow looks:
- Push your cleaned-up codebase (we discussed in Step 1) to a GitHub repository.
- In the AWS Console, navigate to App Runner and click “Create service.”
- Choose “Source code repository” and authorize your GitHub account. Choose your repo and branch.
- Configure the build settings. App Runner auto-detects your runtime (Node.js, Python, etc.) and suggests build and start commands based on your project structure. Verify these match what’s in your package.json scripts or your Python entry point. If the auto-detected configuration needs overriding, or you want it committed to source control, add an apprunner.yaml at your project root. That looks like this:
version: 1.0
runtime: nodejs18
build:
  commands:
    build:
      - npm install
run:
  command: npm start
  network:
    port: 3000

yaml

5. Configure instance settings. App Runner offers CPU and memory allocations ranging from 0.25 vCPU / 0.5 GB up to 4 vCPU / 12 GB per instance. For most applications migrating off Replit, 1 vCPU / 2 GB with a minimum of one instance is a reasonable starting point. Tune from there based on observed traffic.
6. For environment variables, use two approaches depending on sensitivity. Inject non-sensitive config like NODE_ENV=production as plain-text environment variables directly in the App Runner configuration.
7. For actual credentials, reference your Secrets Manager ARNs from Step 1 under the ‘Environment variables’ section in the console, selecting ‘Secrets Manager’ as the source. App Runner resolves the secret at container startup and injects the value as an environment variable, so no SDK calls are needed in your application code.
You will need to grant the App Runner service’s instance role secretsmanager:GetSecretValue permission scoped to the relevant secret ARNs. Also worth noting: if you rotate a secret in Secrets Manager, App Runner won’t pick up the new value until the next deployment.
When to choose App Runner
- Your application is a single container serving an API, web app, or lightweight AI agent.
- You don’t need sidecar containers or complex service meshes, and if your application only needs simple connectivity to resources like an RDS database through a VPC connector, App Runner keeps the infrastructure overhead minimal.
Option B: ECS Fargate (The Enterprise Way)
If your AI application requires multiple containers working together (say, an API gateway, an inference service, a background worker, and a Redis cache), or if you need fine-grained control over networking, service discovery, and task placement, ECS Fargate is the appropriate way to go.
Fargate is the serverless compute engine for Amazon ECS. You define your containers in a task definition, specify CPU/memory allocations per container, and ECS handles scheduling and placement without you provisioning or managing EC2 instances. This effectively means you get the serverless operational model with considerably more architectural flexibility than App Runner.
Containerize your application. Replit handled containerization for you. The platform packaged and ran your code without you ever thinking about it. On Fargate, you need a Dockerfile that tells Docker how to build a deployable image from your codebase. If you’ve never written one, here’s a production-ready example for a Node.js application:
FROM node:20-alpine AS builder
WORKDIR /app
COPY package*.json ./
RUN npm ci --only=production
COPY . .
RUN npm run build

FROM node:20-alpine
WORKDIR /app
COPY --from=builder /app .
EXPOSE 3000
CMD ["node", "dist/server.js"]
This is a multi-stage build. The first stage installs dependencies and compiles your code. The second stage copies only the build output into a clean image, which keeps the final image small and free of dev tooling. Adjust the EXPOSE port and CMD entry point to match your application.
For a Python app using Flask or FastAPI, the structure is similar, but you’d use a python:3.12-slim base image and install from your requirements.txt instead.
Once your Dockerfile is in the repo root, build the image and push it to Amazon Elastic Container Registry (ECR):
Elastic Container Registry (ECR):
aws ecr get-login-password --region us-east-1 | \
  docker login --username AWS --password-stdin <account-id>.dkr.ecr.us-east-1.amazonaws.com

docker build -t myapp .
docker tag myapp:latest <account-id>.dkr.ecr.us-east-1.amazonaws.com/myapp:latest
docker push <account-id>.dkr.ecr.us-east-1.amazonaws.com/myapp:latest
You only need to do this manually once to seed your ECR repository with an initial image. After Step 3, which I’ll cover shortly, your CI/CD pipeline handles every subsequent build and push automatically.
- Define your task: The core unit in ECS is a task definition, which describes your container configuration:
{
  "family": "myapp-task",
  "networkMode": "awsvpc",
  "requiresCompatibilities": ["FARGATE"],
  "cpu": "512",
  "memory": "1024",
  "containerDefinitions": [
    {
      "name": "myapp",
      "image": "your-ecr-repo/myapp:latest",
      "portMappings": [
        {
          "containerPort": 3000,
          "protocol": "tcp"
        }
      ],
      "secrets": [
        {
          "name": "API_KEY",
          "valueFrom": "arn:aws:secretsmanager:us-east-1:123456789012:secret:prod/myapp/api-key"
        }
      ],
      "logConfiguration": {
        "logDriver": "awslogs",
        "options": {
          "awslogs-group": "/ecs/myapp",
          "awslogs-region": "us-east-1",
          "awslogs-stream-prefix": "ecs"
        }
      }
    }
  ]
}
Container images are typically stored in Amazon Elastic Container Registry, AWS’s managed Docker registry. In Amazon ECS, each container definition can specify CPU and memory limits, health checks, environment variables, and logging to Amazon CloudWatch.
The secrets block pulls values directly from Secrets Manager at task startup and injects them as environment variables. Your application code reads them identically to how it reads environment variables on Replit. No SDK calls needed in your application code for this approach.
- Configure networking. Your tasks run inside your VPC, in subnets you specify, with security groups you define. You can place your Application Load Balancer in public subnets and run your containers in private subnets. Your background workers can remain in isolated subnets with no public internet exposure, and service-to-service communication happens over private DNS through ECS Service Connect or AWS Cloud Map, keeping internal traffic inside the VPC. Service-to-service communication happens over private DNS through ECS Service Connect or AWS Cloud Map, keeping internal service traffic inside the VPC.
- Set up auto-scaling. ECS Service Auto Scaling lets you define scaling policies based on CPU utilization, memory utilization, or custom CloudWatch metrics. You can also scale on request count per target if you’re behind an ALB.
Deploy this as a Fargate service behind an Application Load Balancer, inside a VPC with private subnets for your application tier and isolated subnets for your database.
The Database Bridge
If you followed my Replit DB and PostgreSQL migration steps in Step 1, your data is already exported, and your application code is refactored to use standard database clients. The remaining piece is choosing and provisioning your AWS database target.
For teams migrating Replit PostgreSQL data, you have two options on the AWS side:
Amazon RDS for PostgreSQL
Amazon RDS is usually the straightforward choice. It’s a managed PostgreSQL instance with automated backups, patching, and optional Multi-AZ failover. You provision a specific instance size, attach storage, and you have a Postgres endpoint that behaves exactly like any other Postgres server.
- Restore your pg_dump backup (from Step 1) into the RDS instance using pg_restore
- Update your connection strings in Secrets Manager, and you’re running.
Aurora Serverless v2
Aurora Serverless v2 is also a good option, especially if your traffic patterns are unpredictable or spiky. Instead of choosing a fixed instance size, Aurora Serverless automatically scales compute capacity based on your database load. It is measured in Aurora Capacity Units (ACUs), starting as low as 0.5 ACUs when traffic is minimal.
You set a minimum and maximum ACU range, and Aurora adjusts within those bounds. During quiet periods, it scales down to your floor. During traffic bursts, it scales up automatically.
Both options sit inside your VPC, support encryption at rest and in transit, and integrate with IAM authentication if you want to avoid managing database passwords entirely.
For teams that were using Replit DB (the key-value store) and chose DynamoDB as the replacement in Step 1, your data layer is already serverless and fully managed. No additional provisioning needed. DynamoDB scales on its own with on-demand capacity mode, and you only pay per read/write request.
Pointing Your Domain at AWS
If your application is serving traffic on a custom domain through Replit, you need to route that domain to your new AWS infrastructure. The process differs depending on which path you choose.
For App Runner:
- In the App Runner console, select your service and navigate to “Custom domains.”
- Add your domain name (e.g., app.yourdomain.com).
- App Runner provides CNAME or alias records to add to your DNS provider.
- Add those records in Route 53 or whichever DNS service manages your domain.
- App Runner provisions and manages the TLS certificate automatically. No ACM setup needed on your end.
For ECS Fargate behind an ALB:
- Navigate to AWS Certificate Manager (ACM) and request a public certificate for your domain.
- Validate ownership via DNS (ACM gives you a CNAME record to add to your DNS provider). This typically takes a few minutes.
- Once the certificate is issued, attach it to your ALB’s HTTPS listener on port 443.
- Create an alias record (if using Route 53) or a CNAME record (if using an external DNS provider) pointing your domain to the ALB’s DNS name.
- Add an HTTP-to-HTTPS redirect rule on the ALB’s port 80 listener so all traffic is encrypted.
In both cases, reduce your DNS TTL to something short (60-300 seconds) a day or two before the actual cutover.
This is easy to forget and painful to realize after the fact, because a high TTL means your users could be hitting the old Replit endpoint for hours after you’ve switched DNS. Once the migration is validated and stable, you can raise the TTL back to a normal value.
You’ll update your DNS records during the cutover.
Step 3: Setting Up CI/CD (Maintaining Speed)
The third step to migrate Replit to AWS is setting up Continuous Integration and Continuous Delivery. I think Replit gets the deployment experience right. You write code, it runs. There’s no pipeline to configure, no build step to debug, no YAML file to fight with.
I admit that immediacy is valuable, and losing it during migration can make your team feel you’ve eliminated convenience for moving to an “enterprise infrastructure.”
CI/CD on AWS is how you get that back.
The goal here is to rebuild that tight feedback loop on AWS so that pushing code to your main branch still results in a live deployment, just with the added benefit of automated testing, environment separation, and rollback capabilities that Replit never offered in the first place.
Bridging the Gap: GitHub Actions for AWS Deployment
If you chose App Runner in Step 2, you already have push-to-deploy configured natively through the App Runner console. So, no additional pipeline setup is required for basic deployments.
For ECS Fargate deployments, you need to wire this up yourself, and GitHub Actions is the practical standard for teams already using GitHub. The best practice is OIDC-based role assumption: GitHub Actions federates with AWS, assumes a scoped IAM role for the duration of the workflow, and no static credentials are stored anywhere. This is the approach your security review will expect.
Here’s how to set it up:
- Create an OIDC identity provider in IAM for GitHub Actions.
- Create a role that trusts it using the following trust policy. Make sure to replace YOUR_ACCOUNT_ID with your 12-digit AWS account ID.
{
  "Version": "2012-10-17",
  "Statement": [
    {
      "Effect": "Allow",
      "Principal": {
        "Federated": "arn:aws:iam::YOUR_ACCOUNT_ID:oidc-provider/token.actions.githubusercontent.com"
      },
      "Action": "sts:AssumeRoleWithWebIdentity",
      "Condition": {
        "StringLike": {
          "token.actions.githubusercontent.com:sub": "repo:YOUR_GITHUB_ORG/YOUR_REPO:*"
        }
      }
    }
  ]
}
3. Attach only the permissions that the workflow actually needs: ECR push access, ECS task registration, and service update. Nothing broader.
4. Then, create .github/workflows/deploy.yml in your repository:
name: Deploy to ECS

on:
  push:
    branches:
      - main

permissions:
  id-token: write
  contents: read

env:
 AWS_REGION: us-east-1
  ECR_REPOSITORY: myapp
  ECS_CLUSTER: myapp-cluster
  ECS_SERVICE: myapp-service
  TASK_DEFINITION: myapp-task
  CONTAINER_NAME: myapp

jobs:
  deploy:
    runs-on: ubuntu-latest
    steps:
      - name: Checkout code
        uses: actions/checkout@v4

      - name: Configure AWS credentials via OIDC
        uses: aws-actions/configure-aws-credentials@v4
        with:
          role-to-assume: arn:aws:iam::YOUR_ACCOUNT_ID:role/github-actions-deploy
          aws-region: ${{ env.AWS_REGION }}

      - name: Login to Amazon ECR
        id: login-ecr
        uses: aws-actions/amazon-ecr-login@v2

      - name: Build and push container image
        id: build-image
        env:
          ECR_REGISTRY: ${{ steps.login-ecr.outputs.registry }}
          IMAGE_TAG: ${{ github.sha }}
        run: |
          docker build -t $ECR_REGISTRY/$ECR_REPOSITORY:$IMAGE_TAG .
          docker push $ECR_REGISTRY/$ECR_REPOSITORY:$IMAGE_TAG
          echo "image=$ECR_REGISTRY/$ECR_REPOSITORY:$IMAGE_TAG" >> $GITHUB_OUTPUT

      - name: Download current task definition
        run: |
          aws ecs describe-task-definition \
            --task-definition ${{ env.TASK_DEFINITION }} \
            --query taskDefinition \
            > task-definition.json

      - name: Update task definition with new image
        id: task-def
        uses: aws-actions/amazon-ecs-render-task-definition@v1
        with:
          task-definition: task-definition.json
          container-name: ${{ env.CONTAINER_NAME }}
          image: ${{ steps.build-image.outputs.image }}

      - name: Deploy to ECS
        uses: aws-actions/amazon-ecs-deploy-task-definition@v2
        with:
          task-definition: ${{ steps.task-def.outputs.task-definition }}
          service: ${{ env.ECS_SERVICE }}
          cluster: ${{ env.ECS_CLUSTER }}
          wait-for-service-stability: true
Here’s what this workflow does on every push to main:
- Builds a new container image tagged with the commit SHA.
- Pushes it to ECR.
- Registers an updated task definition pointing to that specific image.
- Triggers a rolling deployment on ECS.
The commit SHA tagging is deliberate because it provides a direct audit trail between what’s running in production and the exact commit it originated from. If something breaks, you know which commit to investigate and can roll back by redeploying the previous image tag.
The wait-for-service-stability flag at the end tells the workflow to hold until ECS confirms the new tasks are healthy and serving traffic. If the health check fails, ECS rolls back to the previous task definition automatically, and the GitHub Action reports a failure. You find out in your pipeline notification (like Slack), not from a customer.
Quick note: The task-definition parameter expects the task definition family name (for example, myapp-task) or the full task definition ARN, not the ECS service name. That’s why the workflow uses the TASK_DEFINITION variable instead of ECS_SERVICE when calling describe-task-definition.
Testing Environments: Replicating Replit’s Dev/Prod Toggle in AWS
Replit’s environment toggle is simple because everything lives in one platform. On AWS, environment separation has real security and operational implications.
Account-level separation is the gold standard for blast radius containment. Completely separate AWS accounts for development, staging, and production, each with its own VPC, IAM roles, databases, and secrets managed under AWS Organizations.
Cross-account deployments are handled by your CI/CD pipeline, assuming a role in the target account. A misconfigured IAM policy in development literally cannot touch production resources. If you’re pursuing SOC 2 or have enterprise customers asking about environment isolation, this is the answer they want to hear.
Single-account with separate infrastructure is a lighter-weight starting point. Parallel stacks within the same AWS account, differentiated by naming convention and environment-scoped IAM roles.
Your secrets follow the dev/myapp/stripe-key and prod/myapp/stripe-key hierarchy established in Step 1, and your pipeline deploys to development on every feature branch push and to production only on merges to main.
The GitHub Actions branch-based trigger for this looks like:
on:
  push:
    branches:
      - main
      - develop
env:
  ENVIRONMENT: ${{ github.ref_name == 'main' && 'prod' || 'staging' }}
Your workflow references the ENVIRONMENT variable to select the right ECS cluster, task definition, and secrets path per deployment. Same pipeline, different targets.
For App Runner users, the cleanest approach is:
- Run two separate App Runner services: one connected to your develop branch, one connected to main.
- Give each service its own URL, environment variables, Secrets Manager references, and scaling configuration.
- Test against the staging URL, verify the behavior, then merge to main.
- Production deploys automatically. No GitHub Actions workflow needed for this path.
This gives you a staging environment that is architecturally identical to production, which is the entire point of having a staging environment.
Step 4: How to Switch Live Traffic When You Migrate Replit to AWS
Now, how do you switch live traffic to your AWS architecture without your users noticing?
- Validate in staging first. Run your full test suite against the staging environment. Hit critical API endpoints manually. Verify that secrets are resolving, database queries return expected data, and response times are within an acceptable range. If your application has webhook integrations or third-party callbacks, confirm that those are reaching the new infrastructure.
- Lower your DNS TTL. If you didn’t do this in Step 2, do it now and wait for the original TTL to expire before proceeding. This ensures that when you update the record, propagation happens in minutes rather than hours.
- Run both environments in parallel. Keep Replit live and serving production traffic. Your AWS environment should be fully deployed and reachable at its default endpoint (the App Runner URL or the ALB DNS name). Test the AWS endpoint directly using the raw URL to confirm it behaves identically to production.
- Update DNS. Point your domain to the AWS infrastructure (the App Runner custom domain or the ALB alias). For lower-traffic applications, switching the DNS record directly is straightforward with a low TTL already in place. For higher-traffic applications, use Route 53 weighted routing to shift traffic incrementally rather than all at once. Start by routing 10% of requests to AWS and 90% to Replit, monitor for errors, then gradually increase the AWS weight as confidence builds. This looks like two records for the same domain, each with a different weight value and a different endpoint:
Record 1: app.yourdomain.com → Replit endpoint  (Weight: 90)
Record 2: app.yourdomain.com → AWS endpoint     (Weight: 10)
Adjust the weights progressively until AWS is handling 100% of traffic, then delete the Replit record entirely.
- Monitor the first hour closely. Watch error rates, response times, and database connection counts in CloudWatch. Compare against your Replit baseline. If something is critically wrong, rolling back is as simple as pointing DNS back to Replit, which is why you kept it running.
- Decommission Replit. Once you’re confident the AWS environment is stable (I recommend giving it at least 24-48 hours), you can safely shut down the Replit deployment. I would strongly recommend that you don’t rush this. The cost of keeping Replit running for a few extra days is negligible compared to the cost of not having a rollback option.
With live traffic now hitting your AWS infrastructure, it’s time to make sure it stays healthy, secure, and cost-efficient.
Monitoring, Security & Cost Guardrails After Replit to AWS Migration
Successfully migrating Replit to AWS is a big milestone. Now you need to ensure it stays healthy and financially predictable. Here are three areas you should be checking:
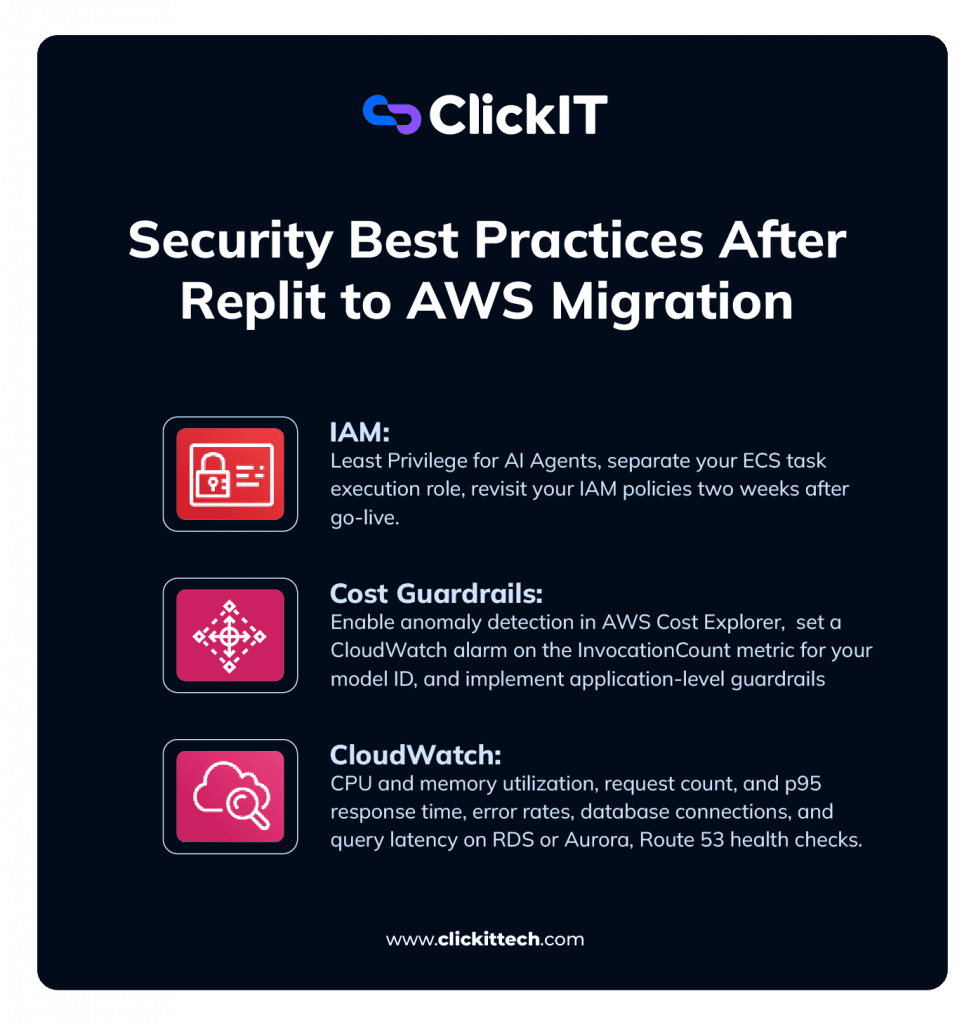
IAM: Least Privilege for AI Agents
- Separate your ECS task execution role (pulls images from ECR, writes logs to CloudWatch) from your task role (what your application code actually assumes at runtime).
- Scope the task role to the exact resources your application touches. If your AI agent reads from one S3 bucket and calls one Bedrock model, name those specific ARNs in the policy. For App Runner, apply the same principle to the instance role.
- Revisit your IAM policies two weeks after go-live and trim any “just make it work” permissions that stuck around from setup.
Cost Guardrails: Protecting Against Runaway Spend When You Migrate Replit to AWS
- Create a monthly AWS Budget matching your expected spend, with alerts at 50%, 80%, and 100% thresholds. Route notifications to email and Slack.
- Enable anomaly detection in AWS Cost Explorer to catch gradual cost creep that stays under your static thresholds.
- For Bedrock workloads, set a CloudWatch alarm on the InvocationCount metric for your model ID to flag unexpected call volume spikes.
- Implement application-level guardrails: a hard cap on agent loop iterations that kills the process and alerts your team before the bill does.
CloudWatch: The Essentials
Set up these alarms after migration:
- CPU and memory utilization on your ECS tasks or App Runner instances. High CPU means scale out or scale up. Consistently low means you’re overpaying.
- Request count and p95 response time on your ALB or App Runner service metrics. Establish a baseline during week one, then alarm when latency exceeds it.
- Error rates. Set a CloudWatch alarm on HTTPCode_Target_5XX_Count. Even a handful per minute is worth catching immediately.
- Database connections and query latency on RDS or Aurora. Watch for connection pool exhaustion during the first few days of production traffic.
- Route 53 health checks. Configure an HTTPS health check against your application’s primary endpoint, so Route 53 is actively verifying reachability from multiple global locations and triggers a CloudWatch alarm if consecutive checks fail. Pair that alarm with a DNS failover configuration so Route 53 can reroute traffic automatically if your primary endpoint goes down.
For all of the above, create an SNS topic and subscribe your team’s email and Slack channel via AWS Chatbot or a Lambda webhook. Then, point every alarm above at that topic. If your team hears about an outage from a customer first, the monitoring isn’t doing its job.
And that is how you migrate Replit to AWS.
FAQs About Migrating Replit to AWS
Replit is excellent for prototyping early development, but production workloads may eventually outgrow its shared compute, limited configuration options, and limited compliance coverage. AWS gives you dedicated compute, granular security controls, VPC-level network isolation, and the infrastructure flexibility to handle real production workloads.
It depends on your team’s familiarity with containerization, CI/CD, IAM, and cloud networking. A gap in any one area can cause downtime or a security issue.
For teams where speed and reliability matter more than learning every service firsthand, working with an AWS migration partner like ClickIT (50+ certified AWS engineers) significantly reduces risk and timeline.
They serve different purposes. Replit is optimized for speed of development. AWS is designed for production, scalability, security, compliance, and operational control.
The better question is which is right for your current stage and application’s specific requirements. Most teams start on Replit and graduate to AWS when the product and user base demand it.
For a straightforward single-container application with a simple database, a focused team can complete the migration in two to five days. More complex setups involving multiple services, large datasets, compliance requirements, or custom networking can extend that to several weeks. The variables that add the most time are data migration complexity, the state of the existing codebase, and the amount of CI/CD infrastructure that needs to be built from scratch.