Imagine a situation where when user load increases or decreases on an application, there is no way for the application to scale out or use its resources as required. Thanks to Kubernetes Autoscaling, which can easily overcome such a situation with its different scaling mechanisms, such an application probably wouldn’t survive in today’s market. Kubernetes Autoscaler mechanisms help scale in and out pods and nodes as required. There are three different methods supported by Kubernetes Autoscaling: Horizontal Pod Autoscaler (HPA), Vertical Pod Autoscaler (VPA) and Cluster Autoscaler (CA).
In this article, we will be taking a look at the different methods of Kubernetes Autoscaling that help with the automated process of scaling resources required by the application.
Kubernetes Autoscaling refers to the feature that allows the cluster to increase the number of nodes as the demand for response increases. If the level of requirement decreases, the number of nodes decreases too.
Many administration chores can be automated with Kubernetes, including provisioning and scaling. Instead of assigning resources manually, you can automate procedures that save time, allowing you to respond quickly to demand spikes and save money by scaling down when resources aren’t needed. This can be used in conjunction with the Cluster Autoscaler, which only allocates necessary resources.
Using autoscaling makes you more likely to operate with optimal resource utilization and cloud spending. Without autoscaling, you’re manually provisioning (and later scaling down) resources every time conditions change.
By dynamically scaling resources up and down in response to demand, Kubernetes Autoscaling helps optimize resource utilization and expenditures.
Before we jump into practical notions, let’s take a look at the theory behind each Kubernetes Autoscaling feature.
You may also like Why Use Kubernetes for Your Enterprise?
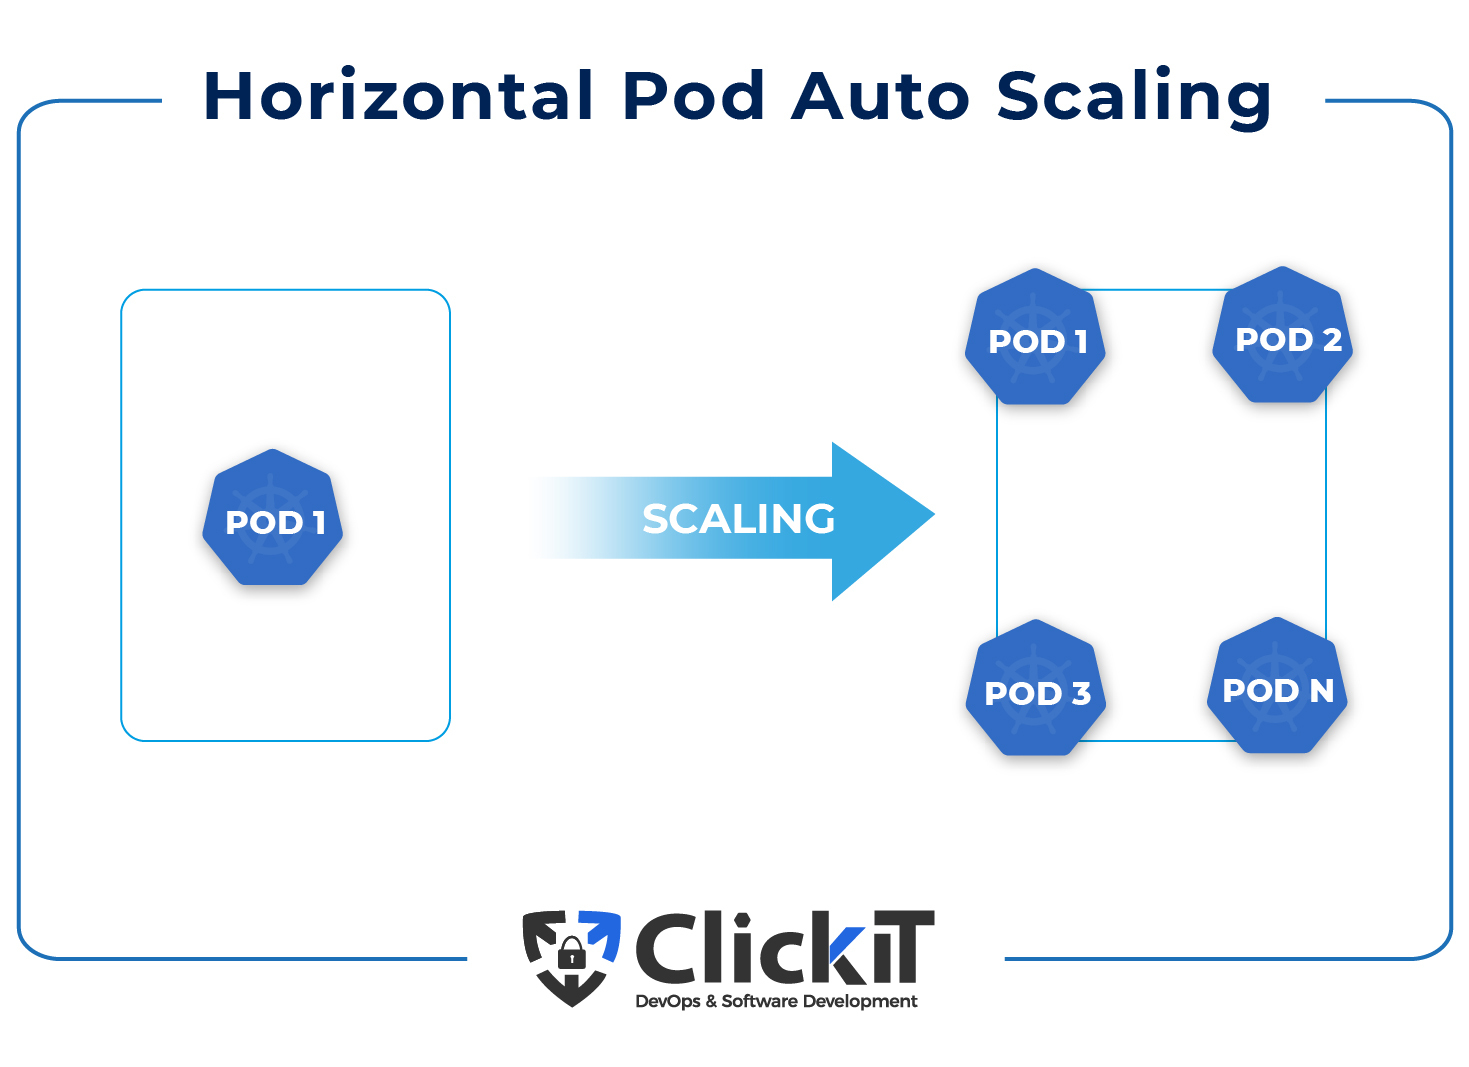
The Kubernetes Horizontal Pod Autoscaler in Kubernetes changes the workload resource, such as a Deployment, StatefulSet or other similar resources, and automatically scales the workload to meet demand. Horizontal scaling refers to the deployment of extra pods in the Kubernetes Cluster in response to a growing load.
Moreover, the Horizontal Pod Autoscaler automatically orders the workload resource to scale back down if the load drops and the number of pods exceeds the defined minimum. This allows your applications to scale out in response to growing demand and scale in when resources aren’t required, freeing up nodes for other applications. For example, if a Deployment is running 1 pod and you want the number of pods to vary between 1 and 4 depending on resource utilization, you can create a Kubernetes HPA that will scale the number of pods controlled by the Deployment.
It is to be noted that Horizontal Pod autoscaling is not compatible with unscalable workloads, such as DaemonSets. Daemonsets work on a “one pod per node” basis, and therefore, they cannot have replicas, which is why Kubernetes HPA is not compatible with Daemonsets.
The Vertical Pod Autoscaler is an autoscaling tool that can be used to resize pods for optimal CPU and memory resources. You can use Vertical Pod autoscaling to provide recommended values for CPU and memory requests and limits or to automatically update the values instead of having to set up up-to-date CPU and memory requests and limits for the containers in your pods.
The Kubernetes Vertical Pod Autoscaler automatically increases your pods’ CPU and memory reservations to help you “right-size” your applications. This can increase cluster resource utilization while also freeing CPU and memory for other pods.
Here are a few of the benefits that the VPA provides:
Based on the presence of pending pods and node utilization data, the Kubernetes Autoscaler increases or decreases the size of a Kubernetes cluster by adding or removing nodes.
When the Kubernetes Autoscaler identifies pending pods that cannot be scheduled, potentially resulting in resource constraints, it adds nodes to the cluster. Moreover, when the utilization of a node falls below a particular threshold set by the cluster administrator, it removes nodes from the cluster allowing for all the pods to have a place to run and avoiding unnecessary nodes.
Kubernetes-as-a-Service is managed by EKS. That said, this mostly refers to the Kubernetes control plane. You must still provide compute nodes to your EKS Cluster in order for the pods to be deployed. There are two ways of creating worker nodes for your EKS Cluster.
Self-Managed Nodes:
With this option, you create, manage and administer your own worker nodes, which gives you more control over your servers.
EKS Managed Nodes:
With this option, you don’t need to manage the nodes in the EKS Kubernetes Cluster. All you need to do is specify configurations and EKS takes care of the rest. Further in this article, we will show you how to use EKS Managed Nodes to create worker nodes for the cluster.
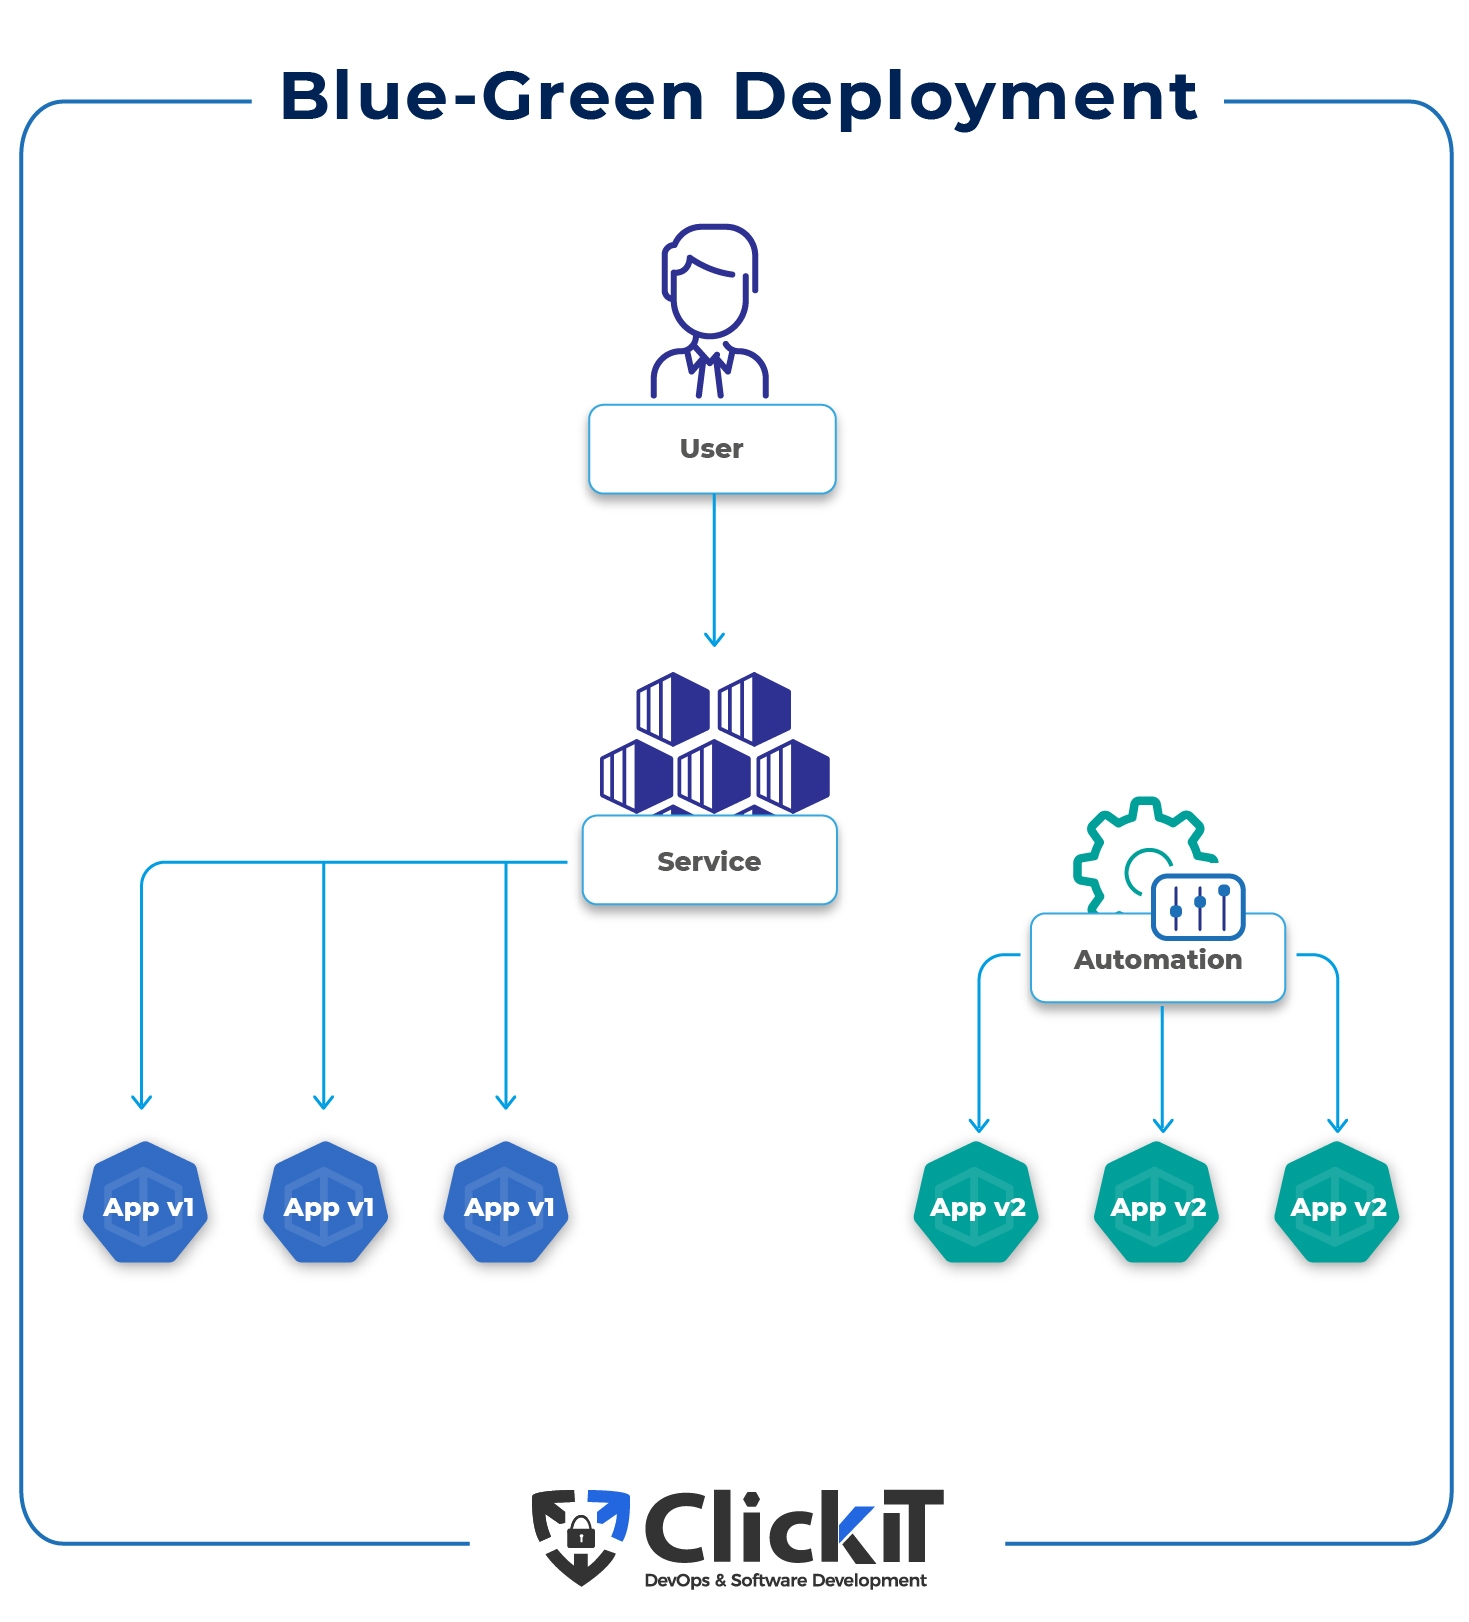
One of the most important things to know in this regard is how to reliably launch the next version of the application when one is already running. How can the present pods be replaced without disturbing traffic?
Kubernetes supports a variety of deployment options. Below, we present to you two options that provide for secure deployment while retaining the ability to backtrack, if necessary.
How does Blue-Green deployment work in Kubernetes?
The ability to execute rolling updates is one of the main advantages of using a Deployment to govern your pods. Rolling updates allow you to progressively update the configuration of your pods, and Deployments give you optimal control over the process.
The update strategy is the most critical setting when it comes to configuring rolling updates.
Spec.strategy.type offers two possible values in your Deployment manifest:
Karpenter is an open-source, customizable and high-performing Kubernetes Cluster Autoscaler built on AWS. It improves application availability and cluster efficiency by quickly deploying the appropriate compute resources in response to a changing application load.
Karpenter also offers just-in-time computing resources to fulfill your application’s requirements and will soon provide a cluster compute resource footprint, which will decrease costs and increase performance. Karpenter monitors the aggregate resource requests of unscheduled pods and decides whether to deploy new nodes or terminate existing ones to reduce scheduling delays and infrastructure expenses.
KEDA (Kubernetes-based Event-driven Autoscaling) is an open-source component created by Microsoft and Red Hat, which allows Kubernetes workload to benefit from an event-driven architecture style.
KEDA horizontally scales a Kubernetes Deployment or Job. It is based on the Kubernetes Horizontal Pod Autoscaler and allows users to specify autoscaling criteria based on information from any event source, including a Kafka topic latency and metrics acquired from a Prometheus query. This feature allows you to pick from a list of pre-defined triggers that serve as a source of events and metrics when autoscaling a Deployment or a Job.
Before we dive into the different Kubernetes Autoscaling mechanisms on a practical level, let’s create a Kubernetes Cluster on AWS using the EKS managed nodes as our playground.
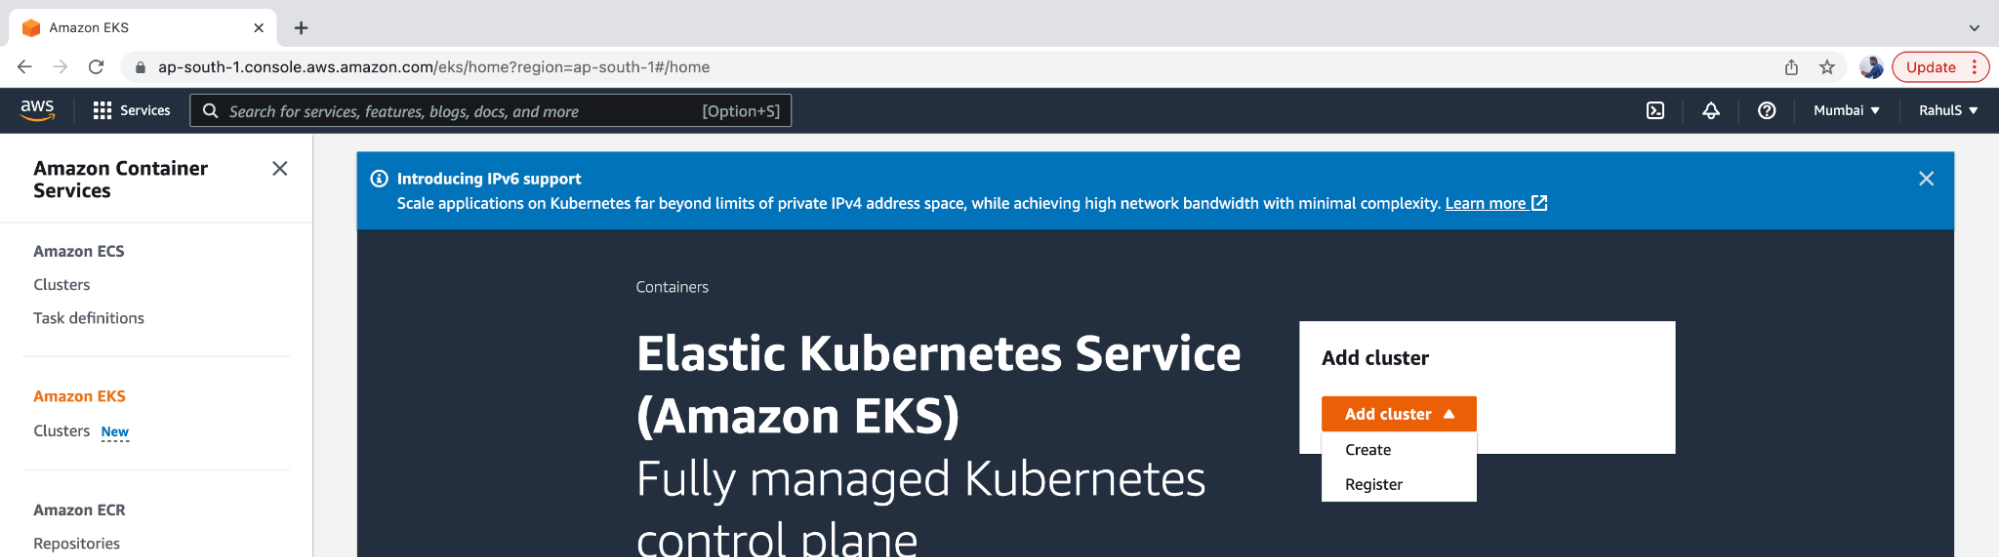
1. Go to EKS and click on “Add cluster” → “Create” options.
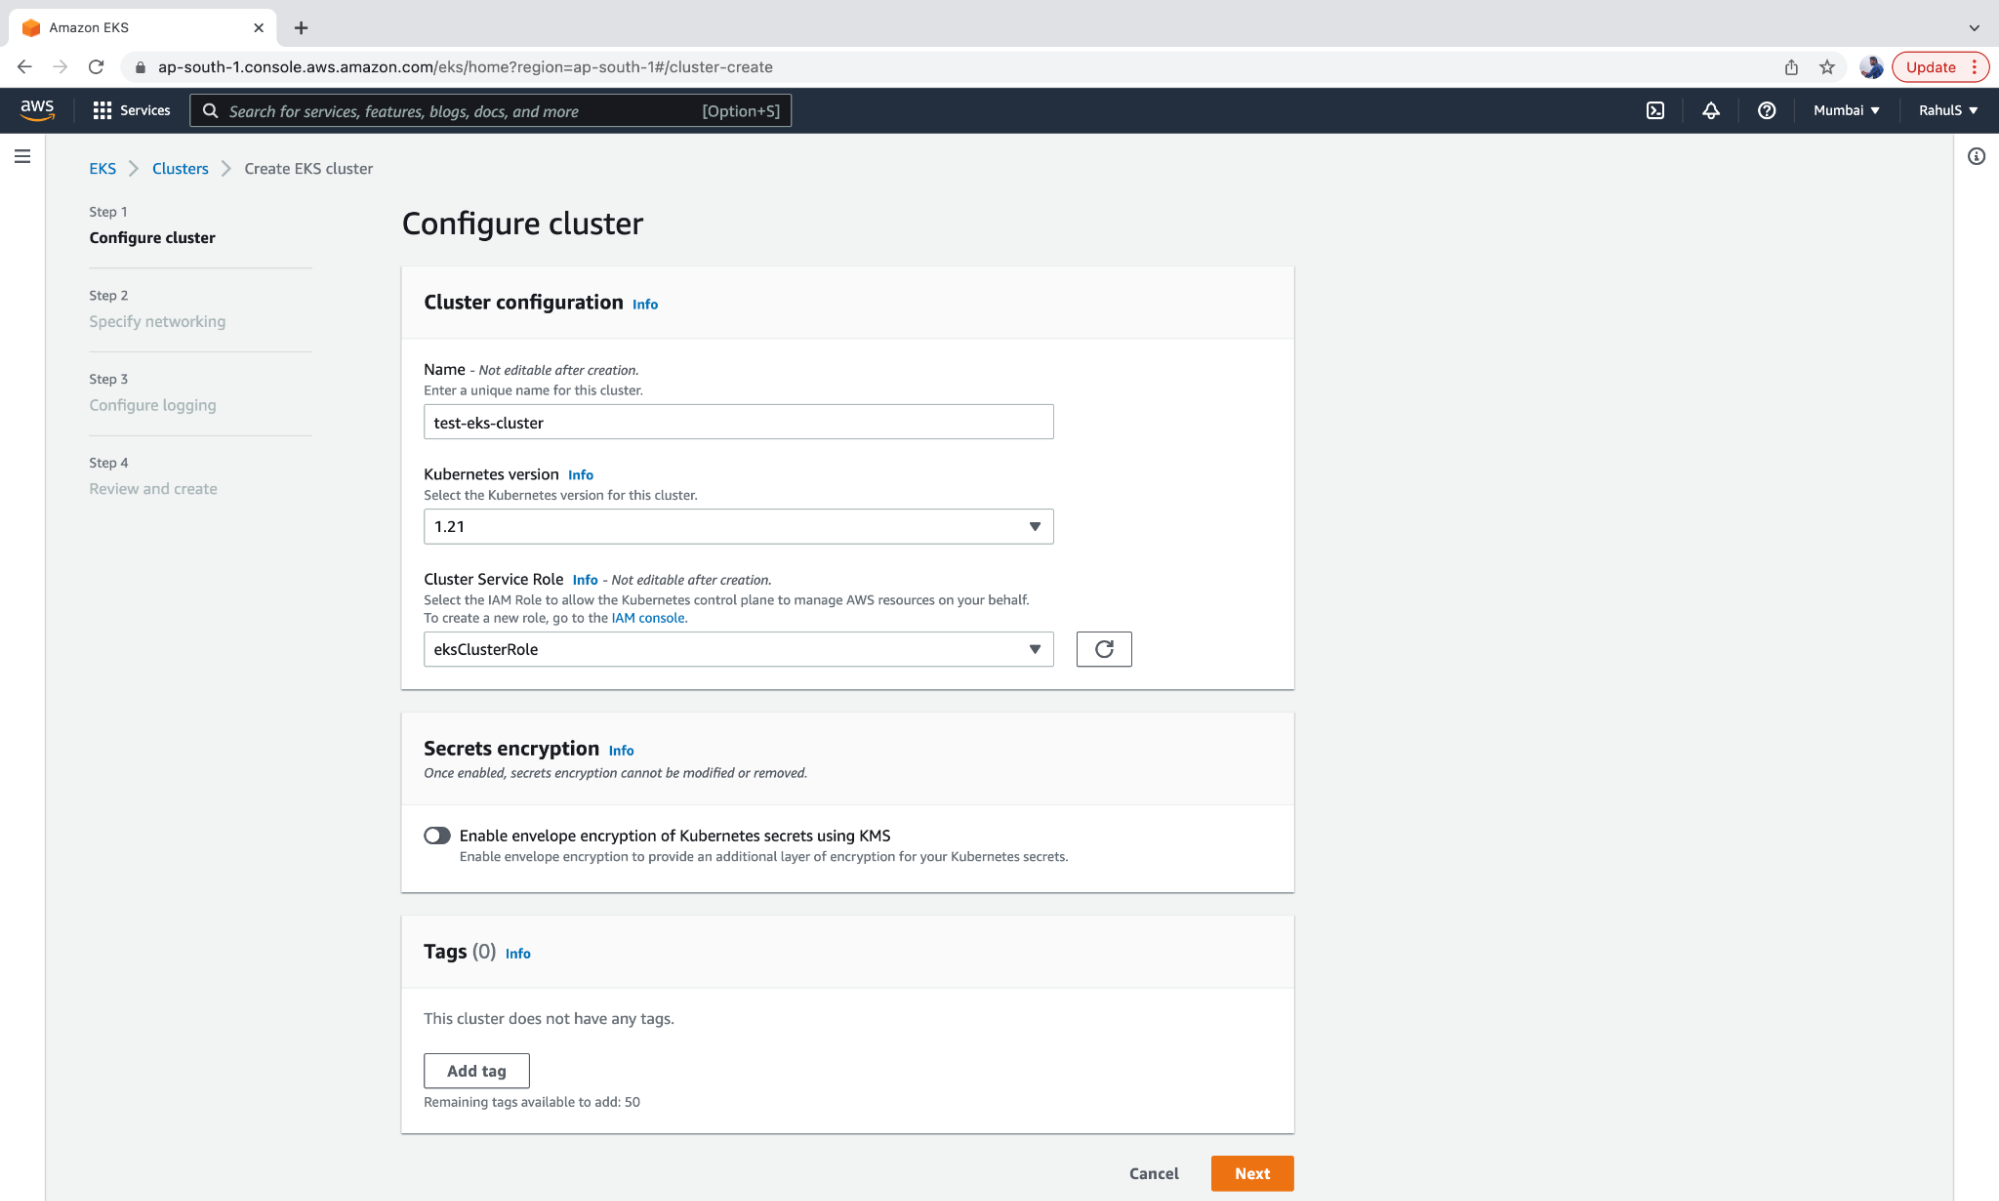
2. The configuration screen below should appear on your device. Provide a name to the cluster, choose the Version, Service Role and click on the “Next” button.
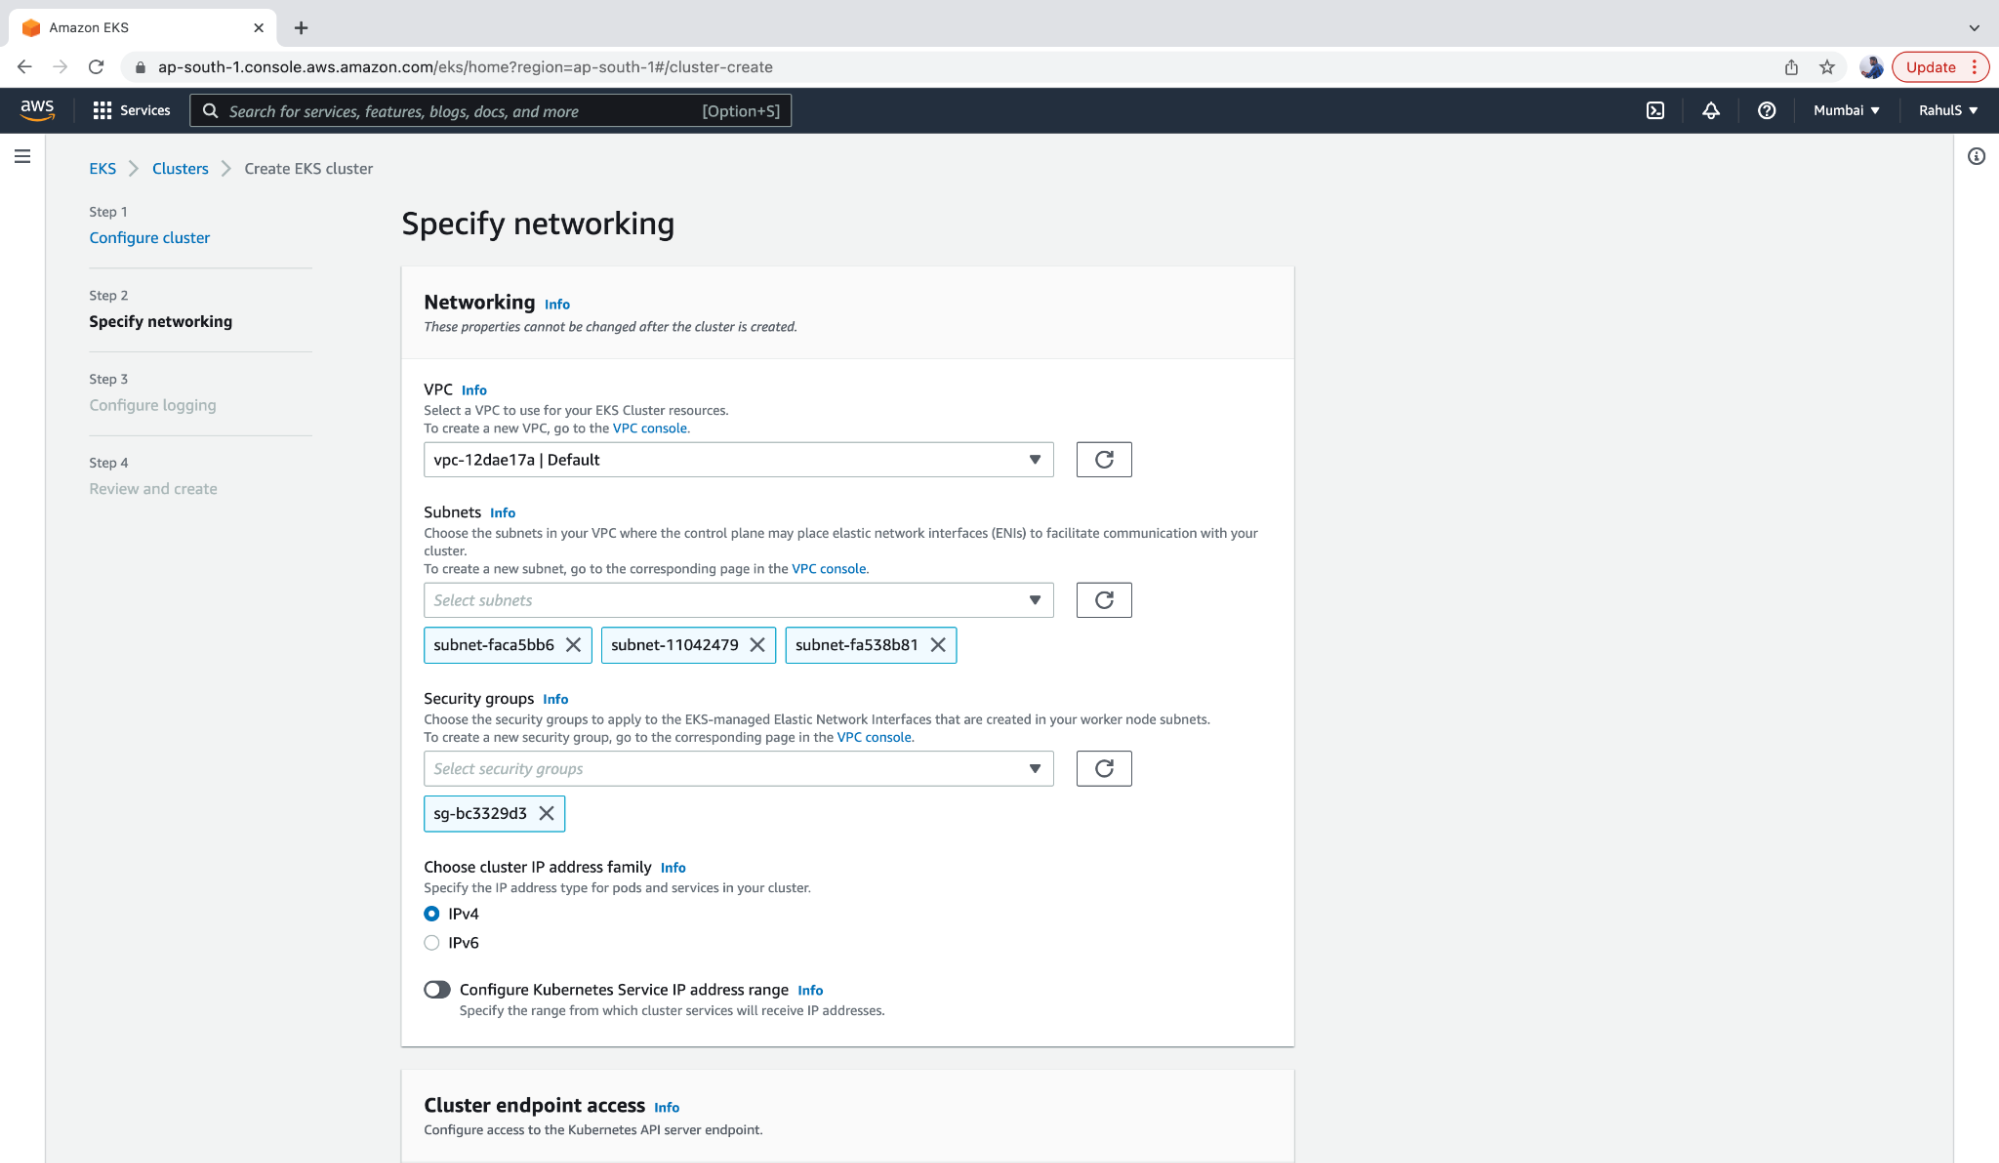
3. Next, select a VPC, Subnets, and a Security Group.
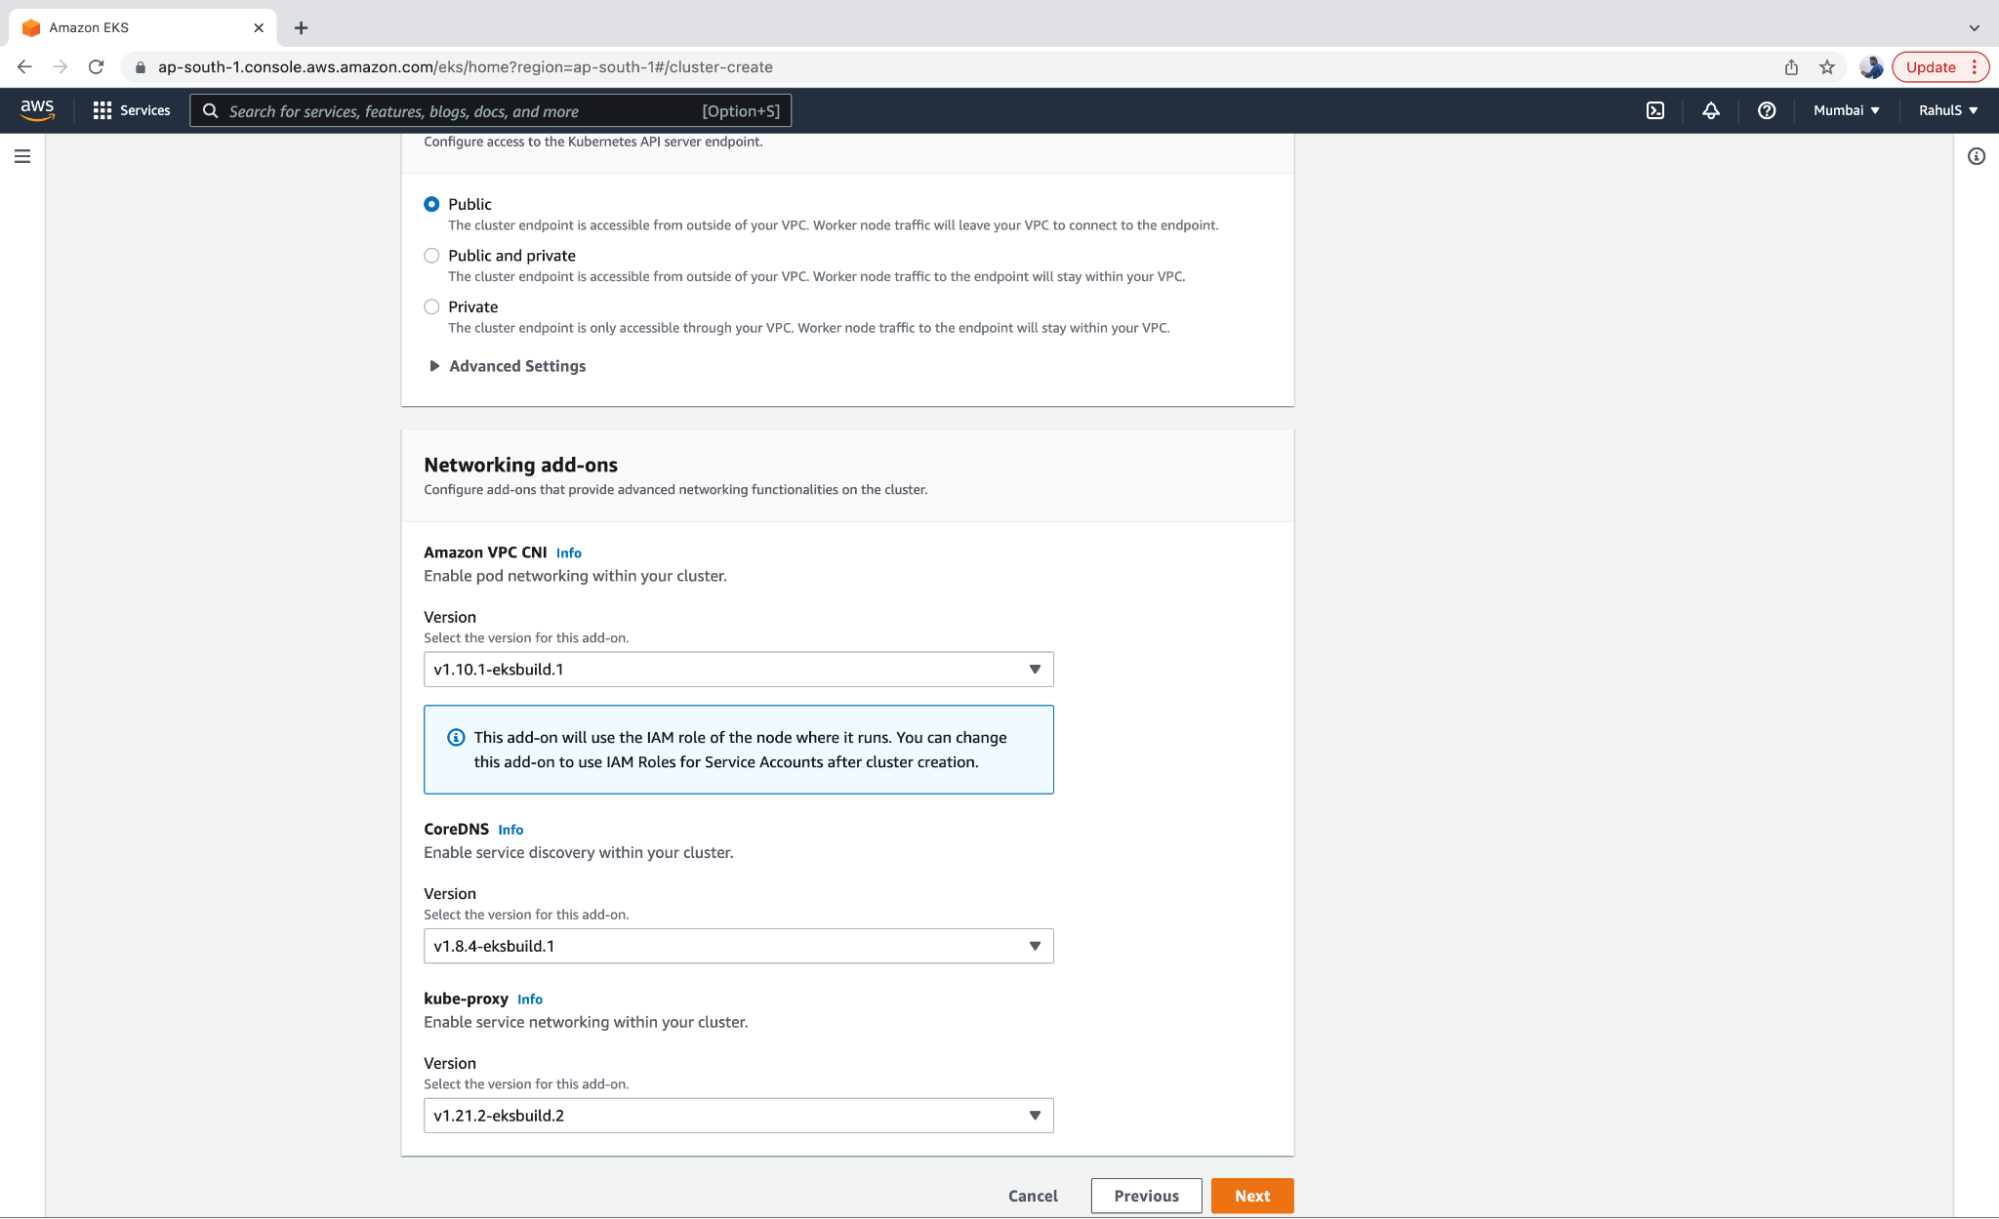
4. Keep the Cluster endpoint on “Public” so that it can be accessed from your machine. Select the latest versions of Networking add-ons and click on the “Next” button.
5. Click on the “Next” button and enable logging if required.
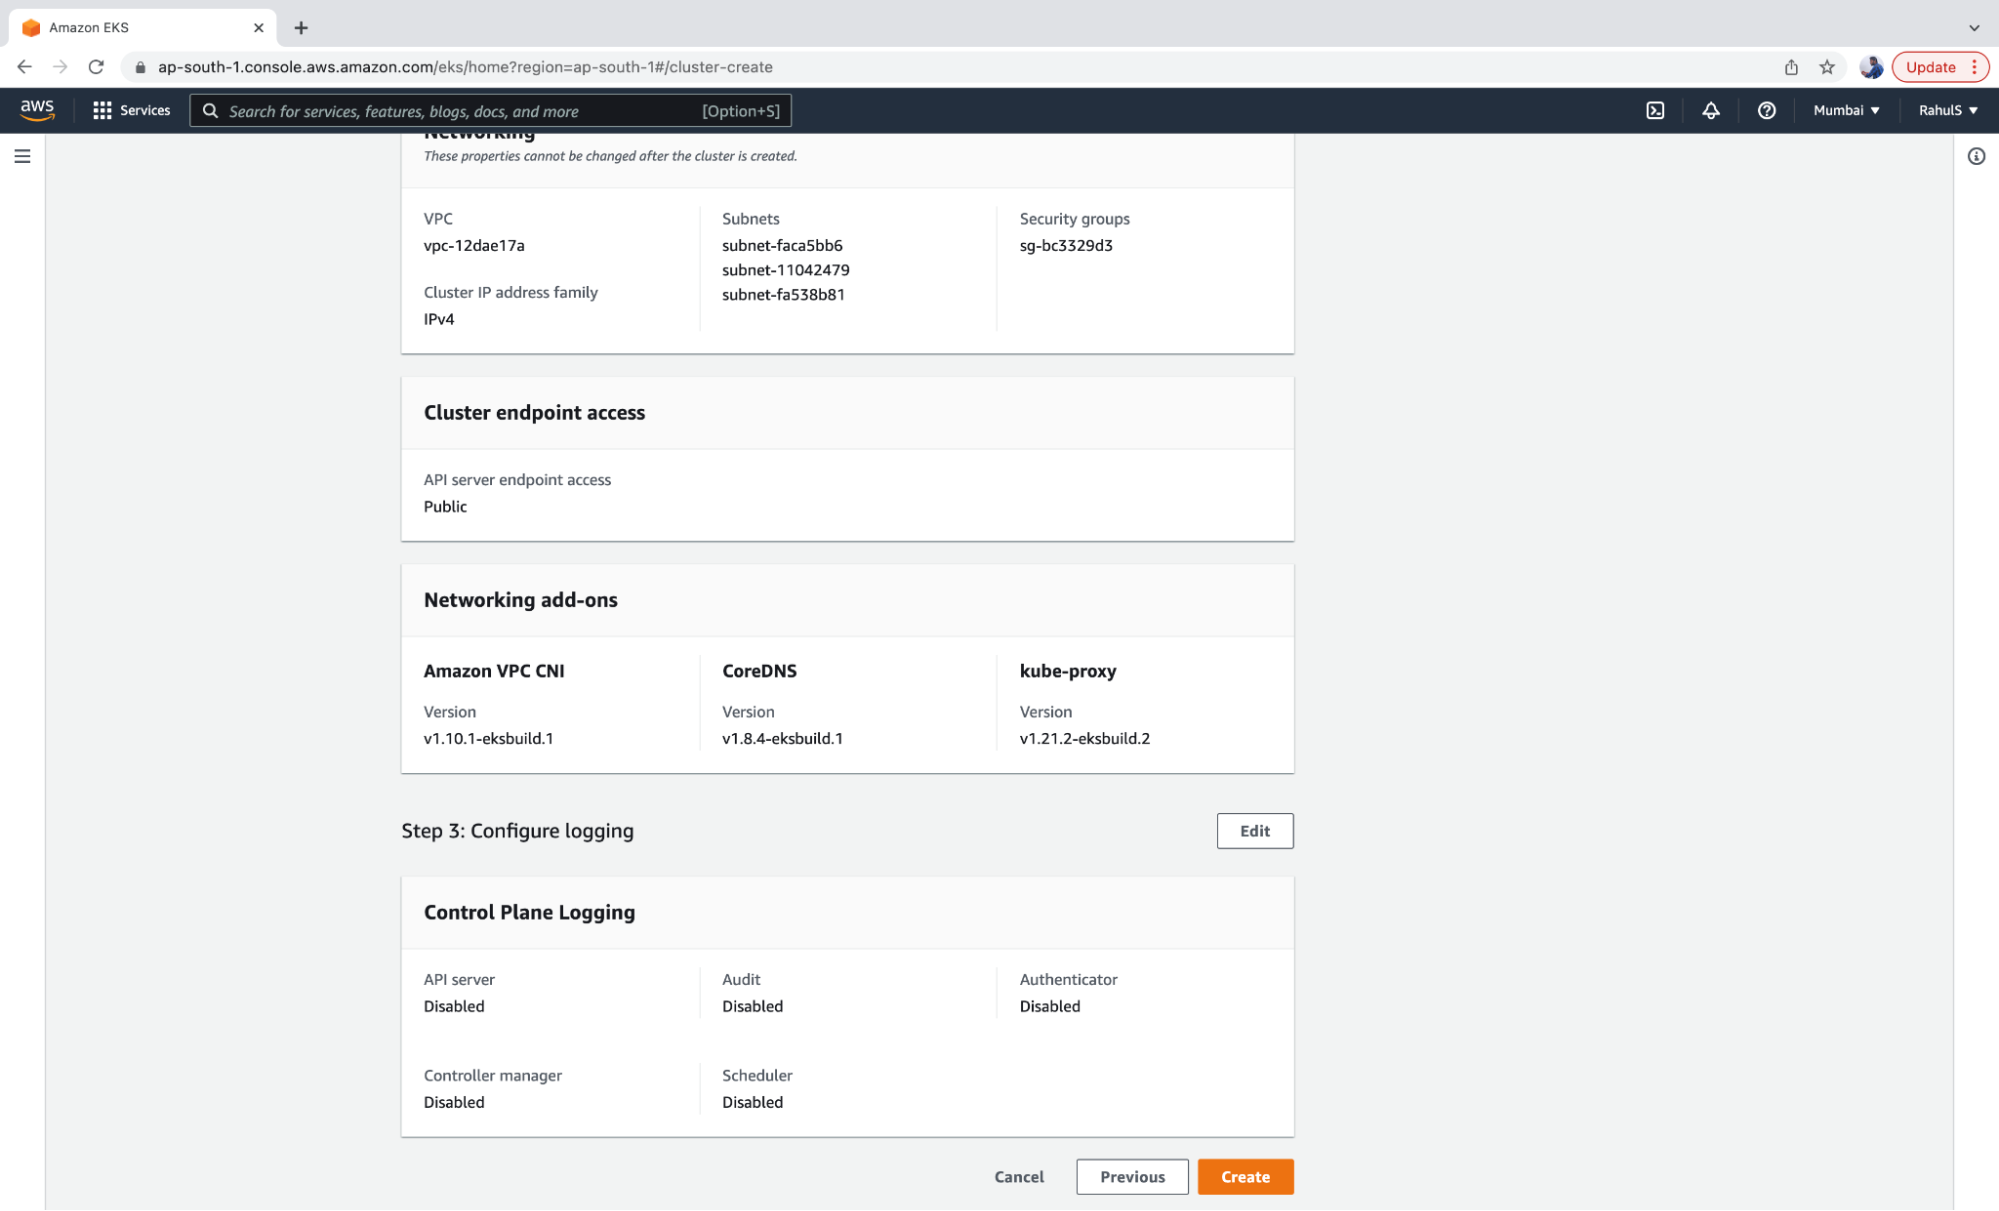
6. Review the configuration and click on the “Create” button to create the EKC control plane.
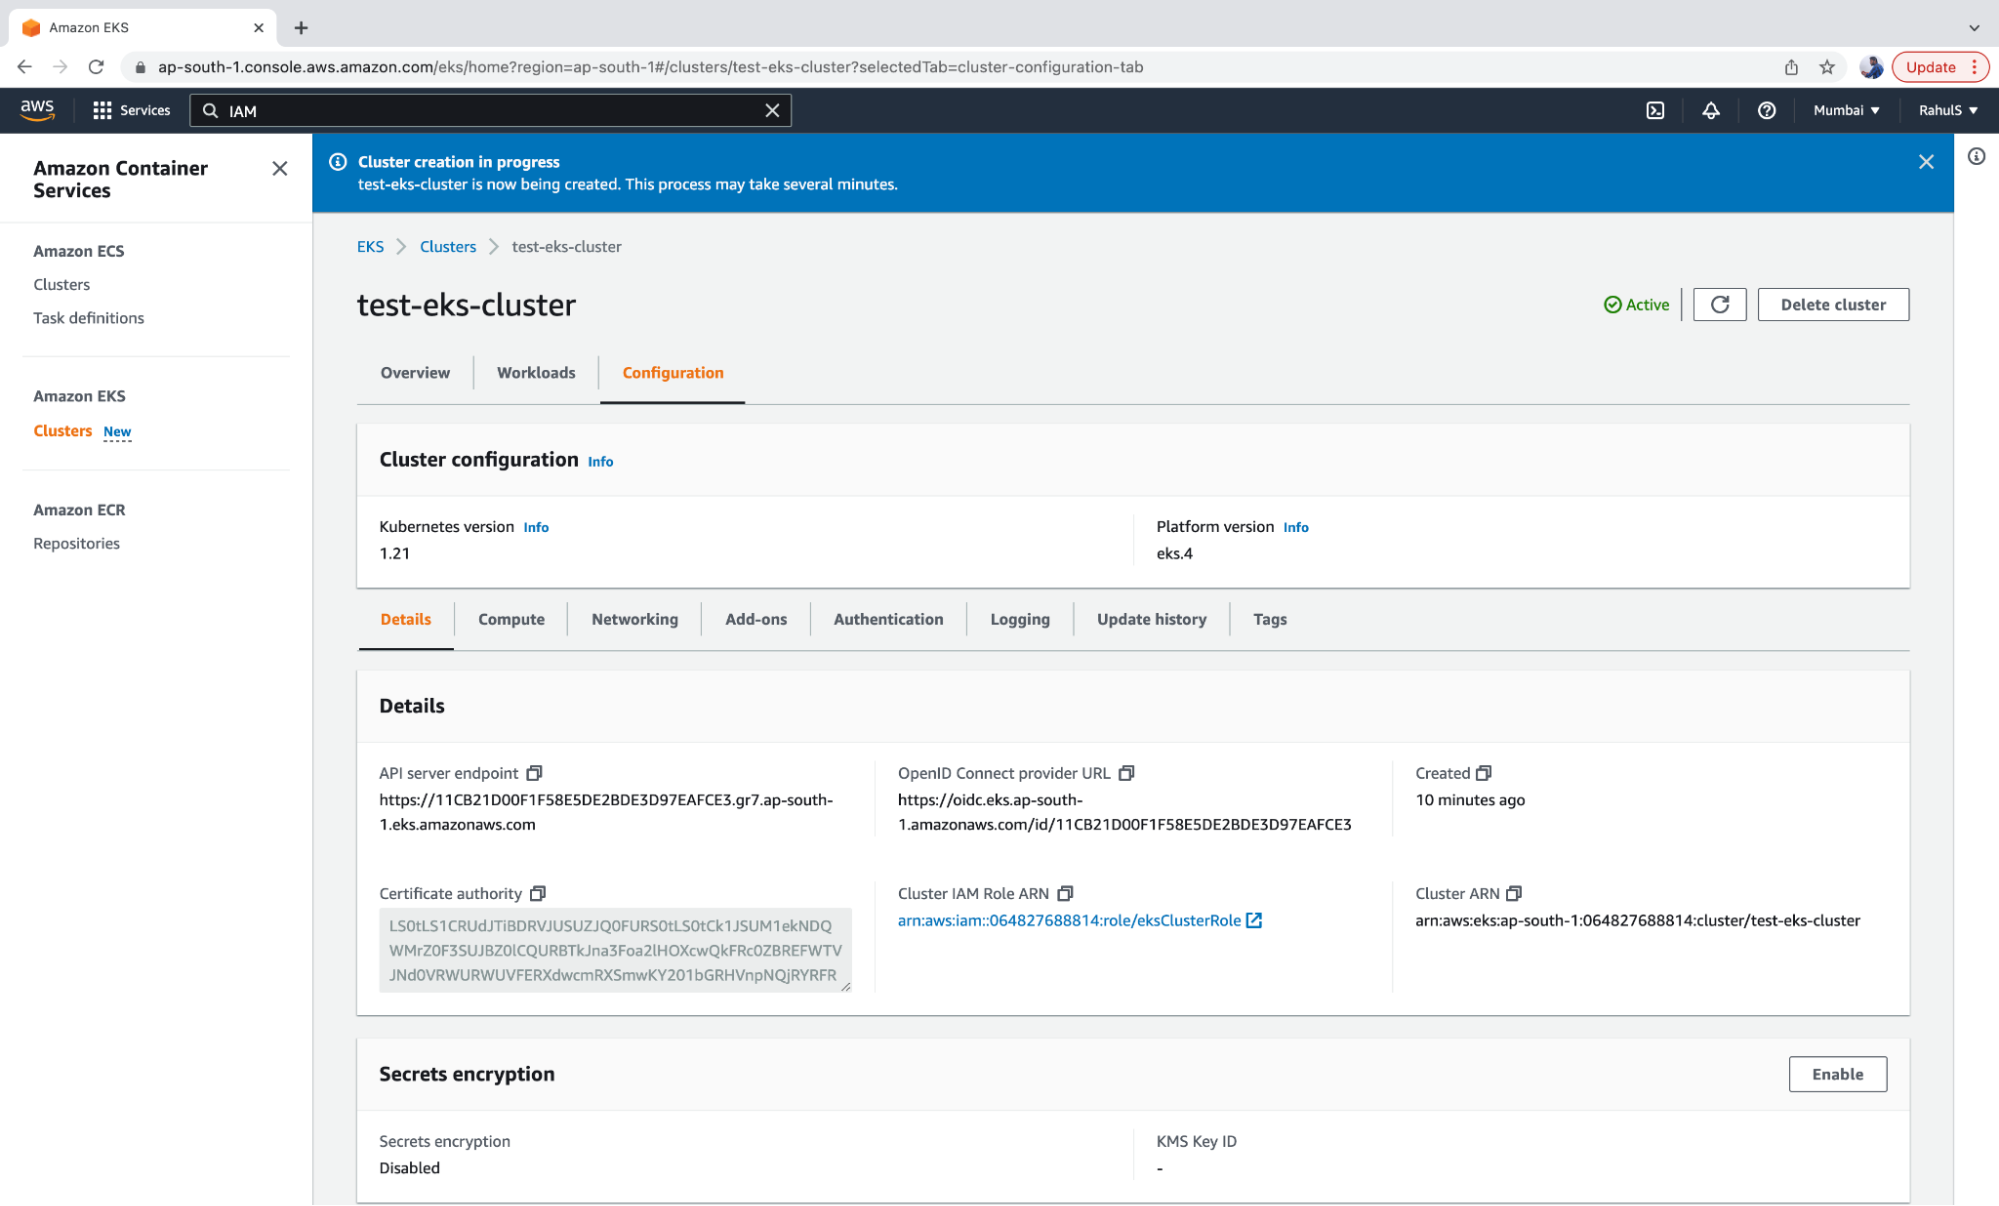
7. Verify the details of the cluster. Once the cluster is set to “Active” you can access it.
Before you access the cluster, you need to configure your CLI in order to connect to your AWS account. The easiest way to do this is to export your AWS_ACCESS_KEY_ID and AWS_SECRET_ACCESS_KEY. You need to have these keys handy at all times. In this case, the keys must belong to the AWS user and the user must have the required permissions. For the sake of the demo, you can use the root account’s keys, however we do not recommend using the root user.
You are now just one step away from accessing the cluster from the CLI. In order to do this, you must first configure kubectl, which will allow you to connect to the Amazon EKS cluster you just created. The “aws” command must also be available on your local machine.
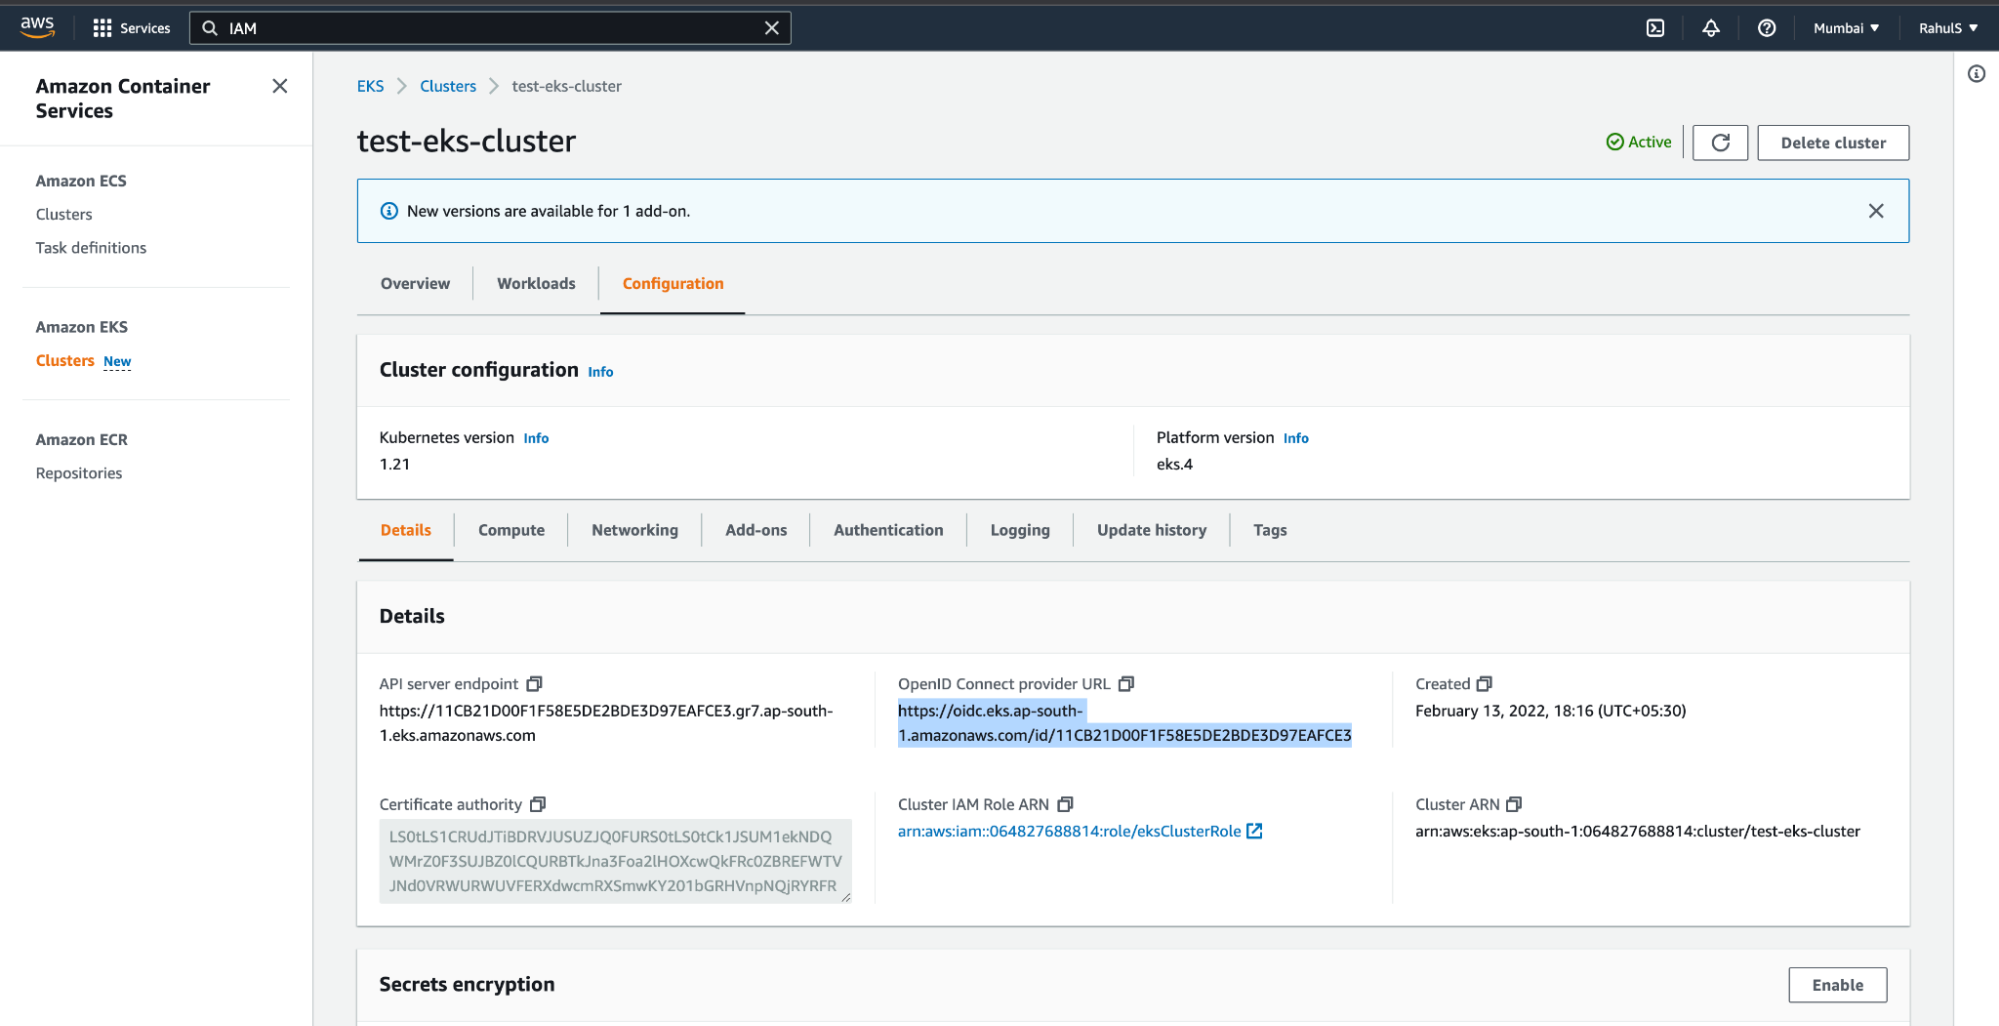
EKS cluster has an OpenID Connect issuer URL associated with it. An IAM OIDC provider must exist in order for your cluster to be able to use IAM roles for service accounts.
1. To create an IAM OIDC provider, copy the OpenID Connect provider URL from the EKS Cluster.
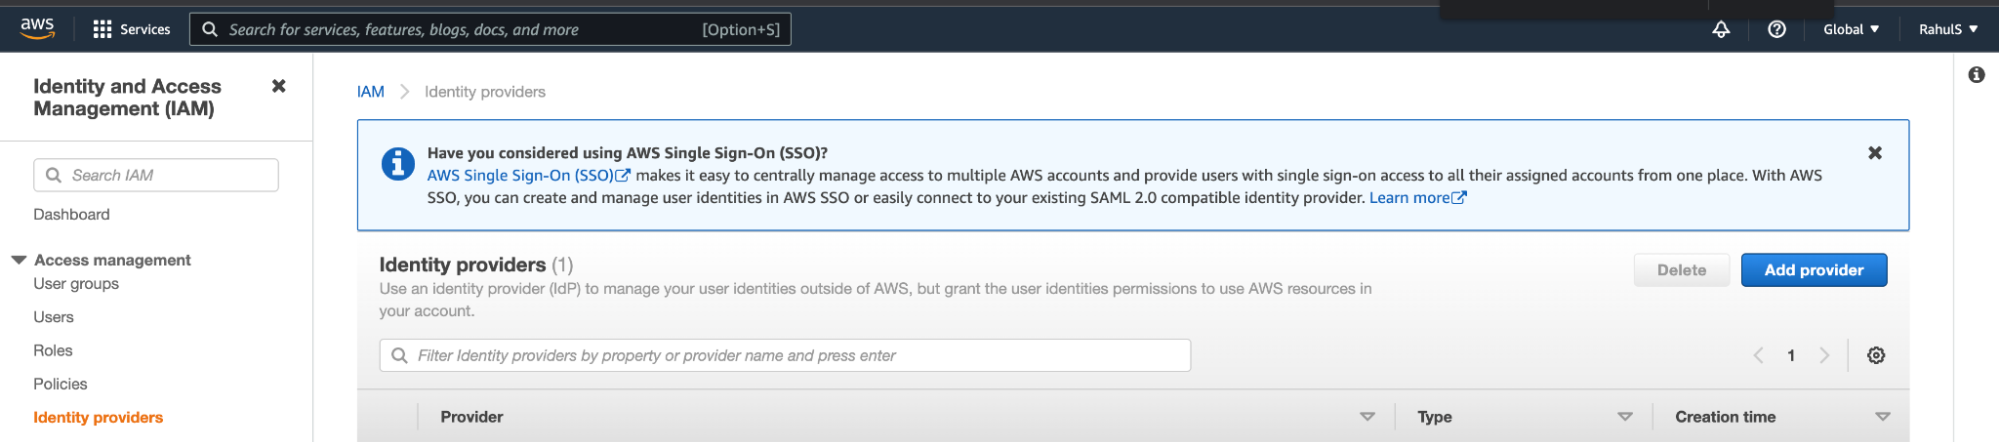
2. Go to IAM –> Identity Provider and click on the “Add provider” button.
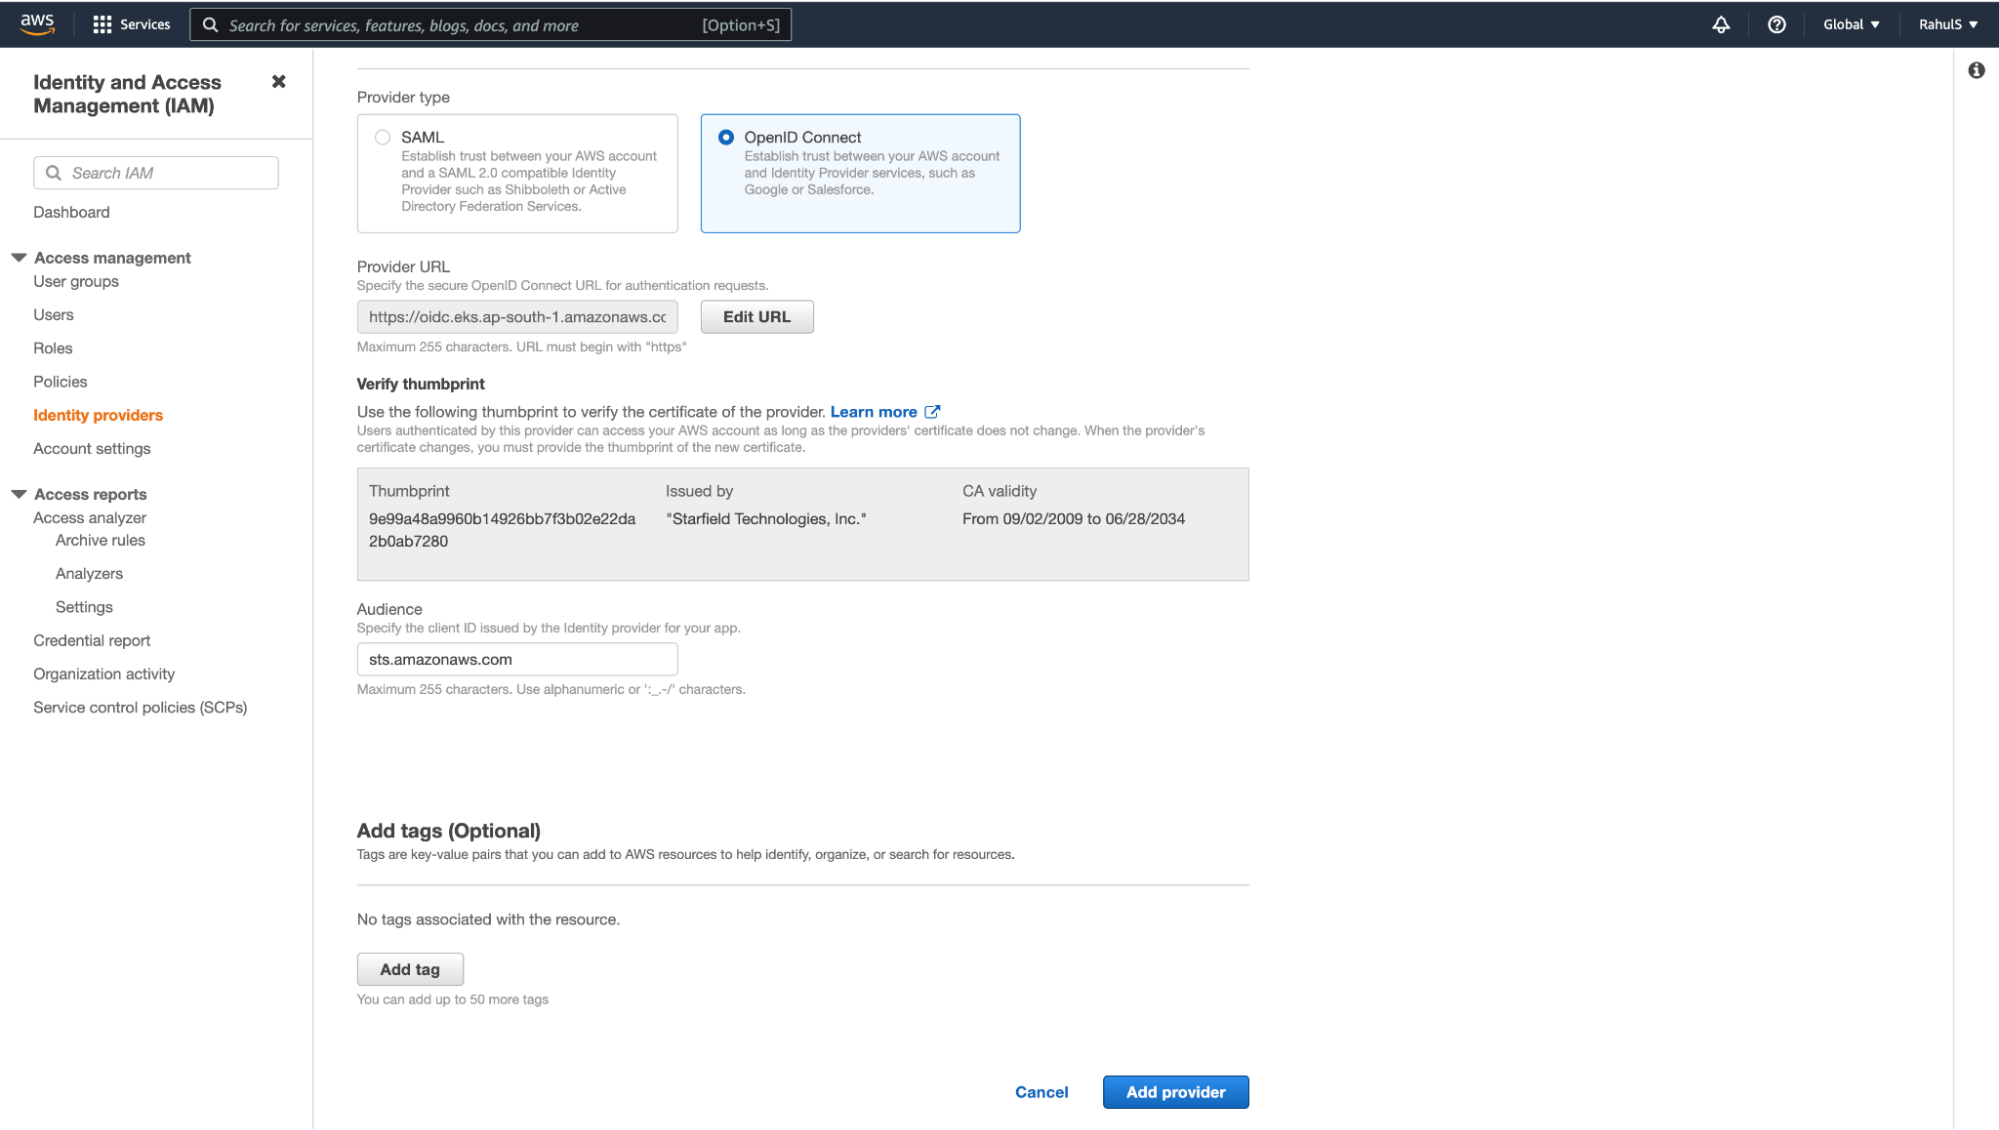
3. Select the “OpenID Connect” option and paste the “OpenID Connect provider URL” copied above in the “Provider URL” textbox. Next, click on the “Get thumbprint” button and add “sts.amazonaws.com” in the “Audience” textbox. Finally, click on the “Add provider” button.
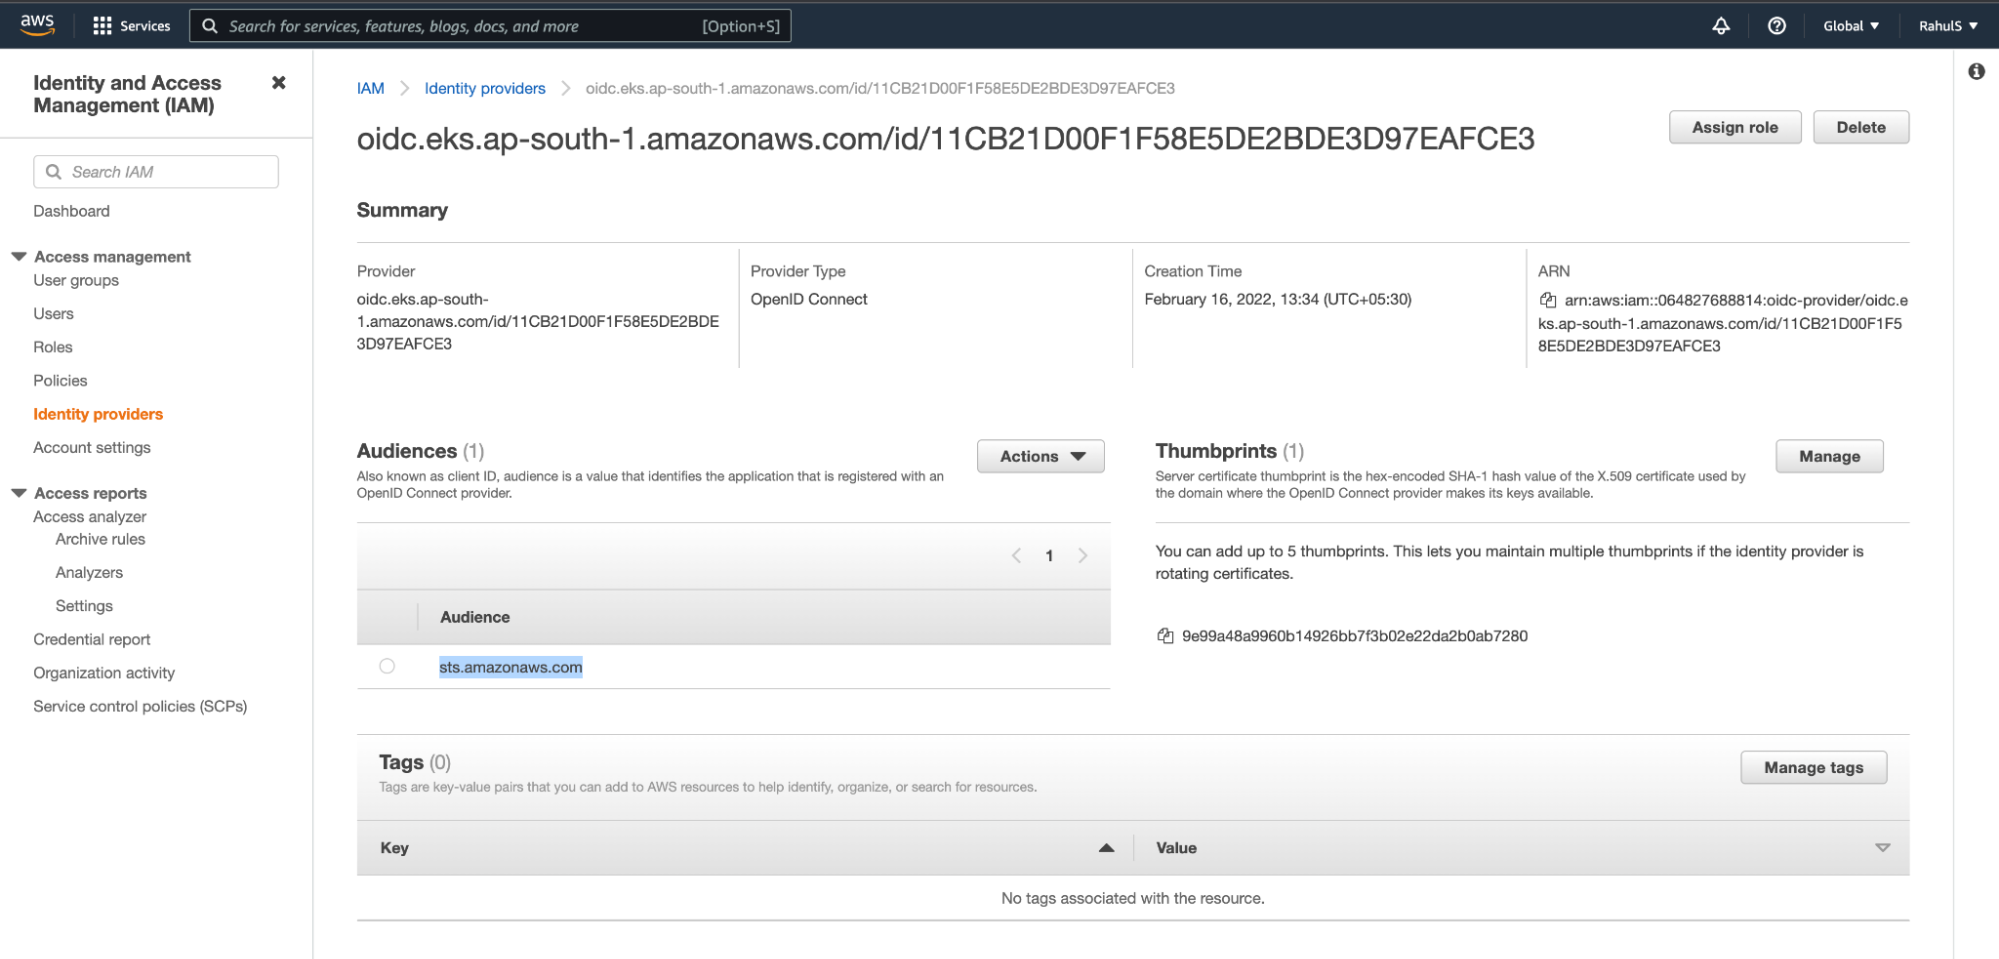
4. Once you have added the provider, you should see the following configuration on your screen. Copy the “ARN” from this screen before you move onto the next step.
In order to deploy Amazon EC2 nodes to the cluster, you will need an IAM role.
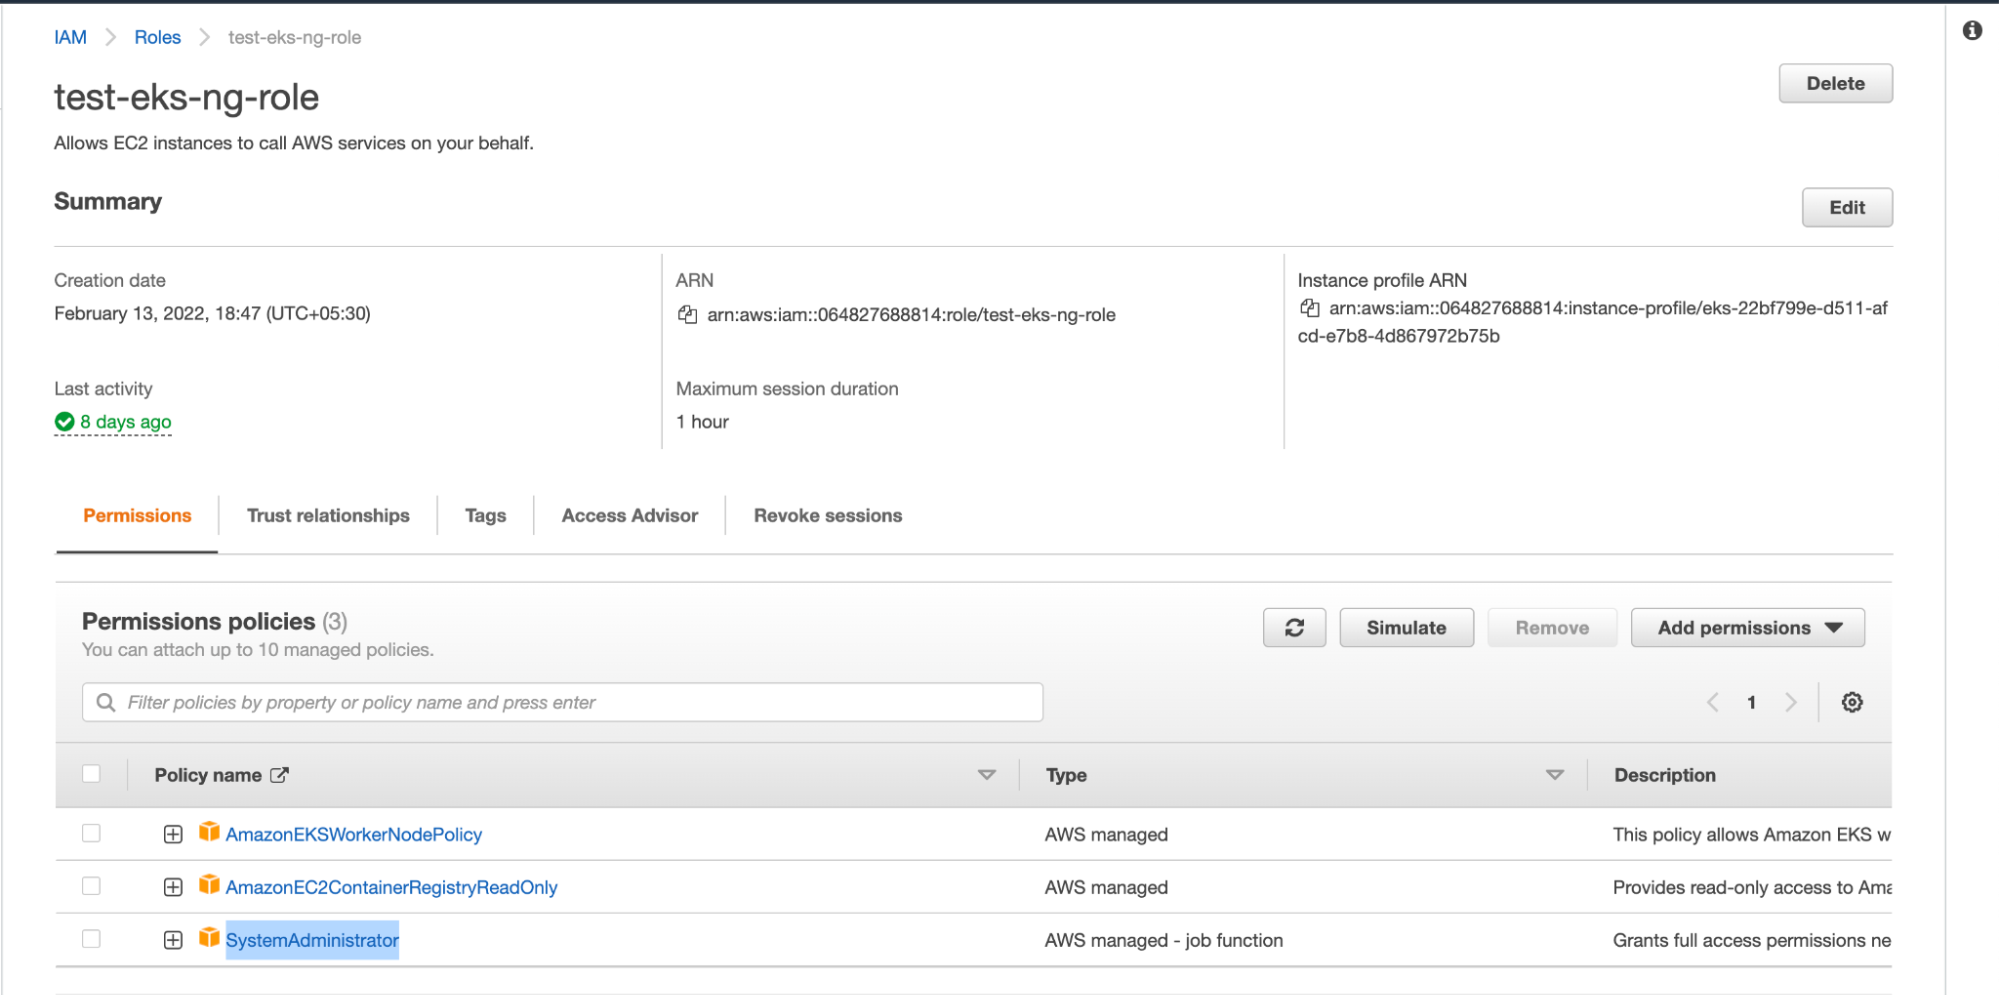
1. Create an IAM Role “test-eks-ng-role” with AmazonEKSWorkerNodePolicy, AmazonEC2ContainerRegistryReadOnly, and SystemAdministrator permissions.
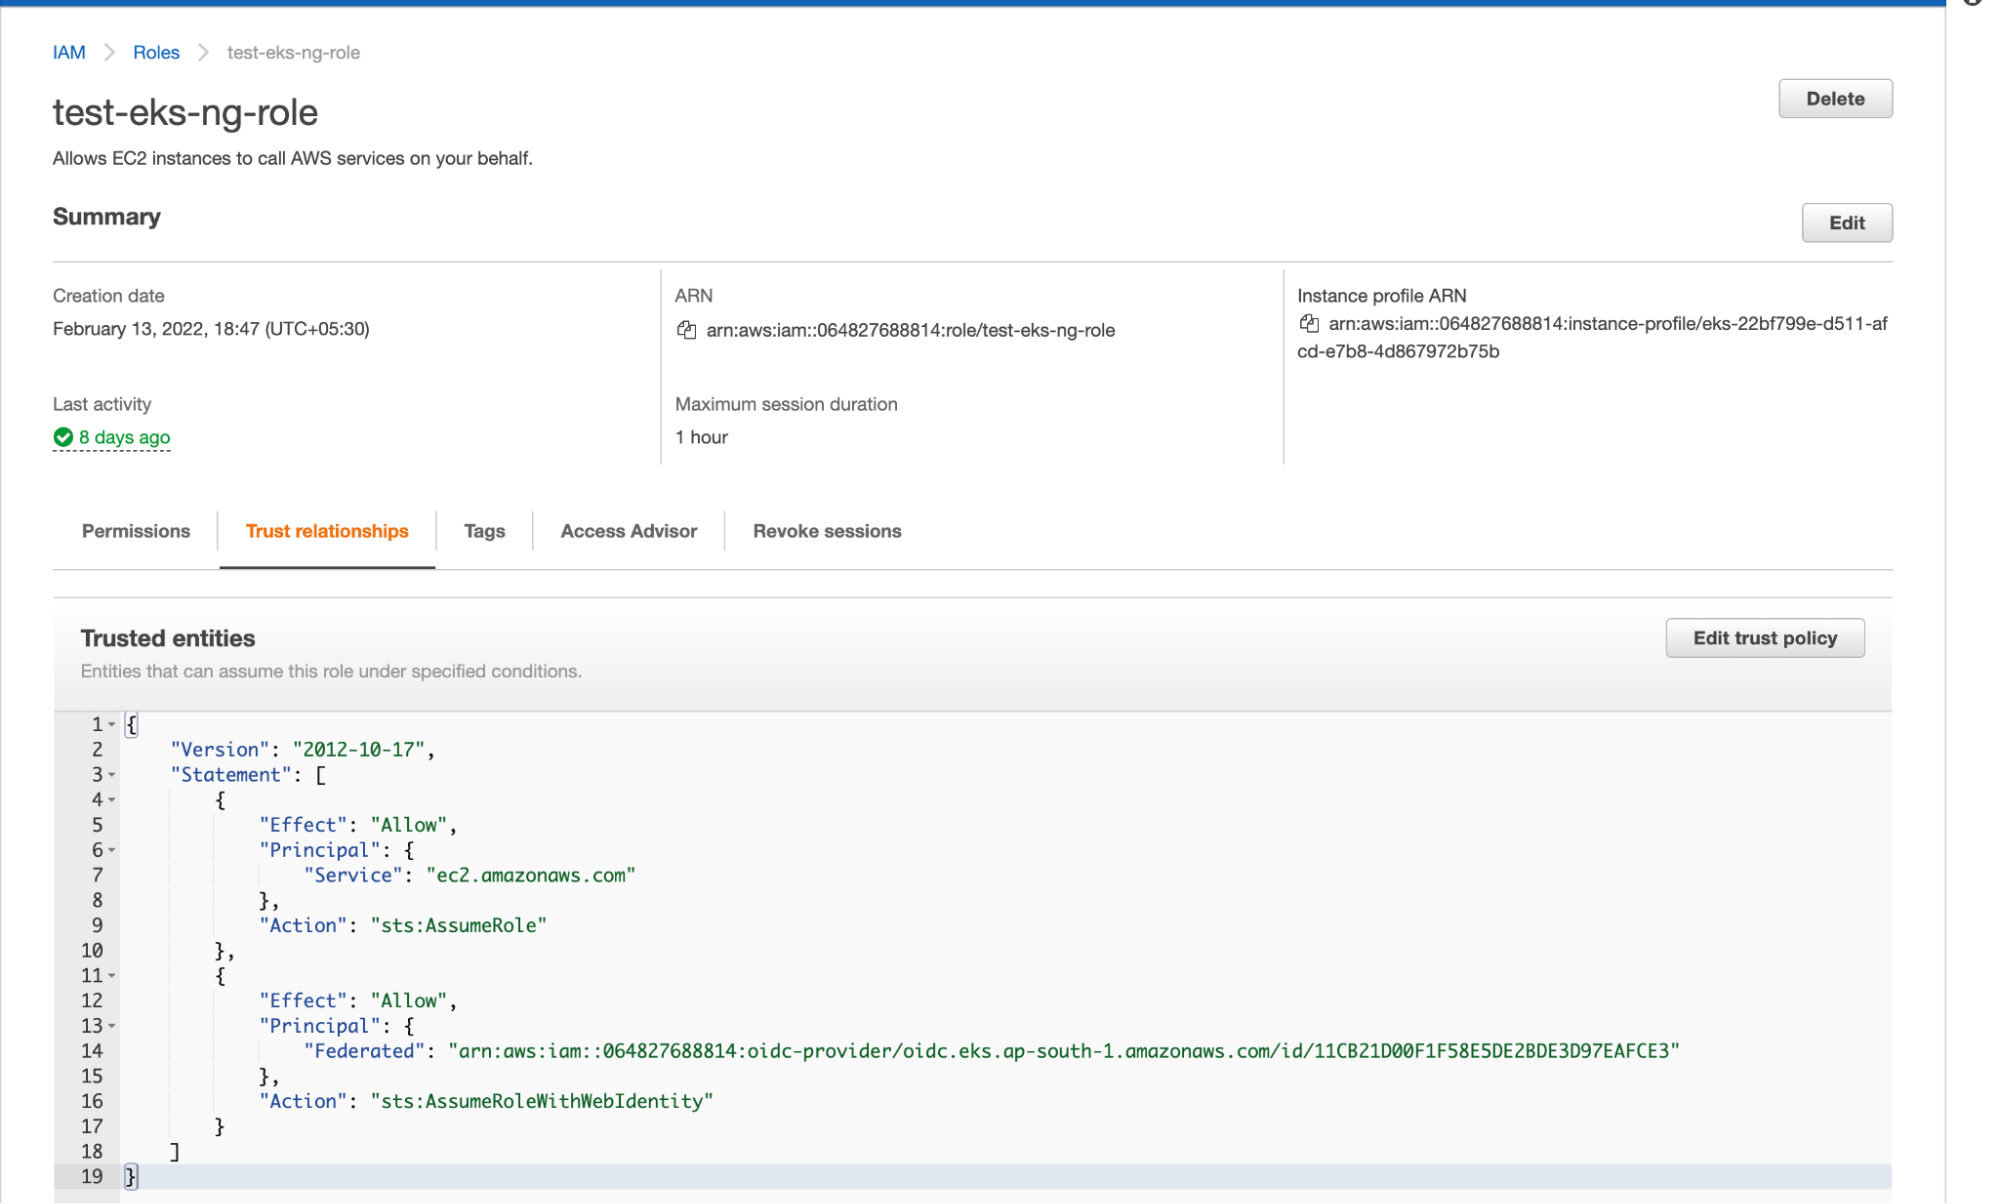
2. Add the following trust relationships to the IAM Role.
| { “Version”: “2012-10-17”, “Statement”: [ { “Effect”: “Allow”, “Principal”: { “Service”: “ec2.amazonaws.com” }, “Action”: “sts:AssumeRole” }, { “Effect”: “Allow”, “Principal”: { “Federated”: “<REPLACE-THIS-WITH-THE-ARN-OF-THE-IDENTITY-PROVIDER-WE-CREATED-IN-THE-ABOVE-STEP>” }, “Action”: “sts:AssumeRoleWithWebIdentity” } ] } |
Now, let’s create an EKS managed node group.
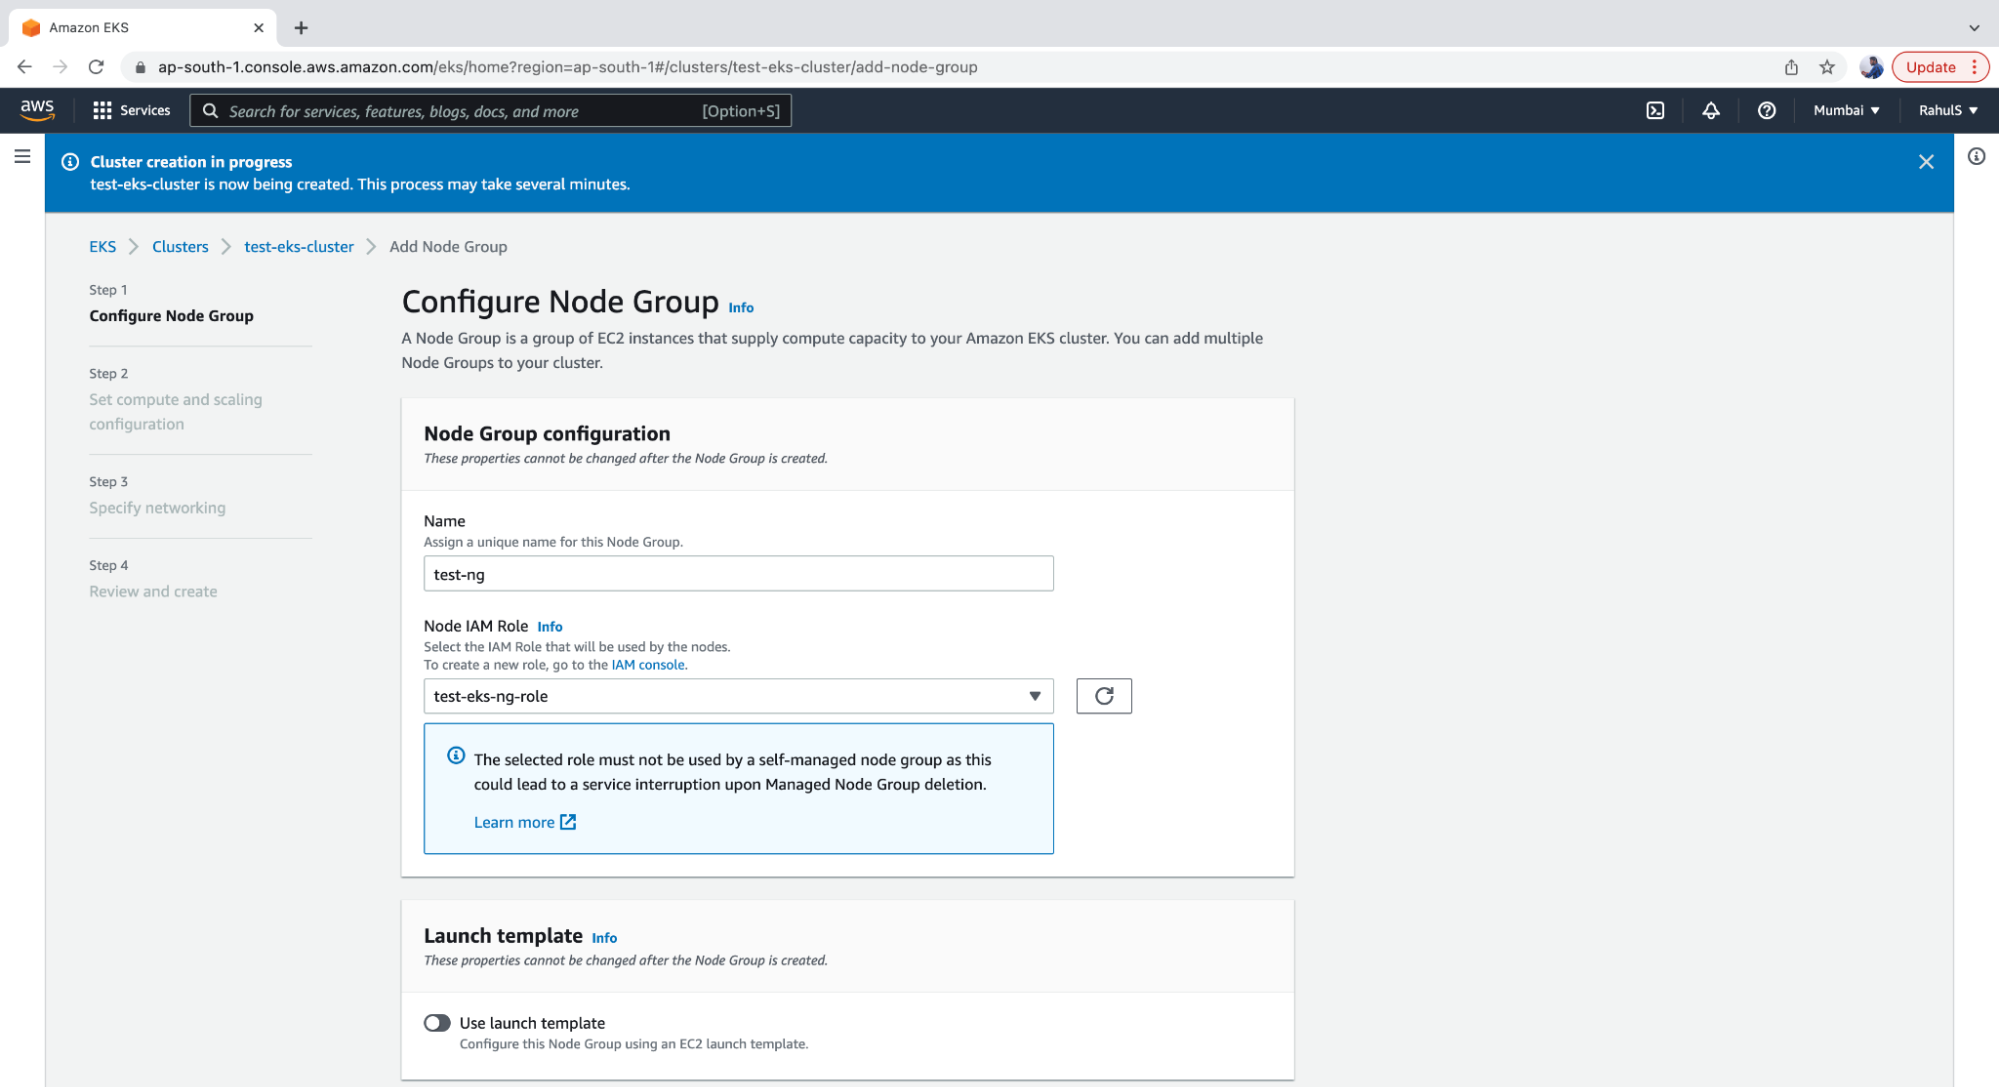
1. First off, go to the EKS control plane that you created, click on the “Computer” tab and then click on the “Add Node Group” button.
2. Next, provide a name for the Node Group and choose an IAM Role with sufficient permissions for the nodes to perform the required operations. For the sake of the demo, you can create a Role with full administrative access.
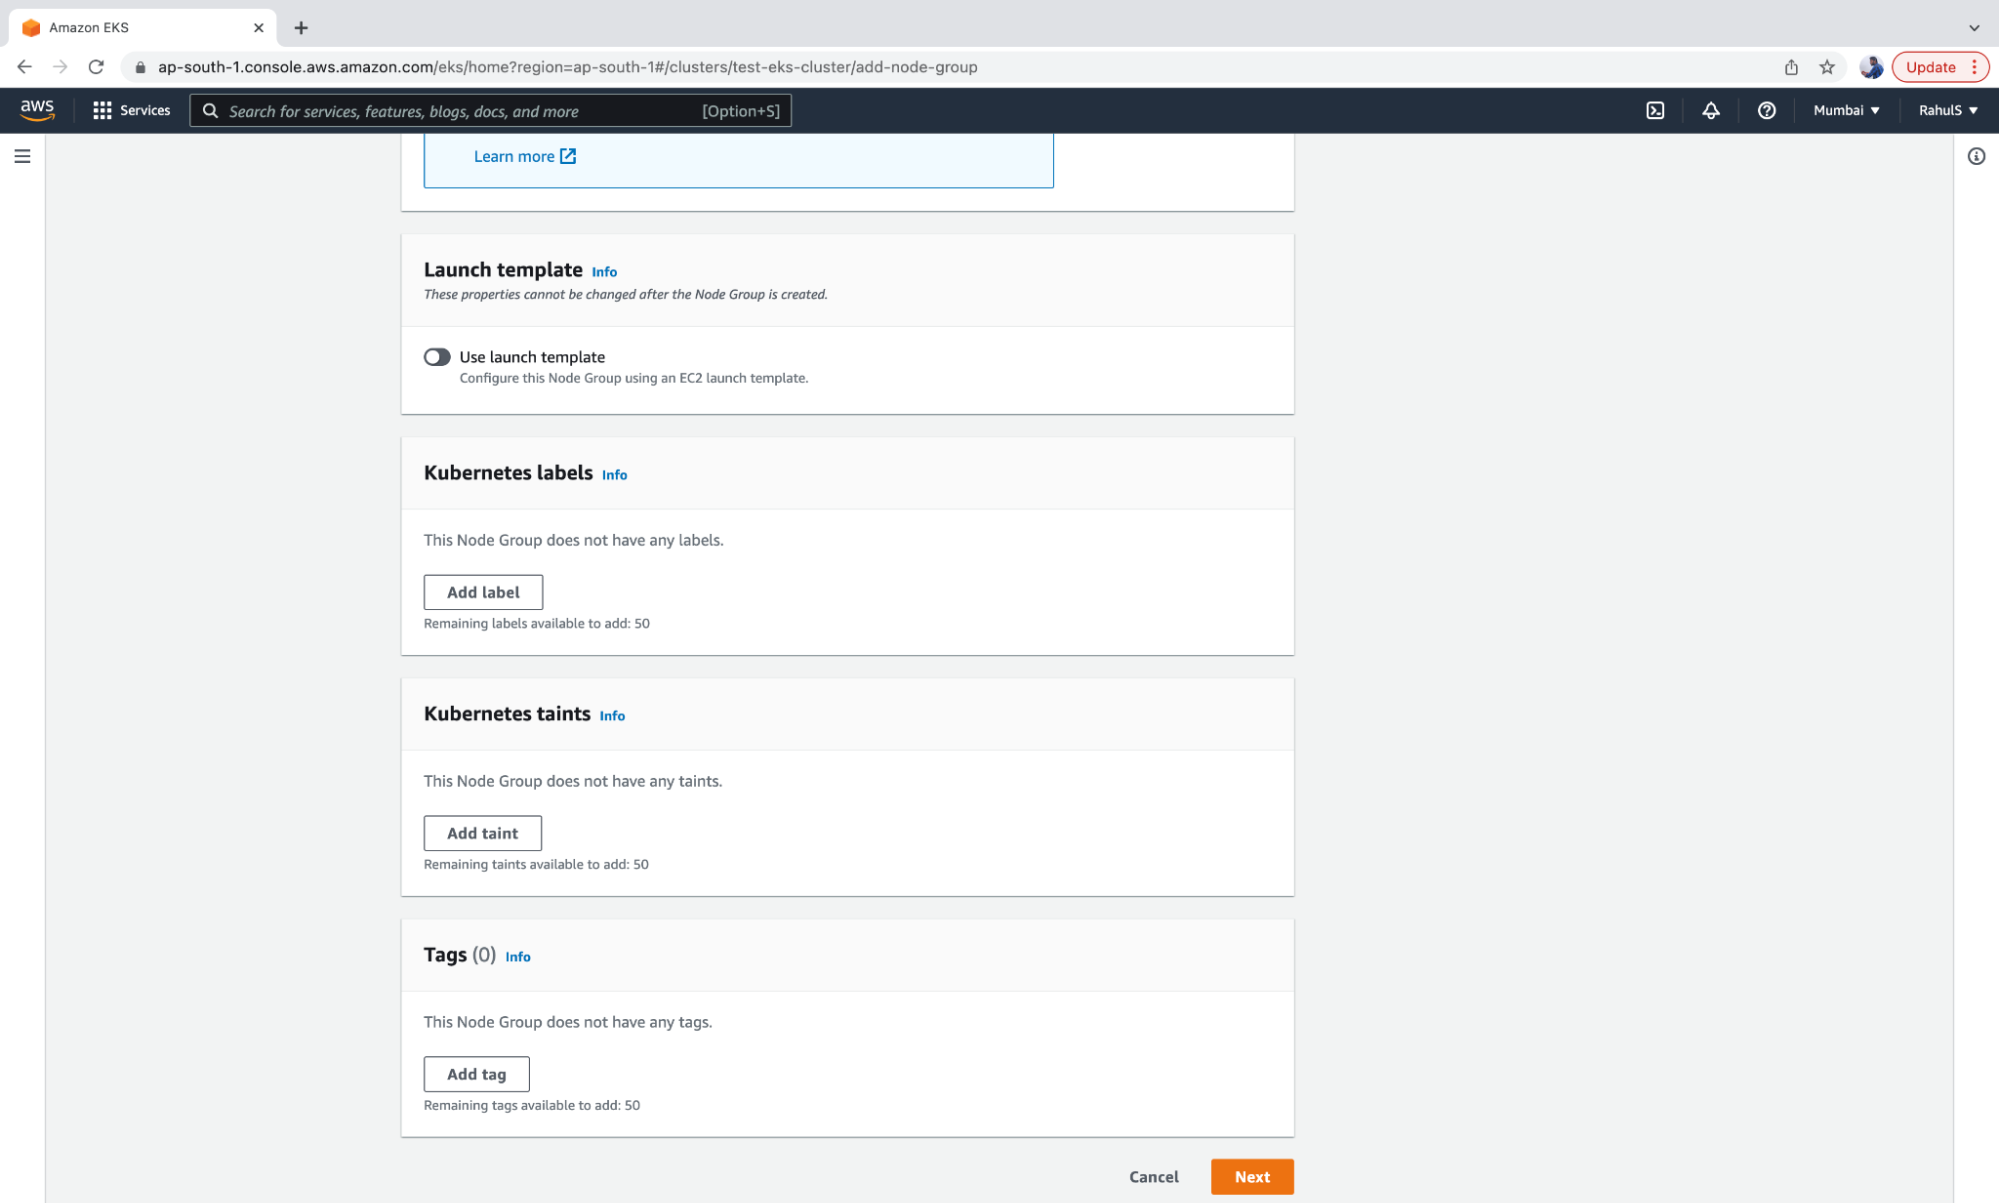
3. The other configurations on this page are optional. Click on the “Next” button to proceed.
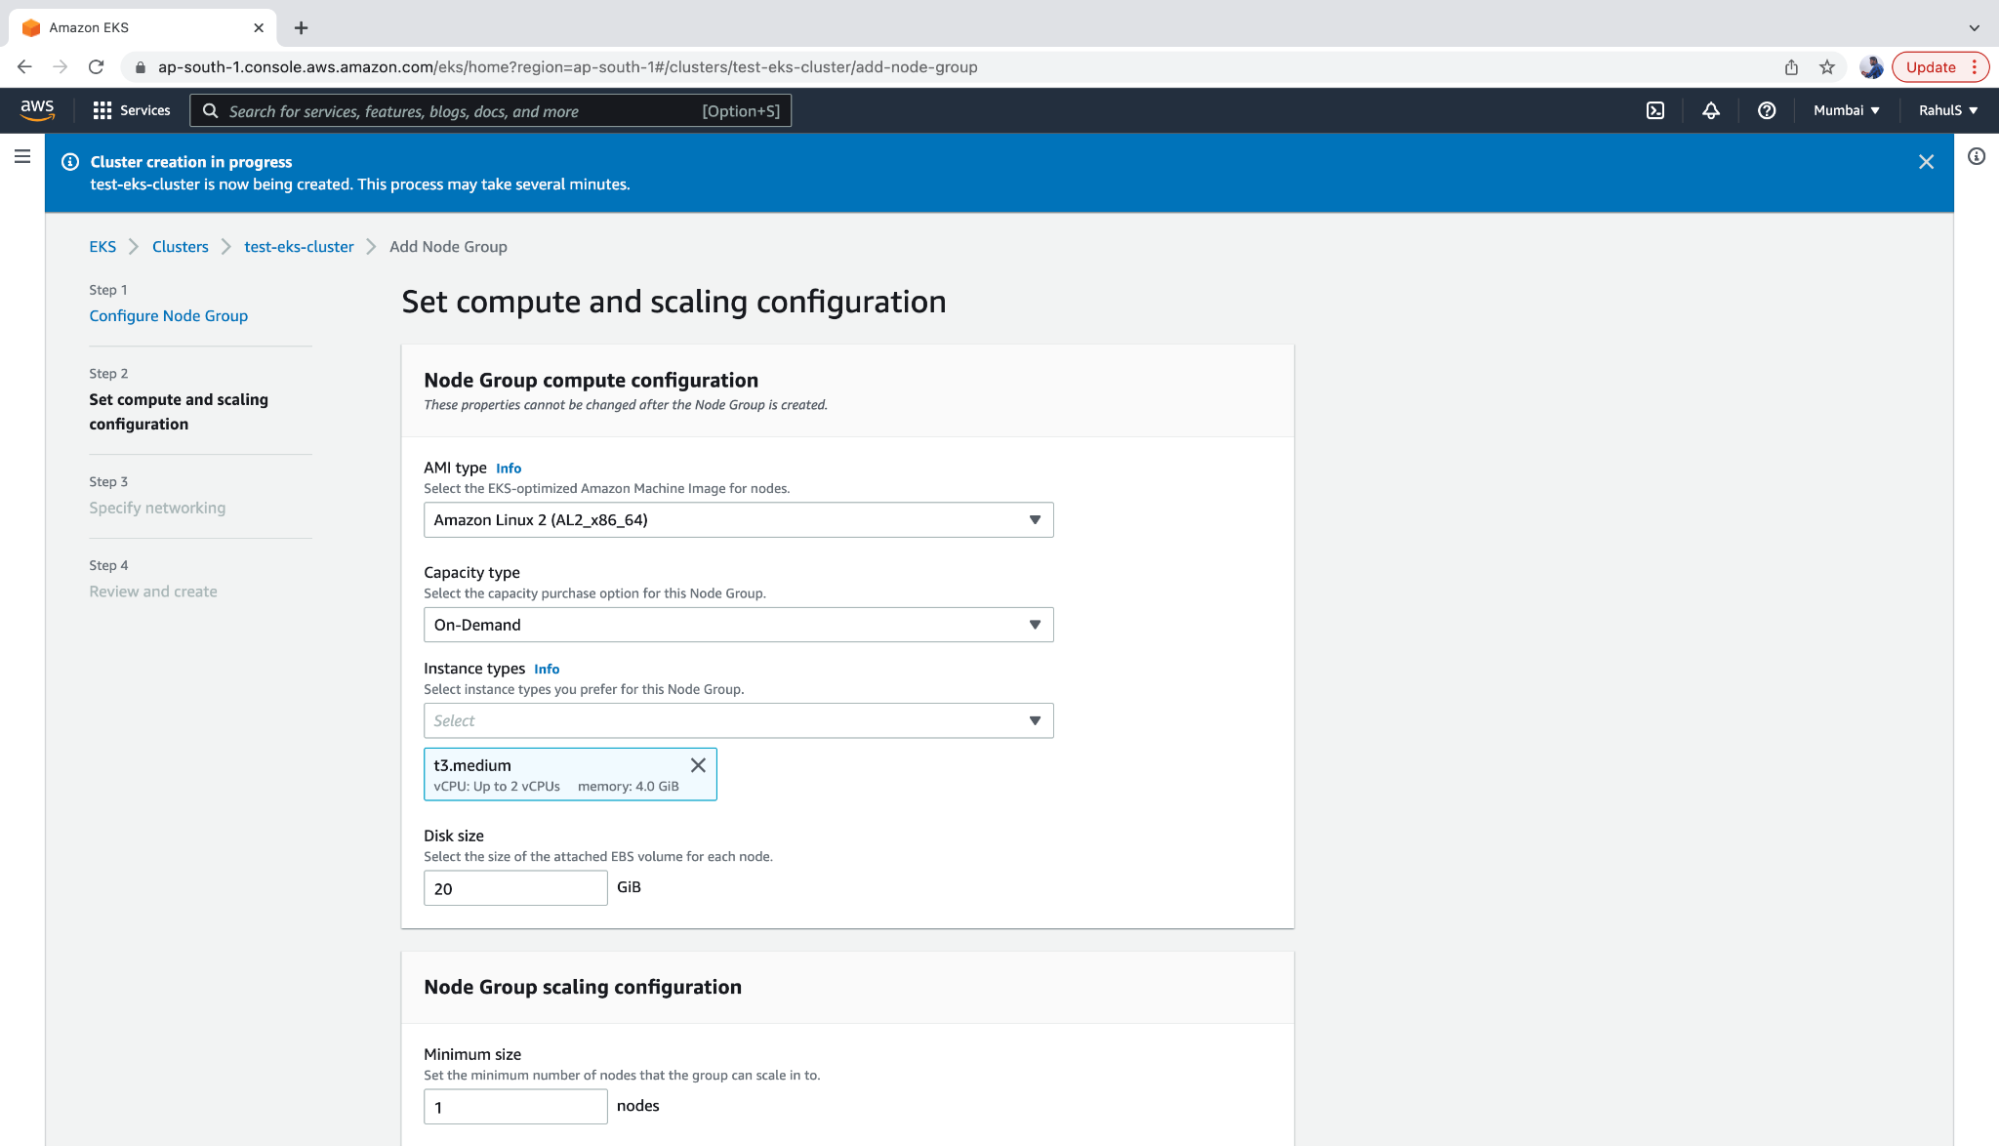
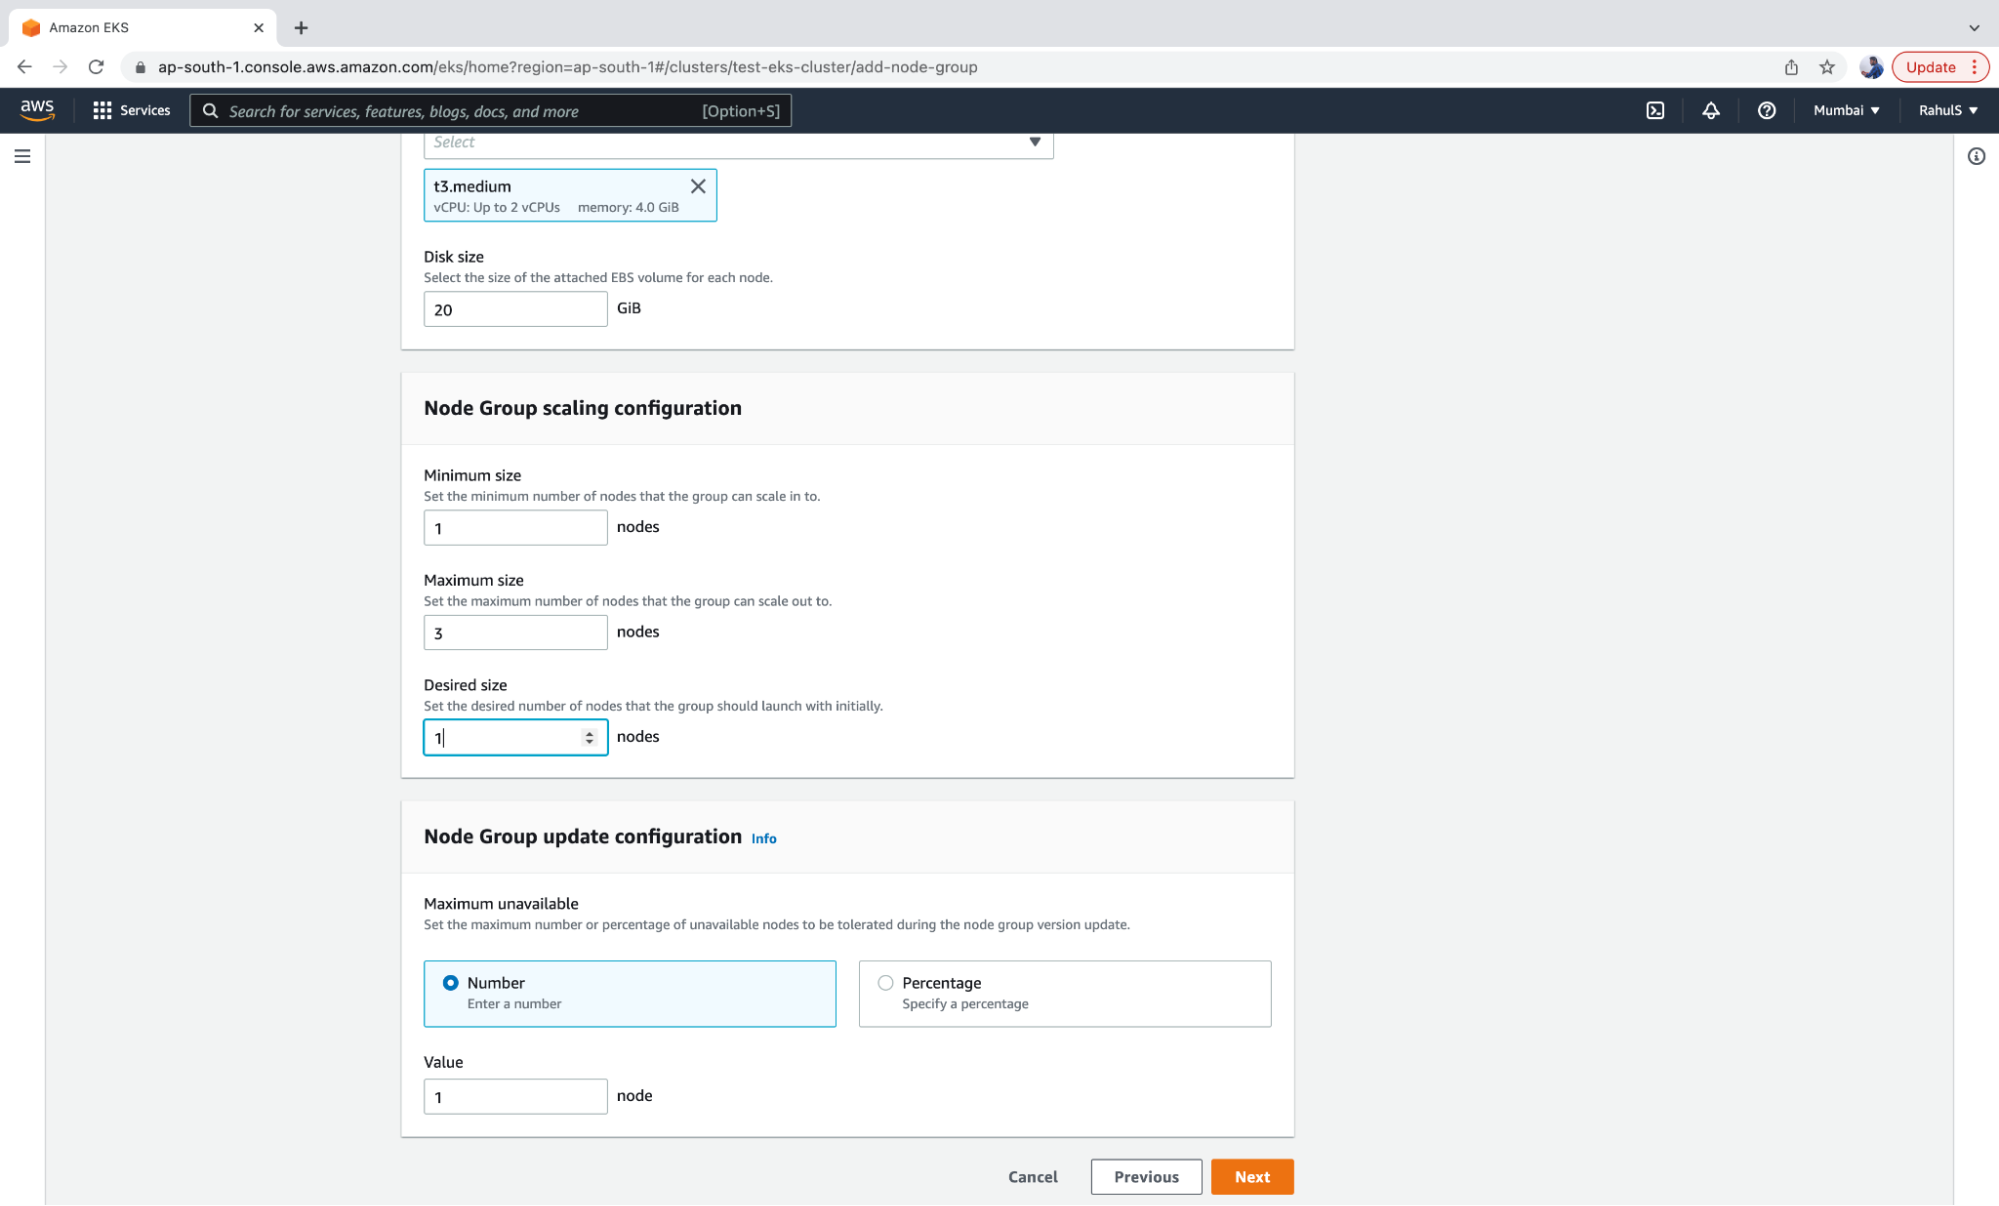
4. Now, choose the AMI, Capacity and Instance settings for the nodes, as well as the disk size, minimum, maximum, and the desired number of Instances in the Node Group.
5. Click on the “Next” button.
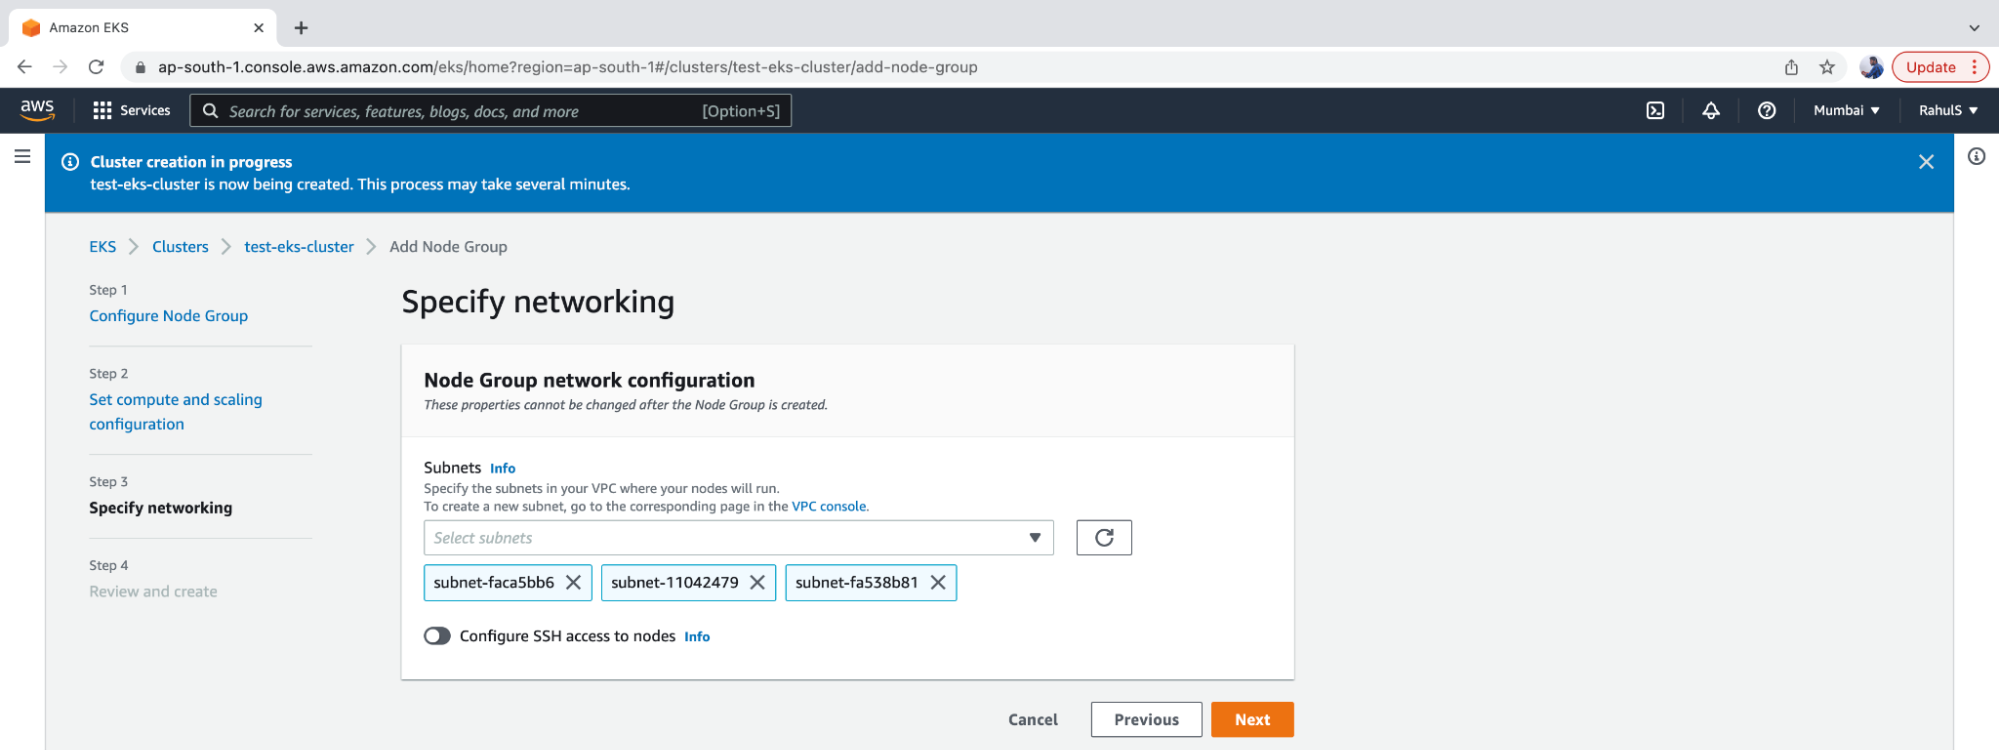
6. Specify the Subnets and click on “Next”.
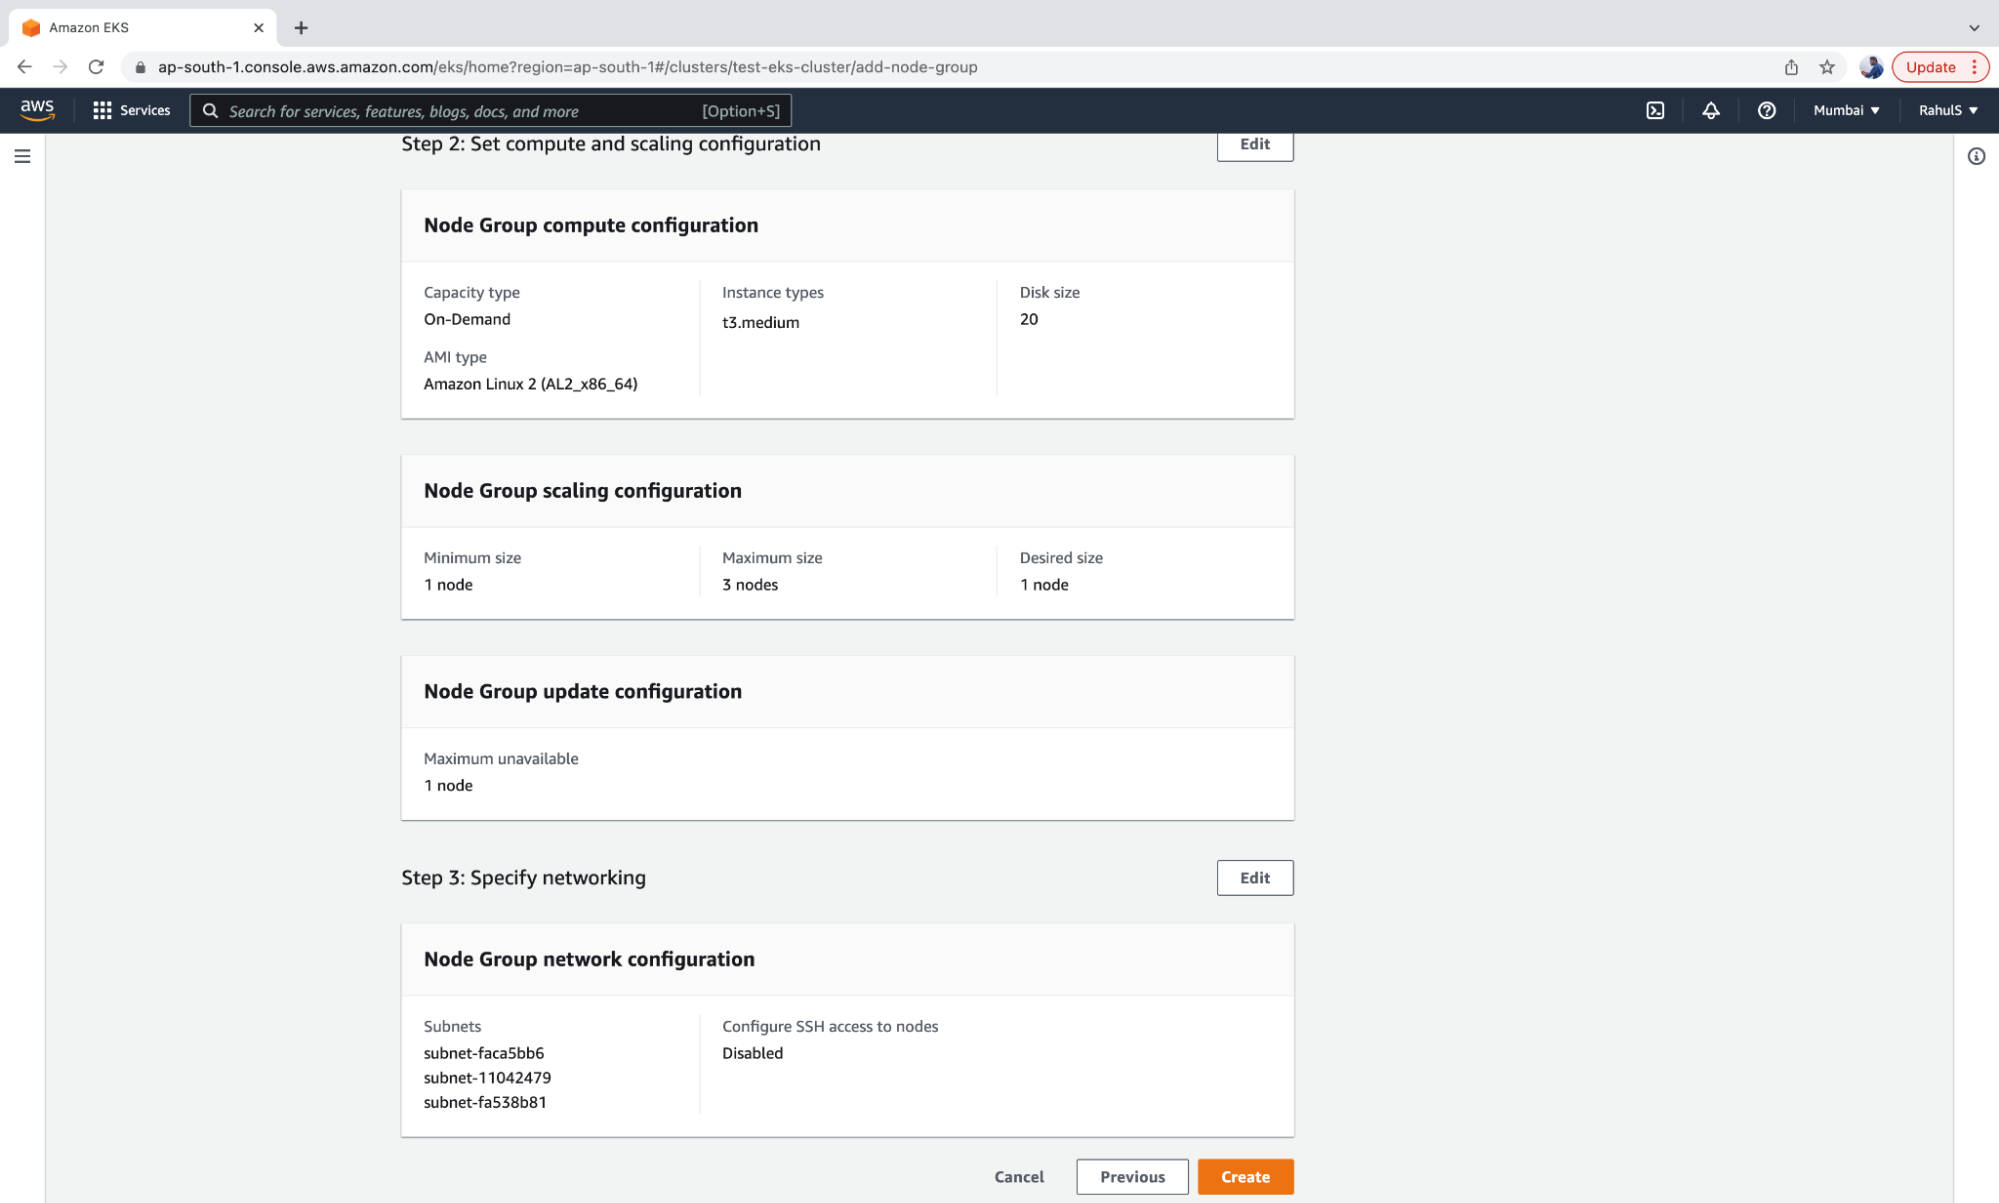
7. Review the configurations and click on “Create.”
8. Once the node is up and running (after 2-3 minutes), you can get the status of the node using kubectl command.
a. kubectl get nodes
9. You can also check the default pods using the following commands:
a. kubectl get pods
b. kubectl get pods -A
At this point, you should have a Kubernetes Cluster with one node. Before you set up Kubernetes Autoscaling, you need to add a Metric Server to the Cluster.
The Kubernetes Metrics Server is a resource consumption data aggregator which isn’t installed by default in Amazon EKS clusters. Other Kubernetes add-ons typically use the Metrics Server.
The Kubernetes Metrics Server collects resource metrics from each worker node’s kubelet and presents them to the Kubernetes API server via the Kubernetes Metrics API.
The Metric Server can be installed using the following command:
1. kubectl apply -f
https://github.com/kubernetes-sigs/metrics-server/releases/latest/download/components.yaml
You are now ready to implement your first Kubernetes Autoscaling mechanism.
| apiVersion: apps/v1 kind: Deployment metadata: name: php-apache-test-hpa spec: selector: matchLabels: run: php-apache-test-hpa replicas: 1 template: metadata: labels: run: php-apache-test-hpa spec: containers: – name: php-apache-test-hpa image: k8s.gcr.io/hpa-example ports: – containerPort: 80 resources: limits: cpu: 200m requests: cpu: 100m — apiVersion: v1 kind: Service metadata: name: php-apache-test-hpa labels: run: php-apache-test-hpa spec: ports: – port: 80 selector: run: php-apache-test-hpa |
2. Execute the following command to create a Deployment and Service:
a. kubectl apply -f test-hpa.yaml
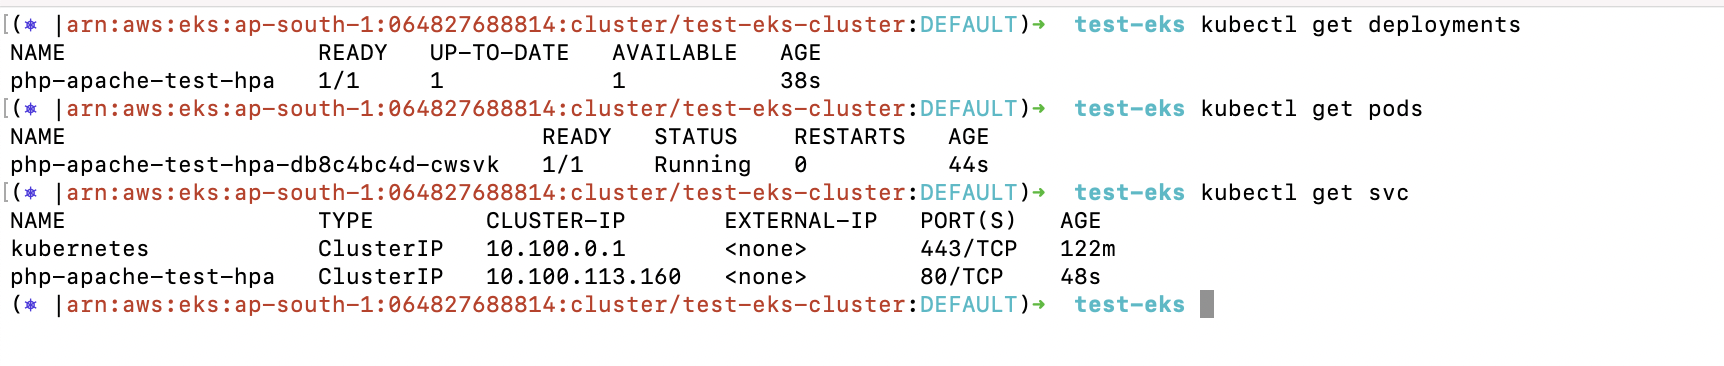
3. Review the Deployment and Service created from the above object file.
a. kubectl get deployments
b. kubectl get pods
c. kubectl get svc
4. Now you can create an HPA that can help with Kubernetes Pod Autoscaling by decreasing or increasing the number of pods based on resource consumption. The following “kubectl autoscale” will create an HPA which increases the number of pods if CPU resource consumption increases by more than 50%.
a. kubectl get hpa
b. kubectl autoscale deployment php-apache-test-hpa –cpu-percent=50 –min=1 –max=10
c. kubectl get hpa
d. kubectl get pods
5. As you can see, Deployment currently has only one replica.
6. Check the current number of pods and create a load generator that will increase the resource consumption of the Deployment by hitting the service, thus helping with the Kubernetes Pod Autoscaling.
a. kubectl get pods
b. kubectl run load-generator –image=busybox –restart=Never — /bin/sh -c “while sleep 0.01; do wget -q -O- http://php-apache-test-hpa; done”
7. If you check the number of pods, you will notice that the pod count has not yet increased.Wait a few seconds for the load generator to start.
a. kubectl get pods
b. kubectl get hpa
c. kubectl get pods
d. kubectl get hpa
8. If you check the pods again, you should notice that the pod count has increased and the Kubernetes Pod Autoscaling has taken place. The HPA works by increasing the number of pods in response to an increase in resource consumption.
a. kubectl get pods
b. kubectl get hpa
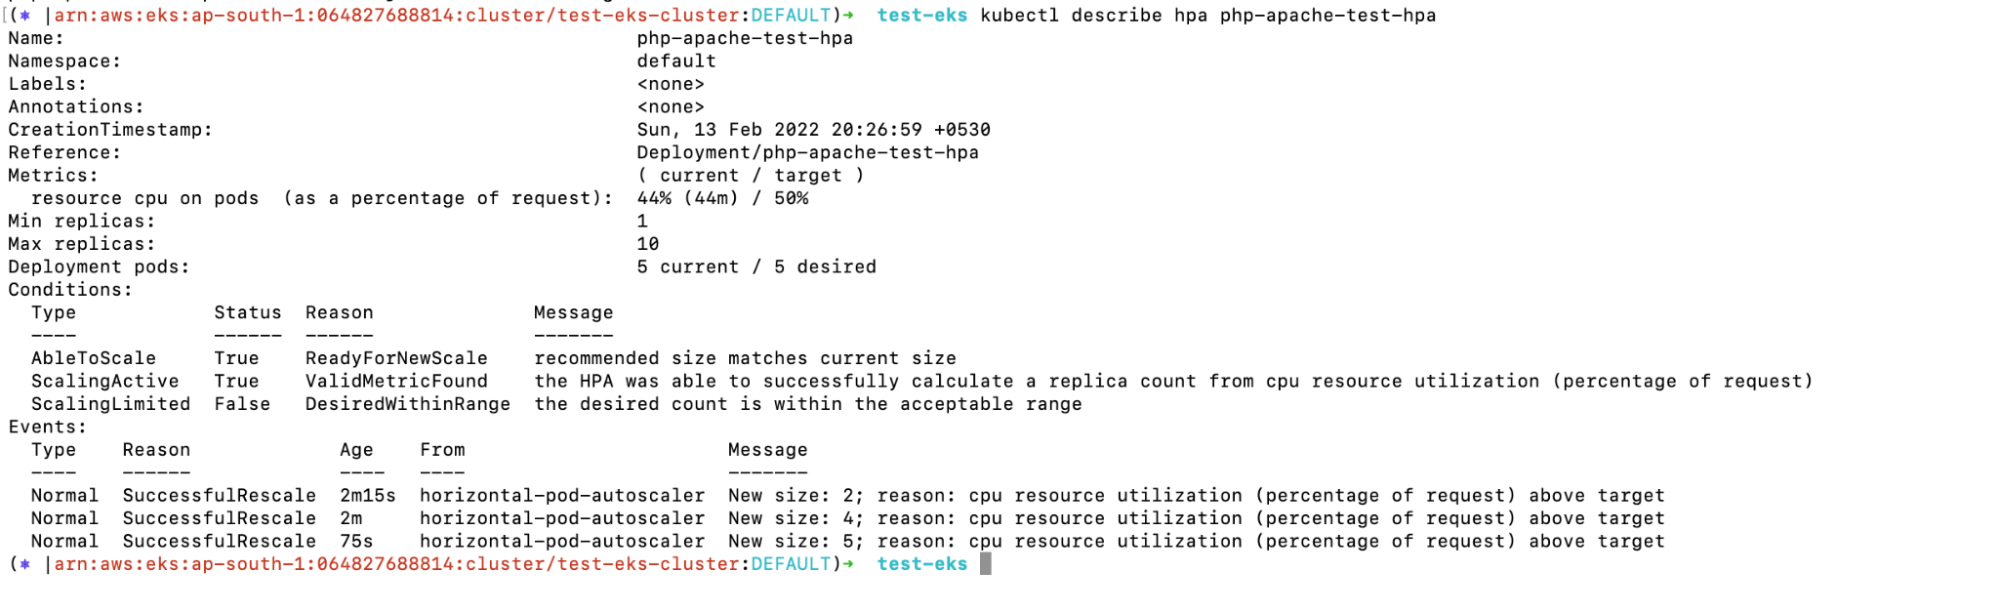
9. You can describe the HPA object in order to verify the scaling details.
a. kubectl describe hpa php-apache-test-hpa
10. You can now delete all of the resources created as part of the Kubernetes HPA.
a. Get the deployment, Service and HPA
i. kubectl get deployment
ii. kubectl get svc
iii. kubectl get hpa
b. Delete the HPA, Service, and Deployment.
i. kubectl delete hpa php-apache-test-hpa
ii. kubectl delete svc php-apache-test-hpa
iii. kubectl delete deployment php-apache-test-hpa
c. Confirm the deletion.
i. kubectl get deployment
ii. kubectl get svc
iii. kubectl get hpa
d. Delete the load generator pod.
i. kubectl delete pod load-generator
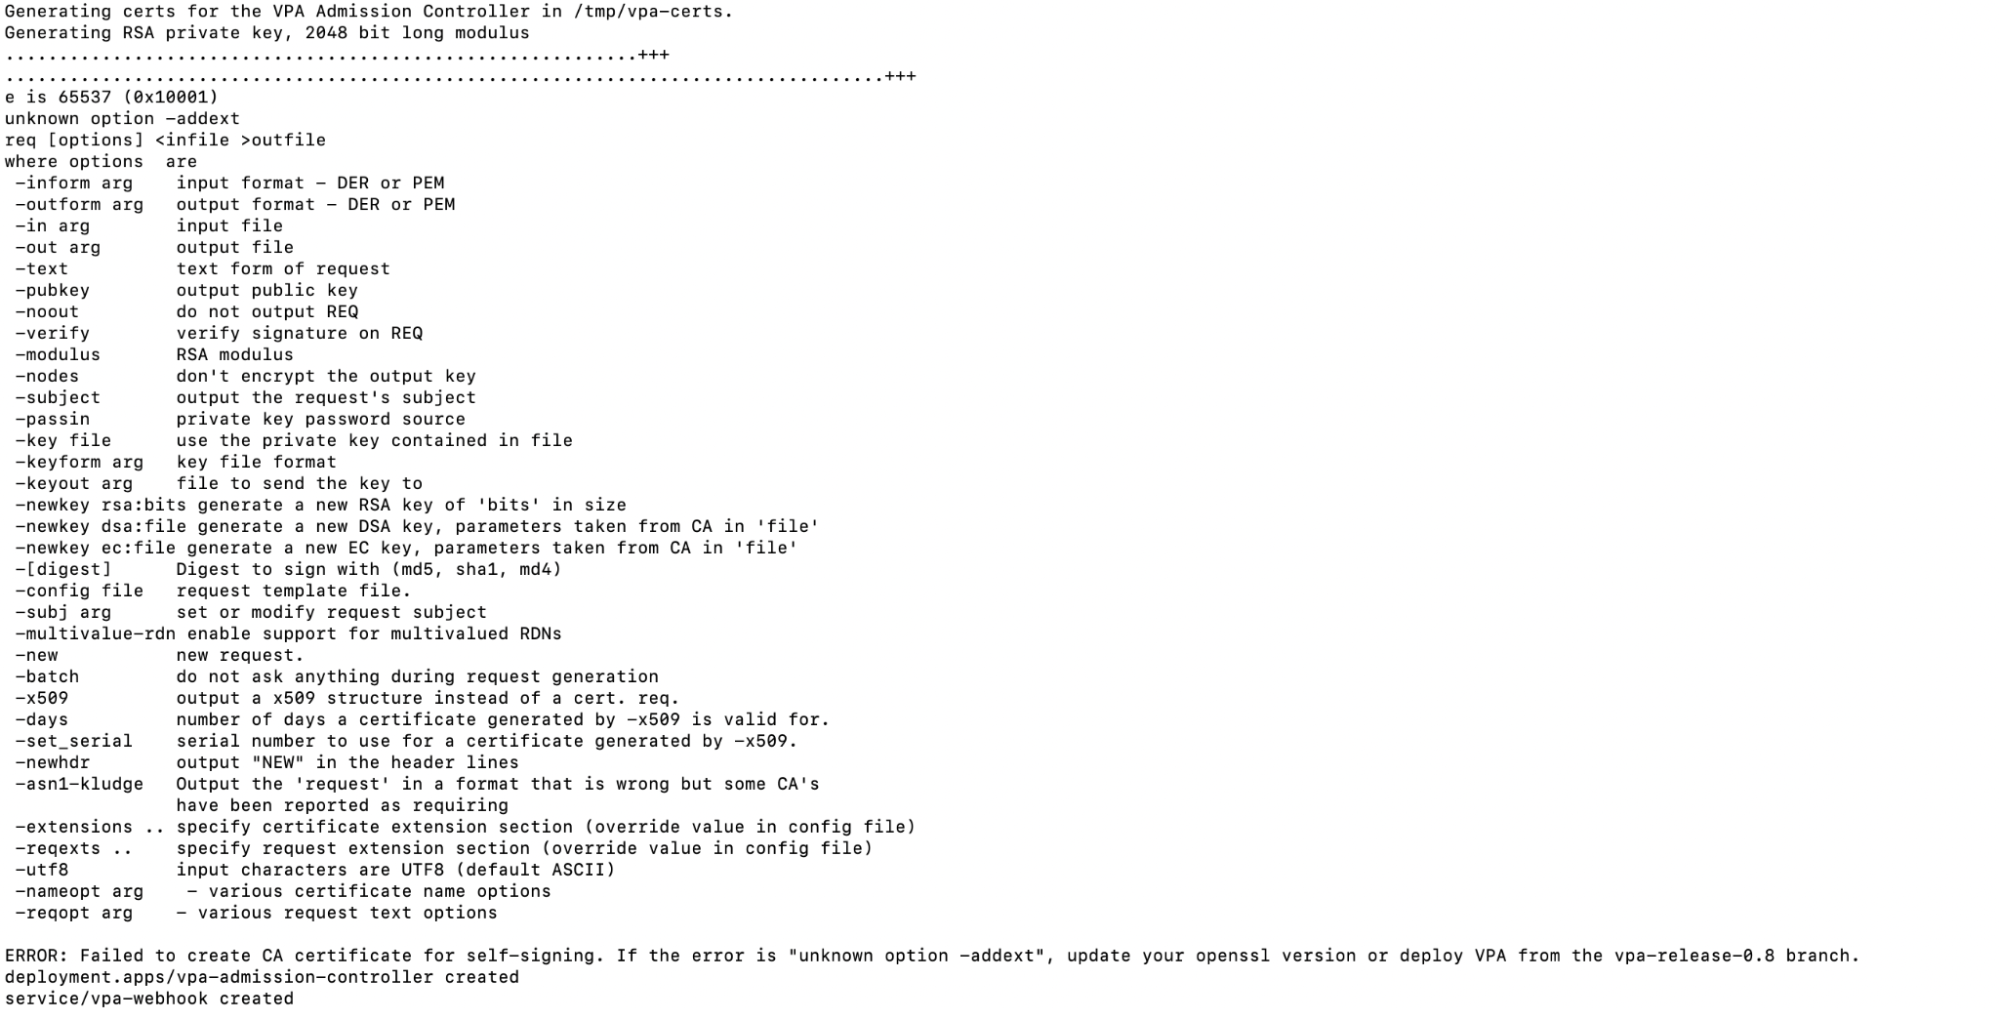
VPA is our second Kubernetes Autoscaling method. Before you can set up a VPA, you need to first need to install VPA in order for the Cluster to be able to recommend and set resource requests for your pods. Multiple Kubectl commands the installation issues to the Kubernetes Cluster, which inserts the configuration and deploys the required pods in the kube-system namespace.
Note: You will get the following error codes if you do not switch to a vpa-release-0.8 branch or if the openssl version is not 1.1.1 or higher and does not support -addext option. For additional details, please refer to the Github repository here.
2. Now, create a test-vpa-deployment.yaml file with the following content. By way of example, we are defining CPU and Memory requests for the pods.
a. vim test-vpa-deployment.yaml
| apiVersion: apps/v1 kind: Deployment metadata: name: test-vpa-deployment labels: app: sample-app spec: replicas: 2 selector: matchLabels: app: sample-app template: metadata: labels: app: sample-app spec: containers: – name: test-vpa-container image: k8s.gcr.io/ubuntu-slim:0.1 resources: requests: cpu: 100m memory: 50Mi command: [“/bin/sh”] args: – “-c” – “while true; do timeout 0.5s yes >/dev/null; sleep 0.5s; done” |
3. You now need a Vertical Pod Autoscaler resource for the Deployment to automatically compute resource requirements. Let’s create test-vpa-object.yaml with the following content.
a. vim test-vpa-object.yaml
| apiVersion: autoscaling.k8s.io/v1beta2 kind: VerticalPodAutoscaler metadata: name: test-vpa spec: targetRef: apiVersion: “apps/v1” kind: Deployment name: test-vpa-deployment updatePolicy: updateMode: “Auto” |
4. Check the existing pods and create a Deployment using the following commands.
a. kubectl get pods
b. kubectl apply -f test-vpa-deployment.yaml
5. Check the existing pods and create a VPA resource using the following commands.
a. kubectl get pods
b. kubectl apply -f test-vpa-object.yaml
c. kubectl get vpa
6. Once the VPA resource is created, it can set the requests automatically based on usage for each pod.
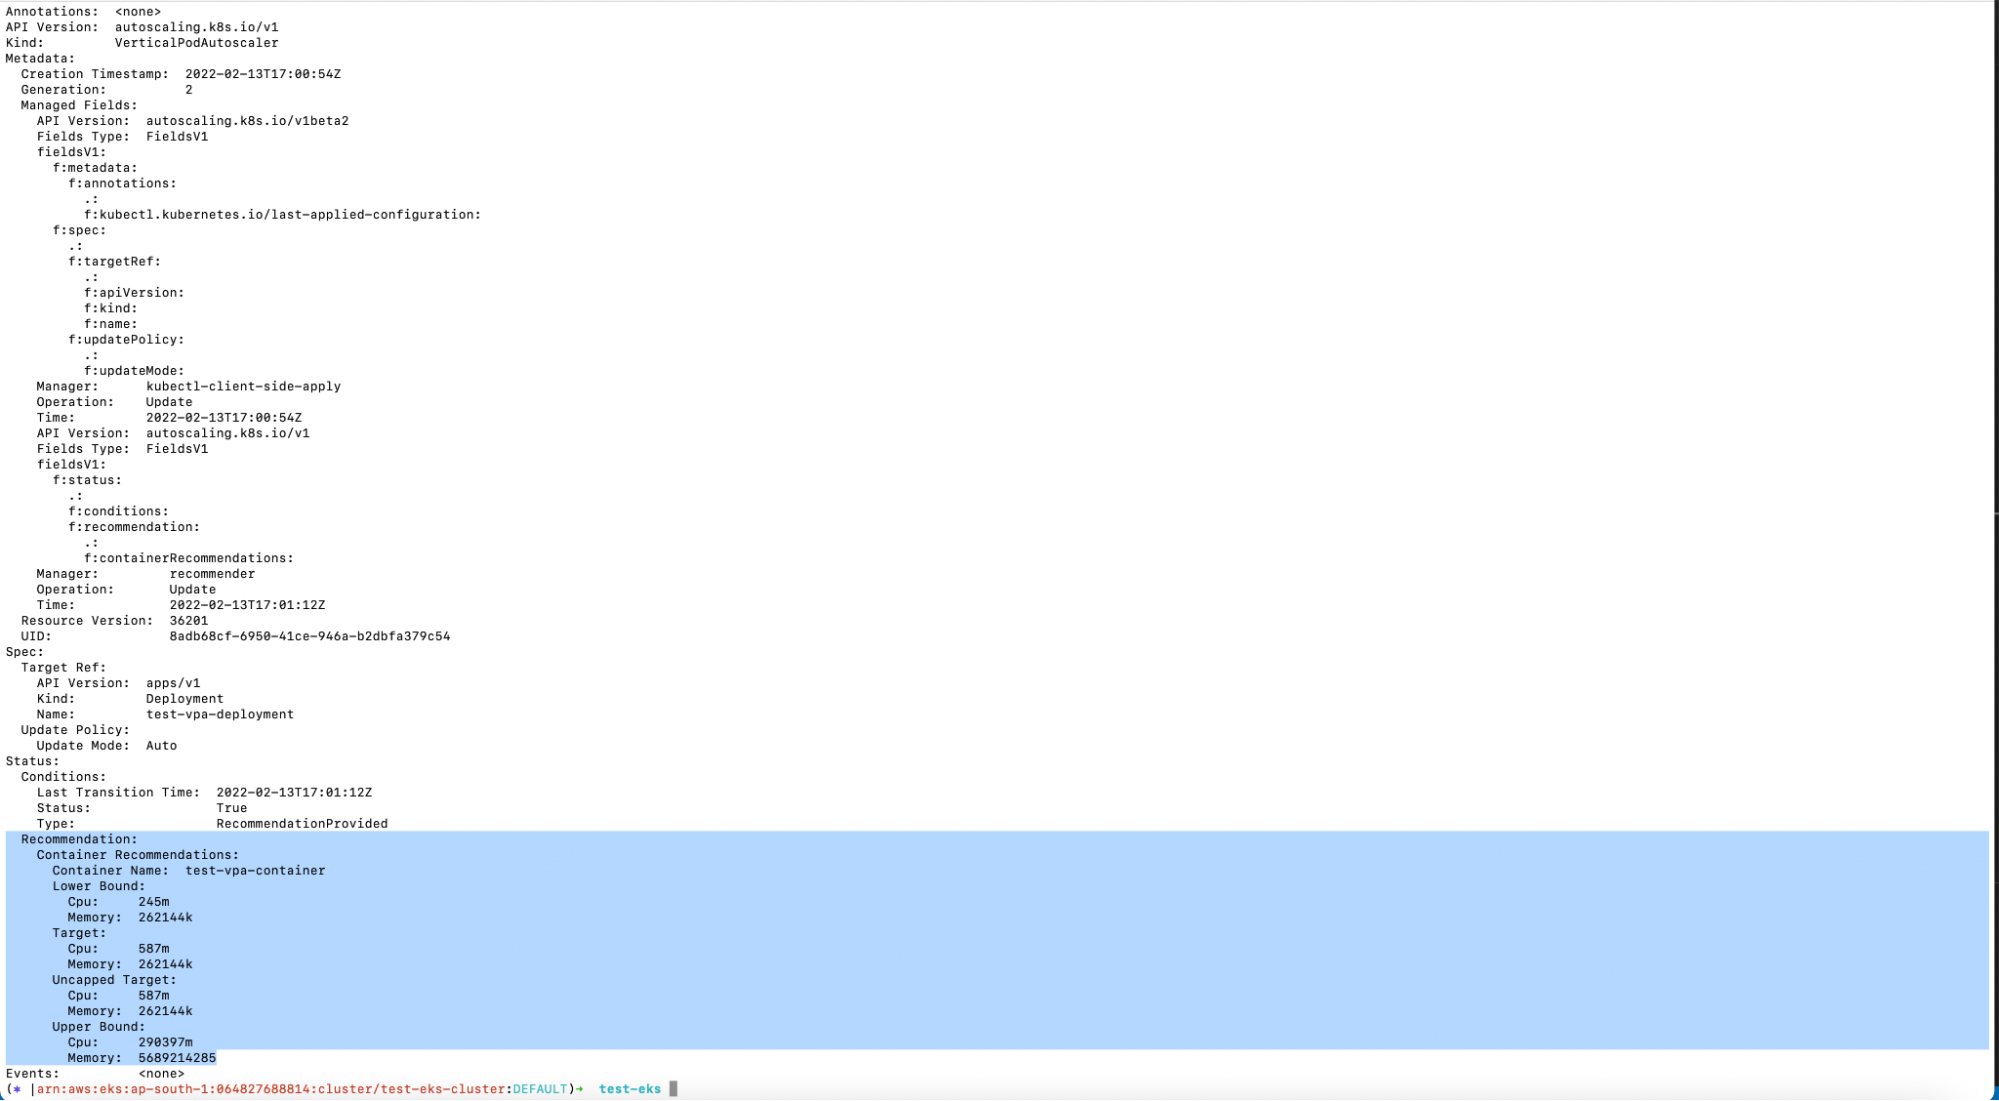
7. Describe the VPA resource using the following command to see recommendations.
a. kubectl describe vpa nginx-deployment-vpa
The screenshot above shows the recommendations given by the VPA object.
8. You can also check the Kubernetes Events w.r.t. the VPA.
a. kubectl get events | grep VPA
b. kubectl get pods
9. You can now delete all of the resources created as part of the VPA.
a. kubectl delete -f test-vpa-object.yaml
b. ubectl delete -f test-vpa-deployment.yaml
1. The first step to setting up the Kubernetes Autoscaler is to download the Cluster Autoscaler YAML file.
a. curl -o cluster-autoscaler-autodiscover.yaml https://raw.githubusercontent.com/kubernetes/autoscaler/master/cluster-autoscaler/cloudprovider/aws/examples/cluster-autoscaler-autodiscover.yaml
2. Once the file is downloaded, modify it and replace <YOUR CLUSTER NAME> with the cluster name in the file.
a. vim cluster-autoscaler-autodiscover.yaml
3. You can now apply the YAML file to set up the Kubernetes Autoscaler.
a. kubectl apply -f cluster-autoscaler-autodiscover.yaml
3. You can now apply the YAML file to set up the Kubernetes Autoscaler.
a. kubectl apply -f cluster-autoscaler-autodiscover.yaml
4. When performing the step above,a Service Account will be created. You must annotate this cluster-autoscaler Service Account with the ARN from the IAM Role “test-eks-ng-role” that was previously created. Replace the <example values> with your own values.
a. kubectl annotate serviceaccount cluster-autoscaler -n kube-system eks.amazonaws.com/role-arn=<ARN-OF-test-eks-ng-role-Role>
5. The next step is to patch the Deployment in order to add the cluster-autoscaler.kubernetes.io/safe-to-evict annotation to the Cluster Autoscaler pods with the following command. This Deployment was created when you deployed the autoscaler.
a. kubectl patch deployment cluster-autoscaler -n kube-system -p ‘{“spec”:{“template”:{“metadata”:{“annotations”:{“cluster-autoscaler.kubernetes.io/safe-to-evict”: “false”}}}}}’
a. kubectl -n kube-system edit deployment.apps/cluster-autoscaler
7. In a web browser, go to the Kubernetes Autoscaler releases page on GitHub and look for the newest Kubernetes Autoscaler version that matches your cluster’s Kubernetes major and minor versions. For example, if your cluster’s Kubernetes version is 1.21, find the newest Kubernetes Autoscaler release starting with 1.21. write down the semantic version number (1.21.n) for the release, which will be required for the next step.
8. With the following command, set the Kubernetes Autoscaler image tag to the version you selected in the previous step. In this case, it’s v1.21.2. It will be different for you if your control plane has a different version.
a. kubectl set image deployment cluster-autoscaler -n kube-system cluster-autoscaler=k8s.gcr.io/autoscaling/cluster-autoscaler:v1.21.2
9. Check the logs of the Kubernetes Cluster Autoscaler.
a. kubectl -n kube-system logs -f deployment.apps/cluster-autoscaler
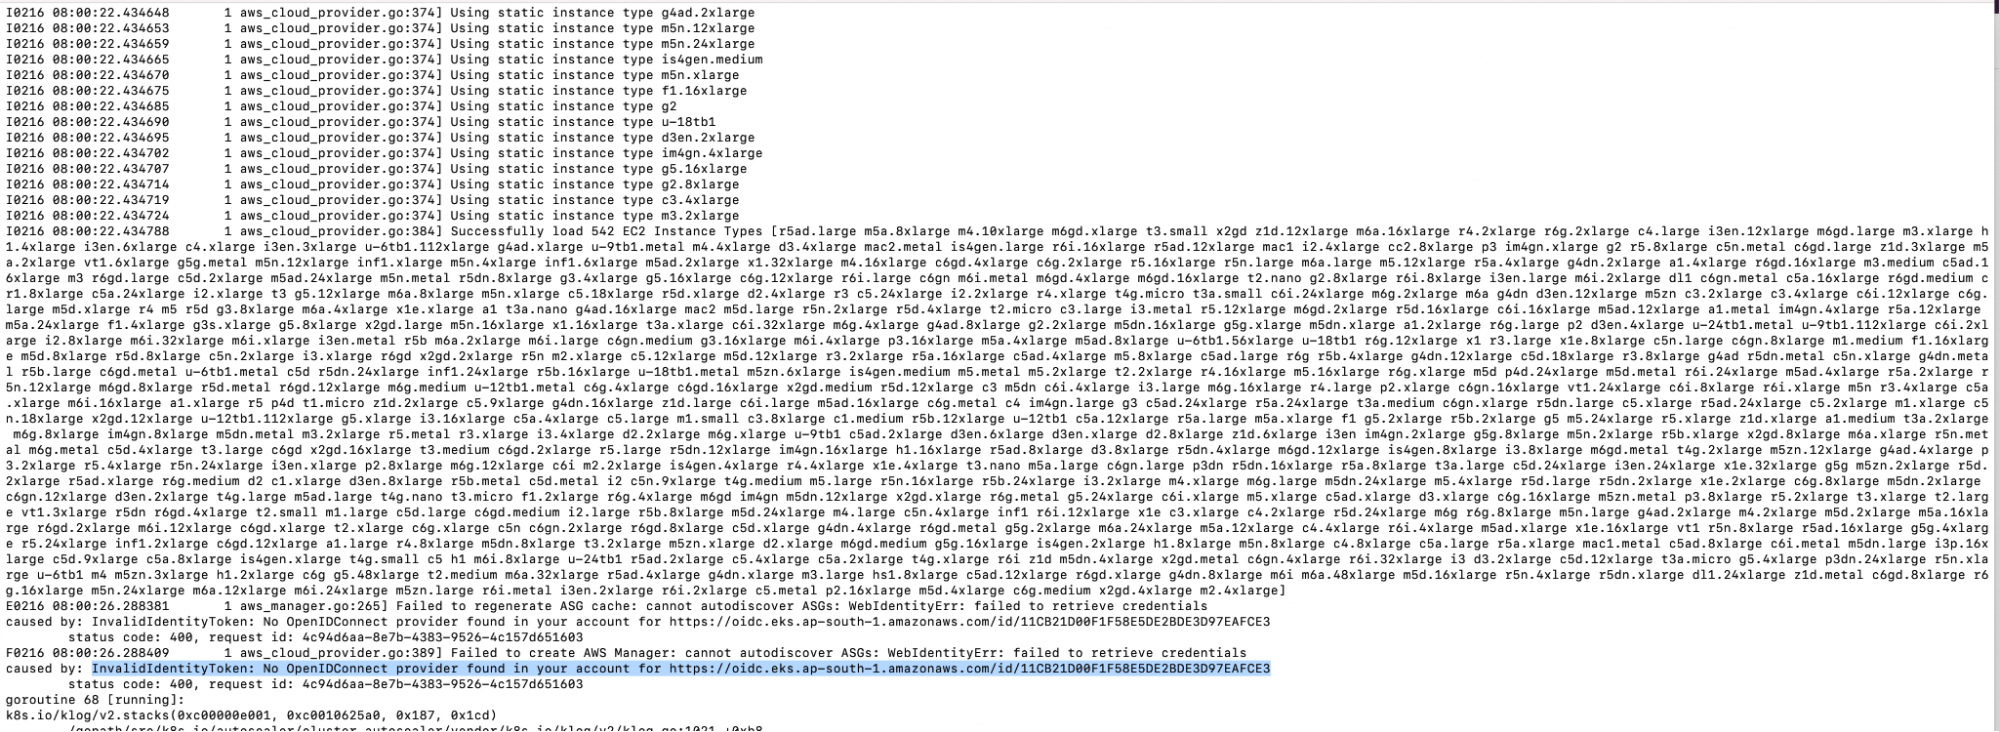
You will notice the error in the screenshot above if you haven’t set up the Identity Provider, as shown in the “Create an Identity Provider” step.
10. In this case, you can delete the Kubernetes Cluster Autoscaler pod once you have added the Identity Provider.
a. kubectl get pods -n kube-system | grep auto
b. kubectl delete pod cluster-autoscaler-866c8566d7-x9b6k -n kube-system
c. ubectl get pods -n kube-system | grep auto
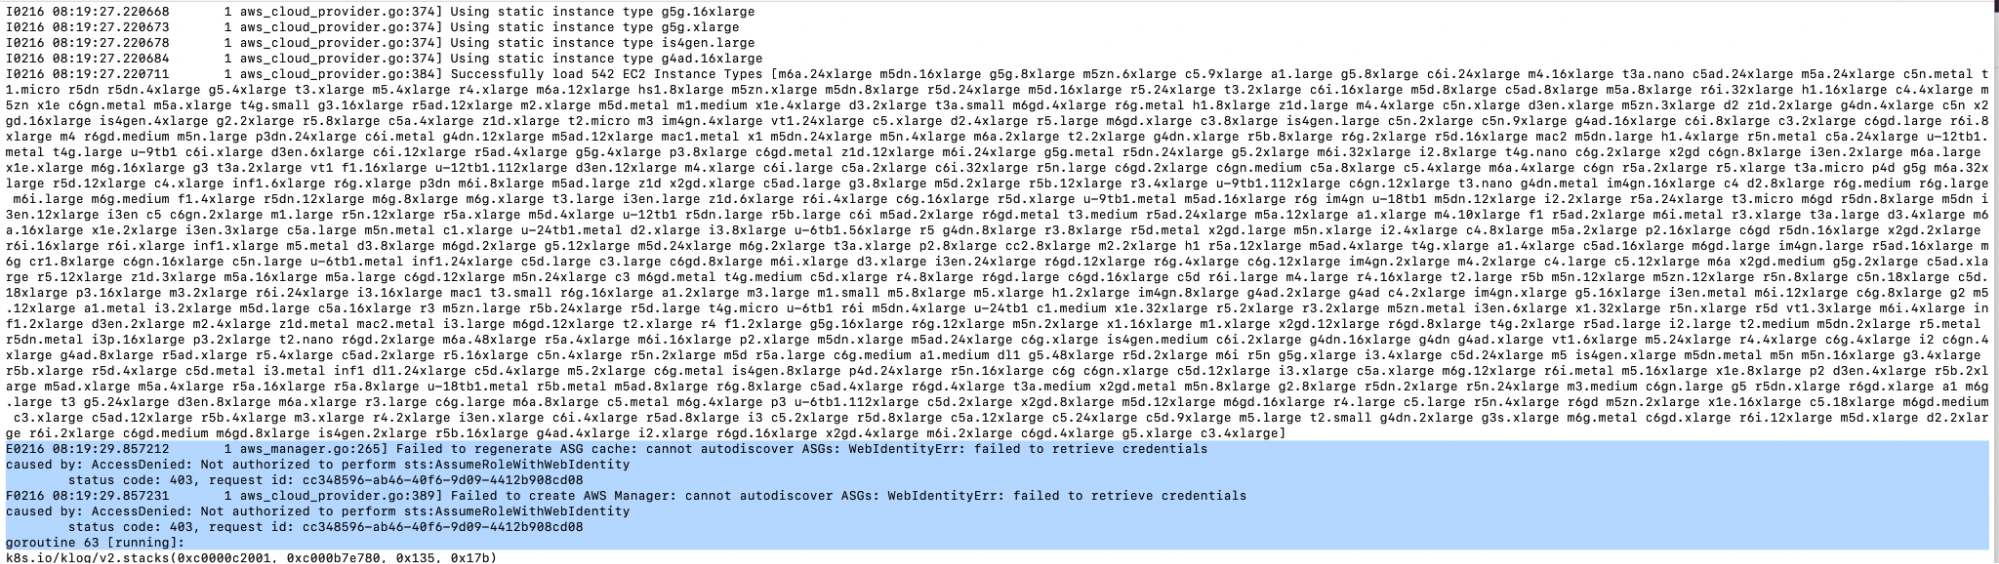
11. Again, you will see the error code in the following screenshot if you haven’t set up the Trust Relationships in the IAM Role as shown in the “Create an IAM Role” step.
12. In this case, you can delete the Kubernetes Autoscaler pod once the Trust Relationships have been added to the IAM Role.
a. ubectl -n kube-system logs -f deployment.apps/cluster-autoscaler
b. kubectl get pods -n kube-system | grep auto
c. kubectl delete pod cluster-autoscaler-866c8566d7-4q97h -n kube-system
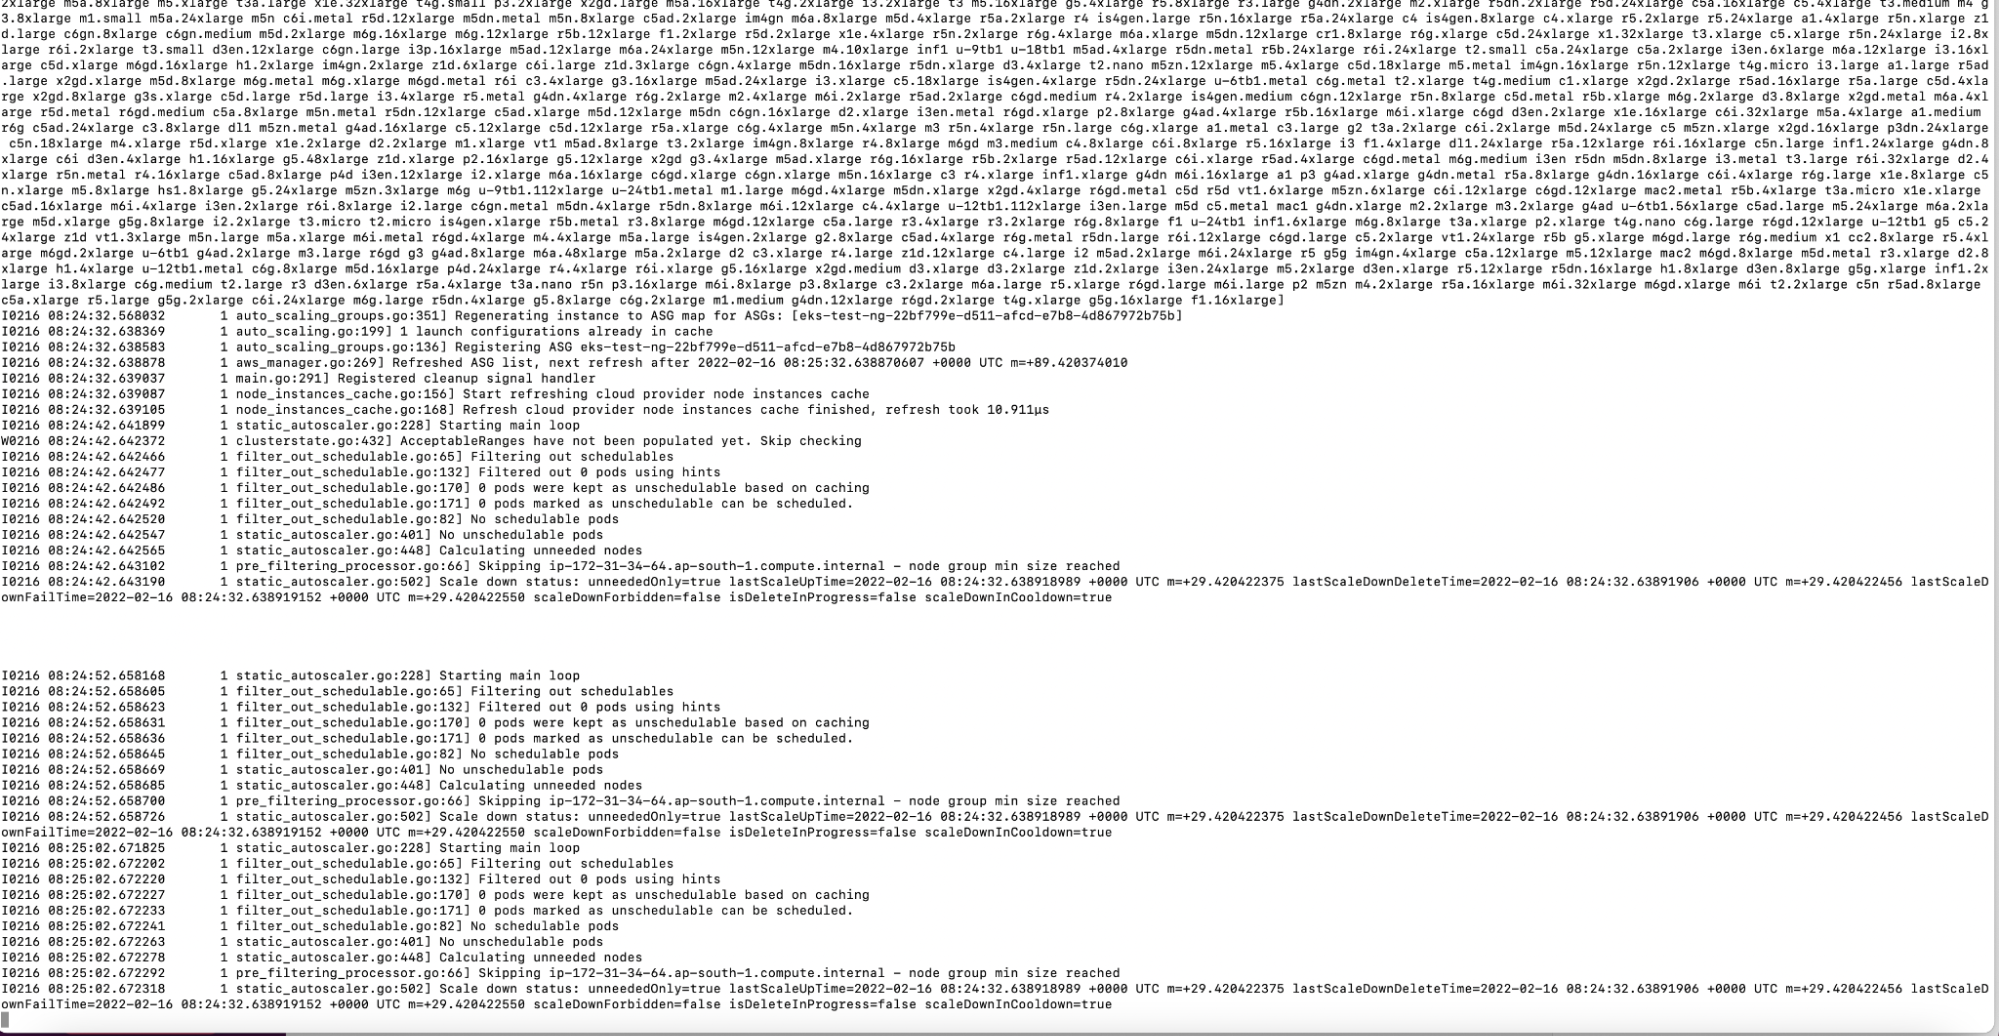
13. Once you have configured the Identity Provider and Trust Relationships correctly, you shouldn’t see any errors in the Kubernetes Autoscaler logs. The logs should be as follows:
a. kubectl -n kube-system logs -f deployment.apps/cluster-autoscaler
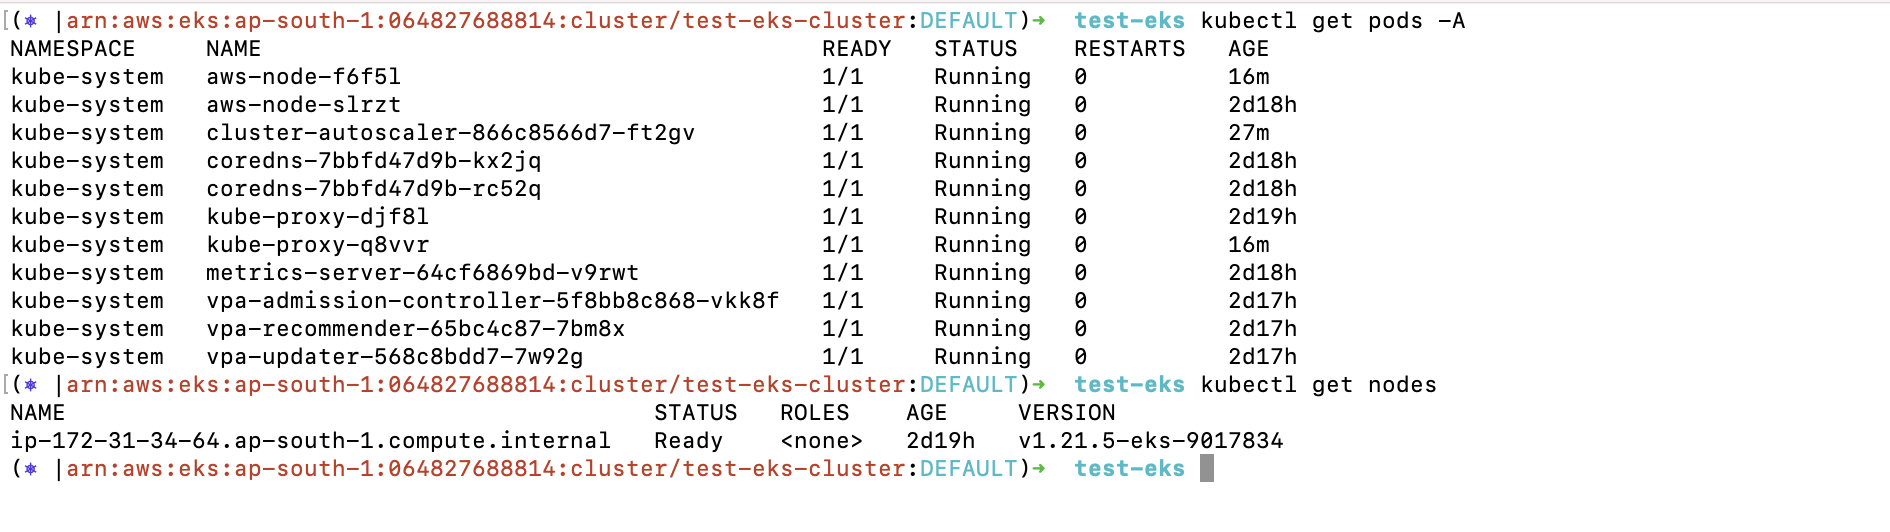
14. Before testing the Kubernetes Cluster Autoscaling to scale the nodes as required, check the current pods and nodes for any issues.
a. kubectl get pods -A
b. kubectl get nodes
You can now test the Cluster Autoscaling.
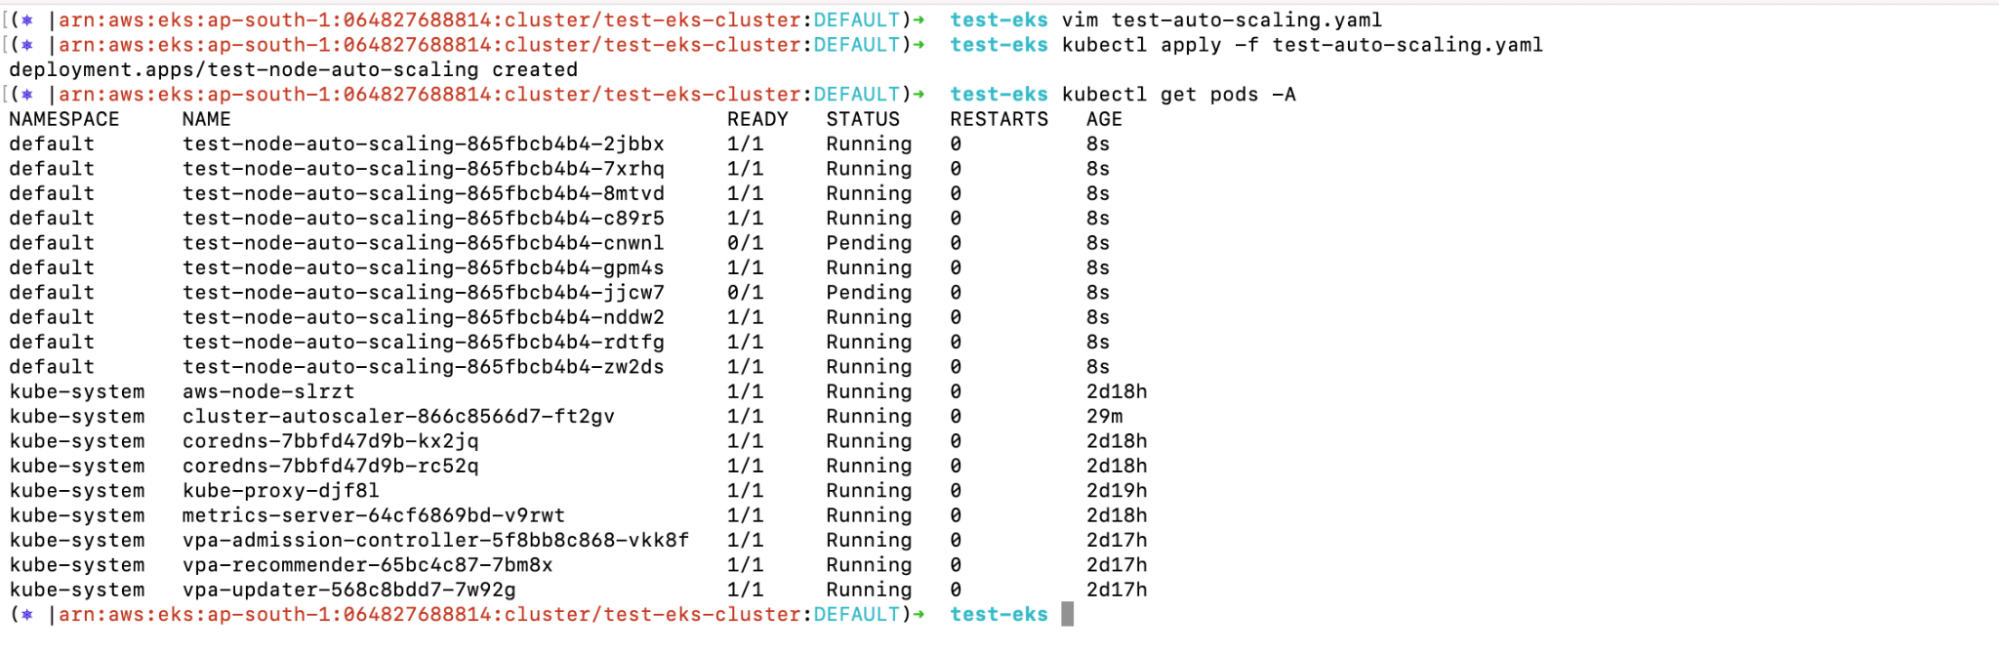
1. Create a test-auto-scaling.yaml file with the following content:
a. vim test-auto-scaling.yaml
| apiVersion: apps/v1 kind: Deployment metadata: name: test-node-auto-scaling spec: selector: matchLabels: run: test-node-auto-scaling replicas: 10 template: metadata: labels: run: test-node-auto-scaling spec: containers: – name: test-node-auto-scaling image: k8s.gcr.io/hpa-example ports: – containerPort: 80 resources: limits: cpu: 200m requests: cpu: 100m |
2. Next, create the Deployment and check the pods created as part of the Deployment.
a. kubectl apply -f test-auto-scaling.yaml
b. kubectl get pods -A
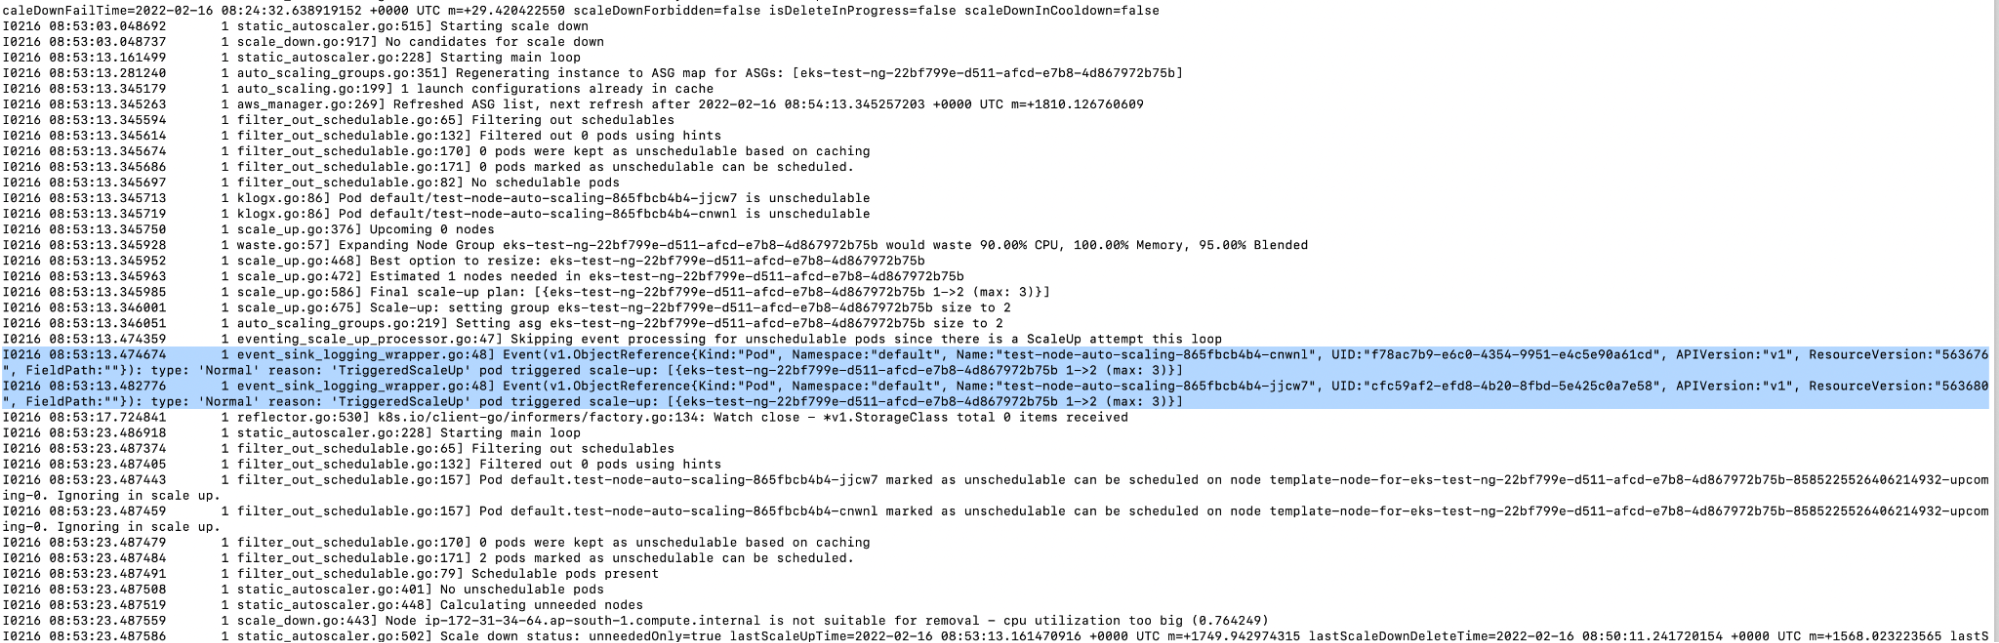
3. When you check the logs of the Kubernetes Autoscaler, you will notice that the autoscaler has detected that it is necessary to scale the nodes seeing as not all the pods fit in the current nodes.
a. kubectl -n kube-system logs -f deployment.apps/cluster-autoscaler
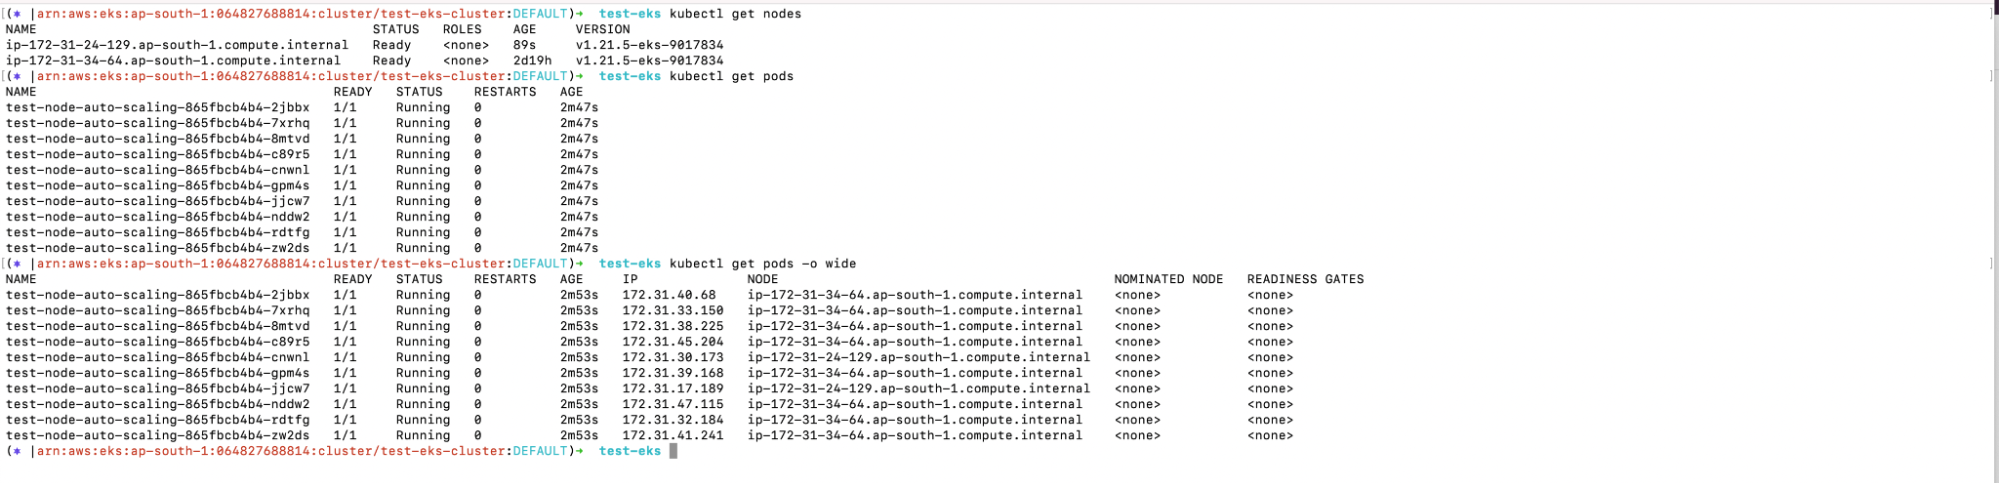
4. Upon checking the number of nodes using the kubectl command, you will notice some newly added nodes, as required. In this case, 1 new node has been added. The same can be seen in the AWS EC2 Console
a. kubectl get nodes
b. kubectl get pods
c. kubectl get pods -o wide
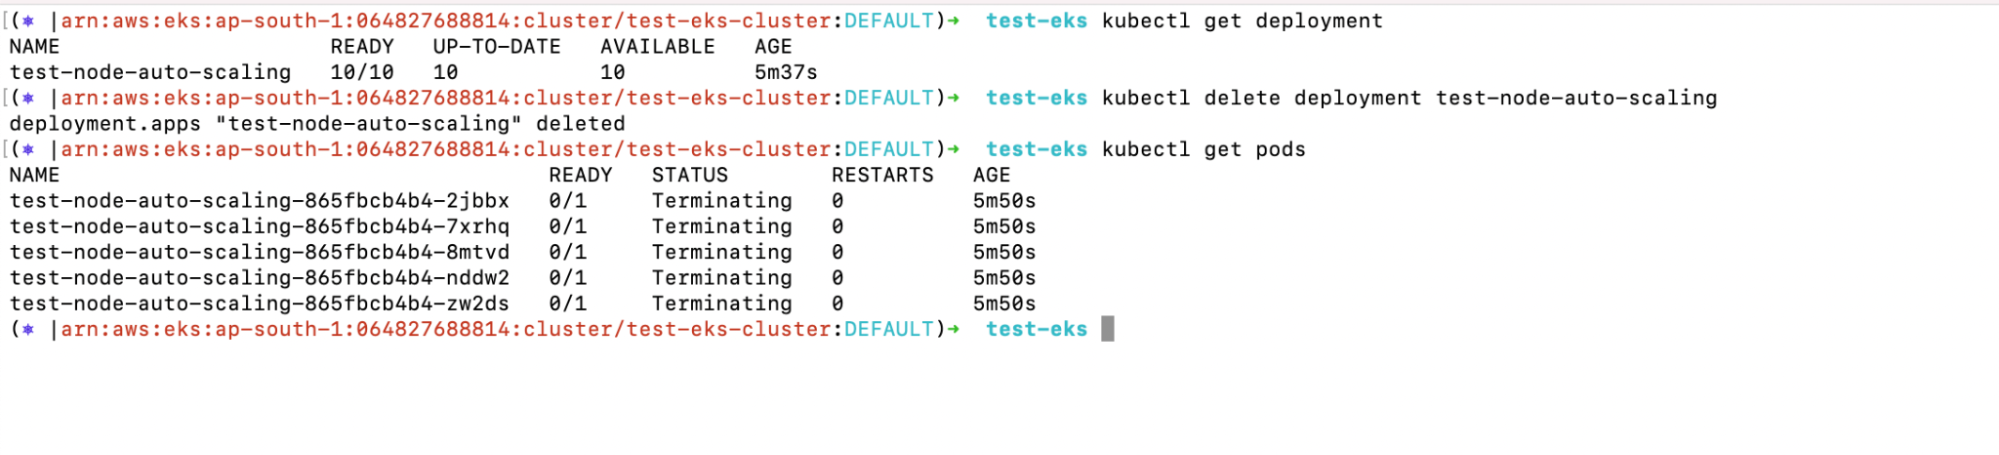
5. Now, in order to test whether the Kubernetes Autoscaler reduced or removed the nodes, delete the Deployment you created.
a. kubectl get deployment
b. kubectl delete deployment test-node-auto-scaling
c. kubectl get pods
6. Check the logs of the Kubernetes Autoscaler again; you will notice that the Autoscaler has identified the unrequired nodes. Within a few minutes, it will also reduce the number of nodes.
a. kubectl -n kube-system logs -f deployment.apps/cluster-autoscaler
Now you know exactly how Kubernetes Autoscaling can help you scale resources in and out on the Kubernetes Cluster. Keep in mind that both layers (nodes/pods) of the Kubernetes Autoscaling are important and interrelated.
You can leverage Kubernetes HPA to scale the number of pods in and out. More specifically, you can increase the pod count when consumption increases and decrease the pod count when user load decreases. HPA increases or decreases the pod count, whereas VPA automatically increases or decreases the CPU and memory reservations of the pods to help you “right-size” your applications.
HPA and VPA achieve Kubernetes Autoscaling at pod level. You need the Kubernetes Autoscaler to increase the number of nodes in the cluster.
Make sure you avoid using Kubernetes HPA and VPA together for the same set of pods, seeing as HPA and VPA are currently incompatible and serve different purposes. However, we do recommend using VPA in combination with the Cluster Autoscaler (CA).
Whether you employ Kubernetes HPA, VPA, CA, or a mix will depend on the needs of your application. Experimentation is the best way to determine which choice is best for you, therefore, it may take a few tests before you achieve your optimal setup. Learning to work with Kubernetes Autoscaling is a journey that will require continual learning along the way as the tools mature.
Read this blog on DZone and follow us
The Kubernetes Cluster Autoscaler is a Kubernetes Autoscaling mechanism that helps increase or decrease the numbers of nodes in the Kubernetes Cluster depending on the resource requirements.
Horizontal Pod Autoscaling scales the number of pods in the Kubernetes Cluster to match demand.
Vertical Pod Autoscaling enables automatic CPU and memory requests and limits adjustments based on resource usage. Unlike HPA, VPA doesn’t increase or decrease the pod count.
HPA increases or decreases the number of pods, whereas VPA increases or decreases the pod resources.
When a user logs on to this desktop/laptop or mobile, opens a browser and types…
Low-code development is great news for businesses, reducing time-to-market for apps, and allocating costs more…
So, have you caught wind of the latest PHP update? If you not, this PHP…
When it comes to AWS ECS vs EC2, the choice boils down to your specific…
Ever wondered how Netflix keeps you glued to your screen with uninterrupted streaming bliss? Netflix…
In today's busy world, where information is important, handling data well is crucial for success.…