For some of us, the geolocation ionic 3 plugin can be very useful. With it, we can obtain the user’s location and use it for different purposes in our projects. In this case, we are going to get the user’s location, store it in some variables and then use those variables to send them as parameters to the launch navigator plugin and launch the google maps app (if available) to show the route form the user’s location to a specific location.
1. First of all, we need to install it running this command:
$ ionic cordova plugin add cordova-plugin-geolocation
$ npm install --save @ionic-native/geolocation
2. Then we need to declare it in our app.module.ts file.
import { Geolocation } from '@ionic-native/geolocation';

providers: [
StatusBar,
SplashScreen,
Geolocation,
{provide: ErrorHandler, useClass: IonicErrorHandler} ]
3. We also need to declare it in the component we are going to use this plugin in:
import { Geolocation } from '@ionic-native/geolocation';

constructor(public navCtrl: NavController, public geolocation: Geolocation) {}
4. Now that we have declared our plugin we can start using it, and it is very easy to use.
import { NavController} from 'ionic-angular';
import { Geolocation } from '@ionic-native/geolocation';

@Component({
selector: 'page-geolocation',
templateUrl: 'geolocation.html'
})

export class GeolocationPage {
latitude:number ;
longitude:number ;
constructor(public navCtrl: NavController, public geolocation: Geolocation, private launchNavigator:LaunchNavigator) {}
ionViewDidLoad(){
this.geolocation.getCurrentPosition().then(position =>{
this.latitude = position.coords.latitude;
this.longitude = position.coords.longitude;
},error=>{
console.log('error',error);
});
}
}
What are we doing here? Well, we are declaring two number variables (latitude and longitude) to store the user’s latitude and longitude, then we are asking ionic if the view loaded with the function ionViewDidLoad, in case it did load, the code inside this function will be executed. Inside this function we used the geolocation method getCurrentPosition() which will provide us the coordinates(coords) or the timestamp of the user location. So we are getting the latitude and longitude from the coords.
Now let’s see how we can use this coordinates to open google maps showing the user’s location and the distance to a particular establishment using another Cordova plugin called launchNavigator.
5. We need to install the launchNavigator plugin with these commands.
- $ ionic cordova plugin add uk.co.worykingedge.phonegap.plugin.launchnavigator
- $ npm install –save @ionic-native/launch-navigator
6. And as we did with the geolocation plugin we have to declare it in our app.module.ts file and in our constructor.
import { Geolocation } from '@ionic-native/geolocation';
import { LaunchNavigator } from '@ionic-native/launch-navigator';

providers: [
StatusBar,
SplashScreen,
Geolocation,
LaunchNavigator,
{provide: ErrorHandler, useClass: IonicErrorHandler} ]
7. Also we have to declare it in our component.
import { LaunchNavigator, LaunchNavigatorOptions } from '@ionic-native/launch-navigator';
constructor(public navCtrl: NavController, public geolocation: Geolocation,private launchNavigator:LaunchNavigator) {}
8. Okay, so let’s get to it
navigateLocation(){
let options: LaunchNavigatorOptions = {
app: this.launchNavigator.APP.GOOGLE_MAPS,
start:[this.latitude,this.longitude]
};
this.launchNavigator.navigate('London, ON',options)
.then(success =>{
console.log(success);
},error=>{
console.log(error);
})
}
We created a function called navigateLocation, in which we make use of our launchNavigator plugin. In this function we are declaring the launchNavigator options which are “app” (the name of the app we are launching, in this case, Google Maps) and “start” (the coordinates of the user we obtained with the geolocation plugin), then let’s say we want to navigate to London. So we call the navigate method and send the destination, in this case, London, and the launchNavigator options. Lastly we call the method then and we console log the success and error message.
9. At the end your component should look like this
- import { NavController} from ‘ionic-angular’;
- import { Geolocation } from ‘@ionic-native/geolocation’;
- import { LaunchNavigator, LaunchNavigatorOptions } from ‘@ionic-native/launch-navigator’;
- @Component({
- selector: ‘page-geolocation’,
- templateUrl: ‘geolocation.html’
- })
- export class GeolocationPage {
- latitude:number ;
- longitude:number ;
- constructor(public navCtrl: NavController, public geolocation: Geolocation, private launchNavigator:LaunchNavigator) {}
- ionViewDidLoad(){
- this.geolocation.getCurrentPosition().then(position =>{
- this.latitude = position.coords.latitude;
- this.longitude = position.coords.longitude;
- },error=>{
- console.log(‘error’,error);
- });
- }
- navigateLocation(){
- let options: LaunchNavigatorOptions = {
- start:[this.latitude,this.longitude],
- app: this.launchNavigator.APP.GOOGLE_MAPS
- };
- this.launchNavigator.navigate(‘London, ON’, options)
- .then(success =>{
- console.log(success);
- },error=>{
- console.log(error);
- })
- }
- }
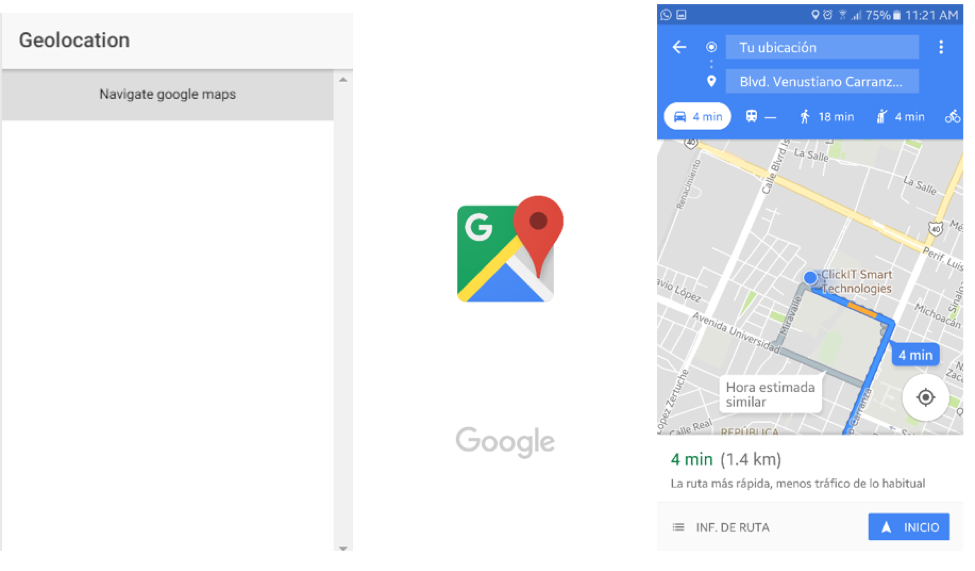
10. Now in order for us to use this, we must have a button which calls this method
<ion-header>
<ion-navbar>
<ion-title>
Geolocation
</ion-title>
</ion-navbar>
</ion-header>
<ion-content>
<button (click)="navigateLocation()">Navigate google maps</button>
</ion-content>
At the end you’ll have something like this.
Because ionic 3 is buit on top of apache cordova, you can find tons of plugins like these in the ionic 3 documentation https://ionicframework.com/docs/native and they are very easy to use.
In ClickIT we implement technologies like these plugins Cordova provides, to give a high-quality service to our customers.