Yes I know, WP Engine works just fine. I have worked on fairly enough projects with this platform to say that is a reliable option. Their customer support is on point and is a perfectly fast and secure hosting for small WordPress sites. So, why you should consider a WP Engine Migration?
Well, you heard it:
WP Engine is fine just for SMALL WEBSITES. Alternatively, just one site as their price tag goes up as you add more domains, which is not the alternative if you want to save money.
But what happens when your site reaches a higher amount of traffic? Well, let me tell you that WPengine can quickly become the nightmare you tried to avoid in the first place. Outages and downtimes, more than 30 seconds to load one single page or bad gateway errors are real and common problems that many users are facing.The hosting selection is a vital element to consider within our budget and select the right one for your WordPress, it can be a nightmare.
There are hundreds of hosting alternatives that offer different packages, prices or benefits. Some provide 24/7 support, automated backups, developer options and more; all this can be very useful for people or businesses looking for an experience with specific characteristics for each need or a more detailed personalization.
So let’s talk about how to migrate your WordPress site from WPEngine to AWS (Amazon Web Services) which is the best alternative when it comes to hosting a more developed WordPress site.

AWS vs WPengine
If your site is hosted on WPengine, you could consider a more affordable and exciting alternative which is AWS. Amazon Web Services is known for being a complete hosting tool, with advanced options and moreover, for being a less expensive option. Amazon has the “pay for what you use” alternative, which is 40 to 70% cheaper than your current provider.
Furthermore, the platform gives you the opportunity to add services that allow you a better administration in your database, files or content; and the best part is that you can add the services whenever you want.
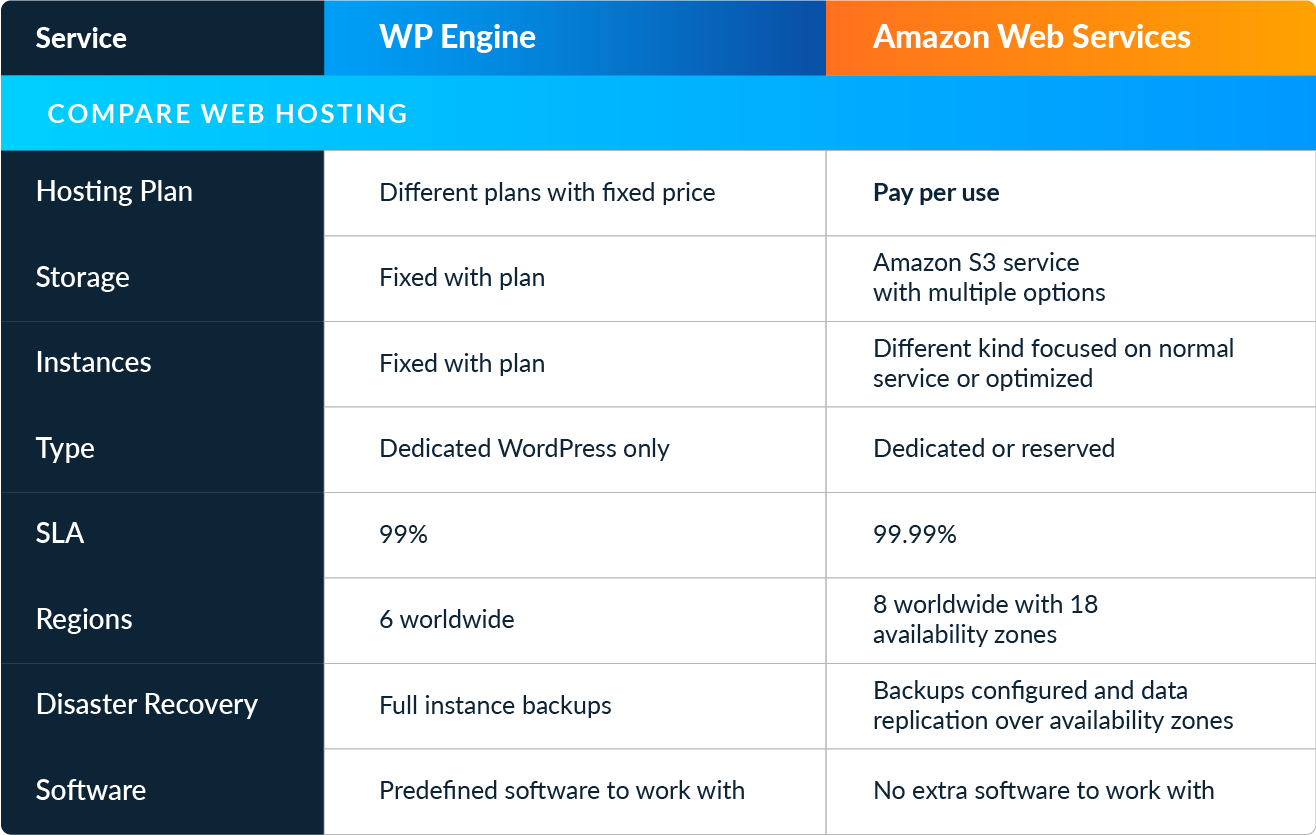
In short, AWS is a better alternative for bigger sites since you can pay only for what you use. So if your traffic is constantly changing you can scale up or down your resources as needed on AWS or use different S3 options. On the other side, WP Engine has a fixed amount and type of instances which makes it less flexible for your WordPress project; while AWS lets you host your WP or any application with 99.99% of availability.
You can visualize some differences between AWS and WP Engine in the next section:
How to migrate your WordPress from WPEngine to AWS
Take the WPEngine files
As a good practice for migration, it is advisable to create a backup of the information to be removed from this platform.
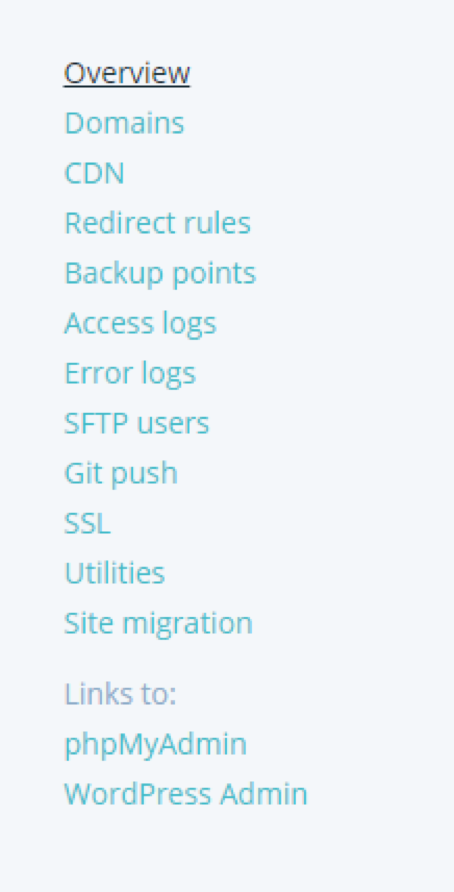
First, you must select which backup you want to migrate within the “Backup Points” option in the menu.
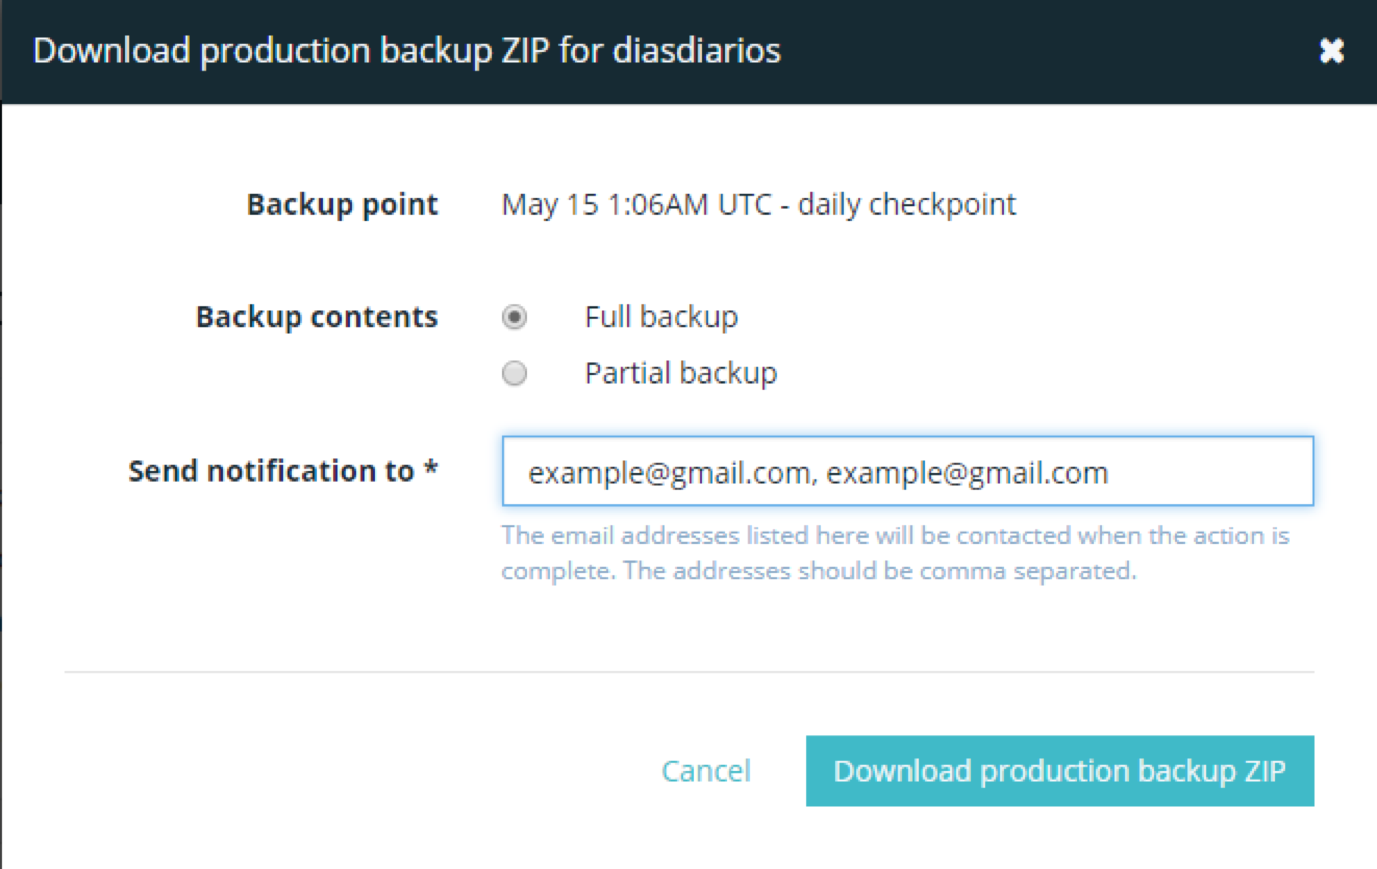
Within the menu, you have a list of backups that can be selected. Locate the most current or the one you want to migrate. You also have the option “Backup Now” that contains the changes of the last hours. After that, select the option “Download as ZIP.” With this, a pop-up message appears asking if you want a Full or Partial Backup.Partial backup gives you a choice between database, theme, plugins, multimedia files or others. Select this option if you only want specific information. However, I recommend you do a Full Backup to make the migration easier.
Then, you can indicate where (email address) to send the notification when your ZIP file is ready to download. It may take a couple of hours depending on the size of the WordPress.
Remove the WPengine files
WPEngine works with certain files or special plugins, which are not necessary if the site will be migrated to another hosting, these should be deleted. This is the list of files that need to be deleted along with their location:
- wp-content/mu-plugins/mu-plugin.php
- wp-content/mu-plugins/wpengine-common/
- wp-content/mu-plugins/slt-force-strong-passwords.php
- wp-content/mu-plugins/force-strong-passwords/
- wp-content/mu-plugins/stop-long-comments.php
- wp-content/advanced-cache.php
- wp-content/object-cache.php
After removing these files, the backup is ready to be used in AWS.
Now you must create an account and build an EC2 instance. To learn more about this process, our blog: “How to create a server on AWS” can help you.
With this, you have now an instance created ready to install your website from WPEngine.
Migrate your data to AWS
You have two easy options to migrate your data to Amazon Web Services.
FTP
You can upload your files via FTP by connecting your PC to your instance with a client like Filezilla or WinSCP. The client will ask you for the FTP credentials of the instance, IP, username, password and port of connection. Once submitted you will be connected to it, now you have to look for the files and either drag them or drop them on the other screen. The process may take a while depending on the size of the backup. If you have any problem, you can look at the following tutorial.
Command line
1. From the Linux terminal you can input the next commands:
scp -i /route/keySSH/created /route/wordpress.tar.gz ubuntu@IP:/home/ubuntu/scp -i /route/keySSH/created/route/db_name.sql.gz ubuntu@IP:/home/ubuntu/
With your files on the new server you now have to create the folder of the website.
2. Create the directory where the WordPress will be located.
sudo mkdir -p /var/www/domain.com/public_html/
3. Change the owner of the created directory.
sudo chown -R ubuntu:www-data /var/www/domain.com/
4. Unzip the .tar.gz file in/home/ubuntu/.
cd /home/ubuntu/ tar -xzvf /home/ubuntu/wordpress.tar.gz
5. Move the content to the directory created before.
mv /home/ubuntu/wordpress/* /var/www/domain.com/public_html/
6. hange permissions and owner to all WordPress.
Change the owner user to “ubuntu” and the group to “www-data”
sudo chown -R ubuntu:www-data /var/www/domain.com/
7. Change permissions to directories to allow reading, writing, and execution to owner and group, but only read and execute “all others”:
find /var/www/domain.com/public_html/ -type d -exec chmod 775 {} \;
8. Change permissions to the files to allow the owner and group to read and write, but only read “everyone else”:
find /var/www/domain.com/public_html/ -type f -exec chmod 664 {} \;
9. Edit the wp-config.php file by changing the host to the RDS endpoint.
vim /var/www/domain.com/public_html/wp-config.php... define('DB_HOST', 'ENDPOINT');...Exit saving changes.
Set Up the Database
1. The first thing is to unzip the file “.sql.gz” to leave it in “.sql” format and facilitate its import.
cd /home/ubuntu/tar -xzvf db_name.sql.gz
2. Connect to the RDS with the user and password of the administrator, and the corresponding host / endpoint.
mysql -h ENDPOINT -u USER -pEnter password: **********
3. Take note of the data in the WordPress wp-config.php file.
vim /var/www/domain.com/public_html/wp-config.php…define('DB_NAME', 'db_name’);define('DB_USER', 'db_user');define('DB_PASSWORD', 'password');...
4. Create the WordPress database.
CREATE DATABASE db_name;
5. Create the user in the database.
CREATE USER 'db_user'@'IP_EC2_instance' IDENTIFIED BY 'password';
Note: It is necessary to replace “IP_EC2_instance” with the IP of the EC2 instance (I recommend the private so that the traffic is minimal and it doesn’t need to leave the internal network), and thus increase the security in the connection to the RDS.
So, only the connection between the EC2 instance and the RDS through that user will be possible, from no other IP this connection will be possible.
6. Give user privileges on the database.
GRANT ALL PRIVILEGES ON db_name.* TO 'db_user'@'IP_EC2_instance';FLUSH PRIVILEGES;
7. Use the newly created database.
use db_name;
8. Import database.
source /home/ubuntu/db_name.sql;
Changing your DNS
After having setup your website on your new host on AWS, the last remaining thing to do is point the Domain to it.
Go to your DNS provider panel(GoDaddy, HostGator, Google Domains, etc). There you need to update your @ record to your new IP on AWS.
Your WordPress on AWS
Now you have more control over your files, more flexibility to customize the code of your site and costs can decrease between 30 and 60% thanks to the modality of “pay what you use” of AWS. With this, your WordPress is now in a cheaper and more flexible hosting.
Remember that you also have the AWS advanced options and you can purchase them from the Marketplace. RDS for an optimized database as necessary, Amazon S3 for multimedia files storage, Route 53 to direct traffic and a specific service in your VPC, CloudFront to deliver your content faster and the first layer of security for attacks, AutoScaling for Scale your resources when traffic increases on your website, and many other technologies that can help you have a better performance.