
A couple of months ago one of our clients contacted us to perform an email migration. This client didn’t really like google to be his email server, so he decided to use AWS WorkMail. At first, the idea sounded simple: migrating his Zimbra server to AWS WorkMail. But after a little bit of research, we discovered that Amazon offers only one tool to perform the migration from an Exchange mail server to WorkMail and their other third party solutions offered by their technology partners. So we decided to get a free license in order to use the migration software.
First steps to begin the mail migration
- Create the domain: The first step was to create the company on the WorkMail, pretty simple by following the steps on the site and typing the “alias” that will be used to access to the web client. After that just pressed the “create” button and we were ready to start and setup the domain.
- Add the domain:With the Organization previously created we just needed to add the domain that the company would be using to manage the accounts. Click the “Domains” menu and press the button “Add domain”, type the name domain and click the “Add domain” button again.
- Domain verify: While trying to verify the ownership of the domain, Amazon asks you to add a txt record like this “_amazonses.domain.com”. At this point, the first problem appears: the DNS provider was Network Solutions and they don’t accept the underscore character on any kind of record. So, the fastest solution to solve this, was to use AWS Route53 (if your DNS provider supports the underscore character then you can skip the next step).
- Route53 setup: The first thing that I had to do here, is to set up the hosted zone for the domain, with the hosted zone created. I started with the replications of the DNS records from Network Solutions and the avoidance of any kind of issue after the DNS switch. It’s a pretty easy step, but be careful, because you can break a lot of things if you don’t clone all the records that you have. With everything ready, the last thing that you need to do is to switch the DNS records to use the Route53 ones. The difficulty of the level would depend on your DNS provider. One bad thing about doing this is that some of them have established TTL value so this change can take from 1-3 days to propagate. In my case, it took around 5 days.
- Set up the accounts: Setting up the accounts is really easy! Thanks to the friendly interface from Amazon. I have just to select the user’s option on the panel and then start the creation of the accounts using the blue button for user creation. What do I need? Just the name of the user, username, and password. You can optionally decide whether to use the temporary password option or to force the users to change their passwords on the first login. In my case, the client decided to use a master password for all the accounts and tell the employees to change it by themselves. Another alternative is to setup alias for each account. After all account creation, assign the respective alias for the accounts and create the distribution lists (groups). Be ready for one of the last steps to change the DNS records.
- MX Record: With everything ready, the last thing before starting the email migration is to change the MX records. To complete this, you have to edit the current value with the MX servers from WorkMail on the Route53 hosted zone that you’ve previously configured. This step can take from 1-2 days depending the TTL value; with this ready, all the emails are going to be delivered to the WorkMail mail boxes. Now you’re ready to test the migration software partnered with Amazon.
Example of email migration
This was probably the most time consuming activity: in order to use the tool partnered by Amazon. I’ve read all the available documentation on the site and it was very helpful. The software was not very easy to setup but to follow the instructions was a bit more comprehensive. The software supports single account migration and batch migration, a technician way to say multiple account migration.
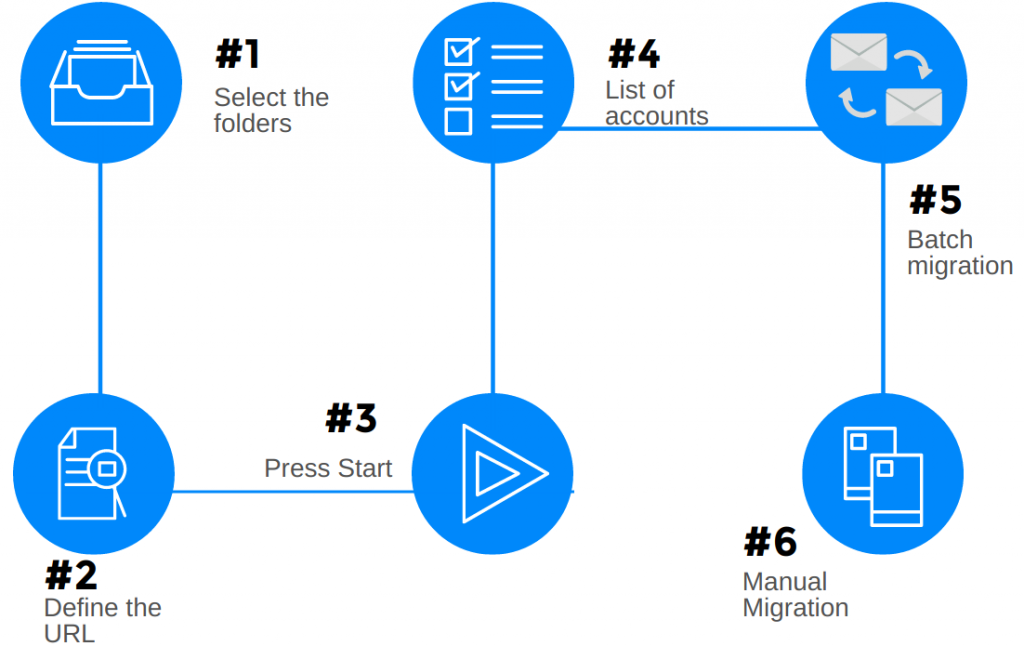
- Select the folders you want to migrate
For the first attempt, I used the single account migration and the way to set up was too easy. In my case, there was an option for the Zimbra server, so I just added the server IP, the user account, and the password. You can select which folders you want to migrate. By default the tool moves everything, so select the destiny server; in this case it was AWS WorkMail.
- Check the URL you’re going to use.
By default the software sets the server URL, but you have to be careful because if you have the WorkMail server in one Availability Zone you have to change it in the server URL, the destiny account, and the password account.
- Press Start.
Then press the button <> to begin the migration. In my case, the account has not too much content, it took around 10 minutes and was successful, so I decided to try the batch migration in order to speed up the migration process. At that point, I had two options for the migration: to use the Admin account and avoid setting the password for each account or to setup all the passwords accounts. In the software documentation, they said that the best option is to use the admin account of the server source and to set up an administrator account on WorkMail.
- Create the list of account.
After having the admin account for the source and destiny servers I’ve created the list of accounts on the batch migration section, just a table with ‘$varN’ on each column. So in the first column, I’ve put the source account and in the second one the destiny account.
- Start the batch migration.
Once you have the list ready you just need to tick the option of batch migration, put the column name on each field, then start the migration and wait for the results. After a few hours, I checked the firsts results, and they were almost satisfactory because almost all the accounts had the status-completed, but there was one with 80%. This event caught my attention, so I contacted the tech support of the software. They explained me the situation, that sometimes this happens because WorkMail only accepts 25MB attachments, so I started the migration once again. It was a matter of time, one to two days, depending on the amount.
- Manual migration.
The way to perform the manual migration is to use MS Outlook and copy-paste the emails from the Zimbra account to the WorkMail account. After a week the software “finished” the mail migration, also in that time I was checking the contents and moving the missing once.
The problem appears with the larger accounts, those with almost 8GB of emails. In those cases, the missing emails were in random positions so the best solution is to avoid the search of missing emails, delete all the content and manually migrate the accounts. This took another week to completely sync the content of that Zimbra accounts to WorkMail. After all the issues I’ve completed the migration using MS Outlook and the migration tool, all the emails on their respective mailboxes and all the devices works fine.
In conclusion:
After all the issues during the migration I successfully migrated all the content of the dedicated Zimbra server to the cloud (AWS WorkMail). All the setting steps were easy compared with the manual migration, the amount of data migrated was 50GB in 25 accounts, 14 of them successfully migrated by the tool and 11 completed or re-migrated manually.
The software still needs documentation and updates to clearly explain why it fails with some emails. My recommendation to you is that, if you are going to migrate an account with more than 50 thousand email you should apply the manual way to avoid rework.
One of the advantages of the migration was the cost reduction, because since they have the dedicated server in the office, they have to give it the respective maintenance.
While using AWS WorkMail, you don’t have to think about maintenance and other complicated things that you have to when you have a physical server, you just have to pay the fee for each account and that’s all. You can contact us to help you with your email server migration below!
What Problems does ClickIT solve?
- We HELP agencies and enterprises migrate, build and operate web applications on AWS.
- We HELP grow and scale web applications to have more visitors, customers and leads.
- We SOLVE the gap between a digital company and Amazon Web Services hosting provider. Everyone love AWS, but who will bring superlative expertise to operate their digital products within AWS?
- And we HELP cut DevOps and AWS operating expenses due to our affordable implementation costs without compromising quality. What is NearShore Outsourcing?