What if you were asked to deploy your Python Flask Application or dockerize Flask app 100 times a day on a Virtual Machine? Most people would agree that it’d be a tedious and frustrating task. In this article, we show you how to Dockerize Flask Python Application to overcome the above scenario.
Setting up a machine manually to deploy your Python Flask Application multiple times can easily lead to human errors and also increase the chances of missing certain dependencies. It takes plenty of time to figure out the errors, fix them, and then deploy the applications.
Table of contents
- What is Docker?
- What are Containers?
- Create a flask python application
- Creating a Dockerfile to Dockerize your Python Flask Application
- Creating a Docker image to Dockerize your Flask python application
- Docker Compose
- Deploy your Flask python application using Docker in Production
- Troubleshooting Docker containers
- Next steps after deploying your python flask applications
- Summary table for ECS, EKS, and AKS
- Conclusion
- FAQs
Now, if you were asked to share the Python Flask or any other application with your team members across the globe, how would you do that? If you think you will not be able to share the machine, you are right. You can create a snapshot of the machine but that’s about it. In this article, we will also see how the Dockerized Python Flask Application can be used by global teams residing at different places.
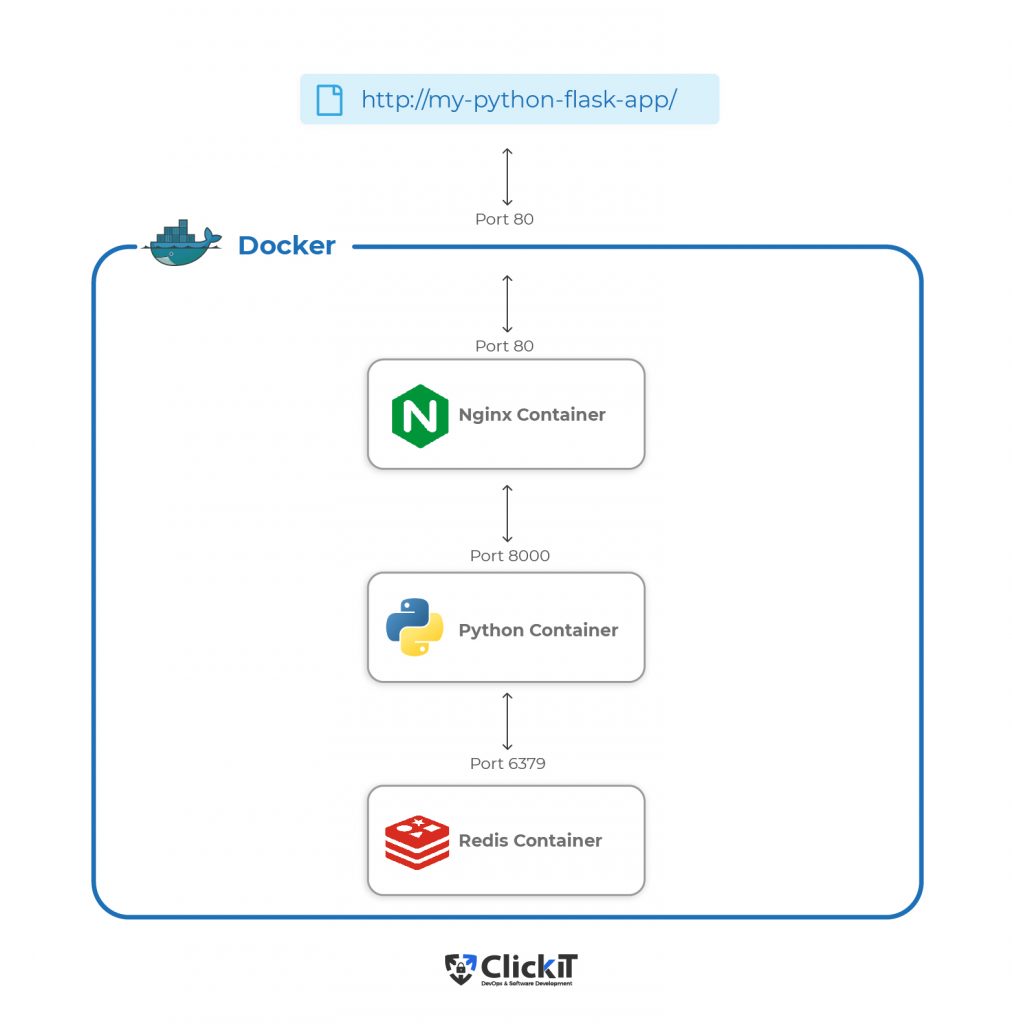
Before we dive into the nitty-gritty of “How to Dockerize Flask Python Application”, let’s see the components that we are going to deploy as Docker Containers.
- Nginx Reverse Proxy:
We will create a Docker Image of Nginx to use as a Reverse Proxy, i.e. to forward user requests to a Python Application. - Python Flask Application:
We will create a simple Python Flask Application providing 3 APIs. This application will store the count of visits or hits to the applications in Redis. For this, we will write a Dockerfile and create a Docker Image. - Redis Database:
We will use Redis Database to store the count of visits or hits to our application and a Redis image which is available already to create its container.
What is Docker?
Docker is an open platform written in the Go language for developing, shipping, and running applications. It enables applications to separate from the infrastructure which results in better speed. It makes it possible to manage the infrastructure the same as we manage the applications. To achieve this, Docker uses a client-server architecture and has the following components.
- Docker Client:
Docker Client is a way to interact with Docker Daemon(dockerd). - Docker Daemon:
Docker Daemon(dockerd) listens for Docker API requests and manages Docker objects. - Docker Objects:
- Docker Image:
It is a read-only template with instructions for creating a Docker container. - Docker Container:
It is a runnable instance of a Docker Image. - Docker Volumes:
The persisting data generated and used by Docker Containers is stored on Docker Volumes. - Docker Network:
Docker Network is a tunnel through which all isolated Docker Containers communicate with each other.
- Docker Image:
- Docker Registry:
Docker Registry is a place where Docker Images are stored.
If you’re interested in learning more about Docker, you can access its official guide here .
Before we proceed let’s see the steps to install Docker on Ubuntu 20.04 Server.
- Check Linux Version
$ cat /etc/issue - Update the apt package index
$ sudo apt-get update - Install packages to allow apt to use a repository over HTTPS
$ sudo apt-get install apt-transport-https ca-certificates curl gnupg lsb-release - Add Docker’s official GPG key:
$ curl -fsSL https://download.docker.com/linux/ubuntu/gpg | sudo gpg –dearmor -o /usr/share/keyrings/docker-archive-keyring.gpg - Set up the stable repository
$ echo “deb [arch=amd64 signed-by=/usr/share/keyrings/docker-archive-keyring.gpg] https://download.docker.com/linux/ubuntu $(lsb_release -cs) stable” | sudo tee /etc/apt/sources.list.d/docker.list > /dev/null - Update the apt package index
$ sudo apt-get update - Install the latest version of Docker Engine and containerd
$ sudo apt-get install docker-ce docker-ce-cli containerd.io - Check Docker version
$ docker –version - Manage Docker as a non-root user
- Create ‘docker’ group
$ sudo groupadd docker - Add your user to the docker group
$ sudo usermod -aG docker <your-user-name>
- Create ‘docker’ group
- Exit and re-login.
- Verify that you can run docker commands without sudo
$ docker run hello-world - Upon executing the above run command, you should see the output as follows.
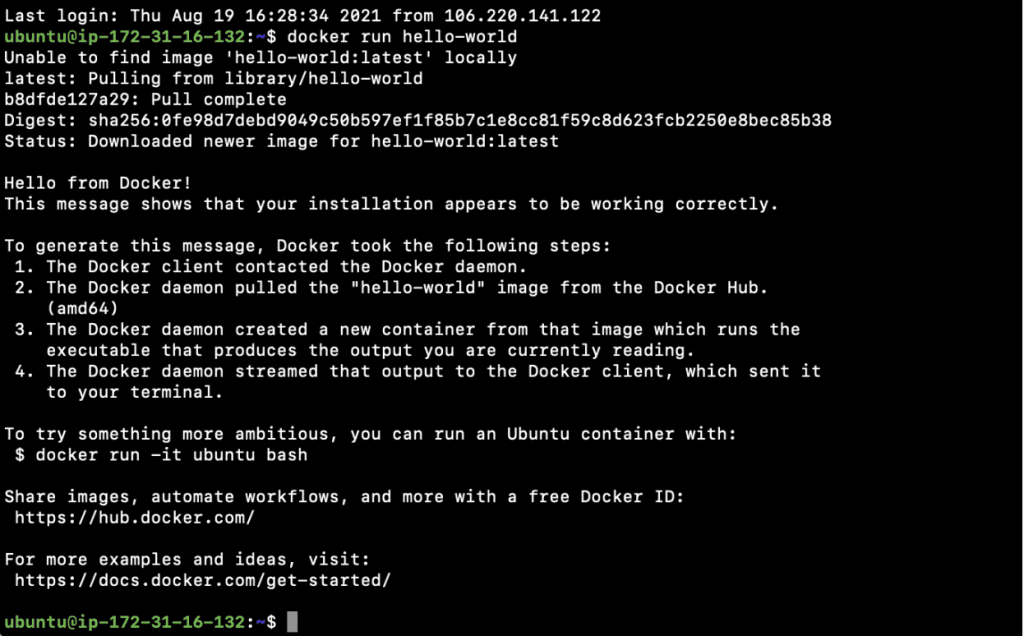
Now you have Docker installed on your machine. To know more about installation and other installation alternatives, click here. . To know more about post-installation steps, click here.
What are Containers?
A Docker Container is an object in the Docker Engine that bundles up the code and all its dependencies, it is a running instance of the Docker Image, i.e. Docker Images become Docker Containers when they run on a Docker Engine.
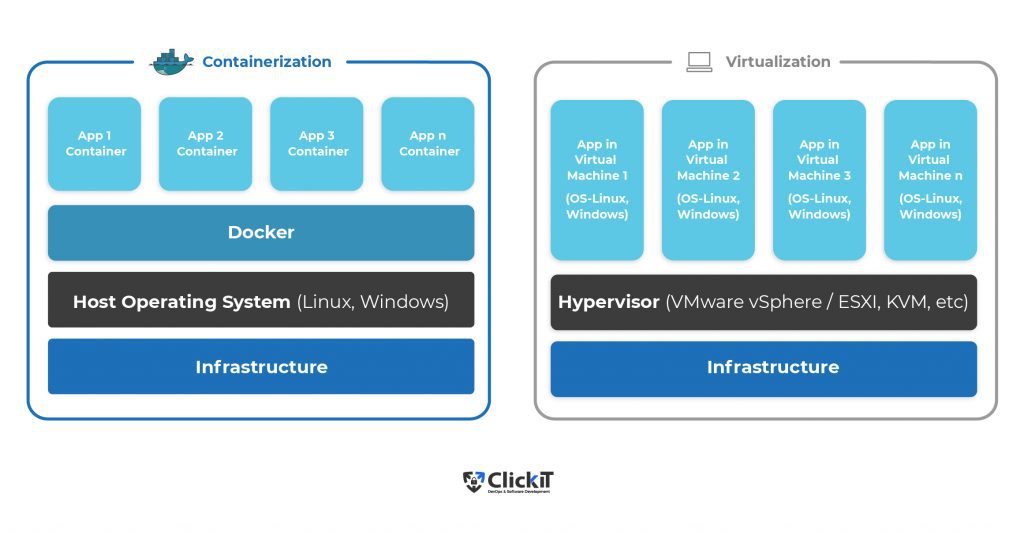
Docker Containers virtualize the Operating System(OS), unlike Virtual Machines that virtualize the hardware.
A Docker Container is a loosely isolated environment where the application runs.
It can be created on Linux OS or Windows OS. Docker Containers provide flexibility in deploying and managing software applications. You can start, stop, delete and perform various operations on a Docker Container using the Docker CLI or API.
Containers can share the same OS, Kernel, and run as isolated processes. They take up less space as compared to virtual machines and can get running in a few seconds.
Let’s get familiar with a few basic commands that we will need in the upcoming sections.
- $ docker run hello-world
In the previous section, you saw the “docker run hello-world” command. This command created a container with the image “hello-world”. - $ docker run –name my-second-container hello-world
You can give a name to the container by adding “–name <container-name>“ option to the “docker run” command. “docker run –name my-second-container hello-world” command will create a container with image=hello-world and name it as my-second-container. - $ docker ps -a
You can also check all your containers using the “docker ps -a” command. - docker ps
If you are interested to see only running containers, do not add “-a” to the command. - $ docker stop <CONTAINER ID>
You can stop a running container before deleting it. - $ docker rm <CONTAINER ID>
Free up your machine by deleting unnecessary containers. - $ docker images
You can also check images that have been pulled on your machine to create the containers. - $ docker image rm <image-name>
Similar to the way containers can be removed or deleted, you can also delete images.

Create a flask python application
Now that you have docker installed on your machine and you have an idea of docker containers, let’s create a Python Flask Application and dockerize it in the next section.
- Go to the home directory
$ cd /home/ubuntu/ - Create a new directory
$ mkdir clickittech - Change your current working directory and stay in it throughout the article.
$ cd clickittech/ - Create a directory to put Python Flask Application files under it
$ mkdir flask - Create a main.py under the flask directory
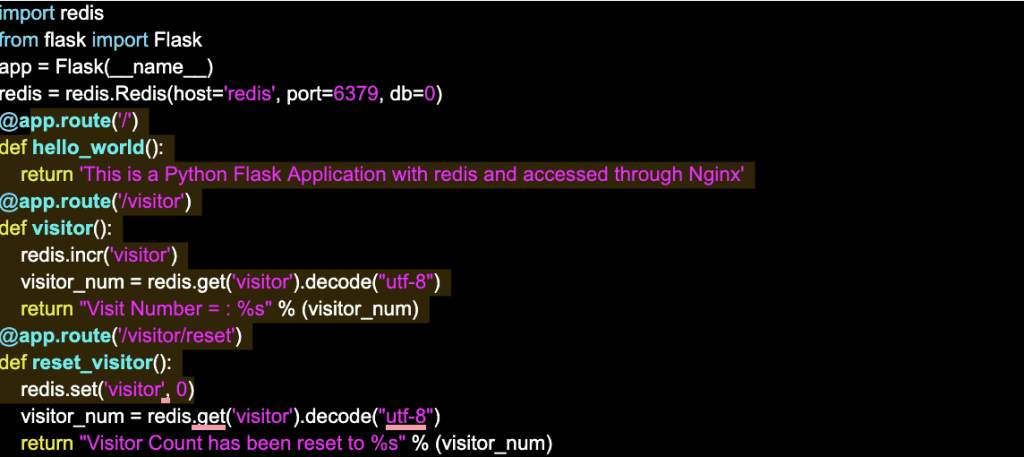
$ vim flask/main.py
import redis
from flask import Flask
app = Flask(__name__)
redis = redis.Redis(host='redis', port=6379, db=0)
@app.route('/')
def hello_world():
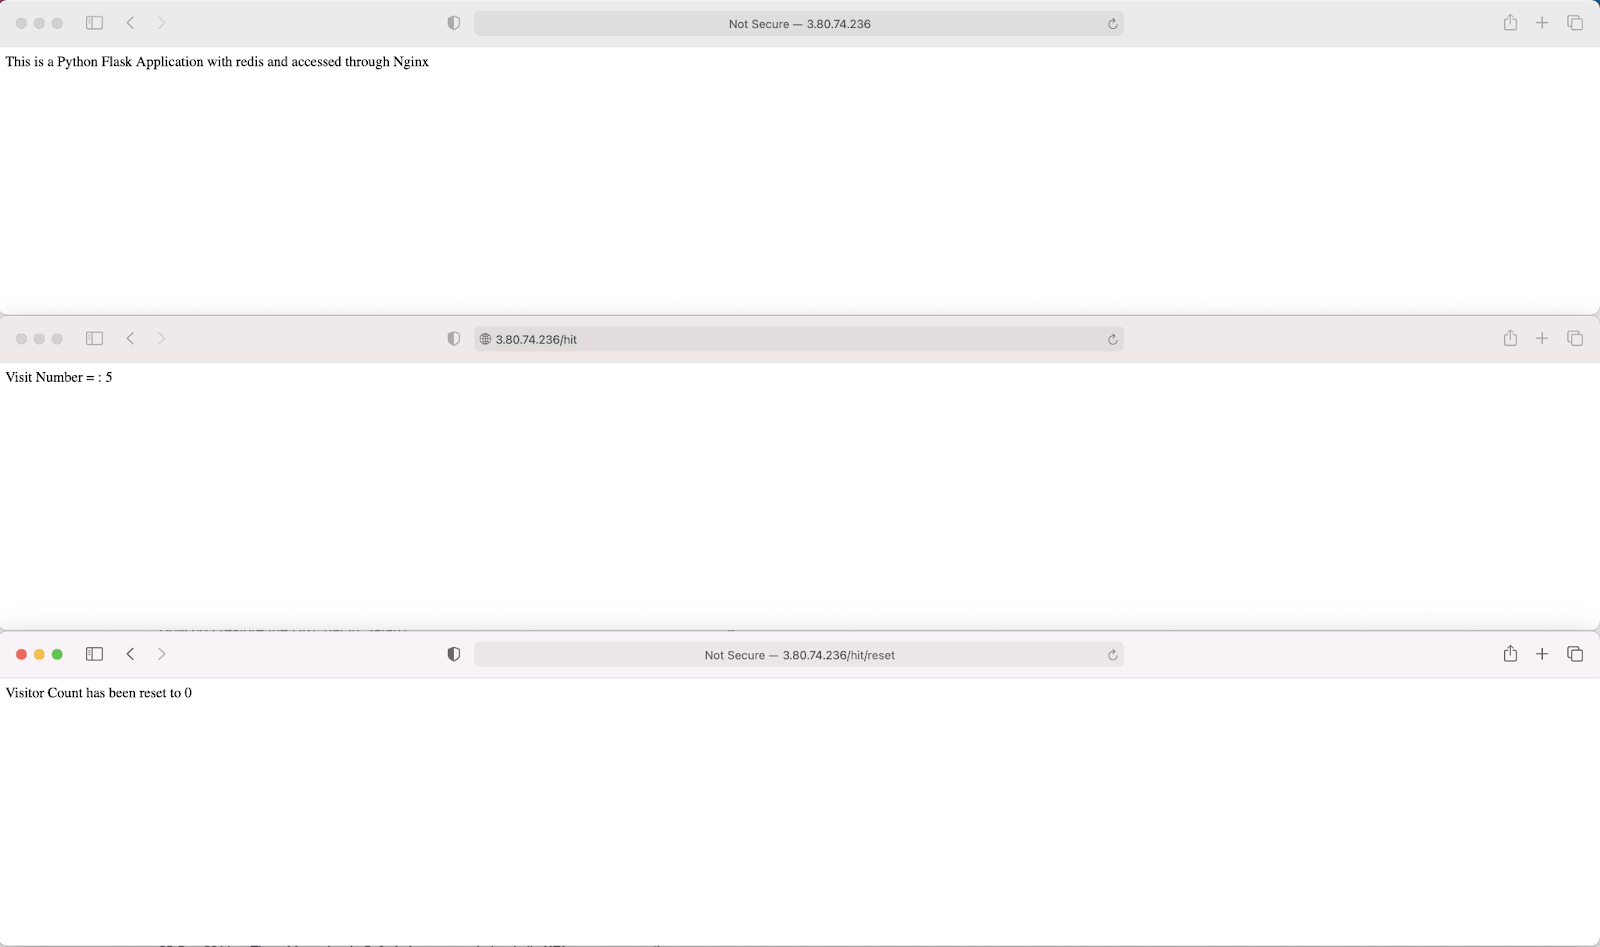
return 'This is a Python Flask Application with redis and accessed through Nginx'
@app.route('/visitor')
def visitor():
redis.incr('visitor')
visitor_num = redis.get('visitor').decode("utf-8")
return "Visit Number = : %s" % (visitor_num)
@app.route('/visitor/reset')
def reset_visitor():
redis.set('visitor', 0)
visitor_num = redis.get('visitor').decode("utf-8")
return "Visitor Count has been reset to %s" % (visitor_num)
Flask vs Django: Read the full blog.
Creating a Dockerfile to Dockerize your Python Flask Application
A Dockerfile is a set of instructions in a text file containing all the commands required to generate a Docker Image. The “docker build” command is used to create an image using the Dockerfile. This command also needs additional arguments.
Before we create a Dockerfile for Python Flask Application, let’s try to understand the Dockerfile instructions.
- FROM – FROM is used to specify the base image to be used by the application/container.
- LABEL – This instruction is used to provide metadata to an image.
- ENV – To set environment variables in a Docker container, ENV is used. You can have multiple variables in a single Dockerfile.
- ARG – It defines build-time variables that users can pass at build-time to the builder with the docker build command.
- WORKDIR – It sets the working directory for the instructions that follow.
- RUN – Used to run a Linux command and install packages into containers, create folders, etc.
- COPY – This copies files and directories from the host machine to the container.
- ADD – It copies files and directories to the container from the host machine as well as from the URL location. It can also unpack compressed files.
- VOLUME – It creates a directory mount point to access and store persistent data.
- EXPOSE – It is used to expose ports on the containers, and it informs Docker that the container listens on the exposed network ports at runtime.
- ENTRYPOINT – It provides a command and arguments for an executing container. If the user specifies any arguments or commands at the end of the “docker run” command, the specified command overrides the default in CMD instruction.
- CMD – It provides defaults for executing containers and there can be only one CMD. It is used to set a command to be executed when running a container.
Refer to the official documentation here to know more about Dockerfile instructions.
Dockerfile for Flask Python Application
Now, let’s create a Dockerfile to “Dockerize Flask Python Application” and “Nginx”
- Stay in the same directory(/home/ubuntu/clickittech) and create a Dockerfile in the “flask” directory for creating an image of the Python Flask Application.
$ vim flask/Dockerfile
FROM python:3.7-alpine
RUN mkdir /app
WORKDIR /app
ADD requirements.txt /app
ADD main.py /app
RUN pip3 install -r requirements.txt
CMD ["gunicorn", "-w 4", "-b", "0.0.0.0:8000", "main:app"]

- Now create a file containing application requirements
$ vim flask/requirements.txt
Flask==1.1.2
redis==3.4.1
gunicorn>=19,<20F

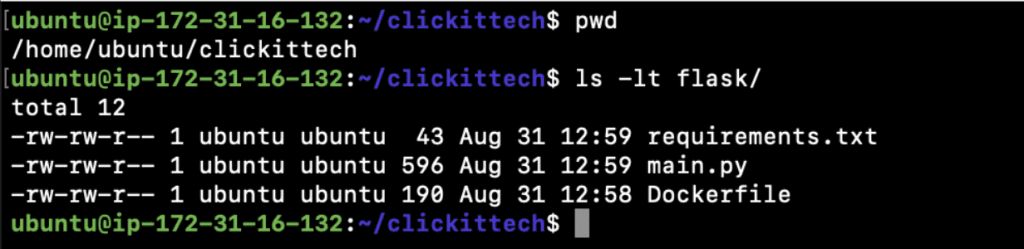
- Now, you should have the following files in your “flask” directory.
- main.py
- requirements.txt
- Dockerfile
Dockerfile for Nginx
- Create a new directory “nginx” at the same location(/home/ubuntu/clickittech) where you created the “flask” in the “/home/ubuntu/clickittech” directory.
$ mkdir nginx - Stay in the same directory(/home/ubuntu/clickittech) and create a Dockerfile in the “nginx” directory for creating an image of the Nginx Proxy.
$ vim nginx/Dockerfile

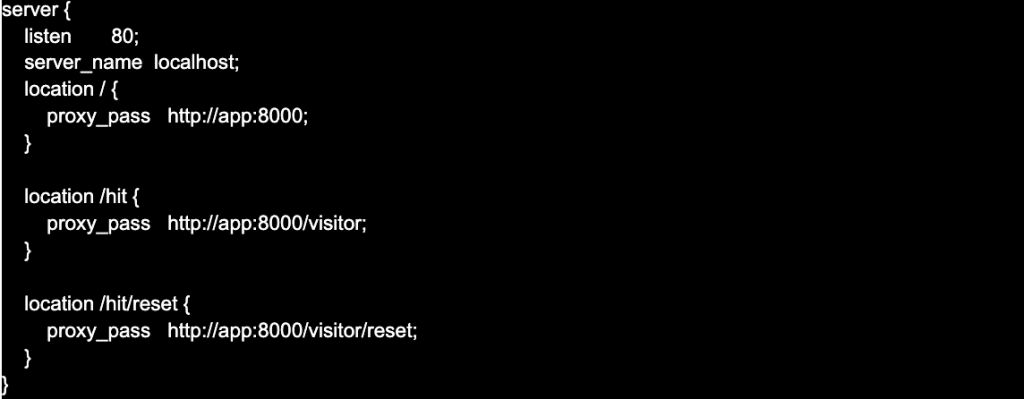
- Also, create a conf file that will hold the routing configuration
$ vim nginx/conf
server {
    listen       80;
    server_name  localhost;
    location / {
        proxy_pass   http://app:8000;
    }
    location /hit {
        proxy_pass   http://app:8000/visitor;
    }
    location /hit/reset {
        proxy_pass   http://app:8000/visitor/reset;
    }
}
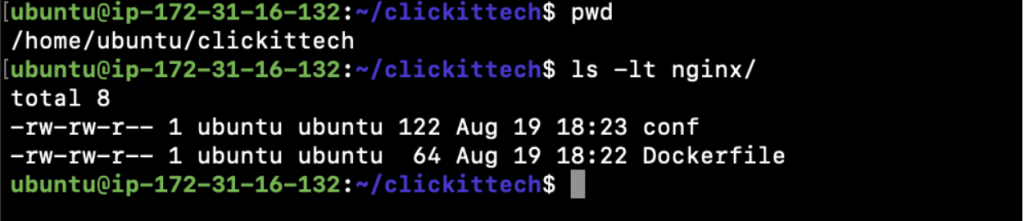
- Now, you should have the following files in your “nginx” directory.
- conf
- Dockerfile
Creating a Docker image to Dockerize your Flask python application
After creating your Dockerfiles, the next step is to make Docker Images. They will be for Python Flask Application and Nginx using the Dockerfiles we generated. For Redis, we will use a readily available Image.
We can create Docker Images using the “docker build” command, however; this is not the only way. Docker Images can also be created when you run your applications using Docker-Compose
Before we use Docker-Compose to build and deploy applications, let’s just see the syntax of the “docker build” command.
Syntax:
docker build [OPTIONS] PATH | URL | –
We won’t go into details of this command as we will be using Docker-Compose to build Docker Images. If you want to know in detail about this command click here to visit the official documentation.
Docker Compose
You probably know by now that it is very convenient to deploy, share and manage software applications using Docker Containers. However, when you have multiple applications to manage, it becomes cumbersome. Docker commands can take a lot of arguments like volume mapping, port mapping, environment variables, command, network, image name, working directory, etc. Imagine you have hundreds of containers to manage, and you still want to keep it simple.
This is why Docker Compose comes into the picture as the next step to manage multi-container applications.
Docker Compose is a tool that helps to define multi-container applications in a file and manage several different containers quickly and easily.
You can use a YAML file to define and configure all your applications. Then, we just need to execute one command “docker-compose up” to get all our applications defined in the YAML file up and running. To destroy the same, we again just need to execute one command “docker-compose down” and to stop applications safely “docker-compose stop” comes to rescue.
The YAML file is used to define services, networks, and volumes. One can use either a .yml or .yaml extension for this docker-compose file.
Let’s install docker-compose as we will need it.
- Download the current stable release of Docker Compose
$ sudo curl -L “https://github.com/docker/compose/releases/download/1.29.2/docker-compose-$(uname -s)-$(uname -m)” -o /usr/local/bin/docker-compose - Apply executable permissions to the docker-compose binary we just downloaded in the above step.
$ sudo chmod +x /usr/local/bin/docker-compose - Test if the installation was successful by checking the docker-compose version
$ docker-compose –version
Now it’s time to create a docker-compose file
- Stay in your “/home/ubuntu/clickittech” directory and create a docker-compose.yml in it.
$ vim docker-compose.yml
version: '3'
services:
  app:
    build: flask
    volumes:
      - app:/app
    ports:      - "8000:8000"
    links:
      - redis:redis
    depends_on:
      - redis
  redis:
    image: "redis:alpine"
    expose:
      - "6379"
  proxy:
    build: nginx
    restart: always
    ports:
      - 80:80
    depends_on:
      - app
volumes:
  app:
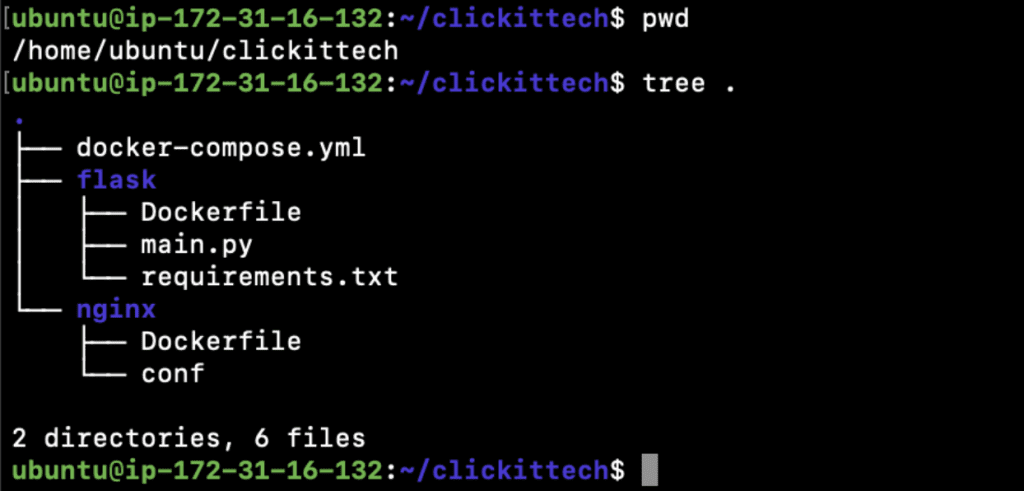
- This is how your folder structure should look like.(Tip: Install “tree” command using “sudo apt install tree”)
- You are ready to deploy your Python Flask Application using docker-compose in just 1 command.
- Stay in the “/home/ubuntu/clickittech” directory and execute the following command to start your application containers.
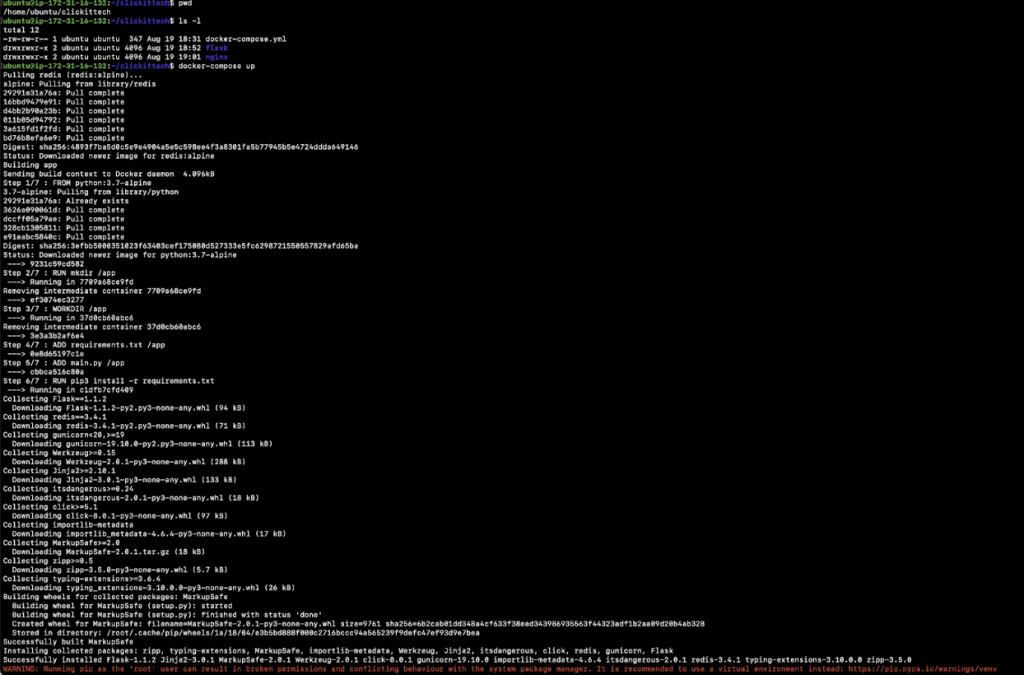
$ docker-compose up - The first time you execute the above command, you will notice that the base images are being pulled and then our images are being created.
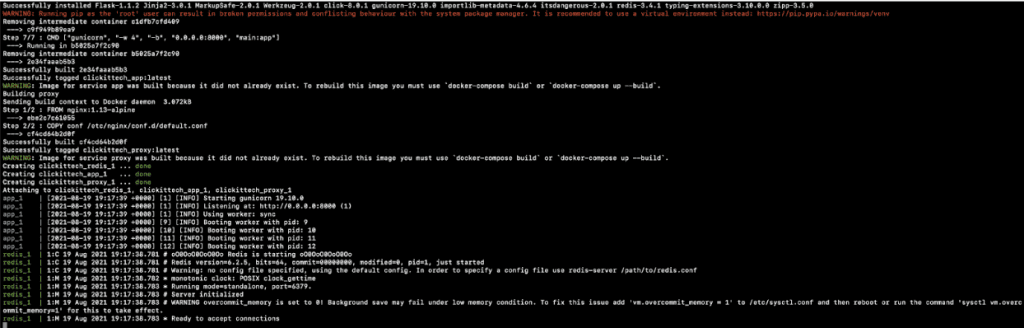
- In the end, you will see that the applications have started.
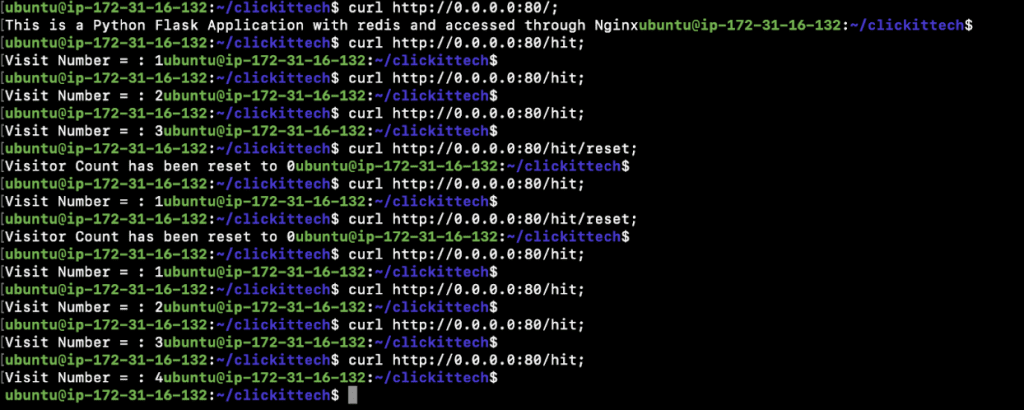
- You can now open a new terminal and try to access the following APIs.
- curl http://0.0.0.0:80/;
- curl http://0.0.0.0:80/hit;
- curl http://0.0.0.0:80/hit/reset;
- You can also hit the same APIs from the browser on Nginx’s IP.
- Now, go back to the console and press “control + c” to stop the execution as “docker-compose up” starts the applications in the foreground.
Here are a few more commands you can play with.
- To start containers in the background and leave them running, execute the command with –detach option as follows.
$ docker-compose up –detach - Check logs of containers by service name defined in the docker-compose file.
$ docker-compose logs -f –tail 10 app
$ docker-compose logs -f –tail 10 redis - Check running processes
$ docker-compose top - To stop containers use the following command.
$ docker-compose stop - Again start the services/applications/containers.
$ docker-compose start - Stop and remove containers, networks, images, and volumes
$ docker-compose down
Deploy your Flask python application using Docker in Production
Deploying any applications on Production is a very different experience. It is not just writing Dockerfiles, building Images, and using Docker-Compose to deploy the application. A lot can change when you promote the application to Production. Here are a few things that you need to consider while deploying your Python Flask Application on Production.
- First and foremost, never build your Docker Images on the Production servers. You must always pull your images from the central Docker Registry/Repository.
- Always verify the source of base images that you use in your Dockerfiles.
- Clean up containers that are no longer running using the “docker rm” command.
- Use volumes to store your application logs on persistent volumes.
- Public traffic should not have access to certain containers that are private.
- Use the “docker logs” command to fetch logs from your containers.
- Make use of the “docker inspect” command to get detailed information about Docker Objects.
- Use “docker secret” to manage credentials or secrets, avoid storing secrets in Plain Text format.
- Limit resources for containers, enforce resource limits so that containers use no more than a given limit.
- Enable logging and monitoring for your containerized applications.
- Use the “restart: always” policy to avoid downtime.
- And very important to note, use a Container Orchestration Tool.
Troubleshooting Docker containers
This section will give you an idea of how to troubleshoot your dockerized applications. When you encounter issues in your Docker environment, run the following checks.
- docker ps -a
Get information of all the containers, running and stopped. - docker logs <container-id>
Check logs of the container. - docker stop <container-id>
If the container is not behaving as expected, stop it. - docker start <container-id>
Try to start the container. - docker rm <container-id>
Remove the container if it fails to start. - Check mounted volumes, if the data is irrelevant in the volumes, clean them up.
Next steps after deploying your python flask application
So, now you understand the reason behind using Docker over Virtual Machines. You also got to know the steps to Dockerize Python Flask Application and deploy applications using Docker-Compose.
Docker-Compose is good when containers will only be deployed on a single machine, but it can not provide high availability to the application. Imagine, if the machine goes down, so will all your containers. In the Docker-Compose environment, all containers run on a single machine, and this machine can be a point of failure.
Docker-Compose can be good in the early stages of the container world as it does not have a steep learning curve, however; it has its limitations as mentioned above. Once you become good at Docker-Compose and have reached a certain point, you need to move to one of the Container Orchestration tools such as ECS, EKS, AKS, Kubernetes, Docker-Swarm.
Container Orchestrations tools come with benefits that can help to overcome the limitations of Docker-Compose.
- Container Orchestrations tools help deploy containers on multiple machines, called worker nodes or nodes, that provide high availability to the applications.
- Container or application auto-scaling can be done based on resource consumption using Container Orchestrations tools.
There are other benefits of using Container Orchestration tools for Production Applications, let’s see a few of the Orchestration tools.
Amazon ECS
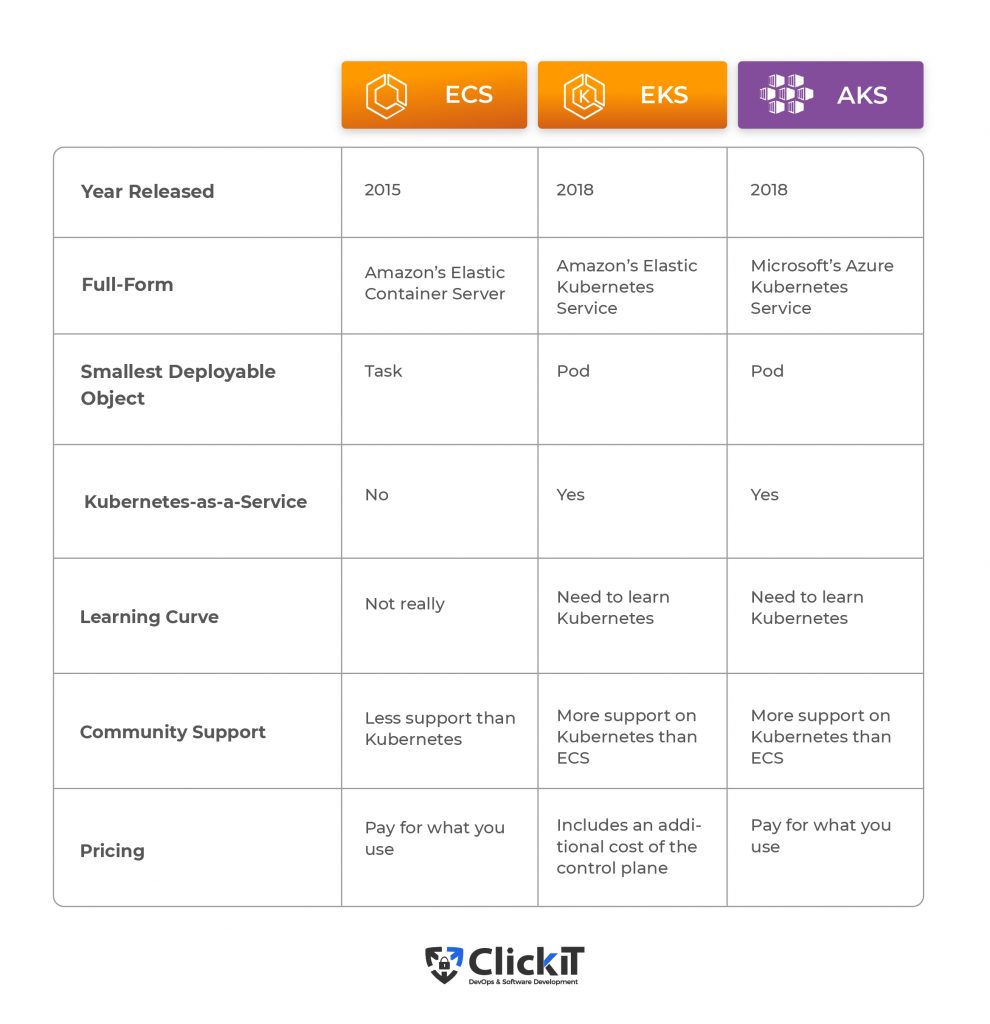
AWS Elastic Container Service(ECS) is a fully managed container orchestration service provided by AWS and made available in 2015 in the US East (N. Virginia), US West (Oregon), Asia Pacific (Tokyo), and Europe (Ireland) Regions. One does not need to learn Kubernetes to deploy containerized applications on ECS. It is easily integrated with other AWS services to provide a secure and easy-to-use solution for running containers. One has to pay only for the resources you configure. The smallest object that manages the lifecycle of the container in ECS is a task.
Amazon EKS
AWS Elastic Kubernetes Service(EKS) is a Kubernetes-as-a-Service platform provided by AWS and made available in 2018. You need to know about Kubernetes to deploy your containerized application on EKS. One can have a fully managed Kubernetes Cluster on AWS, however; one has to pay the additional cost for the Kubernetes control plane. The smallest object that manages the lifecycle of the container in EKS is a pod.
Microsoft AKS
Azure Kubernetes Service(AKS) is a fully managed Kubernetes service provided by Azure. It was released in 2018. While using AKS, one does not have to pay the additional cost of the Kubernetes control plane, but only for the virtual machines, associated storage, and networking resources consumed. You need to know about Kubernetes to deploy your containerized applications on AKS. The smallest object that manages the lifecycle of the container in AKS is a pod.
Summary table for ECS, EKS, and AKS
Conclusion
Containerization offers a solution based on containers for virtualization. It creates an image of the deployable application with all its dependencies and reduces the build and deployment time.
Docker is a container-based virtualization platform that provides a way for fast, and consistent delivery of applications. It helps to scale and run more workloads on the same hardware.
In this article, we saw “How to Dockerize Flask Python Application” and reduce the build and deployment time. We deployed 3 different components, viz. a Python Flask Application, Redis Database, and Nginx Reverse Proxy, in 3 different containers. Dockerizing applications serve as the basis to enable the decomposed microservices-based architecture.
There is no doubt that Docker is a revolutionary technology to provide isolation and environmental independence. To make the best out of it, container orchestration platforms like ECS, EKS, AKS can definitely be a great choice since they make the scenario of having 1000s of containers deploying 100s of microservices much easier.
This blog is also available on Medium

FAQ
Dockerizing is the process of creating Docker images of your applications, deploying them, and running your applications using Docker containers by making use of the images that you created.
Dockerizing your applications helps you save time that you would otherwise unnecessarily spend on creating VMs, installing dependencies, building and then deploying your applications on those VMs. The time that you saved can be used on your Software Development.
Dockerizing your applications is the first step in the world of containers. Having a few services to deploy can be managed by docker commands, however; when the number of services and the workload increases, you need container orchestration tools or platforms like Docker-Compose, ECS, EKS, AKS, etc. You can choose the platform that suits your requirement.
Yes, Microsoft announced the general availability of Windows Server 2016 and later for Docker Engine – Enterprise, and containers work the same way as it does on Linux. To know more about this, visit the blog here published by Docker.