If you’re still building and delivering your software applications the traditional way then you are missing out on a major innovation in the Software Development Process or Software Development Life Cycle. To show you what I’m talking about, in this article I will share “How to create a CI CD Pipeline with Jenkins, Containers and Amazon ECS” that deploys your application and overcomes the limitations of the traditional software delivery model. This innovation greatly affects deadlines, time to market, quality of the product, etc. I will take you through the whole step-by-step process of setting up a CI CD Docker pipeline for a sample Nodejs application.
Table of contents
- What is a CI CD Pipeline?
- CI CD Docker Tool Stack
- Architecture
- CI CD workflow and phases
- Deployment strategy
- Dockerize Node.js app
- Setup Github Repositories
- Setup the AWS Infrastructure
- Setup Jenkins on the EC2 Instance
- Configure the Jenkins Server
- Deploy the Nodejs Application to the ECS Cluster
- Cleanup the resources we created
- Summary
- Conclusion
- FAQs
What is a CI CD Pipeline?
A CI CD Pipeline or Continuous Integration Continuous Delivery Pipeline is a set of instructions to automate the process of Software tests, builds, and deployments. Here are a few benefits of implementing CI CD in your organization.
- Smaller Code Change
The ability of CI CD Pipelines to allow the integration of a small piece of code at a time helps developers to recognize any potential problem before too much work is completed. - Faster Delivery
Multiple daily releases or continual releases can be made a reality using CI CD Pipelines. - Observability
Having automation in place that generates extensive logs in each stage of the development process helps to understand if something goes wrong. - Easier Rollbacks
There are chances that the code that has been deployed may have issues. In such cases, it is very crucial to get back to the previous working release as soon as possible. One of the biggest advantages of using the CI CD Pipelines is that you can quickly and easily roll back to the previous working release. - Reduce Costs
Having automation in place for repetitive tasks frees up the Developer and Operation guys’ time that could be spent on Product Development.
These are just a few benefits of having CI CD Pipelines for builds and deployments. On this video you can continue learning the CI CD benefits and why use a CI CD in place.
Now, before we proceed with the steps to set up a CI CD Pipeline with Jenkins, Containers, and Amazon ECS, let’s see in short what CI/CD tools and technologies we will be using.
CI CD Docker Tool Stack
- Github
It is a web-based application or a cloud-based service where people or developers collaborate, store and manage their application code using Git. We will create and store our sample Nodejs application code here.
- AWS EC2 Instance
AWS EC2 is an Elastic Computer Service provided by Amazon Web Services used to create Virtual Machines or Virtual Instances on AWS Cloud. We will create an EC2 instance and install Jenkins and other dependencies in it.
- Java
This will be required to run Jenkins Server.
- AWS CLI
aws-cli i.e AWS Command Line Interface is a command-line tool used to manage AWS Services using commands. We will be using it to manage AWS ECS Task and ECS Service.
- Nodejs and Npm
Nodejs is a back-end JavaScript runtime environment and Npm is a package manager for Node. We will be creating a CI CD Docker Pipeline for the Nodejs application.
- Docker
Docker is an open-source containerization platform used for developing, shipping, and running applications. We will use it to build Docker Images of our sample Nodejs application and push/pull them to/from AWS ECR.
- Jenkins
Jenkins is an open-source, freely available automation server used to build, test, and deploy software applications. We will be creating our CI CD Docker Pipeline to build, test and deploy our Nodejs application on AWS ECS using Jenkins
- AWS ECR
AWS Elastic Container Registry is a Docker Image Repository fully managed by AWS to easily store, share, and deploy container images. We will be using AWS ECR to store Docker Images of our sample Nodejs application.
- AWS ECS
AWS Elastic Container Service is a container orchestration service fully managed by AWS to easily deploy, manage, and scale containerized applications. We will be using it to host our sample Nodejs application.
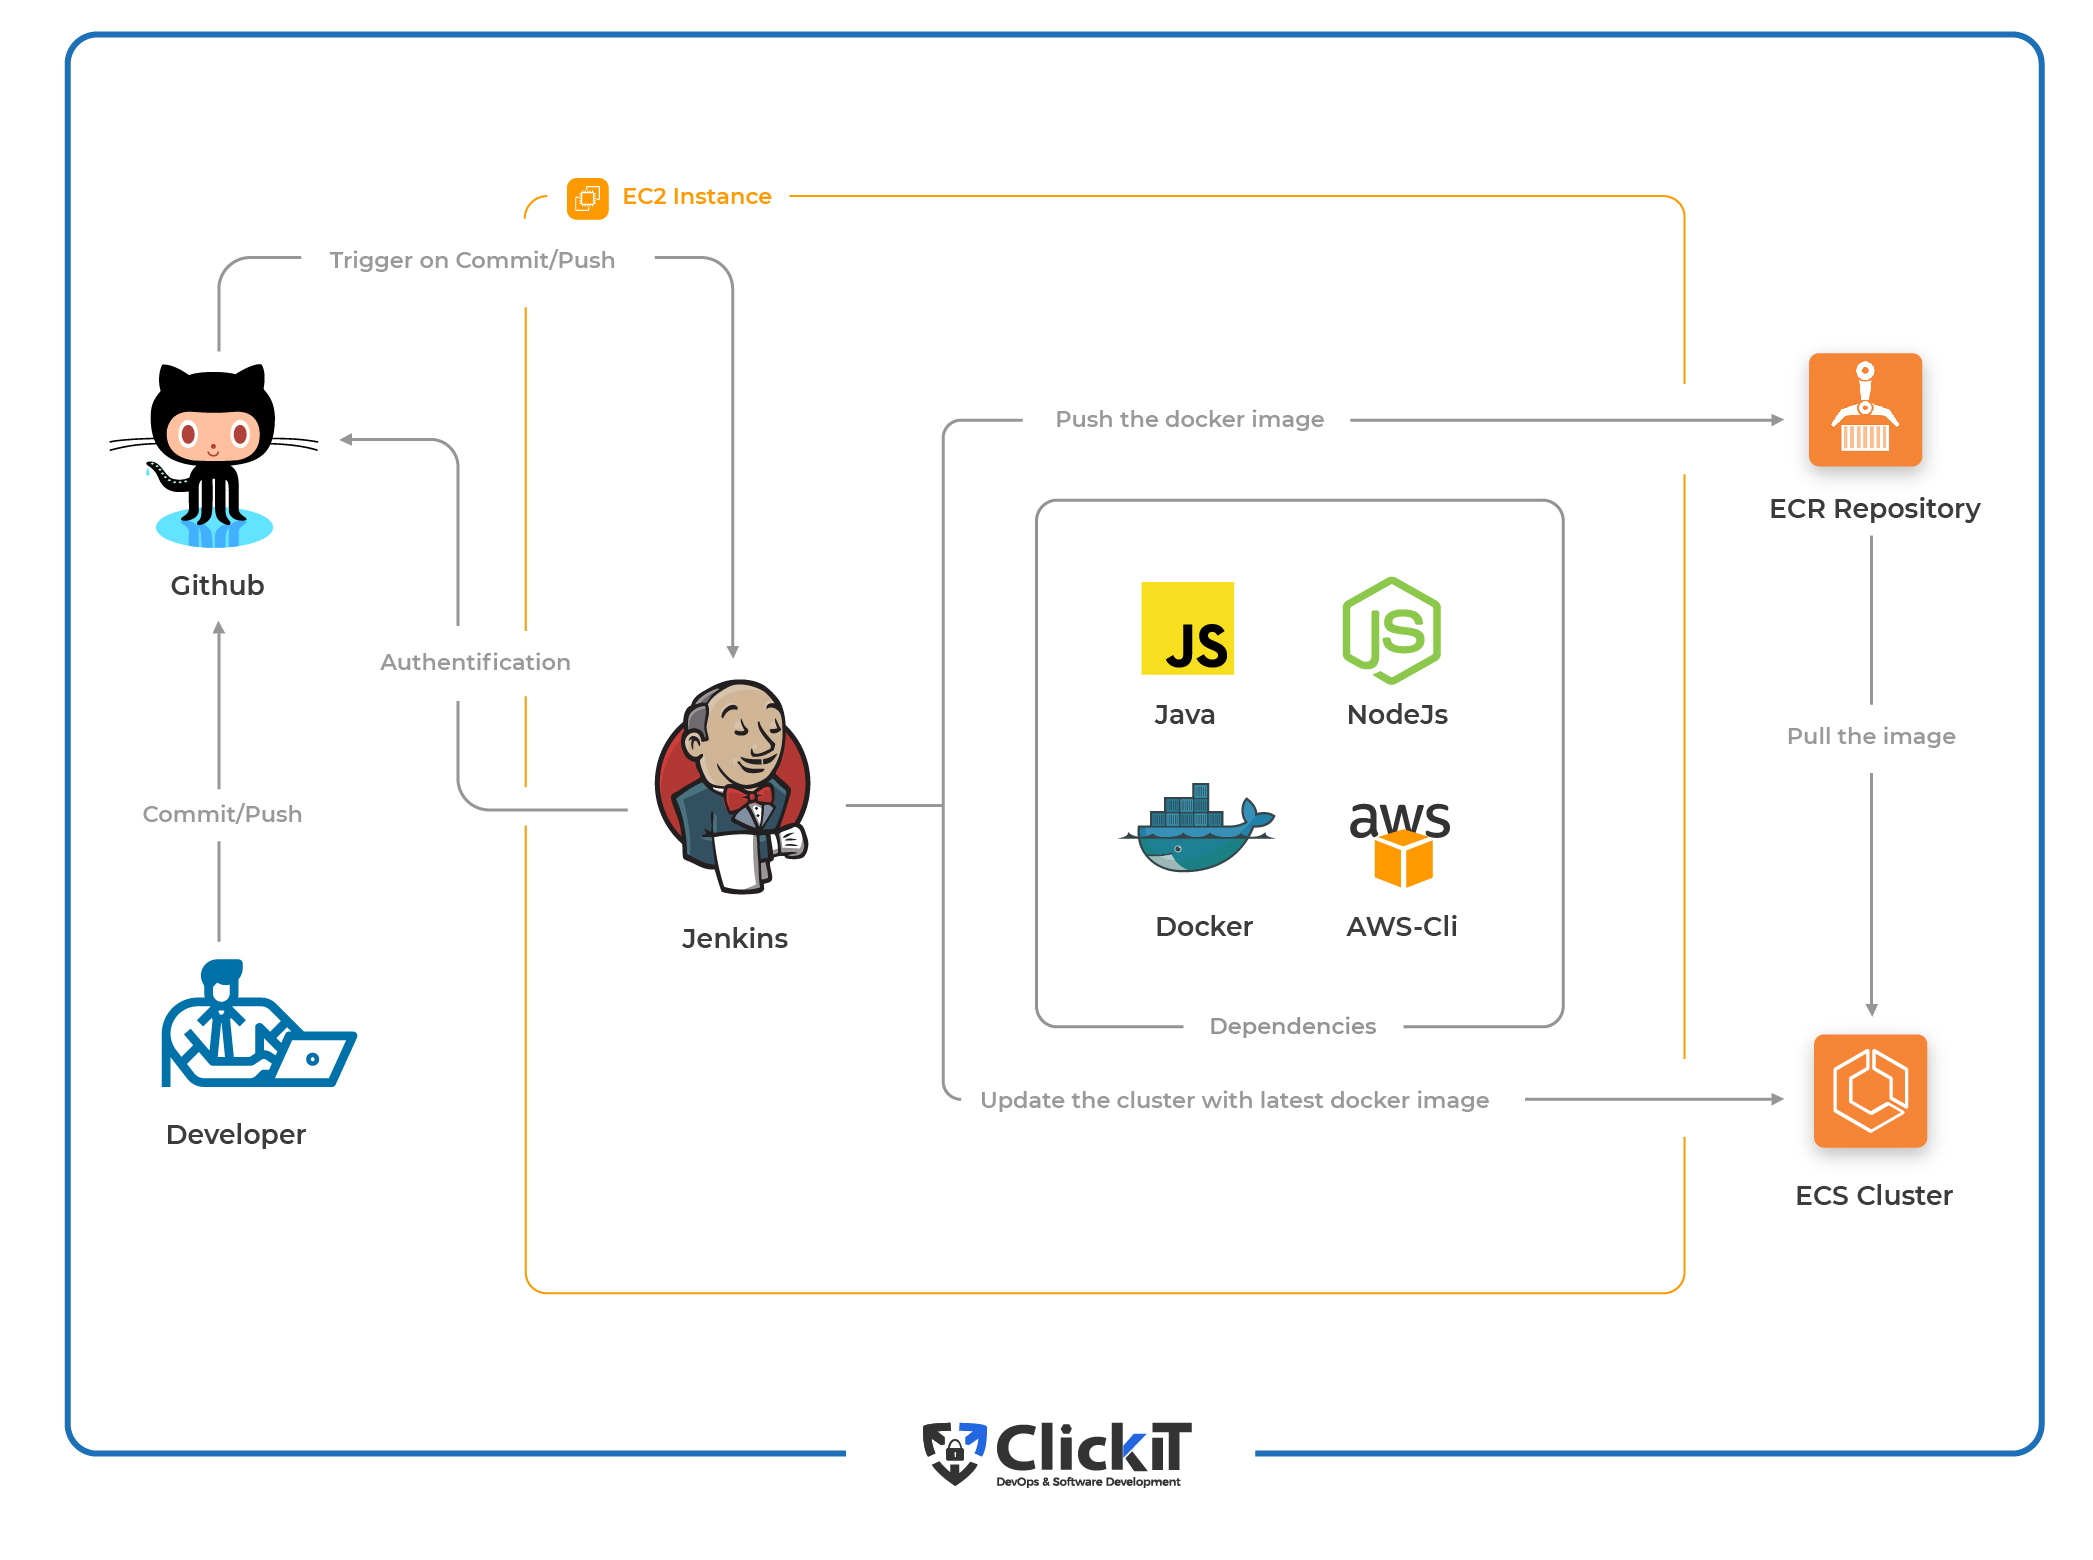
Architecture
This is how our architecture will look like after setting up the CI CD Pipeline with Docker.
After the CI CD Docker Pipeline is successfully set up, we will push commits to our Github repository and in turn, Github Webhook will trigger the CI CD Pipeline on Jenkins Server. Jenkins Server will then pull the latest code, carry out unit tests, build a docker image and push it to AWS ECR. After the image is pushed to AWS ECR, the same image will be deployed in AWS ECS by Jenkins.
CI CD workflow and phases
Workflow
CI and CD Workflow allows us to focus on Development while it carries out the tests, build, and deployments in an automated way.
- Continuous Integration
This allows the developers to push the code to the Version Control System or Source Code Management System, build & test the latest code pushed by the developer and generate & store artifacts. - Continuous Delivery
This is the process that lets us deploy the tested code to the Production whenever required. - Continuous Deployment
This goes one step further and releases every single change without any manual intervention to the customer system every time the production pipeline passes all the tests.
Phases
The primary goal of the automated CI CD pipeline is to build the latest code and deploy it. There can be various stages as per the need. The most common ones are mentioned below.
- Trigger
The CI CD pipeline can do its job on the specified schedule when executed manually or triggered automatically on a particular action in the Code Repository. - Code Pull
In this phase, the pipeline pulls the latest code whenever the pipeline is triggered. - Unit Tests
In this phase, the pipeline performs tests that are there in the codebase, this is also referred to as unit tests. - Build or Package
Once all the tests pass, the pipeline moves forward and builds artifacts or docker images in case of dockerized applications. - Push or Store
In this phase, the code that has been built is pushed to the Artifactory or Docker Repository in case of dockerized applications. - Acceptance Tests
This phase or stage of the pipeline validates if the software behaves as intended. It is a way to ensure if the software or application does what it is meant to do. - Deploy
This is the final stage in any CI CD pipeline. In this stage, the application is ready for delivery or deployment.
Deployment strategy
A deployment strategy is a way in which containers of the micro-services are taken down and added. There are various options available; however, we will only discuss the ones that are available and supported by ECS
Rolling updates
In rolling updates, the scheduler in the ECS Service replaces the currently running tasks with new ones. The tasks in the ECS cluster are nothing but running containers created out of the task definition. Deployment configuration controls the number of tasks that Amazon ECS adds or removes from the service. The lower and the upper limit on the number of tasks that should be running is controlled by minimumHealthyPercent and maximumPercent respectively.
- minimumHealthyPercent example: If the value of minimumHealthyPercent is 50 and the desired task count is 4, then the scheduler can stop 2 existing tasks before starting 2 new tasks
- maximumPercent example: If the value of maximumPercent is 4 and the desired task is 4 then the scheduler can start 4 new tasks before stopping 4 existing tasks.
If you want to learn more about this, visit the official documentation here.
Blue/Green Deployment
Blue/Green deployment strategy enables the developer to verify a new deployment before sending traffic to it by installing an updated version of the application as a new replacement task set.
There are primarily 3 ways in which traffic can shift during blue/green deployment.
- Canary — Traffic is shifted in two increments, percentage of traffic shifted to your updated task set in the first increment and the interval, in minutes, before the remaining traffic is shifted in the second increment.
- Linear — Traffic is shifted in equal increments, the percentage of traffic shifted in each increment and the number of minutes between each increment.
- All-at-once — All traffic is shifted from the original task set to the updated task set all at once.
To learn more about this, visit the official documentation here.
Out of these 2 strategies, we will be using the rolling-updates deployment strategy in our demo application.
Dockerize Node.js app
Now, let’s get started and make our hands dirty.
The Dockerfile for the sample Nodejs application is as follows. There is no need to copy-paste this file, it is already available in the sample git repository that you cloned previously.
Let’s just try to understand the instructions of our Dockerfile.
- FROM node:12.18.4-alpine
This will be our base image for the container. - WORKDIR /app
This will be set as a working directory in the container. - ENV PATH /app/node_modules/.bin:$PATH
PATH variable is assigned a path to /app/node_modules/.bin. - COPY package.json ./
Package.json will be copied in the working directory of the container. - RUN npm install
Install dependencies. - COPY . ./
Copy files and folders with dependencies from the host machine to the container. - EXPOSE 3000
Allow to port 300 of the container. - CMD [“node”, “./src/server.js”]
Start the application
This is the Docker file that we will use to create a docker image.
Setup Github Repositories
Create a new repository
- Go to https://github.com/, create an account if you don’t have it already else log in to your account and create a new repository. You can name it as per your choice; however, I would recommend using the same name to avoid any confusion.


- You will get the screen as follows, copy the repository URL and keep it handy. Call this URL as a Github Repository URL and note it down in the text file on your system.


Note: Create a new text file on your system and note down all the details that will be required later.
Create a Github Token
This will be required for authentication purposes. It will be used instead of a password for Git over HTTPs, or can be used to authenticate to the API over Basic Authentication.
- Click on the user icon in the top-right, go to “Settings”, then click on the “Developers settings” option in the left panel.

- Click on the “Personal access tokens” options and “Generate new token” to create a new token.


- Tick the “repo” checkbox, the token will then have “full control of private repositories”

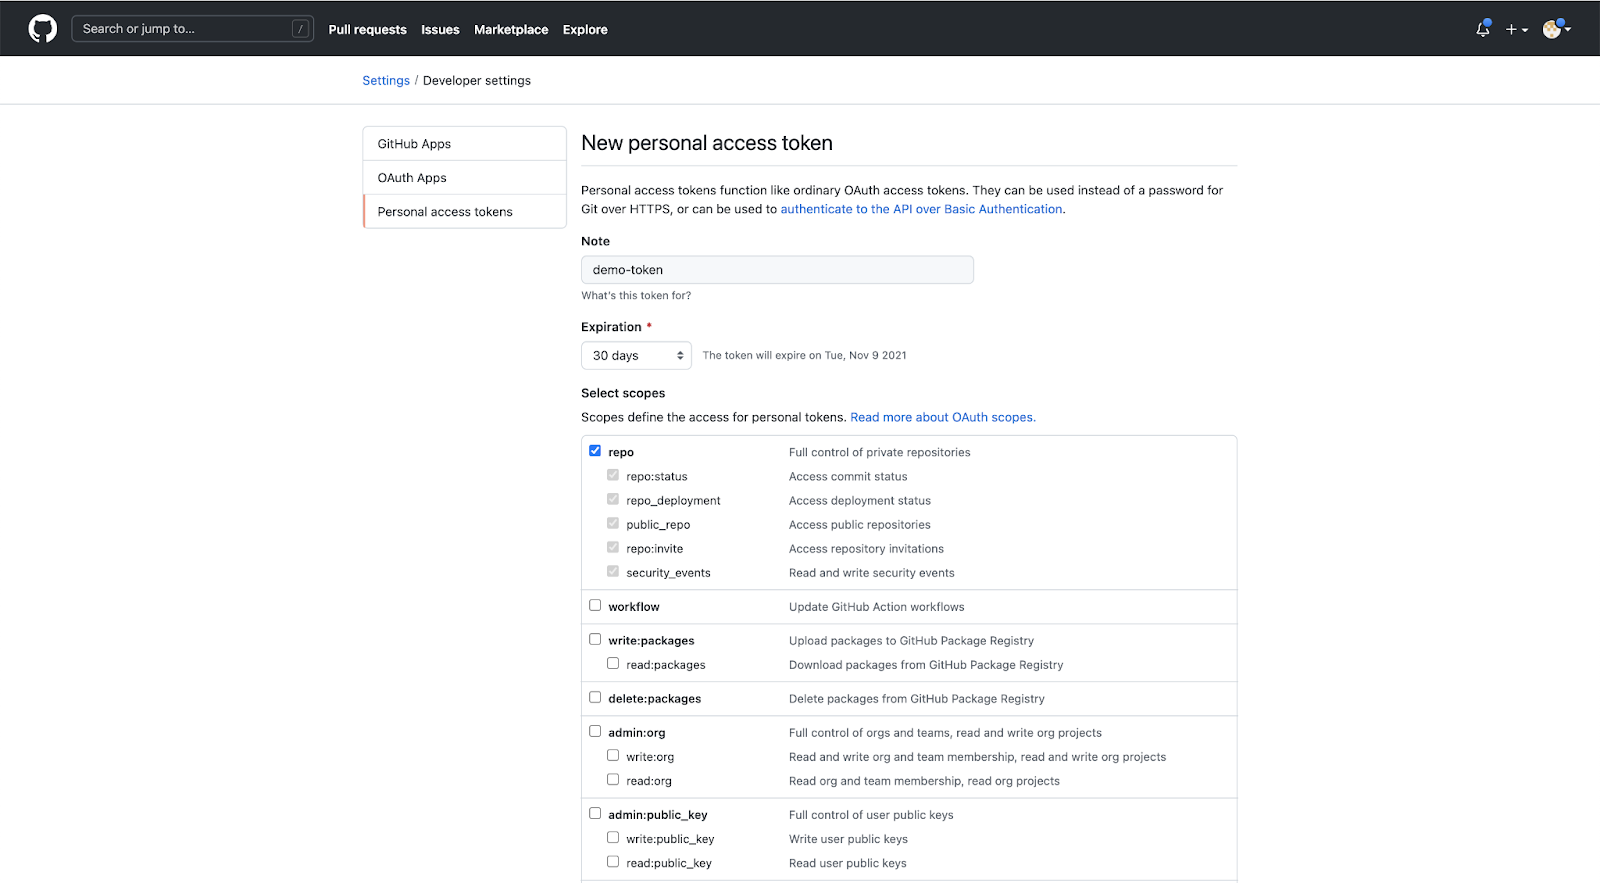
- You should see your token created now.

Clone the sample Repository
- Check your present working directory.
pwd
Note: You are in the home directory, i.e. /home/ubuntu.
- Clone my sample repository containing all the required code.
git clone https://github.com/shivalkarrahul/nodejs.git - Create a new repository. This repository will be used for CI CD Pipeline setup.
git clone https://github.com/shivalkarrahul/demo-nodejs-app.git - Copy all the code from my nodejs repository to the newly created demo-nodejs-app repository.
cp -r nodejs/* demo-nodejs-app/ - Change your working directory.
cd demo-nodejs-app/
Note: For the rest of the article, do not change your directory. Stay in the same directory, here it is /home/ubuntu/demo-nodejs-app/, and execute all the commands from there.
- ls -l
- git status

Push your first commit to the repository
- Check your present working directory, it should be the same. Here it is /home/ubuntu/demo-nodejs-app/
pwd - Set a username for your git commit message.
git config user.name “Rahul” - Set an email for your git commit message.
git config user.email “<[email protected]>” - Verify the username and email you set.
git config –list - Check the status, see files that have been changed or added to your git repository.
git status - Add files to the git staging area.
git add - Check the status, see files that have been added to the git staging area.
git status - Commit your files with a commit message.
git commit -m “My first commit” - Push the commit to your remote git repository.
git push

Setup the AWS Infrastructure
Create an IAM User with a Programmatic Access
- Create an IAM user with programmatic access in your AWS account and note down the access key and secret key in your text file for future references. Provide administrator permissions to the user.
We don’t need admin access; however, to avoid permission issues and for the sake of the demo, let’s proceed with administrator access.

Create an ECR Repository
- Create an ECR Repository in your AWS account and note its URL in your text file for future references.

Create an ECS Cluster
- Go to ECS Console and click on “Get Started” to create a cluster.


- Click on the “Configure” button available in the “custom” option under “Container definition”.


- Specify a name to the container as “nodejs-container”, the ECR Repository URL in the “Image” text box, “3000” port in the Port mappings section, and then click on the “Update” button. You can specify any name of your choice for the container.

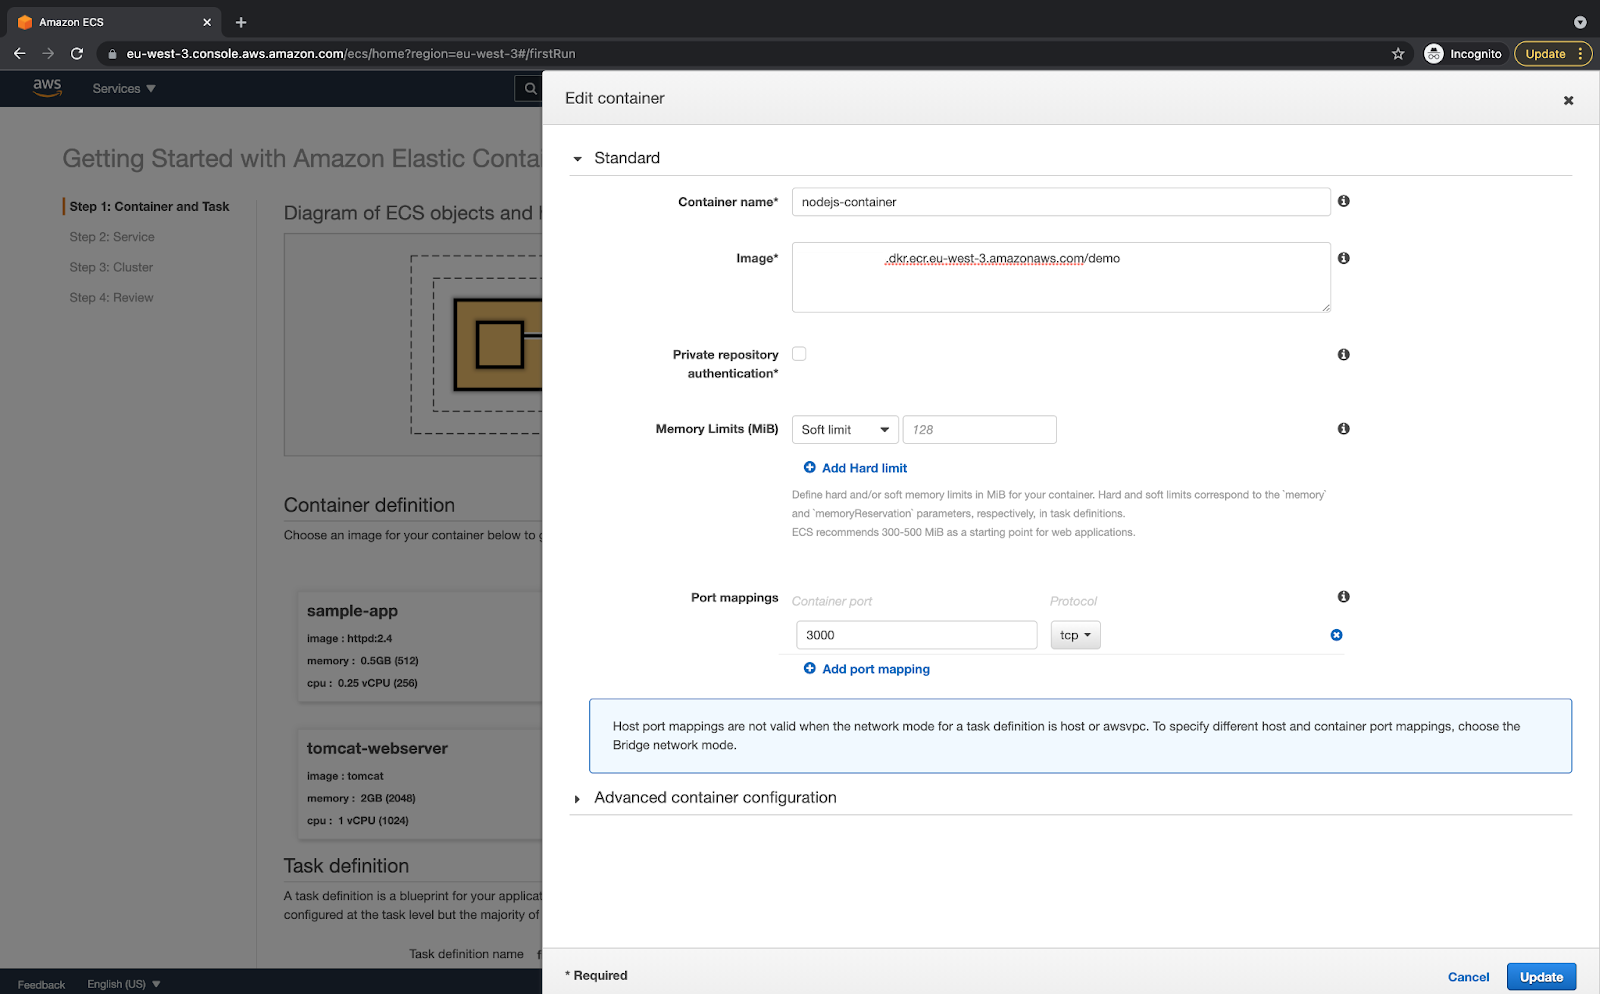
- You can now see the details you specified under “Container definition”. Click on the “Next” button to proceed

- Select “Application Load Balancer” under “Define your service” and then click on the “Next” button.

- Keep the cluster name as “default” and proceed by clicking on the “Next” button. You can change the cluster name if you want.


- Review the configuration and it should look as follows. If the configurations match, then click on the “Create” button. This will initiate the ECS Cluster creation.

- After a few minutes, you should have your ECS cluster created and the Launch Status should be something as follows.


Create an EC2 Instance for setting up the Jenkins Server
- Create an EC2 Instance with Ubuntu 18.04 AMI and open its Port 22 for your IP and Port 8080 for 0.0.0.0/0 in its Security Group. Port 22 will be required for ssh and 8080 for accessing the Jenkins Server. Port 8080 is where Github Webhook will try to connect to on Jenkins Server, hence we need to allow it for 0.0.0.0/0
Setup Jenkins on the EC2 Instance
After the instance is available, let’s install Jenkins Server on it along with all the dependencies.
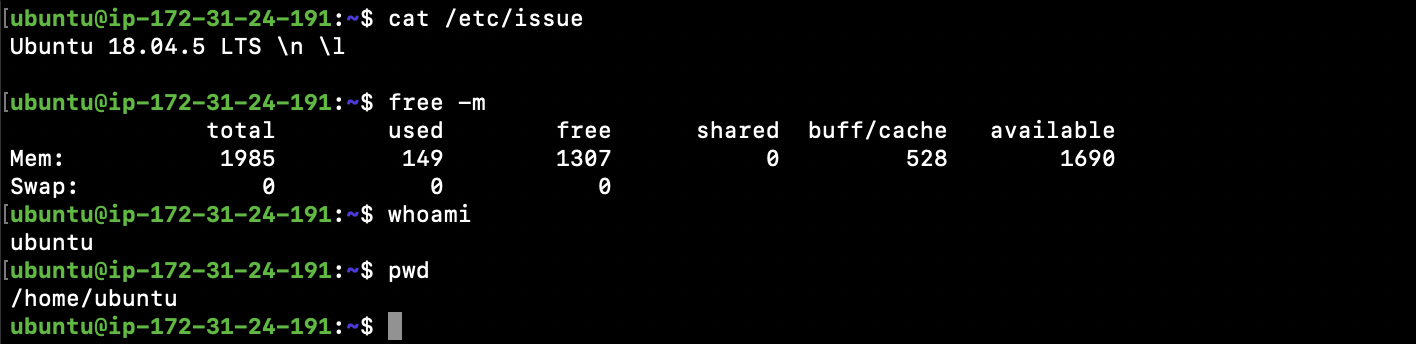
Pre-requisites of the EC2 Instance
- Verify if the OS is Ubuntu 18.04 LTS
cat /etc/issue
- Check the RAM, minimum of 2 GB is what we require.
free -m
- The User that you use to log in to the server should have sudo privileges. “ubuntu” is the user available with sudo privileges for EC2 instances created using “Ubuntu 18.04 LTS” AMI.
whoami - Check your present working directory, it will be your home directory.
pwd
Install Java, JSON Processor jq, Nodejs/NPM and aws-cli on the EC2 Instance
- Update your system by downloading package information from all configured sources.
sudo apt update - Search and Install Java 11
sudo apt search openjdk
sudo apt install openjdk-11-jdk - Install jq command, the JSON processor.
sudo apt install jq - Install Nodejs 12 and NPM
curl -sL https://deb.nodesource.com/setup_12.x | sudo -E bash –
sudo apt install nodejs - Install aws cli tool.
sudo apt install awscli - Check the Java version.
java –version - Check the jq version.
jq –version - Check the Nodejs version
node –version - Check the NPM version
npm –version - Check the aws cli version
aws –version

Note: Make sure all your versions match the versions seen in the above image.
Install Jenkins on the EC2 Instance
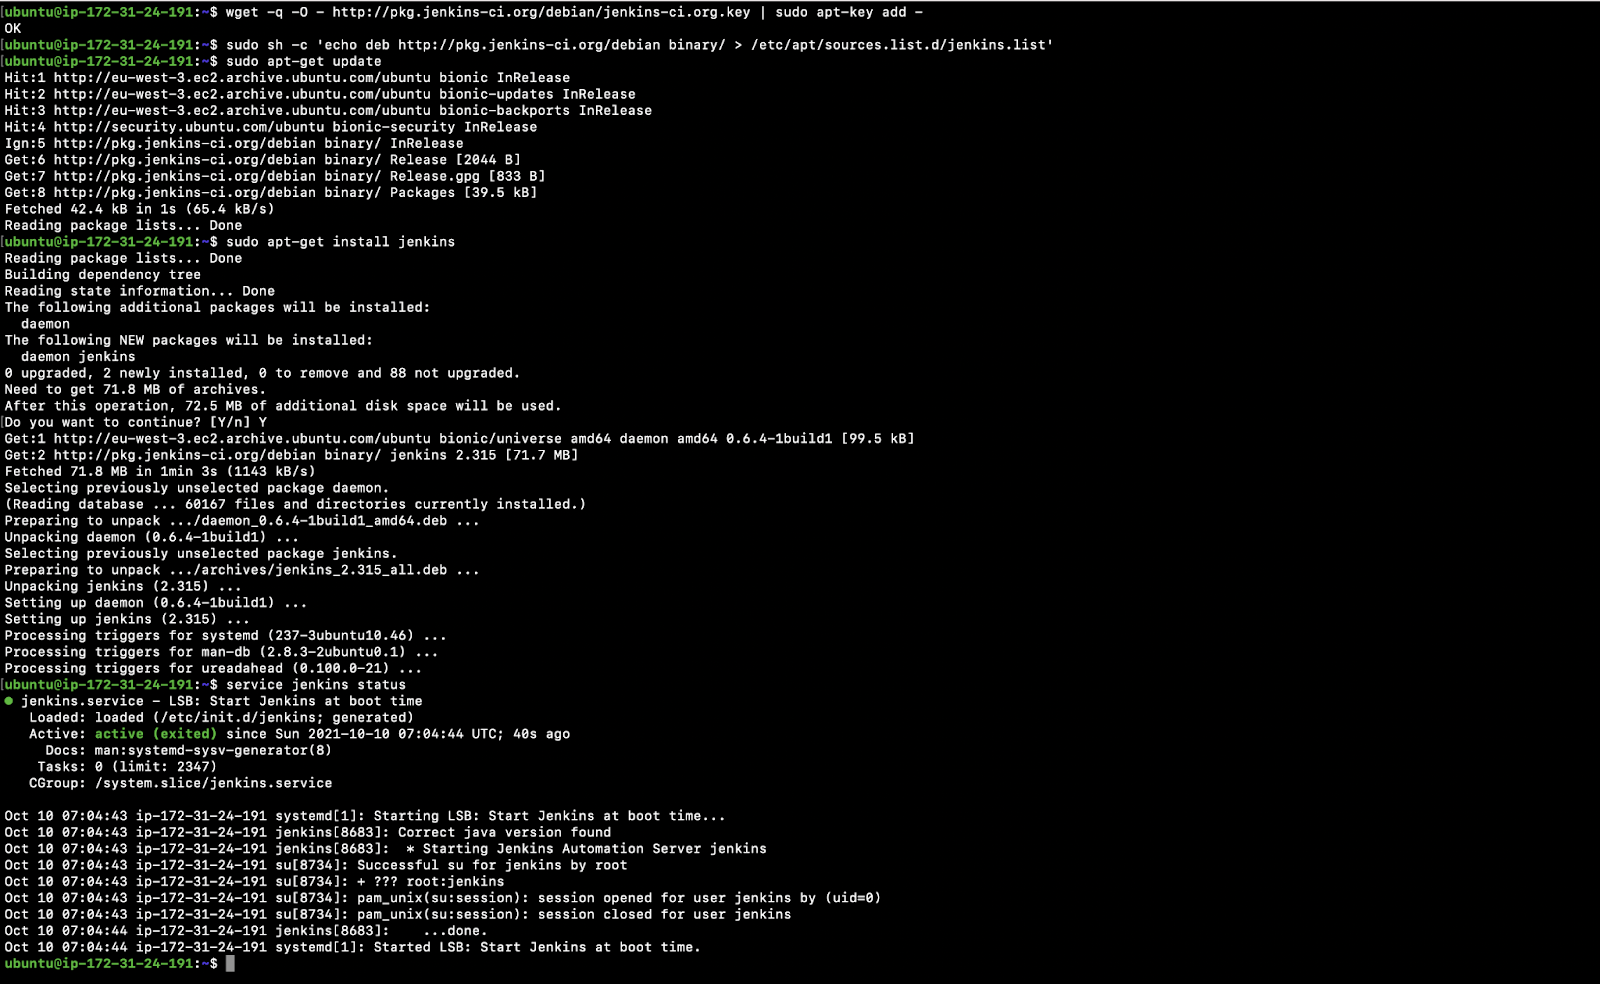
- Jenkins can be installed from the Debian repository
wget -q -O – http://pkg.jenkins-ci.org/debian/jenkins-ci.org.key | sudo apt-key add -sudo sh -c ‘echo deb http://pkg.jenkins-ci.org/debian binary/ > /etc/apt/sources.list.d/jenkins.list’ - Update the apt package index
sudo apt-get update - Install Jenkins on the machine
sudo apt-get install jenkins - Check the service status if it is running or not.
service jenkins status - You should have your Jenkins up and running now. You may refer to the official documentation here if you face any issues with the installation.

Install Docker on the EC2 Instance
- Install packages to allow apt to use a repository over HTTPS:
sudo apt-get install apt-transport-https ca-certificates curl gnupg lsb-release - Add Docker’s official GPG key:
curl -fsSL https://download.docker.com/linux/ubuntu/gpg | sudo gpg –dearmor -o /usr/share/keyrings/docker-archive-keyring.gpg - Set up the stable repository
echo “deb [arch=amd64 signed-by=/usr/share/keyrings/docker-archive-keyring.gpg] https://download.docker.com/linux/ubuntu $(lsb_release -cs) stable” | sudo tee /etc/apt/sources.list.d/docker.list > /dev/null - Update the apt package index
sudo apt-get update - Install the latest version of Docker Engine and containerd,
sudo apt-get install docker-ce docker-ce-cli containerd.io - Check the docker version.
docker –version - Create a “docker” group, this may exit.
sudo groupadd docker - Add “ubuntu” user to the “docker” group
sudo usermod -aG docker ubuntu - Add “jenkins” user to the “docker” group
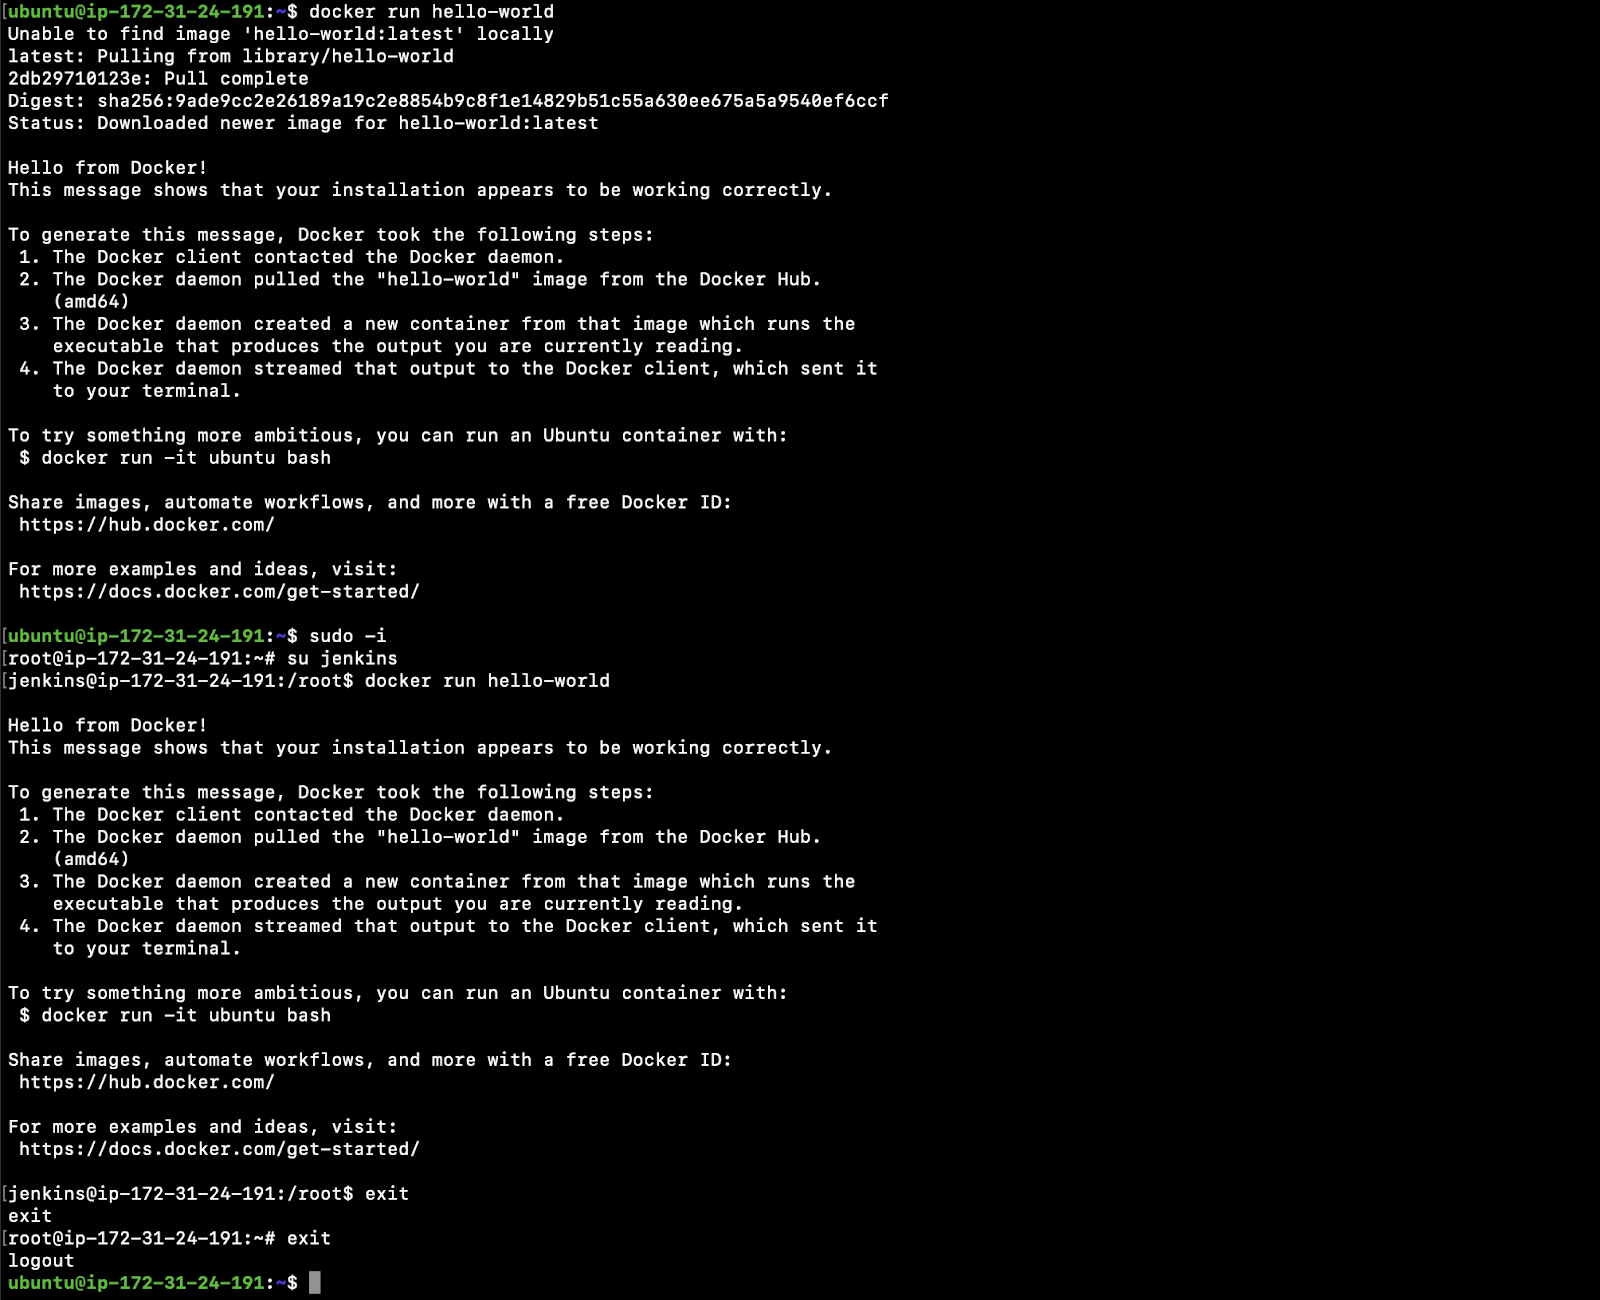
sudo usermod -aG docker jenkins - Test if you can create docker objects using “ubuntu” user.
docker run hello-world - Switch to “root” user
sudo -i - Switch to “jenkins” user
su jenkins - Test if you can create docker objects using “jenkins” user.
docker run hello-world - Exit from “jenkins” user
exit - Exit from “root” user
exit - Now you should be back in “ubuntu” user. You may refer to the official documentation here if you face any issues with the installation.

Configure the Jenkins Server
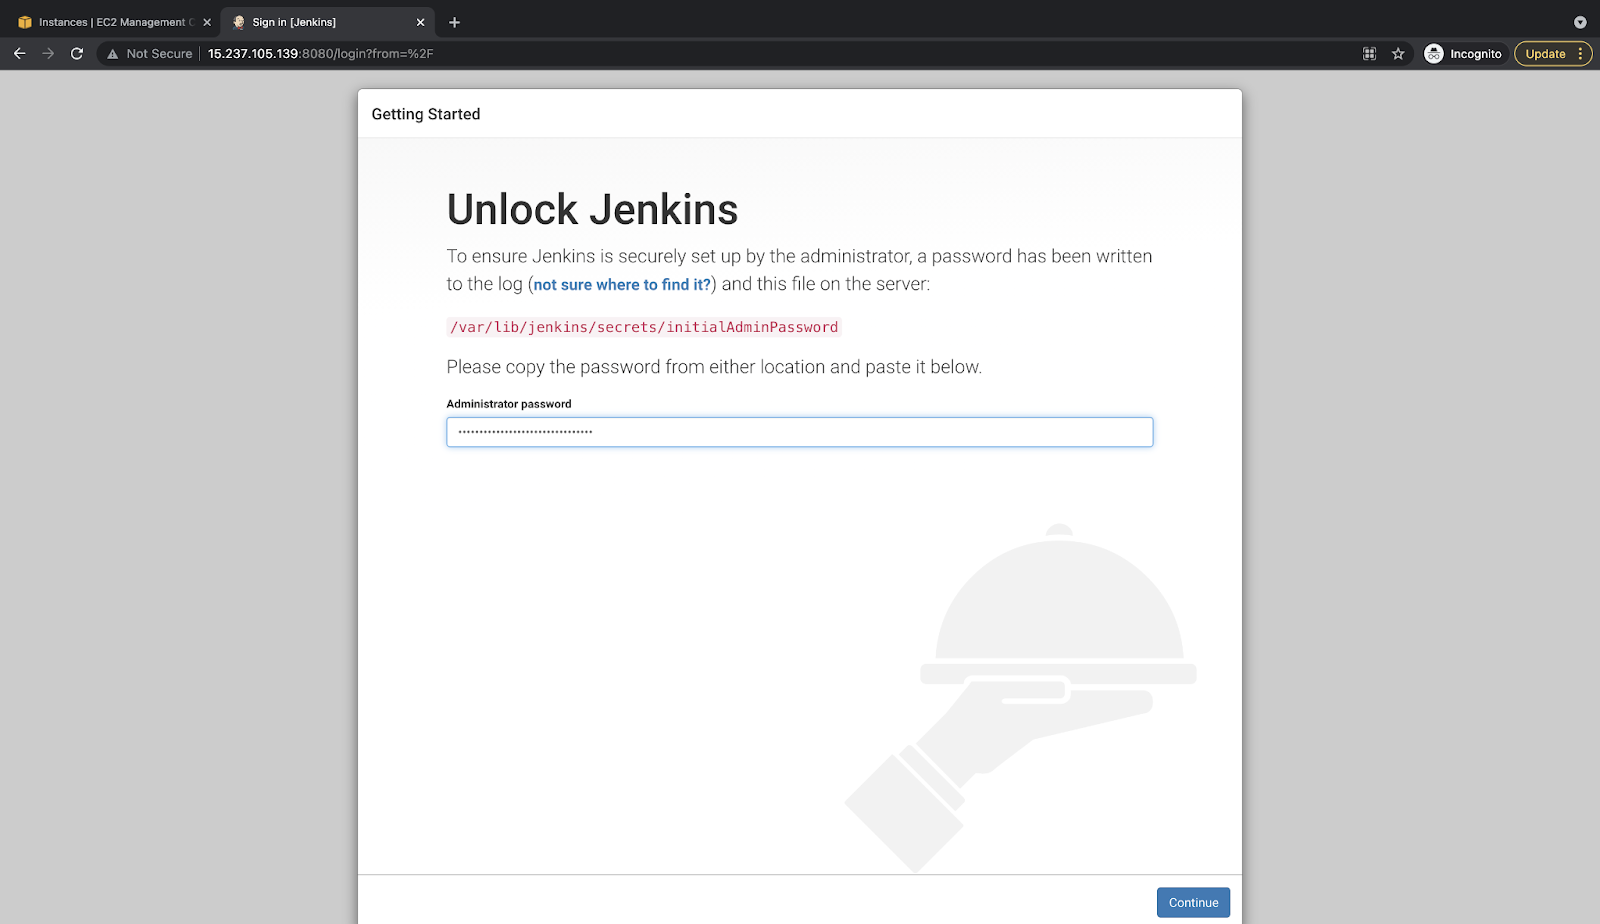
- After Jenkins has been installed, the first step is to extract its password.
sudo cat /var/lib/jenkins/secrets/initialAdminPassword
- Hit the URL in the browser
Jenkins URL: http://<public-ip-of-the-ec2-instace>:8080
- Select the “Install suggested plugins” option


- Specify user-name, password for the new admin user to be created. You can use this user as an admin user.

- This URL field will be auto-filled, click on the “Save and Finish” button to proceed.


- Your Jenkins Server is ready now.


- Here is how its Dashboard looks like.


Install Plugins
- Let’s install all the plugins that we will need. Click on “Manage Jenkins” in the left panel.


- Here is a list of plugins that we need to install
- CloudBees AWS Credentials:
Allows storing Amazon IAM credentials, keys within the Jenkins Credentials API. - Docker Pipeline:
This plugin allows building, testing, and using Docker images from Jenkins Pipeline. - Amazon ECR:
This plugin provides integration with AWS Elastic Container Registry (ECR)
Usage: - AWS Steps:
This plugin adds Jenkins pipeline steps to interact with the AWS API.
- CloudBees AWS Credentials:
- In the “Available” tab, search all these plugins and click on “Install without restart”.


- You will see the screen as follows after the plugins have been installed successfully.


Create Credentials in Jenkins
- CloudBees AWS Credentials plugin will come to rescue here. Go to “Manage Jenkins”, and then click on “Manage Credentials”.


- Click on “(global)” “Add credentials”.


- Select Kind as “AWS Credentials” and provide ID as “demo-admin-user”. This can be provided as per your choice, keep a note of this ID in the text file. Specify the Access Key and Secret Key of the IAM user we created in the previous steps. Click on “OK” to store the IAM credentials.


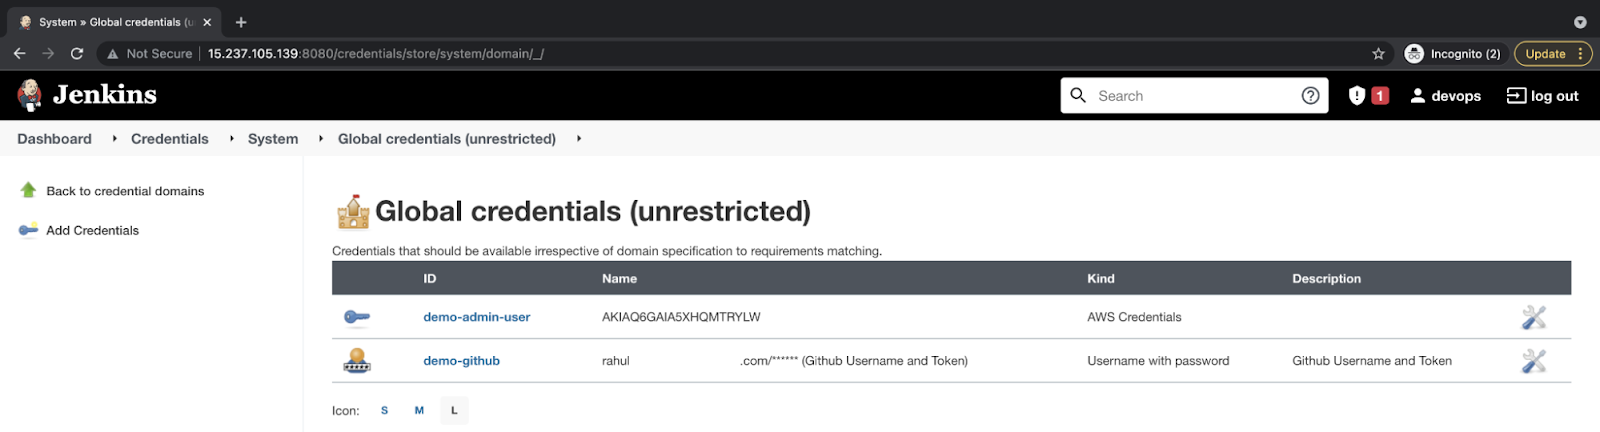
- Follow the same step and this time select Kind as “Username with password” to store the Github Username and Token we created earlier. Click on “Ok” to store the Github credentials.

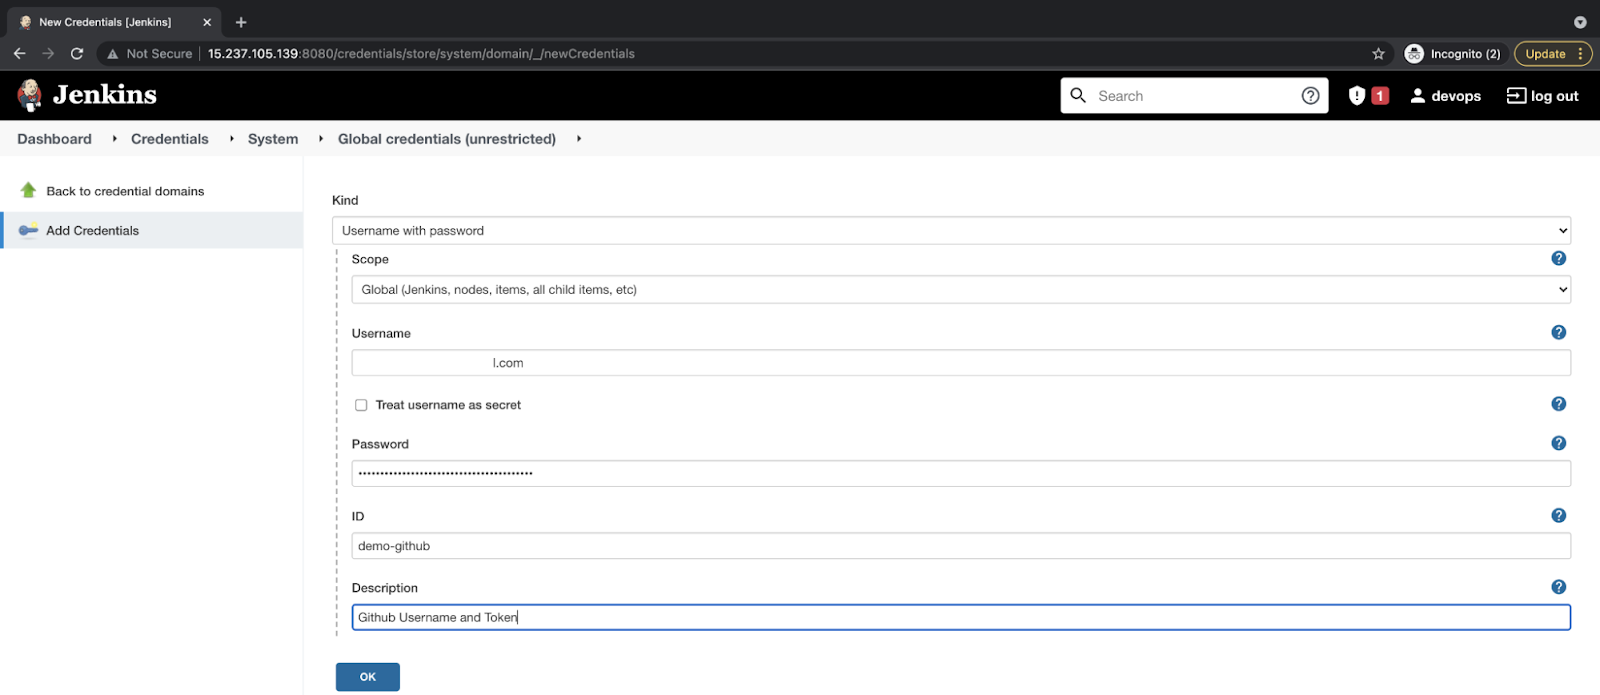
- You should now have IAM and Github credentials in your Jenkins.

Create a Jenkins Job
- Go to the main dashboard, and click on “New Item” to create a Jenkins Pipeline.


- Select the “Pipeline” and name it as “demo-job” or provide a name of your choice.


- Tick the “Github project” checkbox under the “General” tab, provide the Github Repository URL of the one we created earlier. Also, tick the checkbox “Github hook trigger for GitScm polling” under the “Build Trigger” tab.


- Under the “Pipeline” tab, select “Pipeline script from the SCM” definition, specify our repository URL and select the credential we created for Github. Check the branch name if it matches the one you will be using for your commits. Review the configurations and click on “Save” to save your changes to the pipeline.


- Now you can see the pipeline we just created.


Integrate Github and Jenkins
The next step is to integrate Github with Jenkins so that whenever there is an event on the Github Repository, it can trigger the Jenkins Job.
- Go to the settings tab of the repository, click on “Webhooks” in the left panel. You can see the “Add webhook” button, click on it to create a webhook.


- Provide the Jenkins URL with context as “/github-webhook/”. The URL will look as follows.
Webhook URL: http://<Jenkins-IP>:8080/github-webhook/
You can select the events of your choice; however, for the sake of simplicity I have chosen “Send me everything”. Make sure the “Active” checkbox is checked. Click on “Add webhook” to create a webhook that will trigger the Jenkins job whenever there is any kind of event in the Github Repository.

- You should see your webhook. Click on it to see if it has been configured correctly or not.


- Click on the “Recent Deliveries” tab and you should see a green tick mark. The green tick mark shows that the webhook was able to connect to the Jenkins Server.


Deploy the Nodejs Application to the ECS Cluster
Before we trigger the Pipeline from Github Webhook, lets try to manually execute it.
Build the Job Manually
- Go to the Job we created and Build it.


- If you see its logs, you will see that it failed. The reason is, we have not yet assigned values to variable we have in our Jenkinsfile

Push your second commit
Reminder Note: For the rest of the article, do not change your directory. Stay in the same directory i.e. /home/ubuntu/demo-nodejs-app and execute all the commands from here.
Assign values to the variable in the Jenkinsfile
- To overcome the above error, you need to make some changes to the Jenkinsfile. We have variables in that file and we need to assign values to those variables to deploy our application to the ECS cluster we created. Assign correct values to the variables having “CHANGE_ME”.
cat Jenkinsfile

- Here is the list of variables for your convenience.
We have the following variables in the Jenkinsfile.- AWS_ACCOUNT_ID=”CHANGE_ME”
Assign your AWS Account Number here. - AWS_DEFAULT_REGION=”CHANGE_ME”
Assign the region you created your ECS Cluster in - CLUSTER_NAME=”CHANGE_ME”
Assign the name of the ECS Cluster that you created. - SERVICE_NAME=”CHANGE_ME”
Assign the Service name that got created in the ECS Cluster. - TASK_DEFINITION_NAME=”CHANGE_ME”
Assign the Task name that got created in the ECS Cluster. - DESIRED_COUNT=”CHANGE_ME”
Assing the number of tasks you want to be created in the ECS Cluster. - IMAGE_REPO_NAME=”CHANGE_ME”
Assign the ECR Repositoy URL - IMAGE_TAG=”${env.BUILD_ID}”
Do not change this. - REPOSITORY_URI = “${AWS_ACCOUNT_ID}.dkr.ecr.${AWS_DEFAULT_REGION}.amazonaws.com/${IMAGE_REPO_NAME}”
Do not change this. - registryCredential = “CHANGE_ME”
Assign the name of the credentials you created in Jenkins to store the AWS Access Key and Secret Key
- AWS_ACCOUNT_ID=”CHANGE_ME”
- Check the status to confirm that the file has been changed.
git status
cat Jenkinsfile

- Add a file to the git staging area, commit it and then push to the remote Github Repository.
git status
git add Jenkinsfile
git commit -m “Assigned environment specific values in Jenkinsfile”
git push

Error on Jenkins Server
After pushing the commit, the Jenkins Pipeline will get triggered. However, you will see an error “Got permission denied while trying to connect to the Docker daemon socket at unix:///var/run/docker.sock” in your Jenkins Job. The reason for this is, a “jenkins” user that is used by the Jenkins Job is not allowed to create docker objects. To give permission to a “jenkins” user, we added it to the “docker” group in the previous step; however, we did not restart the Jenkins service after that.
I kept this deliberately so that I could show you the need to add the “jenkins” user to the “docker” group in your EC2 Instance.

Now you know what needs to be done to overcome the above error.
- Restart the Jenkins service.
sudo service jenkins restart - Check if the Jenkins service has started or not.
sudo service jenkins status

Push your third commit
- Make some changes in README.md to commit, push and test if the Pipeline gets triggered automatically or not.
vim README.md
- Add, commit and push the file.
git status
git diff README.md
git add README.md
git commit -m “Modified README.md to trigger the Jenkins job after restarting the Jenkins service”
git push

- This time you can observe that the job must have got triggered automatically. Go to the Jenkins job and verify the same.


- This is how the Stage View looks like. It shows us the stages that we have specified in our Jenkinsfile.


Check Status of the Task in the ECS Cluster
- Go to the Cluster, click on the “Tasks” tab, and then open the running “Task”.

- Click on the “JSON” tab and verify the image, the image tag should match with the Jenkins Build number. In this case, it is “6” and it matches with my Jenkins Job Build number.

- Hit the ELB URL to check if the Nodejs application is available or not.You should get the message as follows in the browser after hitting the ELB URL.

Push your fourth commit
- Open the “src/server.js” file and make some changes in the display message to test the CI CD Pipeline again.
vim src/server.js - Check the files that have been changed. In this case, only one file can be seen as changed.
git status - Check the difference that your change has caused in the file.
git diff src/server.js - Add the file that you changed to the git staging area.
git add src/server.js - Check the status of the local repository.
git status - Add a message to the commit.
git commit -m “Updated welcome message” - Push your change to the remote repository.
git push

- Go to the Task, this time you will see 2 tasks running. One with the older revision and one with the newer revision. You see 2 tasks because of the rolling-update deployment strategy configured by default in the cluster.


Note: Your revision numbers may differ.
- Wait for around 2-3 minutes, and you should only have one task running with the latest revision.

- Again hit the ELB URL and you should see your changes. In this case, we had changed the display message.
Congratulations! You have a working Jenkins CI CD Pipeline to deploy your Nodejs containerized application on AWS ECS whenever there is a change in your source code.
Cleanup the resources we created
If you were just trying out to set up a CI CD pipeline to get familiar with it or for POC purposes in your organization and no longer need it, it is always better to delete the resources you created while carrying out the POC. As part of this CI CD pipeline, we created a few resources. We created the below list to help you delete them.
- Delete the Github Repository
- Delete the Github Token
- Delete the IAM User
- Delete the EC2 Instance
- Delete the ECR Repository
- Delete the ECS Cluster
- Deregister the Task Definition
Summary
And finally, here is the summary of what you have to do to set up a CI CD Docker pipeline to deploy a sample Nodejs application on AWS ECS using Jenkins.
- Clone the existing sample Github Repository
- Create a new Github Repository and copy the code from the sample repository in it
- Create a Github Token
- Create an IAM User
- Create an ECR Repository
- Create an ECS Cluster
- Create an EC2 Instance for setting up the Jenkins Server
- Install Java, JSON processor jq, Nodejs, and NPM on the EC2 Instance
- Install Jenkins on the EC2 Instance
- Install Docker on the EC2 Instance
- Install Plugins
- Create Credentials in Jenkins
- Create a Jenkins Job
- Integrate Github and Jenkins
- Check the deployment
- Cleanup the resources

Conclusion
A CI CD Pipeline serves as a way of automating your software applications’ builds, tests, and deployments. It is the backbone of any organization with a DevOps culture. It has numerous benefits for software development and it boosts your business greatly.
In this blog, we demonstrated the steps to create a Jenkins CI CD Docker Pipeline to deploy a sample Nodejs containerized application on AWS ECS. We saw how Github Webhooks can be used to trigger the Jenkins pipeline on every push to the repository which in turn deploys the latest docker image to AWS ECS.
CI CD Pipelines with Docker are best for your organization to improve code quality and deliver software releases quickly without any human errors. We hope this blog helped you to learn more about the integral parts of the CI CD Docker Pipeline.
You can also read this blog on Medium
FAQ
In simple words, a CI CD Pipeline is a set of instructions executed in order to deliver a newer version of your software application.
To avoid human errors, enhance code quality, improve release cycles, add technical and business values, improve customer satisfaction, and much more.
Any basic CI CD Pipeline typically includes – Pull, Test, Build, Push and Deploy stages.
Not really. If you are working with a tool like Jenkins that has GUI, you can simply create a CI CD Pipeline by making some configurations on the UI. You may need some basic understanding of scripting to automate your tasks or execute commands.
A CI CD Pipeline that tests, builds, and deploys Docker Containers of your applications is referred to as CI CD Docker Pipeline.
One can use CI CD Pipeline with Docker to specifically automate the Software Development process and improve release cycles of microservices-based applications.